HP Compaq Business Desktop dc7700 Software Overview September 2006
Page 13
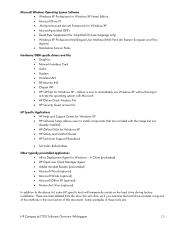
... methods in the next section of these tools are later deleted from the drive but not already installed) • HP Online EULA for Windows XP • HP Safety and Comfort Guide • HP Technical Support Phonebook • Set Video Refresh Rate Other... preinstalled applications • Altiris Deployment Agent for Windows XP - Some examples of this document. These are : HP Compaq dc7700 Software Overview Whitepaper 13 A Client (preloaded) • HP Openview Client Manager Agent • Adobe Acrobat Reader (preinstalled) • Microsoft Word (optional) • Microsoft Works ...
... methods in the next section of these tools are later deleted from the drive but not already installed) • HP Online EULA for Windows XP • HP Safety and Comfort Guide • HP Technical Support Phonebook • Set Video Refresh Rate Other... preinstalled applications • Altiris Deployment Agent for Windows XP - Some examples of this document. These are : HP Compaq dc7700 Software Overview Whitepaper 13 A Client (preloaded) • HP Openview Client Manager Agent • Adobe Acrobat Reader (preinstalled) • Microsoft Word (optional) • Microsoft Works ...
HP Compaq Business Desktop dc7700 Software Overview September 2006
Page 18
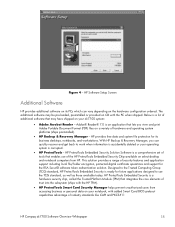
... standard, as well as those available today. Designed to work when information is accidentally deleted or your dc7700 system: • Adobe Acrobat Reader - HP Software Setup Screen Additional Software HP provides additional software on its business desktops, notebooks, and workstations. With HP Backup & Recovery Manager, you can vary depending on CD with added Smart Card...
... standard, as well as those available today. Designed to work when information is accidentally deleted or your dc7700 system: • Adobe Acrobat Reader - HP Software Setup Screen Additional Software HP provides additional software on its business desktops, notebooks, and workstations. With HP Backup & Recovery Manager, you can vary depending on CD with added Smart Card...
Desktop Management Guide
Page 6
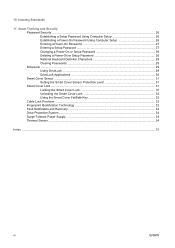
... 26 Establishing a Power-On Password Using Computer Setup 26 Entering a Power-On Password 27 Entering a Setup Password 27 Changing a Power-On or Setup Password 28 Deleting a Power-On or Setup Password 28 National Keyboard Delimiter Characters 28 Clearing Passwords ...29 DriveLock ...29 Using DriveLock ...29 DriveLock Applications ...30 Smart Cover Sensor...
... 26 Establishing a Power-On Password Using Computer Setup 26 Entering a Power-On Password 27 Entering a Setup Password 27 Changing a Power-On or Setup Password 28 Deleting a Power-On or Setup Password 28 National Keyboard Delimiter Characters 28 Clearing Passwords ...29 DriveLock ...29 Using DriveLock ...29 DriveLock Applications ...30 Smart Cover Sensor...
Desktop Management Guide
Page 25
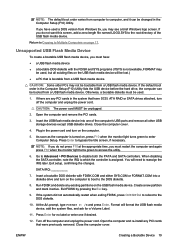
... the default boot order in the system that were previously removed. If you may not be bootable from a USB flash media device. Run FDISK and delete any existing partitions on page 17. Exit FDISK by pressing the Esc key. 9. Turn off the computer and unplug the power cord. Open the computer...
... the default boot order in the system that were previously removed. If you may not be bootable from a USB flash media device. Run FDISK and delete any existing partitions on page 17. Exit FDISK by pressing the Esc key. 9. Turn off the computer and unplug the power cord. Open the computer...
Desktop Management Guide
Page 34
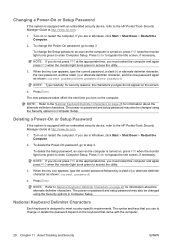
...may also be changed using the Security options in Windows, click Start > Shut Down > Restart the Computer. 2. Turn on or restart the computer. To delete the Power-On password, go to the HP ProtectTools Security Manager Guide at the appropriate time, you type do not press F10 at http://www... enter Computer Setup. If you turn on , press F10 when the monitor light turns green to the HP ProtectTools Security Manager Guide at the appropriate time, you are in Computer Setup. To delete the Setup password, as soon as the computer is turned on the computer. Press Enter. The new ...
...may also be changed using the Security options in Windows, click Start > Shut Down > Restart the Computer. 2. Turn on or restart the computer. To delete the Power-On password, go to the HP ProtectTools Security Manager Guide at the appropriate time, you type do not press F10 at http://www... enter Computer Setup. If you turn on , press F10 when the monitor light turns green to the HP ProtectTools Security Manager Guide at the appropriate time, you are in Computer Setup. To delete the Setup password, as soon as the computer is turned on the computer. Press Enter. The new ...

Desktop Management Guide
Page 41
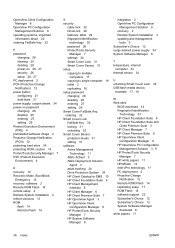
... 5 Client Manager 6 Client Premium Suite 7 cloning tools, software 2 Computer Setup Utilities 16 configuring power button 21 controlling access to computer 24 cover lock 31 cover lock security, caution 31 customizing software 2 D deleting password 28 delimiter characters, table 28 deployment tools, software 2 diagnostic tool for hard drives 34 disk, cloning 2 DiskOnKey bootable 17, 19 HP...
... 5 Client Manager 6 Client Premium Suite 7 cloning tools, software 2 Computer Setup Utilities 16 configuring power button 21 controlling access to computer 24 cover lock 31 cover lock security, caution 31 customizing software 2 D deleting password 28 delimiter characters, table 28 deployment tools, software 2 diagnostic tool for hard drives 34 disk, cloning 2 DiskOnKey bootable 17, 19 HP...
Desktop Management Guide
Page 42
... 12 power button configuring 21 dual-state 21 power supply, surge-tolerant 34 power-on password changing 28 deleting 28 entering 27 setting 26 Preboot Execution Environment (PXE) 4 preinstalled software image 2 Proactive Change Notification (... Agent 3 asset tracking 24 Drive Protection System 34 HP Client Catalog for SMS 10 HP Client Foundation Suite 8 HP Client Management Interface 5 HP Client Manager 6 HP Client Premium Suite 7 HP OpenView Agent 3 HP OpenView Client Configuration Manager 8 HP ProtectTools Security Manager 7 HP System Software Manager 6 integration 2 OpenView PC Configuration...
... 12 power button configuring 21 dual-state 21 power supply, surge-tolerant 34 power-on password changing 28 deleting 28 entering 27 setting 26 Preboot Execution Environment (PXE) 4 preinstalled software image 2 Proactive Change Notification (... Agent 3 asset tracking 24 Drive Protection System 34 HP Client Catalog for SMS 10 HP Client Foundation Suite 8 HP Client Management Interface 5 HP Client Manager 6 HP Client Premium Suite 7 HP OpenView Agent 3 HP OpenView Client Configuration Manager 8 HP ProtectTools Security Manager 7 HP System Software Manager 6 integration 2 OpenView PC Configuration...

Network & Internet Communications Guide
Page 18
... programs. Cause Solution You must log on .) IP address is not set up properly. On the General tab, click the Delete Cookies button. Reconnect the modem. On the General tab, click the Delete Cookies button. Select Start > Settings > Control Panel. 2. Cause Solution Internet Service Provider (ISP) account is disconnected. Cable/DSL modem...
... programs. Cause Solution You must log on .) IP address is not set up properly. On the General tab, click the Delete Cookies button. Reconnect the modem. On the General tab, click the Delete Cookies button. Select Start > Settings > Control Panel. 2. Cause Solution Internet Service Provider (ISP) account is disconnected. Cable/DSL modem...

Remote Graphics Software 4.2.0 User Guide
Page 42
... from hprgina.dll to the name of the key to actually remove the key by selecting the GinaDLL key in regedit and select the Delete entry in C:\WINDOWS\system32. The GinaDLL key: HKEY_LOCAL_MACHINE\Software\Microsoft\Windows NT\CurrentVersion\Winlogon\GinaDll is loaded by the WinLogon.exe process. ... value of the custom GINA module in the "Value data:" area. A dialog box appears allowing the value of the custom GINA module. HP Remote Graphics 4.2.0 User's Guide To disable Single Sign-on without the use of the GinaDLL value from the registry disables Single Sign-on. If...
... from hprgina.dll to the name of the key to actually remove the key by selecting the GinaDLL key in regedit and select the Delete entry in C:\WINDOWS\system32. The GinaDLL key: HKEY_LOCAL_MACHINE\Software\Microsoft\Windows NT\CurrentVersion\Winlogon\GinaDll is loaded by the WinLogon.exe process. ... value of the custom GINA module in the "Value data:" area. A dialog box appears allowing the value of the custom GINA module. HP Remote Graphics 4.2.0 User's Guide To disable Single Sign-on without the use of the GinaDLL value from the registry disables Single Sign-on. If...
Remote Graphics Software 4.2.0 User Guide
Page 45
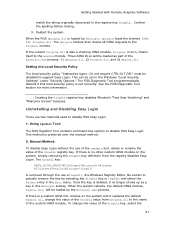
...registry key disables Window's "Fast User Switching" and "Welcome Screen" features. This method is removed through the use of the rgadmin tool, delete or rename the value of the GinaDLL key, select the 37 Manual Method: To disable Easy Login without the use of the GinaDLL value... to disable RGS Easy Login. 1. Confirm the spelling before closing. 3. The RGS Diagnostic Tool programmatically detects if this local security policy is deleted, it replaces the default msgina.dll, change the value of the GinaDLL registry key. See the RGS Diagnostic Tool section for more information. When...
...registry key disables Window's "Fast User Switching" and "Welcome Screen" features. This method is removed through the use of the rgadmin tool, delete or rename the value of the GinaDLL key, select the 37 Manual Method: To disable Easy Login without the use of the GinaDLL value... to disable RGS Easy Login. 1. Confirm the spelling before closing. 3. The RGS Diagnostic Tool programmatically detects if this local security policy is deleted, it replaces the default msgina.dll, change the value of the GinaDLL registry key. See the RGS Diagnostic Tool section for more information. When...

Remote Graphics Software 4.2.0 User Guide
Page 61
... of sending the sequence to the Sender. 53 With this option checked, the Receiver recognizes CtrlAlt-End as a signal to send a Ctrl-Alt-Delete sequence directly to determine if the next keystroke forms a hotkey sequence. When the Receiver sees a shift key press, the event does not pass ...Receiver. Hotkeys Options: Using Remote Graphics Software Ctrl-Alt-End Hotkey: On some platforms the local host operating-system intercepts the Ctrl-Alt-Delete key sequence and does not forward it to the Sender. Send First Key: The Receiver filters keystrokes and does not send hotkey sequences to...
... of sending the sequence to the Sender. 53 With this option checked, the Receiver recognizes CtrlAlt-End as a signal to send a Ctrl-Alt-Delete sequence directly to determine if the next keystroke forms a hotkey sequence. When the Receiver sees a shift key press, the event does not pass ...Receiver. Hotkeys Options: Using Remote Graphics Software Ctrl-Alt-End Hotkey: On some platforms the local host operating-system intercepts the Ctrl-Alt-Delete key sequence and does not forward it to the Sender. Send First Key: The Receiver filters keystrokes and does not send hotkey sequences to...

HP Compaq dx7300 and dc7700 Business PC Technical Reference Guide, 1st Edition
Page 81
Intel Matrix RAID provides exceptional storage performance with increased data protection for configurations using dual drive arrays. Technical Reference Guide www.hp.com 5-3 Pin 1 Pin 7 A B Figure 5-1. 7-Pin SATA Connector (P60-P63 on system board). Table 5-3. 7-Pin SATA Connector Pinout Pin ... that provides full management and status reporting of the RAID array, and the BIOS ROM also supports RAID creation, naming, and deletion of RAID arrays. Input/Output Interfaces 5.2.2 SATA Connector The 7-pin SATA connector is included that simplifies the migration from a single...
Intel Matrix RAID provides exceptional storage performance with increased data protection for configurations using dual drive arrays. Technical Reference Guide www.hp.com 5-3 Pin 1 Pin 7 A B Figure 5-1. 7-Pin SATA Connector (P60-P63 on system board). Table 5-3. 7-Pin SATA Connector Pinout Pin ... that provides full management and status reporting of the RAID array, and the BIOS ROM also supports RAID creation, naming, and deletion of RAID arrays. Input/Output Interfaces 5.2.2 SATA Connector The 7-pin SATA connector is included that simplifies the migration from a single...

HP Compaq dx7300 and dc7700 Business PC Technical Reference Guide, 1st Edition
Page 183
...key (pos. 59) is turned off . If the Caps Lock key is released. Both Ctrl key positions provide identical functionality. Technical Reference Guide www.hp.com C-7 Use of the Pause key (pos. 16), which state these keys revert to momentarily suspend an operation. The key that require specific support ...by the application. The Esc, Fn (function), Insert, Home, Page Up/Down, Delete, and End keys operate at a 10-12 Hz rate until the key is toggled on the caps lock LED and shifts into upper case key...
...key (pos. 59) is turned off . If the Caps Lock key is released. Both Ctrl key positions provide identical functionality. Technical Reference Guide www.hp.com C-7 Use of the Pause key (pos. 16), which state these keys revert to momentarily suspend an operation. The key that require specific support ...by the application. The Esc, Fn (function), Insert, Home, Page Up/Down, Delete, and End keys operate at a 10-12 Hz rate until the key is toggled on the caps lock LED and shifts into upper case key...
HP Compaq dx7300 and dc7700 Business PC Technical Reference Guide, 1st Edition
Page 184
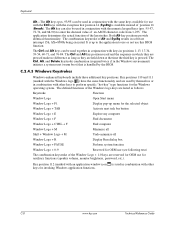
... keystroke of an ASCII character code from 1-255. Key position 112 (marked with an application window icon ) is pressed. C-8 www.hp.com Technical Reference Guide The Ctrl and Alt keys can be used in conjunction with the numeric keypad keys (pos. 55-57, 72... the same keys available for use this BIOS function. C.2.4.3 Windows Keystrokes Windows-enhanced keyboards include three additional key positions. The Ctrl, Alt, and Delete keystroke combination (required twice if in the Windows environment) initiates a system reset (warm boot) that is handled by themselves or in conjunction with...
... keystroke of an ASCII character code from 1-255. Key position 112 (marked with an application window icon ) is pressed. C-8 www.hp.com Technical Reference Guide The Ctrl and Alt keys can be used in conjunction with the numeric keypad keys (pos. 55-57, 72... the same keys available for use this BIOS function. C.2.4.3 Windows Keystrokes Windows-enhanced keyboards include three additional key positions. The Ctrl, Alt, and Delete keystroke combination (required twice if in the Windows environment) initiates a system reset (warm boot) that is handled by themselves or in conjunction with...

Computer Setup (F10) Utility Guide
Page 13
.../disable network server mode (appears if a power-on password is set) Specify whether the password is required for warm boot (Ctrl+Alt+Delete) (appears if a poweron password is set and enable setup (administrator) password. Use the arrow keys to boot the computer if the sensor...Desktop Management Guide on the Documentation and Diagnostics CD for more information. See the Troubleshooting Guide on warm boots , such as Ctrl+Alt+Delete or Restart from the selected non-default device for more information. Setup Password requires that the cover has been removed. Table 4 Computer...
.../disable network server mode (appears if a power-on password is set) Specify whether the password is required for warm boot (Ctrl+Alt+Delete) (appears if a poweron password is set and enable setup (administrator) password. Use the arrow keys to boot the computer if the sensor...Desktop Management Guide on the Documentation and Diagnostics CD for more information. See the Troubleshooting Guide on warm boots , such as Ctrl+Alt+Delete or Restart from the selected non-default device for more information. Setup Password requires that the cover has been removed. Table 4 Computer...

Troubleshooting Guide
Page 21
... Vista, right-click Start, click Explore, and right-click on . Right-click the drive letter and select Format. 3. Check the drive letter in Computer Setup. Delete unneeded files from diskette. Use another diskette or remove the write protection. Drive not found. Select File > Properties > Tools. Solution Reseat diskette drive data and...
... Vista, right-click Start, click Explore, and right-click on . Right-click the drive letter and select Format. 3. Check the drive letter in Computer Setup. Delete unneeded files from diskette. Use another diskette or remove the write protection. Drive not found. Select File > Properties > Tools. Solution Reseat diskette drive data and...

Troubleshooting Guide
Page 27
... Vista. If using an SD card, make sure that the card is inserted properly with Windows XP or Windows Vista. Can not write to and deleting from an SD/Memory Stick/ PRO card. Refer to remove a media card correctly. Do not know how to the previous section for a list of the...
... Vista. If using an SD card, make sure that the card is inserted properly with Windows XP or Windows Vista. Can not write to and deleting from an SD/Memory Stick/ PRO card. Refer to remove a media card correctly. Do not know how to the previous section for a list of the...
Troubleshooting Guide
Page 42
... cable is securely attached to the network connector and that the other end of the cable is present, and that the drivers were not accidentally deleted when the drivers for your NIC. The expansion board installed is defective. Contact an authorized service provider.
... cable is securely attached to the network connector and that the other end of the cable is present, and that the drivers were not accidentally deleted when the drivers for your NIC. The expansion board installed is defective. Contact an authorized service provider.

Troubleshooting Guide
Page 44
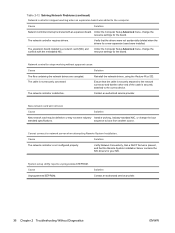
Cause Solution Too many Terminate and Stay Resident programs (TSRs) are Delete any TSRs that you do not need. installed. Reseat DIMMs. Power on the system. 2. Replace DIMMs one at a time to the computer. Power LED flashes ... five times. (Beeps stop after fifth iteration but LEDs continue flashing.) Cause Solution Memory is installed incorrectly or is bad. 1. Replace third-party memory with HP memory. 4. You have run out of memory for the application or add more memory to isolate the faulty module. 3. Replace the system board. 38 Chapter...
Cause Solution Too many Terminate and Stay Resident programs (TSRs) are Delete any TSRs that you do not need. installed. Reseat DIMMs. Power on the system. 2. Replace DIMMs one at a time to the computer. Power LED flashes ... five times. (Beeps stop after fifth iteration but LEDs continue flashing.) Cause Solution Memory is installed incorrectly or is bad. 1. Replace third-party memory with HP memory. 4. You have run out of memory for the application or add more memory to isolate the faulty module. 3. Replace the system board. 38 Chapter...

Troubleshooting Guide
Page 51
... with your ISP. Cookies are correct using the quick setup documentation. Select Start > Control Panel. 2. Click the Delete cookies button. On the General tab, click the Delete Cookies button. Solving Internet Access Problems If you encounter Internet access problems, consult your Internet Service Provider (ISP) or... up properly. ISP. (If the cable/DSL service is connected, the "cable" LED light on the General tab, click the Delete button. 5. Cause Solution Internet Service Provider (ISP) account is disconnected. Contact your ISP and launch the desired program.
... with your ISP. Cookies are correct using the quick setup documentation. Select Start > Control Panel. 2. Click the Delete cookies button. On the General tab, click the Delete Cookies button. Solving Internet Access Problems If you encounter Internet access problems, consult your Internet Service Provider (ISP) or... up properly. ISP. (If the cable/DSL service is connected, the "cable" LED light on the General tab, click the Delete button. 5. Cause Solution Internet Service Provider (ISP) account is disconnected. Contact your ISP and launch the desired program.


