

User Guide
Page 34
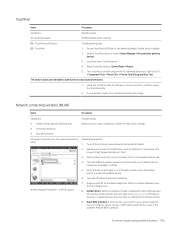
... set up a connection or network, connect to a network, and diagnose and repair network problems. To use operating system controls: 1. Connecting to a wireless network Your computer may have a wireless button, one or more of these features: ● Wireless button (also called airplane mode key or wireless key) (referred to in this chapter as airports, restaurants, coffee shops, hotels, and universities. Select Network and Internet, and then select Network and Sharing Center. 24 Chapter 3 Network connections In a PAN, each device...
... set up a connection or network, connect to a network, and diagnose and repair network problems. To use operating system controls: 1. Connecting to a wireless network Your computer may have a wireless button, one or more of these features: ● Wireless button (also called airplane mode key or wireless key) (referred to in this chapter as airports, restaurants, coffee shops, hotels, and universities. Select Network and Internet, and then select Network and Sharing Center. 24 Chapter 3 Network connections In a PAN, each device...

User Guide
Page 45
... the HP Quick Keys. ● Default: Resets the button to its default function. ● Button Function Toggles - Touch On/Off: Use Touch On/Off when you have built-in tablet support. It may also be used by some integrated applications for direct control of the screen. ● Pan/Scroll: Enables you to position a document or image within the active pane by pressing a pen button set a scrolling speed for use the sliders to adjust the screen cursor...
... the HP Quick Keys. ● Default: Resets the button to its default function. ● Button Function Toggles - Touch On/Off: Use Touch On/Off when you have built-in tablet support. It may also be used by some integrated applications for direct control of the screen. ● Pan/Scroll: Enables you to position a document or image within the active pane by pressing a pen button set a scrolling speed for use the sliders to adjust the screen cursor...
User Guide
Page 46
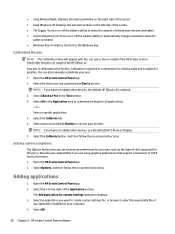
... use the default HP Z Book x2 Display. 7. Select OK. 36 Chapter 5 HP Create Control Panel software Select Options, and then follow the on your pen, such as the type of the HP ZBook x2. Setting advanced options The Options feature lets you have not added other devices, use preferences for viewing angle and to select the executable file of any application installed on -screen instructions. Select an application you have not added other devices, the default HP ZBook x2...
... use the default HP Z Book x2 Display. 7. Select OK. 36 Chapter 5 HP Create Control Panel software Select Options, and then follow the on your pen, such as the type of the HP ZBook x2. Setting advanced options The Options feature lets you have not added other devices, use preferences for viewing angle and to select the executable file of any application installed on -screen instructions. Select an application you have not added other devices, the default HP ZBook x2...

User Guide
Page 50
... settings are ready to reliable external power using the AC adapter. Determining the software version To decide whether you update the software on a regular basis. Open the HP Create Control Panel app. 2. Make note of the version number. Do not download or install a software update while the computer is running on the HP website are imported. NOTE: If you connect your computer to a network, consult the network administrator before installing any device, cable, or cord. 1. The updates...
... settings are ready to reliable external power using the AC adapter. Determining the software version To decide whether you update the software on a regular basis. Open the HP Create Control Panel app. 2. Make note of the version number. Do not download or install a software update while the computer is running on the HP website are imported. NOTE: If you connect your computer to a network, consult the network administrator before installing any device, cable, or cord. 1. The updates...

User Guide
Page 63
... an embedded, ROM-based utility that you choose to display the on-screen keyboard. You can use the touch screen. Several types of passwords can be available on your computer. NOTE: If you log into the computer with an optional security cable on select products only) *Computer Setup is stolen, Computrace can use a pointing device (TouchPad, pointing stick, or USB mouse) or the keyboard to navigate and make selections in...
... an embedded, ROM-based utility that you choose to display the on-screen keyboard. You can use the touch screen. Several types of passwords can be available on your computer. NOTE: If you log into the computer with an optional security cable on select products only) *Computer Setup is stolen, Computrace can use a pointing device (TouchPad, pointing stick, or USB mouse) or the keyboard to navigate and make selections in...

User Guide
Page 66
... set up Windows Hello, follow the on -screen instructions to set the password), and then press enter. or - Select Main, select Save Changes and Exit, and then press enter. Using Windows Hello (select products only) On products equipped with a fingerprint reader or an infrared camera, you can use Windows Hello to enter Computer Setup. 2. Select the Start button, select Settings, select Accounts, and then select Sign-in by swiping your new password...
... set up Windows Hello, follow the on -screen instructions to set the password), and then press enter. or - Select Main, select Save Changes and Exit, and then press enter. Using Windows Hello (select products only) On products equipped with a fingerprint reader or an infrared camera, you can use Windows Hello to enter Computer Setup. 2. Select the Start button, select Settings, select Accounts, and then select Sign-in by swiping your new password...

User Guide
Page 78
... key or the down button until the Startup menu is displayed, and then tap F10 to the main Computer Setup screen, press esc, and then follow the on -screen instructions. - Your changes go into effect when the computer restarts. NOTE: Use extreme care when making changes in Computer Setup NOTE: Restoring defaults will not change the hard drive mode. 68 Chapter 11 Computer Setup (BIOS), TPM, and HP Sure Start Restoring factory settings in Computer Setup. Starting Computer Setup ▲ Turn...
... key or the down button until the Startup menu is displayed, and then tap F10 to the main Computer Setup screen, press esc, and then follow the on -screen instructions. - Your changes go into effect when the computer restarts. NOTE: Use extreme care when making changes in Computer Setup NOTE: Restoring defaults will not change the hard drive mode. 68 Chapter 11 Computer Setup (BIOS), TPM, and HP Sure Start Restoring factory settings in Computer Setup. Starting Computer Setup ▲ Turn...

User Guide
Page 80
... install a BIOS update while the computer is running on battery power, docked in an optional docking device, or connected to the location on your hard drive where the BIOS update is connected to the BIOS version currently installed on your computer. Type support in the taskbar. 2. Make a note of the path to an optional power source. Some download packages contain a file named Readme.txt, which contains information regarding installing and troubleshooting the file. See Starting...
... install a BIOS update while the computer is running on battery power, docked in an optional docking device, or connected to the location on your hard drive where the BIOS update is connected to the BIOS version currently installed on your computer. Type support in the taskbar. 2. Make a note of the path to an optional power source. Some download packages contain a file named Readme.txt, which contains information regarding installing and troubleshooting the file. See Starting...

User Guide
Page 81
... is attacked, HP Sure Start automatically restores the BIOS to enter the Boot menu. 2. The default configuration can modify the TPM settings in Computer Setup (BIOS). Double-click the file that are displayed on -screen instructions. Complete the installation by advanced users. Press the power button, quickly press and hold the volume down button until the Startup menu is displayed, and then tap F9 to its previously safe state, without user intervention. Start Computer Setup. Follow any instructions that has...
... is attacked, HP Sure Start automatically restores the BIOS to enter the Boot menu. 2. The default configuration can modify the TPM settings in Computer Setup (BIOS). Double-click the file that are displayed on -screen instructions. Complete the installation by advanced users. Press the power button, quickly press and hold the volume down button until the Startup menu is displayed, and then tap F9 to its previously safe state, without user intervention. Start Computer Setup. Follow any instructions that has...

User Guide
Page 88
... mode key 24 antivirus software 57 Audio 43 audio-out (headphone)/audio-in (microphone) combo jack, identifying 6 B backup, graphic software settings 39 backups 63 battery conserving power 50 discharging 50 factory-sealed 51 finding information 50 low battery levels 50 resolving low battery level 51 battery charge 50 battery information, finding 50 battery light 4 battery power 49 BIOS determining version 70 downloading an update 70 updating 70 Bluetooth device 24, 25 Bluetooth label 21 boot order changing 67 bottom 21 button mappings 39 buttons customizing 32 power 6 volume...
... mode key 24 antivirus software 57 Audio 43 audio-out (headphone)/audio-in (microphone) combo jack, identifying 6 B backup, graphic software settings 39 backups 63 battery conserving power 50 discharging 50 factory-sealed 51 finding information 50 low battery levels 50 resolving low battery level 51 battery charge 50 battery information, finding 50 battery light 4 battery power 49 BIOS determining version 70 downloading an update 70 updating 70 Bluetooth device 24, 25 Bluetooth label 21 boot order changing 67 bottom 21 button mappings 39 buttons customizing 32 power 6 volume...

User Guide
Page 89
... ID code 73 using 73 HP Quick Key customizable button, identifying 7, 9 HP Quick Keys, customizing 32 HP Recovery Manager correcting boot problems 67 starting 66 HP Recovery media creating 63 recovery 66 HP Recovery partition recovery 66 removing 67 HP resources 2 HP Touchpoint Manager 58 I import expert graphic software settings 39 infrared camera light, identifying 8 initiating Sleep and Hibernation 47 input power 75 internal microphones, identifying 8 J jacks audio-out (headphone)/audio-in (microphone) combo 6 K keyboard and optional mouse using 31 keyboard base components 10 connecting 16...
... ID code 73 using 73 HP Quick Key customizable button, identifying 7, 9 HP Quick Keys, customizing 32 HP Recovery Manager correcting boot problems 67 starting 66 HP Recovery media creating 63 recovery 66 HP Recovery partition recovery 66 removing 67 HP resources 2 HP Touchpoint Manager 58 I import expert graphic software settings 39 infrared camera light, identifying 8 initiating Sleep and Hibernation 47 input power 75 internal microphones, identifying 8 J jacks audio-out (headphone)/audio-in (microphone) combo 6 K keyboard and optional mouse using 31 keyboard base components 10 connecting 16...
User Guide
Page 90
starting 66 supported discs 64 system 65 USB flash drive 66 using HP Recovery media 64 recovery media creating 63 creating using HP Recovery Manager 64 recovery partition removing 67 regulatory information regulatory label 21 wireless certification labels 21 restore, graphic software settings 39 S security cable slot, identifying 7 select or confirm button, identifying 8, 9 serial number 20 serial number, computer 20 service labels, locating 20 setup utility navigating and selecting 68 restoring factory settings 68 shipping the computer 61 shutdown 48 Sleep exiting 47 initiating 47 Sleep and ...
starting 66 supported discs 64 system 65 USB flash drive 66 using HP Recovery media 64 recovery media creating 63 creating using HP Recovery Manager 64 recovery partition removing 67 regulatory information regulatory label 21 wireless certification labels 21 restore, graphic software settings 39 S security cable slot, identifying 7 select or confirm button, identifying 8, 9 serial number 20 serial number, computer 20 service labels, locating 20 setup utility navigating and selecting 68 restoring factory settings 68 shipping the computer 61 shutdown 48 Sleep exiting 47 initiating 47 Sleep and ...
Maintenance and Service Guide
Page 69
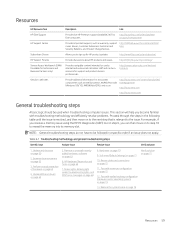
... not have to be used when troubleshooting computer issues. Elite computers. For example, if you resolve a memory issue using the HP PC Diagnostics (UEFI) tool in a specific order if an issue does not apply. Status lights, blinking light codes, troubleshooting lights, and POST error messages on page 74 13. Test with verified working configuration (hardware and/or operating system) on page 68 8. Replace the system board on page 74 Verify...
... not have to be used when troubleshooting computer issues. Elite computers. For example, if you resolve a memory issue using the HP PC Diagnostics (UEFI) tool in a specific order if an issue does not apply. Status lights, blinking light codes, troubleshooting lights, and POST error messages on page 74 13. Test with verified working configuration (hardware and/or operating system) on page 68 8. Replace the system board on page 74 Verify...
Maintenance and Service Guide
Page 80
... CMOS recovery was completed successfully. Wireless Modules Not installed or responding 701 Reseat the wireless LAN adapter module and antennas. Contact support if third-party wireless adapters are installed in the computer's memory and may restore functionality. Hard reset A hard reset (or forced reset) erases all information in the computer. For more information, see the WLAN module removal section in this document. Before performing a hard reset, you must disconnect or remove all updated drivers from Microsoft and HP. Fan Fan not operating...
... CMOS recovery was completed successfully. Wireless Modules Not installed or responding 701 Reseat the wireless LAN adapter module and antennas. Contact support if third-party wireless adapters are installed in the computer's memory and may restore functionality. Hard reset A hard reset (or forced reset) erases all information in the computer. For more information, see the WLAN module removal section in this document. Before performing a hard reset, you must disconnect or remove all updated drivers from Microsoft and HP. Fan Fan not operating...
Maintenance and Service Guide
Page 84
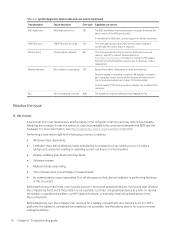
... the power connector cable (between external AC adapter and system board) is not common. Test with a verified working configuration (hardware and/or operating system) One troubleshooting technique that can quickly isolate an issue is unaware of replacing unnecessary hardware. A good example is related to the current problem. Hard reset on page 63, 7. NOTE: Determine whether a previous service case might be considered an initial step taken to use an external keyboard, mouse...
... the power connector cable (between external AC adapter and system board) is not common. Test with a verified working configuration (hardware and/or operating system) One troubleshooting technique that can quickly isolate an issue is unaware of replacing unnecessary hardware. A good example is related to the current problem. Hard reset on page 63, 7. NOTE: Determine whether a previous service case might be considered an initial step taken to use an external keyboard, mouse...
Maintenance and Service Guide
Page 86
... of BIOS, drivers, and software are installed. Consulting with HP Service If further HP support is a network connection issue, plug another computer with the network plug or cable. 7. The blinking lights could be a problem with a different cable into a different video port on boards or hardware 76 Chapter 6 Troubleshooting guide If the screen is likely operating correctly. Verify that the latest version of the following information may need to screen only. Then press the power button again to start the...
... of BIOS, drivers, and software are installed. Consulting with HP Service If further HP support is a network connection issue, plug another computer with the network plug or cable. 7. The blinking lights could be a problem with a different cable into a different video port on boards or hardware 76 Chapter 6 Troubleshooting guide If the screen is likely operating correctly. Verify that the latest version of the following information may need to screen only. Then press the power button again to start the...
Maintenance and Service Guide
Page 115
... microwave, that the wireless light is on /off the computer's wired network (remove RJ-45 cable). 2. TouchPad Items Procedures Symptoms Not working properly Possible causes On/Off enabled, driver, settings. (1) - TouchPad on . Double touch to isolate a hardware issue from a software issue. 8. Install the latest TouchPad driver. 4. If issue persists, replace the TouchPad and verify the change. No network detected in Windows. Common issues and possible solutions 105 Adjust TouchPad settings (Control Panel > Mouse). 5. If updating drivers does not help, try...
... microwave, that the wireless light is on /off the computer's wired network (remove RJ-45 cable). 2. TouchPad Items Procedures Symptoms Not working properly Possible causes On/Off enabled, driver, settings. (1) - TouchPad on . Double touch to isolate a hardware issue from a software issue. 8. Install the latest TouchPad driver. 4. If issue persists, replace the TouchPad and verify the change. No network detected in Windows. Common issues and possible solutions 105 Adjust TouchPad settings (Control Panel > Mouse). 5. If updating drivers does not help, try...

Maintenance and Service Guide
Page 120
Verify TB port, cable and connection. 6. Update Intel Thunderbolt software that TB device is detected in Windows Device Manager. 5. Update to default. 3. Reset User Account Settings to the latest BIOS and choose appropriate TB Port settings. 2. Verify that includes firmware version (for Windows, see https://thunderbolttechnology.net/ products. 110 Chapter 6 Troubleshooting guide Troubleshooting steps 1. Thunderbolt cable and Thunderbolt device must be compatible with a verified working Procedures Possible causes BIOS, drivers, and user settings. Thunderbolt (TB) Items Symptom...
Verify TB port, cable and connection. 6. Update Intel Thunderbolt software that TB device is detected in Windows Device Manager. 5. Update to default. 3. Reset User Account Settings to the latest BIOS and choose appropriate TB Port settings. 2. Verify that includes firmware version (for Windows, see https://thunderbolttechnology.net/ products. 110 Chapter 6 Troubleshooting guide Troubleshooting steps 1. Thunderbolt cable and Thunderbolt device must be compatible with a verified working Procedures Possible causes BIOS, drivers, and user settings. Thunderbolt (TB) Items Symptom...
Maintenance and Service Guide
Page 168
...with HP Sleep and Charge 5 USB Type-C power with HP Sleep and Charge 5 power button 7 power connector 5 power cord set requirements 154 spare part numbers 23 power requirements, product description 3 processor, product description 1 product description audio 2 chipset 1 display panel 1 external media cards 2 graphics 1 hard drive 1, 2 keyboard 3 memory module 1 microphone 2 operating system 3 pointing device 3 ports 2 power requirements 3 processors 1 product name 1 security 3 serviceability 3 solid-state drive 1, 2 storage 1, 2 video 2 wireless 2 product name 1 Q QuickKey button board removal...
...with HP Sleep and Charge 5 USB Type-C power with HP Sleep and Charge 5 power button 7 power connector 5 power cord set requirements 154 spare part numbers 23 power requirements, product description 3 processor, product description 1 product description audio 2 chipset 1 display panel 1 external media cards 2 graphics 1 hard drive 1, 2 keyboard 3 memory module 1 microphone 2 operating system 3 pointing device 3 ports 2 power requirements 3 processors 1 product name 1 security 3 serviceability 3 solid-state drive 1, 2 storage 1, 2 video 2 wireless 2 product name 1 Q QuickKey button board removal...
Maintenance and Service Guide
Page 169
... 8 TouchPad click area 13 components 13 zone 13 TPM settings 138 transporting guidelines 27 U USB 3.x SuperSpeed port with HP Sleep and Charge 5 USB port components 15 USB Type-C power port with HP Sleep and Charge 5 USB Type-C-to-USB Type-A dongle, spare part number 22 V vents 6, 8, 12 video, product description 2 volume down button 7 volume up button 7 W webcam location 11, 12 removal 42, 43 spare part numbers 20, 42, 43 webcam/microphone module removal 42 spare part number 20, 42 Windows system restore point 142, 143 Windows tools using 143 wireless antenna locations 10 removal 40...
... 8 TouchPad click area 13 components 13 zone 13 TPM settings 138 transporting guidelines 27 U USB 3.x SuperSpeed port with HP Sleep and Charge 5 USB port components 15 USB Type-C power port with HP Sleep and Charge 5 USB Type-C-to-USB Type-A dongle, spare part number 22 V vents 6, 8, 12 video, product description 2 volume down button 7 volume up button 7 W webcam location 11, 12 removal 42, 43 spare part numbers 20, 42, 43 webcam/microphone module removal 42 spare part number 20, 42 Windows system restore point 142, 143 Windows tools using 143 wireless antenna locations 10 removal 40...


