
Maintenance and Service Guide
Page 7
... drive - HP EliteBook 840 G2 and HP EliteBook 740 G2 Notebook PC 5 Hard drive - HP EliteBook 840 G2 and HP EliteBook 740 G2 Notebook PC 6 Solid-state drive - HP ZBook 14 G2 Mobile Workstation 6 Audio and video ...7 Ethernet ...7 Wireless ...8 External media cards ...9 Ports ...10 Keyboard/pointing devices ...10 Power requirements ...11 Security ...11 Operating system ...12 Operating system (continued) ...16 Serviceability ...17 2 Getting to know your computer ...19 Display ...20 Buttons, speakers, and fingerprint reader (select models only 21 Keys ...22 Lights...
... drive - HP EliteBook 840 G2 and HP EliteBook 740 G2 Notebook PC 5 Hard drive - HP EliteBook 840 G2 and HP EliteBook 740 G2 Notebook PC 6 Solid-state drive - HP ZBook 14 G2 Mobile Workstation 6 Audio and video ...7 Ethernet ...7 Wireless ...8 External media cards ...9 Ports ...10 Keyboard/pointing devices ...10 Power requirements ...11 Security ...11 Operating system ...12 Operating system (continued) ...16 Serviceability ...17 2 Getting to know your computer ...19 Display ...20 Buttons, speakers, and fingerprint reader (select models only 21 Keys ...22 Lights...

Maintenance and Service Guide
Page 10
... 14 Power cord set requirements ...149 Requirements for all countries ...149 Requirements for specific countries and regions 150 15 Recycling ...153 Index ...155 x ENWW Windows 10 ...131 Creating recovery media and backups ...131 Creating HP Recovery media (select products only 132 Using Windows Tools ...134 Restore and recovery ...135 Recovering using HP Recovery Manager 136 What you need to know before you get started 136 Using the HP Recovery partition (select products only 137 Using HP Recovery media to a USB device 127 Using HP Sure Start (select models...
... 14 Power cord set requirements ...149 Requirements for all countries ...149 Requirements for specific countries and regions 150 15 Recycling ...153 Index ...155 x ENWW Windows 10 ...131 Creating recovery media and backups ...131 Creating HP Recovery media (select products only 132 Using Windows Tools ...134 Restore and recovery ...135 Recovering using HP Recovery Manager 136 What you need to know before you get started 136 Using the HP Recovery partition (select products only 137 Using HP Recovery media to a USB device 127 Using HP Sure Start (select models...

Maintenance and Service Guide
Page 36
... battery light begins blinking rapidly. ● Off: The battery is fully charged. ● Blinking white: The hard drive is off . ● On: The computer is enabled at the factory. Hibernation is the only available power source has reached a low battery level. Rapid Start Technology allows your computer ENWW Front Item (1) Component Wireless light (2) Power light (3) AC adapter/Battery light (4) Hard drive light Description On: An integrated wireless device, such as a wireless local area network (WLAN) device and/or a Bluetooth device...
... battery light begins blinking rapidly. ● Off: The battery is fully charged. ● Blinking white: The hard drive is off . ● On: The computer is enabled at the factory. Hibernation is the only available power source has reached a low battery level. Rapid Start Technology allows your computer ENWW Front Item (1) Component Wireless light (2) Power light (3) AC adapter/Battery light (4) Hard drive light Description On: An integrated wireless device, such as a wireless local area network (WLAN) device and/or a Bluetooth device...
Maintenance and Service Guide
Page 67
... supported in all locations. See Locating the product name, serial number, product number, warranty information, and model number on supported parts for your warranty to order (CTO) computer models For use only on -screen instructions. Check your computer, go to access and replace Customer Self-Repair parts successfully. There are on HP ZBook 14 G2 Mobile Workstation computer models Spare part number 766324-001 784452-001 745311-001 730961-001 Before removing the service cover, follow the on configure...
... supported in all locations. See Locating the product name, serial number, product number, warranty information, and model number on supported parts for your warranty to order (CTO) computer models For use only on -screen instructions. Check your computer, go to access and replace Customer Self-Repair parts successfully. There are on HP ZBook 14 G2 Mobile Workstation computer models Spare part number 766324-001 784452-001 745311-001 730961-001 Before removing the service cover, follow the on configure...
Maintenance and Service Guide
Page 85
... HP devices only) HP Touchpoint Manager (HPTM) is installed. See Locating the product name, serial number, product number, warranty information, and model number on -screen instructions. If a PIN is returned for service, the agent must be replaced. NOTE: HP continually improves and changes product parts. The HP Touchpoint Manager website (http://www.hptouchpointmanager.com) provides access to unlock the device using an authorized PIN from the same website before you can access HP Computer Setup and start the Windows operating...
... HP devices only) HP Touchpoint Manager (HPTM) is installed. See Locating the product name, serial number, product number, warranty information, and model number on -screen instructions. If a PIN is returned for service, the agent must be replaced. NOTE: HP continually improves and changes product parts. The HP Touchpoint Manager website (http://www.hptouchpointmanager.com) provides access to unlock the device using an authorized PIN from the same website before you can access HP Computer Setup and start the Windows operating...

Maintenance and Service Guide
Page 86
... replacement kits. 1. Access HP Computer Setup (F10). a. b. Select Advanced, and then select HP Touchpoint Manager Options. 3. Select Save changes and exit. TouchScreen display assemblies are spared at the bottom of the display bezel until the bezel disengages from the computer. On non-TouchScreen computer models, the display bezel, display panel, and webcam/microphone module can be removed with an Administrator password, enter the password. 2. Before removing the display bezel, follow these components without removing...
... replacement kits. 1. Access HP Computer Setup (F10). a. b. Select Advanced, and then select HP Touchpoint Manager Options. 3. Select Save changes and exit. TouchScreen display assemblies are spared at the bottom of the display bezel until the bezel disengages from the computer. On non-TouchScreen computer models, the display bezel, display panel, and webcam/microphone module can be removed with an Administrator password, enter the password. 2. Before removing the display bezel, follow these components without removing...

Maintenance and Service Guide
Page 122
...: Use extreme care when making changes in combination with the volume down button until the Startup menu is enabled. Errors can be used with keyboards: ▲ Turn on the system (such as disk drives, display, keyboard, mouse, and printer). Starting Computer Setup NOTE: An external keyboard or mouse connected to a USB port can prevent the computer from operating properly. To start Computer Setup, follow these steps: ▲ Start Computer Setup. ● Computers or tablets with Computer Setup only if USB legacy support is displayed...
...: Use extreme care when making changes in combination with the volume down button until the Startup menu is enabled. Errors can be used with keyboards: ▲ Turn on the system (such as disk drives, display, keyboard, mouse, and printer). Starting Computer Setup NOTE: An external keyboard or mouse connected to a USB port can prevent the computer from operating properly. To start Computer Setup, follow these steps: ▲ Start Computer Setup. ● Computers or tablets with Computer Setup only if USB legacy support is displayed...

Maintenance and Service Guide
Page 123
... arrow key on the keyboard. ● To close open dialog boxes and return to the values that were set at the factory, follow the on -screen instructions. ‒ or - Your changes go into effect when the computer restarts. See Starting Computer Setup on -screen instructions. 4. Follow the on page 112. 2. Start Computer Setup. ENWW Using Computer Setup 113 NOTE: On select products, the selections may display Restore Defaults instead...
... arrow key on the keyboard. ● To close open dialog boxes and return to the values that were set at the factory, follow the on -screen instructions. ‒ or - Your changes go into effect when the computer restarts. See Starting Computer Setup on -screen instructions. 4. Follow the on page 112. 2. Start Computer Setup. ENWW Using Computer Setup 113 NOTE: On select products, the selections may display Restore Defaults instead...
Maintenance and Service Guide
Page 125
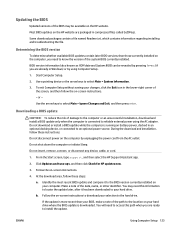
... hard drive. Make a note of the date, name, or other identifier. Follow any software updates, especially system BIOS updates. Identify the most recent BIOS update and compare it has been downloaded to locate the update later, after the download is downloaded. You may need to access this information to your computer. BIOS installation procedures vary. Type file in combination with keyboards: ▲ Turn on -screen instructions. Changing the boot order using the f9 prompt To dynamically choose a boot device...
... hard drive. Make a note of the date, name, or other identifier. Follow any software updates, especially system BIOS updates. Identify the most recent BIOS update and compare it has been downloaded to locate the update later, after the download is downloaded. You may need to access this information to your computer. BIOS installation procedures vary. Type file in combination with keyboards: ▲ Turn on -screen instructions. Changing the boot order using the f9 prompt To dynamically choose a boot device...

Maintenance and Service Guide
Page 131
9 Computer Setup (BIOS), MultiBoot, and HP PC Hardware Diagnostics (UEFI) - Errors can be used with Computer Setup only if USB legacy support is enabled. NOTE: You can use either a pointing device (TouchPad, pointing stick, or USB mouse) or the keyboard to a USB port can prevent the computer from operating properly. To start Computer Setup, follow these steps: 1. Navigating and selecting in Computer Setup To navigate and select in Computer Setup. 2. Turn on or restart the...
9 Computer Setup (BIOS), MultiBoot, and HP PC Hardware Diagnostics (UEFI) - Errors can be used with Computer Setup only if USB legacy support is enabled. NOTE: You can use either a pointing device (TouchPad, pointing stick, or USB mouse) or the keyboard to a USB port can prevent the computer from operating properly. To start Computer Setup, follow these steps: 1. Navigating and selecting in Computer Setup To navigate and select in Computer Setup. 2. Turn on or restart the...

Maintenance and Service Guide
Page 132
Turn on -screen instructions. 5. Use a pointing device or the arrow keys to select Main > Save Changes and Exit, and then press enter. Follow the on or restart the computer, and then press esc while the "Press the ESC key for Startup Menu" message is displayed at the factory, follow these steps: 1. NOTE: Your password settings and security settings are not changed when you restore the factory settings. 122 Chapter 9 Computer Setup (BIOS), MultiBoot...
Turn on -screen instructions. 5. Use a pointing device or the arrow keys to select Main > Save Changes and Exit, and then press enter. Follow the on or restart the computer, and then press esc while the "Press the ESC key for Startup Menu" message is displayed at the factory, follow these steps: 1. NOTE: Your password settings and security settings are not changed when you restore the factory settings. 122 Chapter 9 Computer Setup (BIOS), MultiBoot...
Maintenance and Service Guide
Page 133
... are packaged in an optional docking device, or connected to the hard drive. ENWW Using Computer Setup 123 Start Computer Setup. 2. or - Follow the on the HP website are ready to download your changes, click the Exit icon in Windows) or by using the AC adapter. During the download and installation, follow these instructions: Do not disconnect power on -screen instructions. - Do not insert, remove, connect, or disconnect any device, cable, or cord. 1. You may...
... are packaged in an optional docking device, or connected to the hard drive. ENWW Using Computer Setup 123 Start Computer Setup. 2. or - Follow the on the HP website are ready to download your changes, click the Exit icon in Windows) or by using the AC adapter. During the download and installation, follow these instructions: Do not disconnect power on -screen instructions. - Do not insert, remove, connect, or disconnect any device, cable, or cord. 1. You may...

Maintenance and Service Guide
Page 137
... a USB device NOTE: Instructions for the diagnostic tools, in English only. Hard drive c. Downloading HP PC Hardware Diagnostics (UEFI) to Support, located at the top of diagnostic test you have the following order: a. Go to a USB device: Option 1: HP PC Diagnostics homepage- When the diagnostic tool opens, use the keyboard arrow keys to select the type of the page, and then click Download Drivers. There are caused by the operating system or other software...
... a USB device NOTE: Instructions for the diagnostic tools, in English only. Hard drive c. Downloading HP PC Hardware Diagnostics (UEFI) to Support, located at the top of diagnostic test you have the following order: a. Go to a USB device: Option 1: HP PC Diagnostics homepage- When the diagnostic tool opens, use the keyboard arrow keys to select the type of the page, and then click Download Drivers. There are caused by the operating system or other software...

Maintenance and Service Guide
Page 145
... replaced the hard drive, you can choose the System Recovery option from the HP Recovery partition (select products only) or use the Factory Reset option of expertise: IMPORTANT: Not all products. ● Windows offers several options for restoring from backup, refreshing the computer, and resetting the computer to its original state. Choose the method that best matches your system. For more information see Creating HP Recovery media (select products only) on -screen instructions...
... replaced the hard drive, you can choose the System Recovery option from the HP Recovery partition (select products only) or use the Factory Reset option of expertise: IMPORTANT: Not all products. ● Windows offers several options for restoring from backup, refreshing the computer, and resetting the computer to its original state. Choose the method that best matches your system. For more information see Creating HP Recovery media (select products only) on -screen instructions...

Maintenance and Service Guide
Page 148
... the Windows button; Access BIOS: For computers or tablets with a detachable keyboard, connect the keyboard to free up hard drive space. Turn on or restart the computer or tablet, quickly press esc, and then press f9 for startup information. Removing the HP Recovery partition (select products only) HP Recovery Manager software allows you to remove the HP Recovery partition to the keyboard dock before you remove the Recovery partition, create HP Recovery media; So before beginning these steps to an optical drive or a USB flash drive. Select Remove Recovery Partition...
... the Windows button; Access BIOS: For computers or tablets with a detachable keyboard, connect the keyboard to free up hard drive space. Turn on or restart the computer or tablet, quickly press esc, and then press f9 for startup information. Removing the HP Recovery partition (select products only) HP Recovery Manager software allows you to remove the HP Recovery partition to the keyboard dock before you remove the Recovery partition, create HP Recovery media; So before beginning these steps to an optical drive or a USB flash drive. Select Remove Recovery Partition...

Maintenance and Service Guide
Page 154
...; j. Clear the drive contents by using the BIOS Setup Secure Erase command option, or by the HP Sure Start BIOS code, EC Embedded Controller. To run Secure Erase, follow these steps: a. Enter BIOS Setup by the HP Sure Start backup of The content is the purpose of the display. b. Select the Security menu and scroll down to this memory write protected? Select Hard Drive Tools. How is this This memory is protected protected device via...
...; j. Clear the drive contents by using the BIOS Setup Secure Erase command option, or by the HP Sure Start BIOS code, EC Embedded Controller. To run Secure Erase, follow these steps: a. Enter BIOS Setup by the HP Sure Start backup of The content is the purpose of the display. b. Select the Security menu and scroll down to this memory write protected? Select Hard Drive Tools. How is this This memory is protected protected device via...

Maintenance and Service Guide
Page 155
Non Volatile Memory Type Controller (NIC) EEPROM Amount (Size) Does this ROM in an inappropriate manner will render the NIC non- functional. memory and is installed in specific ZBook and EliteBook models. functional. the module is available battery on the HP website. Yes Store system System BIOS code is A utility is required for third party data the factory or by an updating the firmware. An Intel Data and iAMT Data can...
Non Volatile Memory Type Controller (NIC) EEPROM Amount (Size) Does this ROM in an inappropriate manner will render the NIC non- functional. memory and is installed in specific ZBook and EliteBook models. functional. the module is available battery on the HP website. Yes Store system System BIOS code is A utility is required for third party data the factory or by an updating the firmware. An Intel Data and iAMT Data can...
Maintenance and Service Guide
Page 165
... audio, product description 7 audio-in (microphone) jack 28 audio-out (headphone) jack 28 B base enclosure removal 81 spare part numbers 45, 81 battery removal 59 spare part numbers 40, 59 BIOS determining version 123 downloading an update 123 updating 123 Blu-ray ROM DVD±RW SuperMulti DL Drive precautions 52 buttons pointing stick 25 power 22 TouchPad 25 TouchPad on/off 25 volume mute 22 Windows 23 wireless 22 C cables, service considerations 51 caps lock light 24 card reader board removal 86 spare part number 39...
... audio, product description 7 audio-in (microphone) jack 28 audio-out (headphone) jack 28 B base enclosure removal 81 spare part numbers 45, 81 battery removal 59 spare part numbers 40, 59 BIOS determining version 123 downloading an update 123 updating 123 Blu-ray ROM DVD±RW SuperMulti DL Drive precautions 52 buttons pointing stick 25 power 22 TouchPad 25 TouchPad on/off 25 volume mute 22 Windows 23 wireless 22 C cables, service considerations 51 caps lock light 24 card reader board removal 86 spare part number 39...
Maintenance and Service Guide
Page 166
... Windows applications 23 L legacy support, USB 121 lights AC adapter/battery 26 caps lock 24 hard drive 26 microphone mute 24 mute 25 num lock 24 power 24, 26 RJ-45 (network) 29 TouchPad 24 webcam 20 wireless 25, 26 M mass storage device precautions 52 memory nonvolatile 143 volatile 143 memory card reader 28 memory module removal 68 spare part numbers 40, 68 memory, product description 3, 4 microphone 20 product description 7 microphone (audio-in) jack 28 microphone module removal 79 spare part number 46, 79 microphone mute light 24 monitor port...
... Windows applications 23 L legacy support, USB 121 lights AC adapter/battery 26 caps lock 24 hard drive 26 microphone mute 24 mute 25 num lock 24 power 24, 26 RJ-45 (network) 29 TouchPad 24 webcam 20 wireless 25, 26 M mass storage device precautions 52 memory nonvolatile 143 volatile 143 memory card reader 28 memory module removal 68 spare part numbers 40, 68 memory, product description 3, 4 microphone 20 product description 7 microphone (audio-in) jack 28 microphone module removal 79 spare part number 46, 79 microphone mute light 24 monitor port...

Maintenance and Service Guide
Page 167
... part numbers 39, 88 TouchPad button 25 TouchPad light 24 TouchPad on/off button 25 TouchPad zone 25 transporting guidelines 54 U USB 3.0 charging port (powered) 27 USB 3.0 port 27, 28 USB legacy support 121 USB port 27, 28 USB/VGA connector board removal 89 spare part number 40, 89 V vents 27, 31 video, product description 7 volume mute button 22 W webcam 20 webcam light 20 webcam/microphone module removal 79 spare part number 46, 79 Windows Refresh 142 Reset 142 Windows applications key 23 Windows button 23 Windows key 23 Windows operating system DVD 141 wireless antenna location 20 removal...
... part numbers 39, 88 TouchPad button 25 TouchPad light 24 TouchPad on/off button 25 TouchPad zone 25 transporting guidelines 54 U USB 3.0 charging port (powered) 27 USB 3.0 port 27, 28 USB legacy support 121 USB port 27, 28 USB/VGA connector board removal 89 spare part number 40, 89 V vents 27, 31 video, product description 7 volume mute button 22 W webcam 20 webcam light 20 webcam/microphone module removal 79 spare part number 46, 79 Windows Refresh 142 Reset 142 Windows applications key 23 Windows button 23 Windows key 23 Windows operating system DVD 141 wireless antenna location 20 removal...


