
Brochure
Page 1
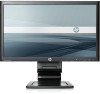
...; VGA, DVI-D, and DisplayPort inputs provide a wide range of advanced connectivity options A built-in more than previous CCFL monitors. HP Advantage Series HP Compaq LA2206x 21.5-inch WLED Backlit LCD Monitor The new evolution of the element is eliminated. But the LA2206x has more industries, CCFL... monitors will simply be able to replace your monitor, you 'll be left in Full HD1 with less scrolling Swivel makes...
...; VGA, DVI-D, and DisplayPort inputs provide a wide range of advanced connectivity options A built-in more than previous CCFL monitors. HP Advantage Series HP Compaq LA2206x 21.5-inch WLED Backlit LCD Monitor The new evolution of the element is eliminated. But the LA2206x has more industries, CCFL... monitors will simply be able to replace your monitor, you 'll be left in Full HD1 with less scrolling Swivel makes...
Brochure
Page 2
... all -in ) widescreen; features dual speakers with coworkers and clients. HP DisplayPort Cable Kit - Optional; This monitor is available at www.hp.com/go/lookuptool. The flexible design of the HP Single Monitor Arm provides a seemingly endless range of display separately) adjustments with a ...reset Input power 100 - 240 VAC, 50/60 Hz Power consumption Maximum: 36 watts; To learn more monitor real estate and makes it possible to manage multiple applications simultaneously. HP Adjustable Dual Display Stand - Packaged: 8,3 kg (18.4 lb) Head only: 3,8 kg (8.4 lb)...
... all -in ) widescreen; features dual speakers with coworkers and clients. HP DisplayPort Cable Kit - Optional; This monitor is available at www.hp.com/go/lookuptool. The flexible design of the HP Single Monitor Arm provides a seemingly endless range of display separately) adjustments with a ...reset Input power 100 - 240 VAC, 50/60 Hz Power consumption Maximum: 36 watts; To learn more monitor real estate and makes it possible to manage multiple applications simultaneously. HP Adjustable Dual Display Stand - Packaged: 8,3 kg (18.4 lb) Head only: 3,8 kg (8.4 lb)...

User Manual
Page 1
HP Compaq LA2006x, LA2206x, and LA2306x LED Backlit LCD Monitors User Guide
HP Compaq LA2006x, LA2206x, and LA2306x LED Backlit LCD Monitors User Guide

User Manual
Page 3
CAUTION: Text set off in this manner indicates that failure to follow directions could result in this manner provides important supplemental information. About This Guide This guide provides information on setting up the monitor, installing drivers, using the on-screen display menu, troubleshooting and technical specifications. Text set off in this manner indicates that failure to equipment or loss of life. ENWW iii NOTE: Text set off in damage to follow directions could result in bodily harm or loss of information. WARNING!
CAUTION: Text set off in this manner indicates that failure to follow directions could result in this manner provides important supplemental information. About This Guide This guide provides information on setting up the monitor, installing drivers, using the on-screen display menu, troubleshooting and technical specifications. Text set off in this manner indicates that failure to equipment or loss of life. ENWW iii NOTE: Text set off in damage to follow directions could result in bodily harm or loss of information. WARNING!

User Manual
Page 5
... contents 1 Product Features ...1 HP LCD Monitors ...1 2 Safety and Maintenance Guidelines ...3 Important Safety Information ...3 Maintenance Guidelines ...3 Cleaning the Monitor ...4 Shipping the Monitor ...4 3 Setting Up the Monitor ...5 Unfolding the Monitor Pedestal Base 5 Rear Components ...6 Connecting the Cables ...7 Adjusting the Monitor ...9 Turning on the Monitor ...11 Connecting USB Devices ...12 Removing the Monitor Pedestal Base 13 Mounting the Monitor ...14 Locating the Rating...
... contents 1 Product Features ...1 HP LCD Monitors ...1 2 Safety and Maintenance Guidelines ...3 Important Safety Information ...3 Maintenance Guidelines ...3 Cleaning the Monitor ...4 Shipping the Monitor ...4 3 Setting Up the Monitor ...5 Unfolding the Monitor Pedestal Base 5 Rear Components ...6 Connecting the Cables ...7 Adjusting the Monitor ...9 Turning on the Monitor ...11 Connecting USB Devices ...12 Removing the Monitor Pedestal Base 13 Mounting the Monitor ...14 Locating the Rating...
User Manual
Page 9
...of cables and cords ● On-Screen Display (OSD) adjustments in several languages for easy setup and screen optimization ● HP Display Assistant for lower resolutions; The monitor models and features include: ● LA2006x model, 50.8 cm (20-inch) diagonal viewable area display with one upstream port ...) and two downstream ports (connects to USB devices) ● USB cable provided to connect the monitor's USB hub to the USB connector on the computer ● Supports an optional HP speaker bar ● Plug and play capability if supported by the system ● Privacy filter slots...
...of cables and cords ● On-Screen Display (OSD) adjustments in several languages for easy setup and screen optimization ● HP Display Assistant for lower resolutions; The monitor models and features include: ● LA2006x model, 50.8 cm (20-inch) diagonal viewable area display with one upstream port ...) and two downstream ports (connects to USB devices) ● USB cable provided to connect the monitor's USB hub to the USB connector on the computer ● Supports an optional HP speaker bar ● Plug and play capability if supported by the system ● Privacy filter slots...

User Manual
Page 10
● HDCP copy protection on DVI and DisplayPort inputs ● Software and documentation CD that includes monitor drivers and product documentation ● Energy saver feature to meet requirements for reduced power consumption ● Energy Star® qualified ● Intelligent Management AssetControl ● Compliant with the following regulated specifications: ◦ European Union CE Directives ◦ Swedish TCO Requirements 2 Chapter 1 Product Features ENWW
● HDCP copy protection on DVI and DisplayPort inputs ● Software and documentation CD that includes monitor drivers and product documentation ● Energy saver feature to meet requirements for reduced power consumption ● Energy Star® qualified ● Intelligent Management AssetControl ● Compliant with the following regulated specifications: ◦ European Union CE Directives ◦ Swedish TCO Requirements 2 Chapter 1 Product Features ENWW
User Manual
Page 11
...the performance and extend the life of the monitor: ● Do not open the monitor cabinet or attempt to service this monitor, as having this monitor. If the monitor is not operating properly or has been dropped or damaged, contact an authorized HP dealer, reseller, or service provider. ●...accidentally step on or trip over them so that is easily accessible at http://www.hp.com/ ergo and/or on the documentation CD, if one may fall over . For your HP LCD monitor. WARNING! ENWW Important Safety Information 3 2 Safety and Maintenance Guidelines Important Safety ...
...the performance and extend the life of the monitor: ● Do not open the monitor cabinet or attempt to service this monitor, as having this monitor. If the monitor is not operating properly or has been dropped or damaged, contact an authorized HP dealer, reseller, or service provider. ●...accidentally step on or trip over them so that is easily accessible at http://www.hp.com/ ergo and/or on the documentation CD, if one may fall over . For your HP LCD monitor. WARNING! ENWW Important Safety Information 3 2 Safety and Maintenance Guidelines Important Safety ...

User Manual
Page 12
...and Maintenance Guidelines ENWW It may damage the monitor. CAUTION: Spray the cleaner onto a cloth and use a 50/50 mix of the unit. 2. Never disconnect the monitor by wiping the screen and the cabinet with a "burned-in image" are not covered under the HP warranty. ● Slots and openings in ...use . Turn off the monitor when not in the cabinet are provided for ventilation. These chemicals may run behind the bezel and damage the electronics. ...
...and Maintenance Guidelines ENWW It may damage the monitor. CAUTION: Spray the cleaner onto a cloth and use a 50/50 mix of the unit. 2. Never disconnect the monitor by wiping the screen and the cabinet with a "burned-in image" are not covered under the HP warranty. ● Slots and openings in ...use . Turn off the monitor when not in the cabinet are provided for ventilation. These chemicals may run behind the bezel and damage the electronics. ...

User Manual
Page 13
... down on the display head to unlock it then pull up the monitor, ensure that the power is locked from its normal condition. ENWW Unfolding the Monitor Pedestal Base 5 Unfolding the Monitor Pedestal Base 1. Refer to the monitor, computer system, and other hand and unfold the display head 90 ...degrees (2). 3 Setting Up the Monitor To set up on the display head to raise it ...
... down on the display head to unlock it then pull up the monitor, ensure that the power is locked from its normal condition. ENWW Unfolding the Monitor Pedestal Base 5 Unfolding the Monitor Pedestal Base 1. Refer to the monitor, computer system, and other hand and unfold the display head 90 ...degrees (2). 3 Setting Up the Monitor To set up on the display head to raise it ...

User Manual
Page 14
Connects the USB hub cable to the monitor's USB hub connector and to the monitor. Connects the VGA cable to a host USB port/hub. Connects the DVI-D cable to the monitor. 6 Chapter 3 Setting Up the Monitor ENWW Connects optional USB devices to the monitor. Rear Components Figure 3-2 Rear Components Component 1 AC Power Connector 2 DisplayPort 3 DVI-D 4 VGA 5 USB Upstream Connector 6 USB Downstream Connectors (2) Function Connects the AC power cord to the monitor. Connects the DisplayPort cable (not included) to the monitor.
Connects the USB hub cable to the monitor's USB hub connector and to the monitor. Connects the VGA cable to a host USB port/hub. Connects the DVI-D cable to the monitor. 6 Chapter 3 Setting Up the Monitor ENWW Connects optional USB devices to the monitor. Rear Components Figure 3-2 Rear Components Component 1 AC Power Connector 2 DisplayPort 3 DVI-D 4 VGA 5 USB Upstream Connector 6 USB Downstream Connectors (2) Function Connects the AC power cord to the monitor. Connects the DisplayPort cable (not included) to the monitor.

User Manual
Page 15
... Connect a VGA signal cable, DVI-D signal cable, or DisplayPort signal cable. Connect the DisplayPort signal cable to the DisplayPort connector on the rear of the monitor and the other end to the VGA connector on the computer. 4. Connect the VGA signal cable to the VGA connector on the rear of the... monitor and the other end to the DisplayPort connector on the computer. ● For DVI digital operation, use the DVI-D signal cable provided. The video ...
... Connect a VGA signal cable, DVI-D signal cable, or DisplayPort signal cable. Connect the DisplayPort signal cable to the DisplayPort connector on the rear of the monitor and the other end to the VGA connector on the computer. 4. Connect the VGA signal cable to the VGA connector on the rear of the... monitor and the other end to the DisplayPort connector on the computer. ● For DVI digital operation, use the DVI-D signal cable provided. The video ...

User Manual
Page 16
... WARNING! Arrange them . Press the clip straight down on the curved neck of the pedestal ensuring that the tabs on the sides of the monitor, and the other end to the equipment: Do not disable the power cord grounding plug. Figure 3-5 Installing the Cable Management Clip 8 Chapter ...3 Setting Up the Monitor ENWW Disconnect power from the equipment by unplugging the power cord from the electrical outlet, grasp the cord by the plug. 6. For your safety...
... WARNING! Arrange them . Press the clip straight down on the curved neck of the pedestal ensuring that the tabs on the sides of the monitor, and the other end to the equipment: Do not disable the power cord grounding plug. Figure 3-5 Installing the Cable Management Clip 8 Chapter ...3 Setting Up the Monitor ENWW Disconnect power from the equipment by unplugging the power cord from the electrical outlet, grasp the cord by the plug. 6. For your safety...

User Manual
Page 17
Tilt the monitor's panel forward or backward to set it to the left or right for the best viewing angle. Swivel the monitor to a comfortable eye level. Figure 3-7 Swiveling the Monitor ENWW Adjusting the Monitor 9 Figure 3-6 Tilting the Monitor 2. Adjusting the Monitor NOTE: Your monitor model may look different than the model in the following illustrations. 1.
Tilt the monitor's panel forward or backward to set it to the left or right for the best viewing angle. Swivel the monitor to a comfortable eye level. Figure 3-7 Swiveling the Monitor ENWW Adjusting the Monitor 9 Figure 3-6 Tilting the Monitor 2. Adjusting the Monitor NOTE: Your monitor model may look different than the model in the following illustrations. 1.

User Manual
Page 18
... for users with the base when pivoting and potentially cause damage to the monitor. The speaker bar will come in contact with the base and potentially cause damage to the monitor or speaker bar. A monitor that is not in full height and full tilt position when pivoting, the... unlock it then pull up on the display head to your application. CAUTION: If the monitor is parallel to raise it after pivoting the monitor. If you adjust your individual workstation. The monitor should not exceed a height that is locked from adjusting to portrait orientation (2). Pivot the...
... for users with the base when pivoting and potentially cause damage to the monitor. The speaker bar will come in contact with the base and potentially cause damage to the monitor or speaker bar. A monitor that is not in full height and full tilt position when pivoting, the... unlock it then pull up on the display head to your application. CAUTION: If the monitor is parallel to raise it after pivoting the monitor. If you adjust your individual workstation. The monitor should not exceed a height that is locked from adjusting to portrait orientation (2). Pivot the...

User Manual
Page 19
... retention is the current active signal, the status of time. If two or more inputs are not covered under the HP warranty. * A prolonged period of time is not one of the monitor, then select Management > Bezel Power LED > Off. NOTE: To view information on the screen in portrait mode, you ...power button on the computer to portrait mode. CAUTION: Burn-in image damage may occur on the front of the active inputs, then the monitor will display the default input source. When the monitor is powered on the monitor screen, you can install the HP Display Assistant software included on the...
... retention is the current active signal, the status of time. If two or more inputs are not covered under the HP warranty. * A prolonged period of time is not one of the monitor, then select Management > Bezel Power LED > Off. NOTE: To view information on the screen in portrait mode, you ...power button on the computer to portrait mode. CAUTION: Burn-in image damage may occur on the front of the active inputs, then the monitor will display the default input source. When the monitor is powered on the monitor screen, you can install the HP Display Assistant software included on the...

User Manual
Page 20
Two USB connectors are used to connect devices such as a digital camera, USB keyboard, or USB mouse. Refer to enable the USB 2.0 ports on the monitor. Figure 3-10 Connecting USB Devices 12 Chapter 3 Setting Up the Monitor ENWW NOTE: You must connect the USB hub cable from the monitor to the computer to Step 4 in Connecting the Cables on the side panel of the monitor. Connecting USB Devices USB connectors are located on page 7.
Two USB connectors are used to connect devices such as a digital camera, USB keyboard, or USB mouse. Refer to enable the USB 2.0 ports on the monitor. Figure 3-10 Connecting USB Devices 12 Chapter 3 Setting Up the Monitor ENWW NOTE: You must connect the USB hub cable from the monitor to the computer to Step 4 in Connecting the Cables on the side panel of the monitor. Connecting USB Devices USB connectors are located on page 7.

User Manual
Page 21
...the Pedestal Base Screws 4. Lay the monitor face down on the monitor stand from the monitor. 2. Figure 3-12 Removing the Pedestal Base ENWW Removing the Monitor Pedestal Base 13 Also disconnect all USB cables connected to disassemble the monitor, be sure the monitor is turned off and the power and...a swing arm, or other mounting fixture. Removing the Monitor Pedestal Base You can remove the monitor panel from the back of the monitor. Pivot the base 45 degrees clockwise and remove the screw from the back of the monitor, then pivot the base 45 degrees counter-clockwise and ...
...the Pedestal Base Screws 4. Lay the monitor face down on the monitor stand from the monitor. 2. Figure 3-12 Removing the Pedestal Base ENWW Removing the Monitor Pedestal Base 13 Also disconnect all USB cables connected to disassemble the monitor, be sure the monitor is turned off and the power and...a swing arm, or other mounting fixture. Removing the Monitor Pedestal Base You can remove the monitor panel from the back of the monitor. Pivot the base 45 degrees clockwise and remove the screw from the back of the monitor, then pivot the base 45 degrees counter-clockwise and ...

User Manual
Page 22
...best performance, it is safely attached. 3. Reconnect the cables to the monitor, four 4 mm, 0.7 pitch, and 10 mm long screws are required. Mounting the Monitor The monitor panel can be used because they may damage the monitor. Longer screws must not be attached to a wall, swing arm,... is compliant with the monitor. 2. To attach a third-party mounting solution to the monitor panel. 14 Chapter 3 Setting Up the Monitor ENWW NOTE: This apparatus is rated to Removing the Monitor Pedestal Base on the monitor. Refer to support the weight of the monitor display panel. It is...
...best performance, it is safely attached. 3. Reconnect the cables to the monitor, four 4 mm, 0.7 pitch, and 10 mm long screws are required. Mounting the Monitor The monitor panel can be used because they may damage the monitor. Longer screws must not be attached to a wall, swing arm,... is compliant with the monitor. 2. To attach a third-party mounting solution to the monitor panel. 14 Chapter 3 Setting Up the Monitor ENWW NOTE: This apparatus is rated to Removing the Monitor Pedestal Base on the monitor. Refer to support the weight of the monitor display panel. It is...

User Manual
Page 23
The rating labels are located on the monitor provide the spare part number, product number, and serial number. Figure 3-15 Installing a Cable Lock ENWW Locating the Rating Labels 15 Locating the Rating Labels The rating labels on the rear panel of the monitor display head. You may need these numbers when contacting HP about the monitor model. Figure 3-14 Locating the Rating Labels Installing a Cable Lock You can secure the monitor to a fixed object with an optional cable lock available from HP.
The rating labels are located on the monitor provide the spare part number, product number, and serial number. Figure 3-15 Installing a Cable Lock ENWW Locating the Rating Labels 15 Locating the Rating Labels The rating labels on the rear panel of the monitor display head. You may need these numbers when contacting HP about the monitor model. Figure 3-14 Locating the Rating Labels Installing a Cable Lock You can secure the monitor to a fixed object with an optional cable lock available from HP.


