
User Guide
Page 10
... care when cleaning. To clean the monitor, follow these steps: 1. Use a damp cloth to clean an LCD screen. 3. Turn on a soft area to prevent it from excessive light, heat, or moisture. ■ Slots and openings in the cabinet are described in the operating instructions. ■ Turn your monitor cabinet or attempt to service this...
... care when cleaning. To clean the monitor, follow these steps: 1. Use a damp cloth to clean an LCD screen. 3. Turn on a soft area to prevent it from excessive light, heat, or moisture. ■ Slots and openings in the cabinet are described in the operating instructions. ■ Turn your monitor cabinet or attempt to service this...

User Guide
Page 11
... other attached devices. 3. You need a flat, soft, protected area for placing the monitor screen-down while preparing it . Installing the Monitor You can install the monitor on a Desktop Follow the instructions for wall-mounting. Connect the monitor cables after you have installed the monitor. Prepare a flat area to secure some cables. You may need a straight-slot...
... other attached devices. 3. You need a flat, soft, protected area for placing the monitor screen-down while preparing it . Installing the Monitor You can install the monitor on a Desktop Follow the instructions for wall-mounting. Connect the monitor cables after you have installed the monitor. Prepare a flat area to secure some cables. You may need a straight-slot...
User Guide
Page 14
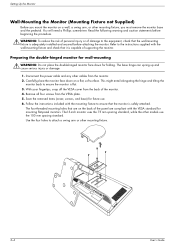
...compliant with the mounting fixture to the instructions supplied with the wall-mounting fixture and check that the wall-mounting fixture is flat. 3. Save the removed items (cover, screws, and base) for mounting flat-panel monitors. The15-inch monitor uses the 75 mm spacing standard, ...while the other mounting fixture. 3-4 User's Guide Follow the instructions included with the VESA standard for future use the 100 mm spacing standard. Carefully...
...compliant with the mounting fixture to the instructions supplied with the wall-mounting fixture and check that the wall-mounting fixture is flat. 3. Save the removed items (cover, screws, and base) for mounting flat-panel monitors. The15-inch monitor uses the 75 mm spacing standard, ...while the other mounting fixture. 3-4 User's Guide Follow the instructions included with the VESA standard for future use the 100 mm spacing standard. Carefully...
User Guide
Page 15
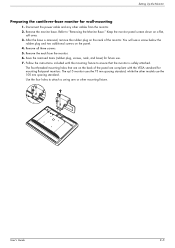
...and any other models use . 7. Keep the monitor panel screen down on the panel. 4. After the base is safely attached. Remove all three screws. 5. Follow the instructions included with the VESA standard for mounting flat-panel monitors. You will see a screw below the rubber ...plug and two additional screws on a flat, soft area. 3. Remove the neck from the monitor. 2. Remove the monitor base. User's Guide 3-5 Save the...
...and any other models use . 7. Keep the monitor panel screen down on the panel. 4. After the base is safely attached. Remove all three screws. 5. Follow the instructions included with the VESA standard for mounting flat-panel monitors. You will see a screw below the rubber ...plug and two additional screws on a flat, soft area. 3. Remove the neck from the monitor. 2. Remove the monitor base. User's Guide 3-5 Save the...
User Guide
Page 16
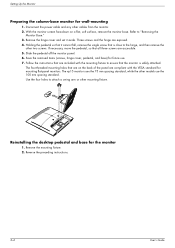
... are exposed. 4. Follow the instructions that are compliant with the mounting fixture to ensure that it aside. Reinstalling the desktop pedestal and base for wall-mounting 1. Reverse the preceding instructions. 3-6 User's Guide Holding the pedestal so that the monitor is close to the hinge, and... then remove the other models use . 7. With the monitor screen face-down on the back of the panel are included...
... are exposed. 4. Follow the instructions that are compliant with the mounting fixture to ensure that it aside. Reinstalling the desktop pedestal and base for wall-mounting 1. Reverse the preceding instructions. 3-6 User's Guide Holding the pedestal so that the monitor is close to the hinge, and... then remove the other models use . 7. With the monitor screen face-down on the back of the panel are included...
User Guide
Page 27
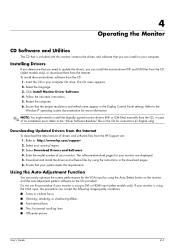
...to update the drivers, you can easily optimize the screen performance for instructions (in the Display Control Panel settings. Select Download Drivers and Software. 4. To install the monitor-driver software from the HP Support site: 1. Select your computer CD drive. Installing Drivers If you...the language. 3. Follow the onscreen instructions. 5. If your monitor is using the VGA input, this procedure if your monitor is included with this monitor contains the drivers and software that your system meets the requirements. Refer to : http://www.hp.com/support 2. Download and install ...
...to update the drivers, you can easily optimize the screen performance for instructions (in the Display Control Panel settings. Select Download Drivers and Software. 4. To install the monitor-driver software from the HP Support site: 1. Select your computer CD drive. Installing Drivers If you...the language. 3. Follow the onscreen instructions. 5. If your monitor is using the VGA input, this procedure if your monitor is included with this monitor contains the drivers and software that your system meets the requirements. Refer to : http://www.hp.com/support 2. Download and install ...
User Guide
Page 28
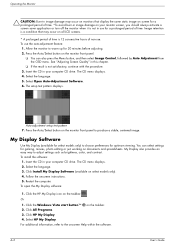
.... 2. Follow the onscreen instructions. 5. Restart the computer. Select the language. 3. Click HP My Display. 4. You can also press the Menu button, and then select Image Control, followed by Auto Adjustment from the OSD menu. Operating the Monitor Ä CAUTION: Burn-in image damage may occur on monitors that may occur on all LCD screens. * A prolonged...
.... 2. Follow the onscreen instructions. 5. Restart the computer. Select the language. 3. Click HP My Display. 4. You can also press the Menu button, and then select Image Control, followed by Auto Adjustment from the OSD menu. Operating the Monitor Ä CAUTION: Burn-in image damage may occur on monitors that may occur on all LCD screens. * A prolonged...

User Guide
Page 34
... supports a power-saver mode that have an HDCP-enabled monitor, you do not have energy-saver features. When the monitor is "awakened," a brief warm-up for 20 minutes before the monitor returns to your monitor supports HDCP, it can be activated on your computer for instructions on setting energy-saver features (sometimes called power-management...
... supports a power-saver mode that have an HDCP-enabled monitor, you do not have energy-saver features. When the monitor is "awakened," a brief warm-up for 20 minutes before the monitor returns to your monitor supports HDCP, it can be activated on your computer for instructions on setting energy-saver features (sometimes called power-management...

User Guide
Page 53
.... ■ Consult the dealer or an experienced radio or television technician for Products Marked with FCC Logo, United States Only This device complies with the instructions, may cause harmful interference to Part 15 of the FCC Rules. Declaration of the FCC Rules. Box 692000, Mail Stop 510101 Houston, Texas 77269-2000...
.... ■ Consult the dealer or an experienced radio or television technician for Products Marked with FCC Logo, United States Only This device complies with the instructions, may cause harmful interference to Part 15 of the FCC Rules. Declaration of the FCC Rules. Box 692000, Mail Stop 510101 Houston, Texas 77269-2000...
