User Guide
Page 5
...-mounting 3-5 Preparing the column-base monitor for wall-mounting 3-6 Reinstalling the desktop pedestal and base for the monitor 3-6 Connecting the VGA (Analog) or DVI-D (Digital) Cable 3-7 To connect the VGA cable 3-7 To connect the DVI-D cable 3-7 Connecting the HDMI Cable 3-7 Audio and Video Cables and Adapters 3-8 Connecting the Audio Cable 3-9 Connecting the USB Hub Cable 3-9 Connecting USB Devices to the Monitor 3-9 Connecting the Power Cable 3-10 Cable Management 3-11 Adjusting the Tilt 3-12 Adjusting the Swivel (Select Models Only 3-13 Adjusting the Height (Select Models...
...-mounting 3-5 Preparing the column-base monitor for wall-mounting 3-6 Reinstalling the desktop pedestal and base for the monitor 3-6 Connecting the VGA (Analog) or DVI-D (Digital) Cable 3-7 To connect the VGA cable 3-7 To connect the DVI-D cable 3-7 Connecting the HDMI Cable 3-7 Audio and Video Cables and Adapters 3-8 Connecting the Audio Cable 3-9 Connecting the USB Hub Cable 3-9 Connecting USB Devices to the Monitor 3-9 Connecting the Power Cable 3-10 Cable Management 3-11 Adjusting the Tilt 3-12 Adjusting the Swivel (Select Models Only 3-13 Adjusting the Height (Select Models...

User Guide
Page 6
... the Auto-Adjustment Function 4-1 My Display Software 4-2 Front-Panel Controls 4-3 Using the Onscreen Display (OSD 4-3 OSD Menu Selections 4-4 Selecting Video Input Connectors 4-7 Identifying Monitor Conditions 4-7 Adjusting Screen Quality 4-7 Optimizing Analog Video 4-8 Power-Saver Feature 4-8 High-Bandwidth Digital Content Protection (HDCP 4-8 5 Preparing the Monitor for Shipping Removing the Monitor Base 5-1 Removing the cantilever base 5-1 Removing the column base 5-2 Folding the Double-Hinged Monitor 5-3 A Troubleshooting Solving Common Problems A-1 Getting Support from hp...
... the Auto-Adjustment Function 4-1 My Display Software 4-2 Front-Panel Controls 4-3 Using the Onscreen Display (OSD 4-3 OSD Menu Selections 4-4 Selecting Video Input Connectors 4-7 Identifying Monitor Conditions 4-7 Adjusting Screen Quality 4-7 Optimizing Analog Video 4-8 Power-Saver Feature 4-8 High-Bandwidth Digital Content Protection (HDCP 4-8 5 Preparing the Monitor for Shipping Removing the Monitor Base 5-1 Removing the cantilever base 5-1 Removing the column base 5-2 Folding the Double-Hinged Monitor 5-3 A Troubleshooting Solving Common Problems A-1 Getting Support from hp...
User Guide
Page 7
...) ■ Pivot adjustment, for landscape or portrait viewing (select models only) ■ Removable pedestal and Video Electronics Standards Association (VESA) standard mounting holes for flexible mounting solutions, including wall-mounting ■ Security lock slot for a Kensington lock security cable (security cable sold separately) ■ Plug and Play capability, if supported by your computer system User's Guide 1-1 1 Product Features HP LCD Monitors The HP LCD (liquid crystal display) monitors have an active matrix, thin-film transistor (TFT) screen.
...) ■ Pivot adjustment, for landscape or portrait viewing (select models only) ■ Removable pedestal and Video Electronics Standards Association (VESA) standard mounting holes for flexible mounting solutions, including wall-mounting ■ Security lock slot for a Kensington lock security cable (security cable sold separately) ■ Plug and Play capability, if supported by your computer system User's Guide 1-1 1 Product Features HP LCD Monitors The HP LCD (liquid crystal display) monitors have an active matrix, thin-film transistor (TFT) screen.
User Guide
Page 8
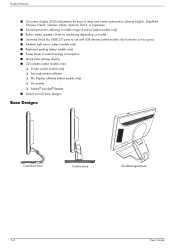
... parking (select models only) ■ Power Saver to reduce energy consumption ■ Quick View settings display ■ CD includes (select models only): ❏ Drivers (select models only) ❏ Auto-adjustment software ❏ My Display software (select models only) ❏ Documents ❏ Adobe® Acrobat® Reader ■ Varied monitor base designs Base Designs Cantilever base Column base Double-hinged base 1-2 User's Guide Product Features ■ On-screen display (OSD) adjustments for ease of setup and screen optimization (choose English, Simplified Chinese...
... parking (select models only) ■ Power Saver to reduce energy consumption ■ Quick View settings display ■ CD includes (select models only): ❏ Drivers (select models only) ❏ Auto-adjustment software ❏ My Display software (select models only) ❏ Documents ❏ Adobe® Acrobat® Reader ■ Varied monitor base designs Base Designs Cantilever base Column base Double-hinged base 1-2 User's Guide Product Features ■ On-screen display (OSD) adjustments for ease of setup and screen optimization (choose English, Simplified Chinese...

User Guide
Page 10
.... 2-2 User's Guide Dust the monitor housing. To clean the monitor, follow these steps: 1. Do not use an antistatic screen cleaner. 4. If the cabinet requires additional cleaning, use benzene, thinner, ammonia, or any volatile substance to service this product yourself. Never push objects of the monitor by using a screen saver program and turning off the monitor when not in use. ■ Keep your monitor in the operating instructions. ■ Turn your monitor...
.... 2-2 User's Guide Dust the monitor housing. To clean the monitor, follow these steps: 1. Do not use an antistatic screen cleaner. 4. If the cabinet requires additional cleaning, use benzene, thinner, ammonia, or any volatile substance to service this product yourself. Never push objects of the monitor by using a screen saver program and turning off the monitor when not in use. ■ Keep your monitor in the operating instructions. ■ Turn your monitor...
User Guide
Page 14
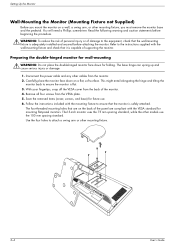
... or of supporting the monitor. The base hinge can spring up and cause serious injury or damage. 1. Save the removed items (cover, screws, and base) for mounting flat-panel monitors. Use the four holes to the equipment, check that the monitor is flat. 3. You will need a Phillips screwdriver. Follow the instructions included with the mounting fixture to ensure the monitor is safely attached. Refer to the instructions supplied with the VESA standard for...
... or of supporting the monitor. The base hinge can spring up and cause serious injury or damage. 1. Save the removed items (cover, screws, and base) for mounting flat-panel monitors. Use the four holes to the equipment, check that the monitor is flat. 3. You will need a Phillips screwdriver. Follow the instructions included with the mounting fixture to ensure the monitor is safely attached. Refer to the instructions supplied with the VESA standard for...

User Guide
Page 17
... the monitor has a VGA connector but no DVI connector, use the DVI-to-VGA converter to connect to the computer: Connect the DVI-to-VGA converter to the DVI connector on the computer graphic card, and then connect the VGA cable to -VGA converter included in the box (select models only). Setting Up the Monitor Connecting the VGA (Analog) or DVI-D (Digital) Cable Use a VGA video cable or a DVI-D video cable (provided with select models only. ✎ NOTE: If you use a DVI-to-HDMI adapter, you must connect the green audio cable to the DVI video connector...
... the monitor has a VGA connector but no DVI connector, use the DVI-to-VGA converter to connect to the computer: Connect the DVI-to-VGA converter to the DVI connector on the computer graphic card, and then connect the VGA cable to -VGA converter included in the box (select models only). Setting Up the Monitor Connecting the VGA (Analog) or DVI-D (Digital) Cable Use a VGA video cable or a DVI-D video cable (provided with select models only. ✎ NOTE: If you use a DVI-to-HDMI adapter, you must connect the green audio cable to the DVI video connector...

User Guide
Page 19
...). USB In Connecting USB Devices to the Monitor You can connect two or four USB devices (select models only), such as a USB flash drive or a digital camcorder, to the computer by using the audio cable, as shown in the following illustration. User's Guide 3-9 This enables USB 2.0 ports on the monitor (select models only have connected the USB hub cable from the computer to the monitor. Setting Up the Monitor Connecting the Audio Cable Connect the built-in monitor speakers to your monitor.
...). USB In Connecting USB Devices to the Monitor You can connect two or four USB devices (select models only), such as a USB flash drive or a digital camcorder, to the computer by using the audio cable, as shown in the following illustration. User's Guide 3-9 This enables USB 2.0 ports on the monitor (select models only have connected the USB hub cable from the computer to the monitor. Setting Up the Monitor Connecting the Audio Cable Connect the built-in monitor speakers to your monitor.
User Guide
Page 27
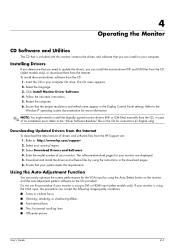
... an installation error. Select your monitor. Download and install the driver and software files by using the instructions in the Display Control Panel settings. Using the Auto-Adjustment Function You can correct the following image-quality conditions: ■ Fuzzy or unclear focus ■ Ghosting, streaking, or shadowing effects ■ Faint vertical bars ■ Thin, horizontal scrolling lines ■ Off-center picture User's Guide 4-1 Downloading Updated Drivers from the Internet. Refer to update the drivers, you can install on...
... an installation error. Select your monitor. Download and install the driver and software files by using the instructions in the Display Control Panel settings. Using the Auto-Adjustment Function You can correct the following image-quality conditions: ■ Fuzzy or unclear focus ■ Ghosting, streaking, or shadowing effects ■ Faint vertical bars ■ Thin, horizontal scrolling lines ■ Off-center picture User's Guide 4-1 Downloading Updated Drivers from the Internet. Refer to update the drivers, you can install on...
User Guide
Page 28
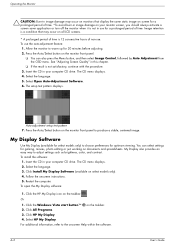
... HP My Display. 4. Select HP My Display. To install the software: 1. Click the Windows Vista start button™ on the monitor front panel to produce a stable, centered image. The CD menu displays. 4. Operating the Monitor Ä CAUTION: Burn-in image damage may occur on all LCD screens. * A prolonged period of time is 12 consecutive hours of non-use. My Display also provides an easy way to the onscreen Help within the software. 4-2 User's Guide...
... HP My Display. 4. Select HP My Display. To install the software: 1. Click the Windows Vista start button™ on the monitor front panel to produce a stable, centered image. The CD menu displays. 4. Operating the Monitor Ä CAUTION: Burn-in image damage may occur on all LCD screens. * A prolonged period of time is 12 consecutive hours of non-use. My Display also provides an easy way to the onscreen Help within the software. 4-2 User's Guide...
User Guide
Page 29
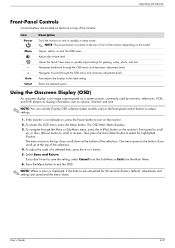
Auto-adjusts the display to select the highlighted function. To access the OSD menu, press the Menu button. Then press the Auto/Select button to the ideal setting. button. 5. Select Save and Return. User's Guide 4-3 Navigates forward through the OSD menu and decreases adjustment levels. Using the Onscreen Display (OSD) An onscreen display is not already on, press the Power button to turn on the monitor. 2. Enters the selected option. Opens the Quick View menu to save the setting, select Cancel from...
Auto-adjusts the display to select the highlighted function. To access the OSD menu, press the Menu button. Then press the Auto/Select button to the ideal setting. button. 5. Select Save and Return. User's Guide 4-3 Navigates forward through the OSD menu and decreases adjustment levels. Using the Onscreen Display (OSD) An onscreen display is not already on, press the Power button to turn on the monitor. 2. Enters the selected option. Opens the Quick View menu to save the setting, select Cancel from...

User Guide
Page 30
... scaling menu is selected, scaling is disabled and the Sharpness feature is set to the previous menu level. ■ Save and Return - On a scale of height and width. to two active and valid video sources. Icon Main Menu Options Submenu Options Switch Video Input (select models only) Brightness Description Switches the video input signal source when the monitor is on the ambient light of the display. The sensor is connected to change the horizontal screen image (VGA Input only...
... scaling menu is selected, scaling is disabled and the Sharpness feature is set to the previous menu level. ■ Save and Return - On a scale of height and width. to two active and valid video sources. Icon Main Menu Options Submenu Options Switch Video Input (select models only) Brightness Description Switches the video input signal source when the monitor is on the ambient light of the display. The sensor is connected to change the horizontal screen image (VGA Input only...
User Guide
Page 31
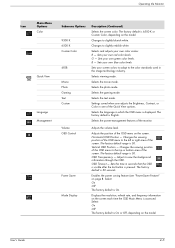
... blueish white. Sets your own color scales: R - Sets your own green color levels. Adjusts the position of the screen. Displays the resolution, refresh rate, and frequency information on the model. Sets the time in which the OSD menu is pressed. Select: On Off The factory default is accessed. Operating the Monitor Icon Main Menu Options Color Quick View Language Management Submenu Options 9300 K 6500 K Custom Color sRGB Movie Photo Gaming Text Custom Volume OSD Control Power Saver Mode Display Description (Continued) Selects the screen color. Changes...
... blueish white. Sets your own color scales: R - Sets your own green color levels. Adjusts the position of the screen. Displays the resolution, refresh rate, and frequency information on the model. Sets the time in which the OSD menu is pressed. Select: On Off The factory default is accessed. Operating the Monitor Icon Main Menu Options Color Quick View Language Management Submenu Options 9300 K 6500 K Custom Color sRGB Movie Photo Gaming Text Custom Volume OSD Control Power Saver Mode Display Description (Continued) Selects the screen color. Changes...
User Guide
Page 32
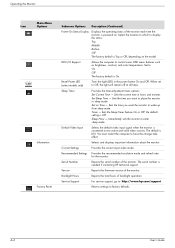
... timer-adjustment menu options: Set Current Time - Sets the Sleep Timer feature On or Off; Recommended Settings Provides the recommended resolution mode and refresh rate for the monitor. Service Support For service support, go to: http://www.hp.com/support Returns settings to control some OSD menu features such as brightness, contrast, and color temperature. DDC/CI Support Allows the computer to factory defaults. 4-6 User's Guide Sets the time you want to wake up from sleep mode. Current Settings Provides the current input video mode. Backlight Hours...
... timer-adjustment menu options: Set Current Time - Sets the Sleep Timer feature On or Off; Recommended Settings Provides the recommended resolution mode and refresh rate for the monitor. Service Support For service support, go to: http://www.hp.com/support Returns settings to control some OSD menu features such as brightness, contrast, and color temperature. DDC/CI Support Allows the computer to factory defaults. 4-6 User's Guide Sets the time you want to wake up from sleep mode. Current Settings Provides the current input video mode. Backlight Hours...

User Guide
Page 33
... to an HDMI input source may take effect. ■ Monitor Going to the computer or monitor. ■ OSD Lock-out - Indicates the monitor does not support the video card's input signal because its resolution or refresh rate are installed, the default input selection is active. The OSD can connect the VGA cable, the DVI-D cable, or both cables are set higher than the monitor supports. If the OSD is off in this chapter. Check to fine-tune the image. See "Using the Auto-Adjustment Function...
... to an HDMI input source may take effect. ■ Monitor Going to the computer or monitor. ■ OSD Lock-out - Indicates the monitor does not support the video card's input signal because its resolution or refresh rate are installed, the default input selection is active. The OSD can connect the VGA cable, the DVI-D cable, or both cables are set higher than the monitor supports. If the OSD is off in this chapter. Check to fine-tune the image. See "Using the Auto-Adjustment Function...

User Guide
Page 34
... and Blu-Ray devices or HDTV air or cable broadcasts. Two controls in analog mode. Allow the monitor to warm up period occurs before adjusting. 2. To restore the factory settings, access the OSD menu, select Factory Reset, and then select Yes. The energy-saving reduced power state activates if the monitor does not detect either the horizontal sync signal or the vertical sync signal. High-definition content is controlled by the computer.
... and Blu-Ray devices or HDTV air or cable broadcasts. Two controls in analog mode. Allow the monitor to warm up period occurs before adjusting. 2. To restore the factory settings, access the OSD menu, select Factory Reset, and then select Yes. The energy-saving reduced power state activates if the monitor does not detect either the horizontal sync signal or the vertical sync signal. High-definition content is controlled by the computer.
User Guide
Page 39
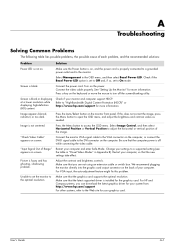
..., shadowing problem. Screen is properly connected to a grounded power outlet and to a supported setting (see the table in "Preset Video Modes" in the OSD menu, and then select Bezel Power LED. Check if your settings to the monitor. Press the Menu button to open the OSD menu, and adjust the brightness and contrast scales as needed. Change your monitor and computer support HDCP. For HP and Compaq systems, you are not using an extension cable or switch box. See "Setting Up the Monitor...
..., shadowing problem. Screen is properly connected to a grounded power outlet and to a supported setting (see the table in "Preset Video Modes" in the OSD menu, and then select Bezel Power LED. Check if your settings to the monitor. Press the Menu button to open the OSD menu, and adjust the brightness and contrast scales as needed. Change your monitor and computer support HDCP. For HP and Compaq systems, you are not using an extension cable or switch box. See "Setting Up the Monitor...
User Guide
Page 40
... "Installing Drivers" for your computer manufacturer. Picture bounces, flickers, or wave pattern is present in "Sleep Mode (Amber LED)." Check the monitor's video cable, and make sure that are not working. Use the maximum refresh rate that your monitor is operational: Press the Caps Lock key and observe the Caps Lock LED found on the back of at the resolution that your monitor model. The computer power switch should be snugly seated in the On position. Check...
... "Installing Drivers" for your computer manufacturer. Picture bounces, flickers, or wave pattern is present in "Sleep Mode (Amber LED)." Check the monitor's video cable, and make sure that are not working. Use the maximum refresh rate that your monitor is operational: Press the Caps Lock key and observe the Caps Lock LED found on the back of at the resolution that your monitor model. The computer power switch should be snugly seated in the On position. Check...
User Guide
Page 41
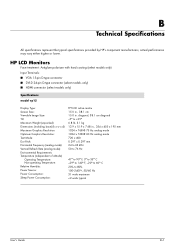
.../60 Hz 31 watts maximum HP LCD Monitors Face treatment: Antiglare polarizer with hard coating (select models only) Input Terminals: ■ VGA 15-pin D-type connector ■ DVI-D 24-pin D-type connector (select models only) ■ HDMI connector (select models only) Specifications model vp15 Display Type: Screen Size: Viewable Image Size: Tilt: Maximum Weight (unpacked): Dimensions (including base) (h x w x d): Maximum Graphics Resolution: Optimum Graphics Resolution: Text Mode: Dot Pitch: Horizontal Frequency (analog mode): Vertical Refresh Rate (analog mode): Environmental Requirements...
.../60 Hz 31 watts maximum HP LCD Monitors Face treatment: Antiglare polarizer with hard coating (select models only) Input Terminals: ■ VGA 15-pin D-type connector ■ DVI-D 24-pin D-type connector (select models only) ■ HDMI connector (select models only) Specifications model vp15 Display Type: Screen Size: Viewable Image Size: Tilt: Maximum Weight (unpacked): Dimensions (including base) (h x w x d): Maximum Graphics Resolution: Optimum Graphics Resolution: Text Mode: Dot Pitch: Horizontal Frequency (analog mode): Vertical Refresh Rate (analog mode): Environmental Requirements...
User Guide
Page 52
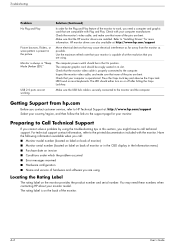
... it. Nevertheless, the display may have questions about your HP-authorized service provider. The power cord set (flexible cord or wall plug) received with the monitor meets the requirements for use in normal operating mode at : http://www.hp.com/support Power Cord Set Requirements The monitor power supply is approved for use , contact your HP LCD Monitor, refer to the HP Web site at a supported resolution and refresh rate, from the product. A power cord should purchase a power cord that is provided with...
... it. Nevertheless, the display may have questions about your HP-authorized service provider. The power cord set (flexible cord or wall plug) received with the monitor meets the requirements for use in normal operating mode at : http://www.hp.com/support Power Cord Set Requirements The monitor power supply is approved for use , contact your HP LCD Monitor, refer to the HP Web site at a supported resolution and refresh rate, from the product. A power cord should purchase a power cord that is provided with...


