User Manual
Page 7
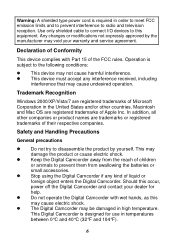
... the Digital Camcorder. Use only shielded cable to connect I/O devices to this may cause electric shock. In addition, all other countries. Stop using the Digital Camcorder if any interference received, including interference that may cause undesired operation. This Digital Camcorder is designed for help. Should this occur, power off the Digital Camcorder and contact your warranty and service agreement. Declaration of the FCC rules. Do not operate the Digital Camcorder with Part...
... the Digital Camcorder. Use only shielded cable to connect I/O devices to this may cause electric shock. In addition, all other countries. Stop using the Digital Camcorder if any interference received, including interference that may cause undesired operation. This Digital Camcorder is designed for help. Should this occur, power off the Digital Camcorder and contact your warranty and service agreement. Declaration of the FCC rules. Do not operate the Digital Camcorder with Part...
User Manual
Page 8
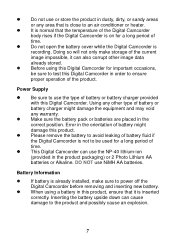
... image data already stored. When using this Digital Camcorder for important occasions, be used for a long period of time. Doing so will not only make sure to power off the Digital Camcorder before removing and inserting new battery. Please remove the battery to avoid leaking of battery fluid if the Digital Camcorder is inserted correctly. DO NOT use the NP-40 lithium-ion (provided in the product packaging) or 2 Photo...
... image data already stored. When using this Digital Camcorder for important occasions, be used for a long period of time. Doing so will not only make sure to power off the Digital Camcorder before removing and inserting new battery. Please remove the battery to avoid leaking of battery fluid if the Digital Camcorder is inserted correctly. DO NOT use the NP-40 lithium-ion (provided in the product packaging) or 2 Photo...

User Manual
Page 10
... spectral power distribution equal to focus properly on removable media along with the image files that indicate how many copies of which the images are stored using the baseline JPEG standard, described in ISO/IEC 10918-1. 9 A compressed file format for that color temperature. Photography Terms and Definitions Terms Auto Focus (AF) White Balance Auto White Balance (AWB) Digital Print Order Format (DPOF) Exif/JPEG JPEG Definitions Auto focus refers to a camcorder lens' ability to adjust its...
... spectral power distribution equal to focus properly on removable media along with the image files that indicate how many copies of which the images are stored using the baseline JPEG standard, described in ISO/IEC 10918-1. 9 A compressed file format for that color temperature. Photography Terms and Definitions Terms Auto Focus (AF) White Balance Auto White Balance (AWB) Digital Print Order Format (DPOF) Exif/JPEG JPEG Definitions Auto focus refers to a camcorder lens' ability to adjust its...
User Manual
Page 14
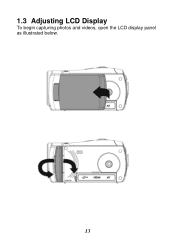
1.3 Adjusting LCD Display 1313BB 1313BB To begin capturing photos and videos, open the LCD display panel as illustrated below. 13
1.3 Adjusting LCD Display 1313BB 1313BB To begin capturing photos and videos, open the LCD display panel as illustrated below. 13

User Manual
Page 21
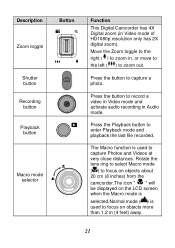
2.5 Buttons & Functions 18B Description Power button Menu button MODE button Button Function Press the power button to cycle through the different modes. Press the Mode switch to turn the Digital Camcorder ON/OFF. Opening and closing the LCD panel will also power ON/OFF as well. There are three operating modes for various setting of functions 4-Way Direction button Press the 4-Way Direction Button UP to change the flash options: off, auto, fill-in in Photo mode Press DOWN to delete a photo or video in the focusing distance to...
2.5 Buttons & Functions 18B Description Power button Menu button MODE button Button Function Press the power button to cycle through the different modes. Press the Mode switch to turn the Digital Camcorder ON/OFF. Opening and closing the LCD panel will also power ON/OFF as well. There are three operating modes for various setting of functions 4-Way Direction button Press the 4-Way Direction Button UP to change the flash options: off, auto, fill-in in Photo mode Press DOWN to delete a photo or video in the focusing distance to...
User Manual
Page 22
... be displayed on the LCD screen when the Macro mode is selected.Normal mode ( ) is used to capture Photos and Videos at very close distances. Press the button to record a video in Video mode and activate audio recording in Audio mode. Press the button to capture a photo. Description Zoom toggle Shutter button Recording button Playback button Macro mode selector Button Function This Digital Camcorder has 4X Digital zoom (in , or move to the left ( ) to enter Playback mode and playback the last file recorded. The Macro function is used to focus on objects...
... be displayed on the LCD screen when the Macro mode is selected.Normal mode ( ) is used to capture Photos and Videos at very close distances. Press the button to record a video in Video mode and activate audio recording in Audio mode. Press the button to capture a photo. Description Zoom toggle Shutter button Recording button Playback button Macro mode selector Button Function This Digital Camcorder has 4X Digital zoom (in , or move to the left ( ) to enter Playback mode and playback the last file recorded. The Macro function is used to focus on objects...

User Manual
Page 23
The initial power up of the camcorder LED indicator and Self-timer indicator. 2.6 About LED Indicators 19B The table below describes the different modes of this camcorder should display the Date and Time setup menu as shown below. 22 Indicator LED Indicator Power Indicator Color Green Red blinking Self-timer Indicator Recording Red blinking Self-timer Red blinking Definition The power is on The flash is charging Recording Start of Self-timer 2.7 Initial Settings Before Use 20B 2.7.1 Setting Date and Time 43B 1.
The initial power up of the camcorder LED indicator and Self-timer indicator. 2.6 About LED Indicators 19B The table below describes the different modes of this camcorder should display the Date and Time setup menu as shown below. 22 Indicator LED Indicator Power Indicator Color Green Red blinking Self-timer Indicator Recording Red blinking Self-timer Red blinking Definition The power is on The flash is charging Recording Start of Self-timer 2.7 Initial Settings Before Use 20B 2.7.1 Setting Date and Time 43B 1.
User Manual
Page 26
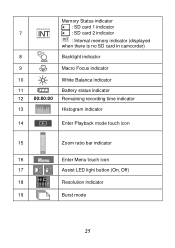
Memory Status indicator : SD card 1 indicator 7 INT : SD card 2 indicator INT : Internal memory indicator (displayed when there is no SD card in camcorder) 8 Backlight indicator 9 Macro Focus indicator 10 White Balance indicator 11 Battery status indicator 12 00:00:00 Remaining recording time indicator 13 Histogram indicator 14 Enter Playback mode touch icon 15 Zoom ratio bar indicator 16 Enter Menu touch icon 17 Assist LED light button (On, Off) 18 Resolution indicator 19 Burst mode 25
Memory Status indicator : SD card 1 indicator 7 INT : SD card 2 indicator INT : Internal memory indicator (displayed when there is no SD card in camcorder) 8 Backlight indicator 9 Macro Focus indicator 10 White Balance indicator 11 Battery status indicator 12 00:00:00 Remaining recording time indicator 13 Histogram indicator 14 Enter Playback mode touch icon 15 Zoom ratio bar indicator 16 Enter Menu touch icon 17 Assist LED light button (On, Off) 18 Resolution indicator 19 Burst mode 25
User Manual
Page 29
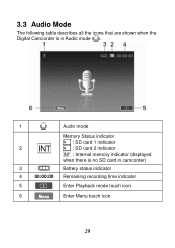
3.3 Audio Mode 2B The following table describes all the icons that are shown when the Digital Camcorder is in Audio mode ( ). 1 Audio mode Memory Status indicator 2 INT : SD card 1 indicator : SD card 2 indicator INT : Internal memory indicator (displayed when there is no SD card in camcorder) 3 Battery status indicator 4 00:00:00 Remaining recording time indicator 5 Enter Playback mode touch icon 6 Enter Menu touch icon 2323BB 2323BB 28
3.3 Audio Mode 2B The following table describes all the icons that are shown when the Digital Camcorder is in Audio mode ( ). 1 Audio mode Memory Status indicator 2 INT : SD card 1 indicator : SD card 2 indicator INT : Internal memory indicator (displayed when there is no SD card in camcorder) 3 Battery status indicator 4 00:00:00 Remaining recording time indicator 5 Enter Playback mode touch icon 6 Enter Menu touch icon 2323BB 2323BB 28
User Manual
Page 30
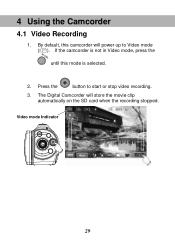
By default, this mode is not in Video mode, press the until this camcorder will store the movie clip automatically on the SD card when the recording stopped. Press the button to Video mode ( ). The Digital Camcorder will power up to start or stop video recording. 3. If the camcorder is selected. 2. 4 Using the Camcorder 3B 4.1 Video Recording 24B 1. Video mode Indicator 29
By default, this mode is not in Video mode, press the until this camcorder will store the movie clip automatically on the SD card when the recording stopped. Press the button to Video mode ( ). The Digital Camcorder will power up to start or stop video recording. 3. If the camcorder is selected. 2. 4 Using the Camcorder 3B 4.1 Video Recording 24B 1. Video mode Indicator 29

User Manual
Page 31
The displayed LCD screen ratio varies depending on the setting of the movie clip resolution. 4. Please refer to the table shown below: Video Recorded Resolution Preview HD1080p (1440 x 1080) HD (1280 x 720) WVGA (848 x 480) 16:9 ratio QVGA (320 x 240) 4:3 ratio Note: If 2 SD cards are inserted into the camcorder and if recording capacity fills the first SD card, use the configuration menu to select the 2nd SD card (if inserted) for additional storage. 30
The displayed LCD screen ratio varies depending on the setting of the movie clip resolution. 4. Please refer to the table shown below: Video Recorded Resolution Preview HD1080p (1440 x 1080) HD (1280 x 720) WVGA (848 x 480) 16:9 ratio QVGA (320 x 240) 4:3 ratio Note: If 2 SD cards are inserted into the camcorder and if recording capacity fills the first SD card, use the configuration menu to select the 2nd SD card (if inserted) for additional storage. 30

User Manual
Page 45
... or QVGA. Press the button and press the 4-Way Direction Button to select the item. 44 Press the button or touch the icon on the screen to highlight Resolution. Return to select a menu item. Turn on the Digital Camcorder and make sure it is in Live View mode. When the menu appears on the LCD display, use the 4-Way Direction button to navigate the menu items. (or to...
... or QVGA. Press the button and press the 4-Way Direction Button to select the item. 44 Press the button or touch the icon on the screen to highlight Resolution. Return to select a menu item. Turn on the Digital Camcorder and make sure it is in Live View mode. When the menu appears on the LCD display, use the 4-Way Direction button to navigate the menu items. (or to...

User Manual
Page 74
..., histogram or no information on LCD screen. 1. You can enter Setup menu by pressing button or the Menu touch icon on screen at Photo or Video or Audio mode then switch to display the submenu. 3. Enter Setup menu, use the 4-Way Direction Button to select Normal, Histogram, or OFF. Press the button or touch the selected option icon on screen to Setup menu options. 6.5.1 Information 71B This function can be used for the Digital Camcorder system settings.
..., histogram or no information on LCD screen. 1. You can enter Setup menu by pressing button or the Menu touch icon on screen at Photo or Video or Audio mode then switch to display the submenu. 3. Enter Setup menu, use the 4-Way Direction Button to select Normal, Histogram, or OFF. Press the button or touch the selected option icon on screen to Setup menu options. 6.5.1 Information 71B This function can be used for the Digital Camcorder system settings.

User Manual
Page 75
Press the button selection Button or touch the Sound icon on screen to set. 74 Use the 4-Way Direction Button to highlight Sound. 2. Press the button or touch the selected option icon on screen to 2.7 for the Setting of Date and time. 6.5.3 Sound 73B 1. Enter Setup menu, use the 4-Way Direction Button to select Off, Low, Medium or High. 6.5.2 Date & Time 72B Please refer to display the submenu. 3.
Press the button selection Button or touch the Sound icon on screen to set. 74 Use the 4-Way Direction Button to highlight Sound. 2. Press the button or touch the selected option icon on screen to 2.7 for the Setting of Date and time. 6.5.3 Sound 73B 1. Enter Setup menu, use the 4-Way Direction Button to select Off, Low, Medium or High. 6.5.2 Date & Time 72B Please refer to display the submenu. 3.

User Manual
Page 81
Enter Setup menu, use the 4-Way Direction Button to select "O" Yes or "X" NO. Press the button or touch the Format icon on screen to set. Warning: All the data stored in memory. 1. Press the button or touch the selected option icon on screen to display the submenu. 3. Use the 4-Way Direction Button to highlight the Format. 2. 6.5.9 Format 79B This function allows you to format the memory card or the built-in the memory card or flash memory will be deleted after formatting. 80
Enter Setup menu, use the 4-Way Direction Button to select "O" Yes or "X" NO. Press the button or touch the Format icon on screen to set. Warning: All the data stored in memory. 1. Press the button or touch the selected option icon on screen to display the submenu. 3. Use the 4-Way Direction Button to highlight the Format. 2. 6.5.9 Format 79B This function allows you to format the memory card or the built-in the memory card or flash memory will be deleted after formatting. 80

User Manual
Page 85
... in flash memory or external SD cards. When the SD cards are inserted, the files will be stored in a built-in the external SD cards rather than the internal flash memory. Press " " button to select the item. or touch the screen to confirm; Enter Setup menu, use the 4-Way Direction Button to display submenu; Press button to SET Mode. 2. 6.5.13 Memory 82B Use this function to select Internal, SD1, or SD2. Press 4-Way Direction Button to select data storage...
... in flash memory or external SD cards. When the SD cards are inserted, the files will be stored in a built-in the external SD cards rather than the internal flash memory. Press " " button to select the item. or touch the screen to confirm; Enter Setup menu, use the 4-Way Direction Button to display submenu; Press button to SET Mode. 2. 6.5.13 Memory 82B Use this function to select Internal, SD1, or SD2. Press 4-Way Direction Button to select data storage...
User Manual
Page 92
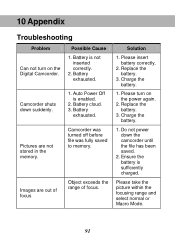
...Macro Mode. 91 Auto Power Off is sufficiently charged. Replace the battery. 3. Charge the battery. 1. Do not power down suddenly. 1. Ensure the battery is enabled. 2. Possible Cause 1. Battery exhausted. Battery cloud. 3. Pictures are out of focus Object exceeds the range of focus. 10 Appendix 9B Troubleshooting Problem Can not turn on the Digital Camcorder. Solution 1. Replace the battery. 3. Camcorder was turned off before file was fully saved to memory. Charge the battery. 1. Images are not stored in the memory. Battery exhausted. Battery is...
...Macro Mode. 91 Auto Power Off is sufficiently charged. Replace the battery. 3. Charge the battery. 1. Do not power down suddenly. 1. Ensure the battery is enabled. 2. Possible Cause 1. Battery exhausted. Battery cloud. 3. Pictures are out of focus Object exceeds the range of focus. 10 Appendix 9B Troubleshooting Problem Can not turn on the Digital Camcorder. Solution 1. Replace the battery. 3. Camcorder was turned off before file was fully saved to memory. Charge the battery. 1. Images are not stored in the memory. Battery exhausted. Battery is...

User Manual
Page 98
... 3.0" TOUCH 960 x 240 SDHC (up to 16G) 32MB Auto, Daylight, Cloudy, Fluorescent, Tungsten Night shot (Video only) CNP-40 (1200 mA-H) or Photo Lithium AA Battery x 2 110 (L) x 58 (H) x 50 (W) mm 260g (without battery) Mini USB Mini C HDMI AV out ArcSoft TotalMedia Extreme Dimensions Approx. Specification Image Sensor Type Total Pixels Effective Pixels Movie Recorded Resolution Image Resolution File Format Lens Specification Digital Zoom Focus Range LCD Monitor Size LCD Monitor Resolution Storage Media Internal Memory White Balance Scene Mode Battery Type Approx.
... 3.0" TOUCH 960 x 240 SDHC (up to 16G) 32MB Auto, Daylight, Cloudy, Fluorescent, Tungsten Night shot (Video only) CNP-40 (1200 mA-H) or Photo Lithium AA Battery x 2 110 (L) x 58 (H) x 50 (W) mm 260g (without battery) Mini USB Mini C HDMI AV out ArcSoft TotalMedia Extreme Dimensions Approx. Specification Image Sensor Type Total Pixels Effective Pixels Movie Recorded Resolution Image Resolution File Format Lens Specification Digital Zoom Focus Range LCD Monitor Size LCD Monitor Resolution Storage Media Internal Memory White Balance Scene Mode Battery Type Approx.
Brochure
Page 1
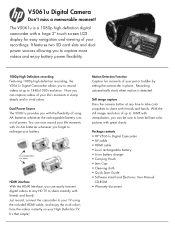
... brilliant color pictures with 2x AA batteries whenever you with friends and family. Motion Detection Function Capture fun moments of your life's moments in sharp details and in place. Package contents • HP V5061u Digital Camcorder • AV cable • HDMI cable • Li-ion rechargeable battery • Li-ion battery charger • Carrying Pouch • Lens Cap • Cleaning cloth • Quick Start Guide • Software install and Electronic User Manual CD-ROM...
... brilliant color pictures with 2x AA batteries whenever you with friends and family. Motion Detection Function Capture fun moments of your life's moments in sharp details and in place. Package contents • HP V5061u Digital Camcorder • AV cable • HDMI cable • Li-ion rechargeable battery • Li-ion battery charger • Carrying Pouch • Lens Cap • Cleaning cloth • Quick Start Guide • Software install and Electronic User Manual CD-ROM...
Brochure
Page 2
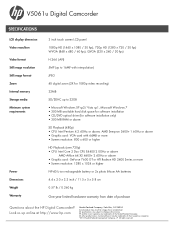
.... V5061u Digital Camcorder SPECIFICATIONS LCD display dimension Video resoultion Video format Still image resolution Still image format Zoom Internal memory Storage media Minimum system requirements Power Dimensions Weight Warranty 3 inch touch screen LCD panel 1080p HD (1440 x 1080 / 30 fps), 720p HD (1280 x 720 / 30 fps) WVGA (848 x 480 / 60 fps), QVGA (320 x 240 / 30 fps) H.264 (.AVI) 5MP (up to 16MP with interpolation) JPEG 4X digital zoom (2X for software installation only...
.... V5061u Digital Camcorder SPECIFICATIONS LCD display dimension Video resoultion Video format Still image resolution Still image format Zoom Internal memory Storage media Minimum system requirements Power Dimensions Weight Warranty 3 inch touch screen LCD panel 1080p HD (1440 x 1080 / 30 fps), 720p HD (1280 x 720 / 30 fps) WVGA (848 x 480 / 60 fps), QVGA (320 x 240 / 30 fps) H.264 (.AVI) 5MP (up to 16MP with interpolation) JPEG 4X digital zoom (2X for software installation only...


