User Guide
Page 3
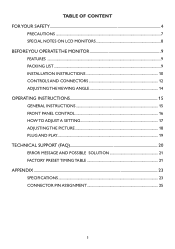
TABLE OF CONTENT FOR YOUR SAFETY 4 PRECAUTIONS 7 SPECIAL NOTES ON LCD MONITORS 8 BEFORE YOU OPERATE THE MONITOR 9 FEATURES 9 PACKING LIST 9 INSTALLATION INSTRUCTIONS 10 CONTROLS AND CONNECTORS 12 ADJUSTING THE VIEWING ANGLE 14 OPERATING INSTRUCTIONS 15 GENERAL INSTRUCTIONS 15 FRONT PANEL CONTROL 16 HOW TO ADJUST A SETTING 17 ADJUSTING THE PICTURE 18 PLUG AND PLAY 19 TECHNICAL SUPPORT (FAQ 20 ERROR MESSAGE AND POSSIBLE SOLUTION 21 FACTORY PRESET TIMING TABLE 21 APPENDIX 23 SPECIFICATIONS 23 CONNECTOR PIN ASSIGNMENT 25 3
TABLE OF CONTENT FOR YOUR SAFETY 4 PRECAUTIONS 7 SPECIAL NOTES ON LCD MONITORS 8 BEFORE YOU OPERATE THE MONITOR 9 FEATURES 9 PACKING LIST 9 INSTALLATION INSTRUCTIONS 10 CONTROLS AND CONNECTORS 12 ADJUSTING THE VIEWING ANGLE 14 OPERATING INSTRUCTIONS 15 GENERAL INSTRUCTIONS 15 FRONT PANEL CONTROL 16 HOW TO ADJUST A SETTING 17 ADJUSTING THE PICTURE 18 PLUG AND PLAY 19 TECHNICAL SUPPORT (FAQ 20 ERROR MESSAGE AND POSSIBLE SOLUTION 21 FACTORY PRESET TIMING TABLE 21 APPENDIX 23 SPECIFICATIONS 23 CONNECTOR PIN ASSIGNMENT 25 3

User Guide
Page 4
... all the criteria in manufacturing country Energy Efficiency Energy efficiency of Waste Equipment by an accredited independent test laboratory. For V203hz/V223hz Congratulations! for future reference. Energy Star compliant, where applicable 4 For more information about where you purchased the product... certification for recycling, please contact your local city office your other household waste. FOR YOUR SAFETY Before operating the monitor, please read this product must not be retained for Sustainable IT. Waste Electrical and Electronic Equipment-WEEE Disposal of product...
... all the criteria in manufacturing country Energy Efficiency Energy efficiency of Waste Equipment by an accredited independent test laboratory. For V203hz/V223hz Congratulations! for future reference. Energy Star compliant, where applicable 4 For more information about where you purchased the product... certification for recycling, please contact your local city office your other household waste. FOR YOUR SAFETY Before operating the monitor, please read this product must not be retained for Sustainable IT. Waste Electrical and Electronic Equipment-WEEE Disposal of product...
User Guide
Page 6
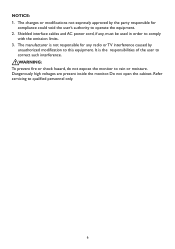
... cord, if any radio or TV interference caused by unauthorized modification to operate the equipment. 2. Dangerously high voltages are present inside the monitor. Do not open the cabinet. It is not responsible for compliance could void the user's authority to this equipment. The manufacturer is ... of the user to comply with the emission limits. 3. NOTICE: 1. WARNING: To prevent fire or shock hazard, do not expose the monitor to qualified personnel only. 6 The changes or modifications not expressly approved by the party responsible for any , must be used in order to...
... cord, if any radio or TV interference caused by unauthorized modification to operate the equipment. 2. Dangerously high voltages are present inside the monitor. Do not open the cabinet. It is not responsible for compliance could void the user's authority to this equipment. The manufacturer is ... of the user to comply with the emission limits. 3. NOTICE: 1. WARNING: To prevent fire or shock hazard, do not expose the monitor to qualified personnel only. 6 The changes or modifications not expressly approved by the party responsible for any , must be used in order to...
User Guide
Page 7
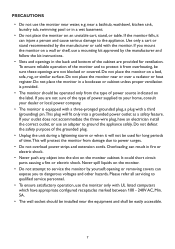
...between 100 - 240V AC, Min. 5A. • The wall socket should be installed near the equipment and shall be easily accessible. 7 If the monitor falls, it will not be used for ventilation. If you to qualified service personnel. • To ensure satisfactory operation, use the...plug. • Unplug the unit during a lightening storm or when it can injure a person and cause serious damage to service the monitor by the manufacturer or sold with the monitor. opening or removing covers can result in fire or electric shock. • Never push any object into a grounded power outlet as ...
...between 100 - 240V AC, Min. 5A. • The wall socket should be installed near the equipment and shall be easily accessible. 7 If the monitor falls, it will not be used for ventilation. If you to qualified service personnel. • To ensure satisfactory operation, use the...plug. • Unplug the unit during a lightening storm or when it can injure a person and cause serious damage to service the monitor by the manufacturer or sold with the monitor. opening or removing covers can result in fire or electric shock. • Never push any object into a grounded power outlet as ...
User Guide
Page 8
... following symptoms are normal with LCD monitors and do not indicate a problem. • You may find slightly uneven brightness on the screen depending on the desktop pattern you use. • The LCD ... dealer or service center to replace parts. It may remain after switching the image when the same image has been displayed for a long time.The monitor will slowly recover from this. • When the screen becomes black or flashing, or cannot illuminate any more . Do not repair the screen by yourself...
... following symptoms are normal with LCD monitors and do not indicate a problem. • You may find slightly uneven brightness on the screen depending on the desktop pattern you use. • The LCD ... dealer or service center to replace parts. It may remain after switching the image when the same image has been displayed for a long time.The monitor will slowly recover from this. • When the screen becomes black or flashing, or cannot illuminate any more . Do not repair the screen by yourself...
User Guide
Page 9
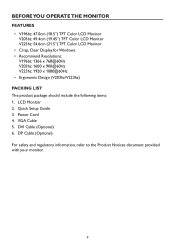
... Product Notices document provided with your monitor. 9 LCD Monitor 2. DVI Cable (Optional) 6. Power Cord 4. VGA Cable 5. Quick Setup Guide 3. BEFORE YOU OPERATE THE MONITOR FEATURES • V196bz: 47.0cm (18.5'') TFT Color LCD Monitor V203hz: 49.4cm (19.45'') TFT Color LCD Monitor V223hz: 54.6cm (21.5'') TFT Color LCD Monitor • Crisp, Clear Display for Windows...
... Product Notices document provided with your monitor. 9 LCD Monitor 2. DVI Cable (Optional) 6. Power Cord 4. VGA Cable 5. Quick Setup Guide 3. BEFORE YOU OPERATE THE MONITOR FEATURES • V196bz: 47.0cm (18.5'') TFT Color LCD Monitor V203hz: 49.4cm (19.45'') TFT Color LCD Monitor V223hz: 54.6cm (21.5'') TFT Color LCD Monitor • Crisp, Clear Display for Windows...

User Guide
Page 11
power cord may be connected to either 100/120V AC or 220/240V AC voltage area (No user adjustment is required.) 3. POWER CORD Power Source: 1. Please ensure you are using the correct power cord in either a wall power outlet or the power outlet socket on your PC, depending on the type of power cord supplied with your LCD monitor's power input socket.The AC- This LCD monitor has an external universal power supply that allows operation in your area. 2. Connect the AC-power cord into your LCD monitor. 11
power cord may be connected to either 100/120V AC or 220/240V AC voltage area (No user adjustment is required.) 3. POWER CORD Power Source: 1. Please ensure you are using the correct power cord in either a wall power outlet or the power outlet socket on your PC, depending on the type of power cord supplied with your LCD monitor's power input socket.The AC- This LCD monitor has an external universal power supply that allows operation in your area. 2. Connect the AC-power cord into your LCD monitor. 11

User Guide
Page 12
Power input 2. VGA Signal input 1 2 12 CONTROLS AND CONNECTORS SIGNAL CABLE • AC Power Connector Connects the AC power cord to the monitor. • DisplayPort Connects the DisplayPort cable to the monitor. • VGA Connects the VGA cable to the monitor. • DVI-D Connects the DVI-D cable to the monitor V196bz 1.
Power input 2. VGA Signal input 1 2 12 CONTROLS AND CONNECTORS SIGNAL CABLE • AC Power Connector Connects the AC power cord to the monitor. • DisplayPort Connects the DisplayPort cable to the monitor. • VGA Connects the VGA cable to the monitor. • DVI-D Connects the DVI-D cable to the monitor V196bz 1.

User Guide
Page 14
It may cause damage or break the LCD screen. • Careful attention is recommended to look at the full face of the monitor, then adjust the monitor's angle to your fingers or hands when you adjust the angle. 14 Hold the stand so you do not topple the monitor when you adjust the angle. You can adjust the tilted angle from 0° to catch your own preference. 2. For optimal viewing, it is required not to 90°. 90o NOTES • Do not touch the LCD screen when you adjust the monitor's angle. 3. ADJUSTING THE VIEWING ANGLE 1.
It may cause damage or break the LCD screen. • Careful attention is recommended to look at the full face of the monitor, then adjust the monitor's angle to your fingers or hands when you adjust the angle. 14 Hold the stand so you do not topple the monitor when you adjust the angle. You can adjust the tilted angle from 0° to catch your own preference. 2. For optimal viewing, it is required not to 90°. 90o NOTES • Do not touch the LCD screen when you adjust the monitor's angle. 3. ADJUSTING THE VIEWING ANGLE 1.

User Guide
Page 15
Connect the video cable from the monitor to your personal preferences. 1. Auto Config. Power button 2. Press the power button to turn the monitor on or off.The control buttons are located on the monitor.The power indicator will light up. 5 1 4 2 3 FRONT CONTROLS 1. button / Exit 15 OPERATING INSTRUCTIONS GENERAL INSTRUCTIONS Press the power button to turn on the front the monitor. By changing these settings, the picture can be connected. 2. The power cord should be adjusted to the video card. 3. MENU / ENTER 3. + / Image Ratio 4. - / ECO 5.
Connect the video cable from the monitor to your personal preferences. 1. Auto Config. Power button 2. Press the power button to turn the monitor on or off.The control buttons are located on the monitor.The power indicator will light up. 5 1 4 2 3 FRONT CONTROLS 1. button / Exit 15 OPERATING INSTRUCTIONS GENERAL INSTRUCTIONS Press the power button to turn on the front the monitor. By changing these settings, the picture can be connected. 2. The power cord should be adjusted to the video card. 3. MENU / ENTER 3. + / Image Ratio 4. - / ECO 5.

User Guide
Page 16
... thinner, benzene, or abrasive cleaners, since these will damage the cabinet.As a safety precaution, always unplug the monitor before cleaning it. • Do not scratch the screen with hard things, it with a mild detergent solution. The Auto Adjustment function is on . LED ...off , press and hold the MENU button while the monitor is off . • Power Indicator: Blue - NOTES • Do not install the monitor in a location near heat sources such as radiators or air ducts, or in a place subject to direct sunlight, or...
... thinner, benzene, or abrasive cleaners, since these will damage the cabinet.As a safety precaution, always unplug the monitor before cleaning it. • Do not scratch the screen with hard things, it with a mild detergent solution. The Auto Adjustment function is on . LED ...off , press and hold the MENU button while the monitor is off . • Power Indicator: Blue - NOTES • Do not install the monitor in a location near heat sources such as radiators or air ducts, or in a place subject to direct sunlight, or...

User Guide
Page 19
...by reducing power consumption when there is no video input signal this monitor, following a time-out period, will automatically switch to an Standby mode.This reduces the monitor's internal power supply consumption. THIS MONITOR WILL APPEAR TO BE NON-FUNCTIONAL IF THERE IS NO VIDEO INPUT ... on the I²C protocol.The host can request EDID information over the DDC2B channel. It allows the monitor to the VESA DDC STANDARD. This monitor meets the Green monitor standards as set by the Video Electronics Standards Association (VESA) and The Swedish Confederation Employees.This feature is...
...by reducing power consumption when there is no video input signal this monitor, following a time-out period, will automatically switch to an Standby mode.This reduces the monitor's internal power supply consumption. THIS MONITOR WILL APPEAR TO BE NON-FUNCTIONAL IF THERE IS NO VIDEO INPUT ... on the I²C protocol.The host can request EDID information over the DDC2B channel. It allows the monitor to the VESA DDC STANDARD. This monitor meets the Green monitor standards as set by the Video Electronics Standards Association (VESA) and The Swedish Confederation Employees.This feature is...
User Guide
Page 20
The LED should either turn ON or OFF after pressing the CAPS LOCK key. • Inspect the monitor's video cable and make sure that may cause electrical interference. • Computer Power Switch should be in the ON position. • Computer Video Card should ...be snugly seated in its slot. • Make sure monitor's video cable is properly connected to the computer. • Inspect monitor's video cable and make sure none of pixels scanned by pressing the CAPS LOCK key on the keyboard while observing...
The LED should either turn ON or OFF after pressing the CAPS LOCK key. • Inspect the monitor's video cable and make sure that may cause electrical interference. • Computer Power Switch should be in the ON position. • Computer Video Card should ...be snugly seated in its slot. • Make sure monitor's video cable is properly connected to the computer. • Inspect monitor's video cable and make sure none of pixels scanned by pressing the CAPS LOCK key on the keyboard while observing...
User Guide
Page 23
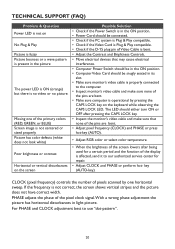
...60Hz Vertical Scan Range 50Hz~60Hz Horizontal Scan Range 30KHz~83KHz Default Color Temperature 6500 Maximum Pixel Clock Speed 110MHz MONITOR SPECIFICATIONS Exterior Color of Monitor Black Plug & Play Yes Tilt -4°(±2)~+18°(±2) Swivel NA Pivot NA Height Adjustment NA ...Height Adjustment Range NA INPUT CONNECTOR TYPES VGA Yes DVI-D No DisplayPort 1.2 N0 POWER AND OPERATING SPECS Power Source 100-240V~,50/60Hz V203hz 19...
...60Hz Vertical Scan Range 50Hz~60Hz Horizontal Scan Range 30KHz~83KHz Default Color Temperature 6500 Maximum Pixel Clock Speed 110MHz MONITOR SPECIFICATIONS Exterior Color of Monitor Black Plug & Play Yes Tilt -4°(±2)~+18°(±2) Swivel NA Pivot NA Height Adjustment NA ...Height Adjustment Range NA INPUT CONNECTOR TYPES VGA Yes DVI-D No DisplayPort 1.2 N0 POWER AND OPERATING SPECS Power Source 100-240V~,50/60Hz V203hz 19...
User Guide
Page 25
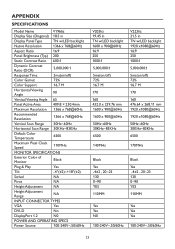
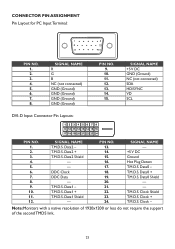
.... 19. 20. 21. 22. 23. 24. T.M.D.S. Data0 Shield - - Data1 - Data0 - Clock + T.M.D.S. Data2 - Data2 + T.M.D.S. Data1 Shield - SIGNAL NAME - +5 V DC Ground Hot Plug Detect T.M.D.S. Clock Shield T.M.D.S. T.M.D.S. T.M.D.S. Note:Monitors with a native resolution of 1920x1200 or less do not require the support of the second TMDS link. 25 SIGNAL NAME R G B NC (not connected) GND (Ground...
.... 19. 20. 21. 22. 23. 24. T.M.D.S. Data0 Shield - - Data1 - Data0 - Clock + T.M.D.S. Data2 - Data2 + T.M.D.S. Data1 Shield - SIGNAL NAME - +5 V DC Ground Hot Plug Detect T.M.D.S. Clock Shield T.M.D.S. T.M.D.S. T.M.D.S. Note:Monitors with a native resolution of 1920x1200 or less do not require the support of the second TMDS link. 25 SIGNAL NAME R G B NC (not connected) GND (Ground...


