
User Guide
Page 2
... is protected by copyright. No part of Microsoft Corporation in the express warranty statements accompanying such products and services. First Edition (February 2015) Document Part Number: 808960-001 2 Nothing herein should be construed as constituting an additional warranty. © 2015 Hewlett-Packard Development Company, L.P. Microsoft,Windows, and Windows Vista are set forth in the United States and...
... is protected by copyright. No part of Microsoft Corporation in the express warranty statements accompanying such products and services. First Edition (February 2015) Document Part Number: 808960-001 2 Nothing herein should be construed as constituting an additional warranty. © 2015 Hewlett-Packard Development Company, L.P. Microsoft,Windows, and Windows Vista are set forth in the United States and...
User Guide
Page 3
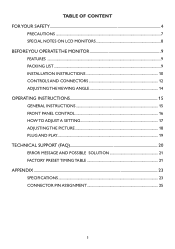
TABLE OF CONTENT FOR YOUR SAFETY 4 PRECAUTIONS 7 SPECIAL NOTES ON LCD MONITORS 8 BEFORE YOU OPERATE THE MONITOR 9 FEATURES 9 PACKING LIST 9 INSTALLATION INSTRUCTIONS 10 CONTROLS AND CONNECTORS 12 ADJUSTING THE VIEWING ANGLE 14 OPERATING INSTRUCTIONS 15 GENERAL INSTRUCTIONS 15 FRONT PANEL CONTROL 16 HOW TO ADJUST A SETTING 17 ADJUSTING THE PICTURE 18 PLUG AND PLAY 19 TECHNICAL SUPPORT (FAQ 20 ERROR MESSAGE AND POSSIBLE SOLUTION 21 FACTORY PRESET TIMING TABLE 21 APPENDIX 23 SPECIFICATIONS 23 CONNECTOR PIN ASSIGNMENT 25 3
TABLE OF CONTENT FOR YOUR SAFETY 4 PRECAUTIONS 7 SPECIAL NOTES ON LCD MONITORS 8 BEFORE YOU OPERATE THE MONITOR 9 FEATURES 9 PACKING LIST 9 INSTALLATION INSTRUCTIONS 10 CONTROLS AND CONNECTORS 12 ADJUSTING THE VIEWING ANGLE 14 OPERATING INSTRUCTIONS 15 GENERAL INSTRUCTIONS 15 FRONT PANEL CONTROL 16 HOW TO ADJUST A SETTING 17 ADJUSTING THE PICTURE 18 PLUG AND PLAY 19 TECHNICAL SUPPORT (FAQ 20 ERROR MESSAGE AND POSSIBLE SOLUTION 21 FACTORY PRESET TIMING TABLE 21 APPENDIX 23 SPECIFICATIONS 23 CONNECTOR PIN ASSIGNMENT 25 3

User Guide
Page 4
...to meet all the criteria in manufacturing country Energy Efficiency Energy efficiency of product and power supply. This product is verified by Users in Private Household in a manner that the manufacture, use and recycling of IT products reflect environmental, social and economic responsibility. Instead, it... equipment at the time of disposal will help to conserve natural resources and ensure that this manual thoroughly.This manual should be disposed of with your other household waste. TCO Certified is recycled in the European Union. working conditions and labor law in TCO Certified...
...to meet all the criteria in manufacturing country Energy Efficiency Energy efficiency of product and power supply. This product is verified by Users in Private Household in a manner that the manufacture, use and recycling of IT products reflect environmental, social and economic responsibility. Instead, it... equipment at the time of disposal will help to conserve natural resources and ensure that this manual thoroughly.This manual should be disposed of with your other household waste. TCO Certified is recycled in the European Union. working conditions and labor law in TCO Certified...

User Guide
Page 5
... the number of different plastics used. Packaging prepared for 20 years. Product Lifetime, Product Take Back Minimum one-year product warranty. Minimum three-year availability of plastics for Recycling Coding of spare parts. TCO Development, the organization behind TCO Certified, has been an international driver in products with scientists, experts, users and manufacturers. A detailed criteria set is...
... the number of different plastics used. Packaging prepared for 20 years. Product Lifetime, Product Take Back Minimum one-year product warranty. Minimum three-year availability of plastics for Recycling Coding of spare parts. TCO Development, the organization behind TCO Certified, has been an international driver in products with scientists, experts, users and manufacturers. A detailed criteria set is...
User Guide
Page 6
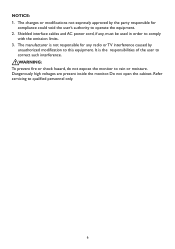
.... 3. Do not open the cabinet. Shielded interface cables and AC power cord, if any radio or TV interference caused by the party responsible for any , must be used in order to correct such interference. It is not responsible for compliance could void the user's authority to this equipment. Refer servicing to rain or moisture. The changes or modifications...
.... 3. Do not open the cabinet. Shielded interface cables and AC power cord, if any radio or TV interference caused by the party responsible for any , must be used in order to correct such interference. It is not responsible for compliance could void the user's authority to this equipment. Refer servicing to rain or moisture. The changes or modifications...
User Guide
Page 7
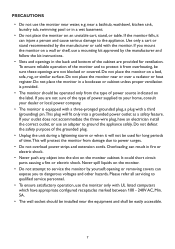
... of the type of power source indicated on a wall or shelf, use the monitor near a bathtub, washbowl, kitchen sink, laundry tub, swimming pool or in a wet basement. • Do not place the monitor on the monitor cabinet. PRECAUTIONS • Do not use a mounting kit approved by the manufacturer and follow the kit instructions. • Slots and openings in the back and...
... of the type of power source indicated on a wall or shelf, use the monitor near a bathtub, washbowl, kitchen sink, laundry tub, swimming pool or in a wet basement. • Do not place the monitor on the monitor cabinet. PRECAUTIONS • Do not use a mounting kit approved by the manufacturer and follow the kit instructions. • Slots and openings in the back and...
User Guide
Page 8
... screen may find slightly uneven brightness on the screen depending on the desktop pattern you use. • The LCD screen has effective pixels of the time. • Due to replace parts. SPECIAL NOTES ON LCD MONITORS The following symptoms are normal with LCD monitors and do not indicate a problem. • You may remain after switching the image when the same image has been displayed for a long time.The monitor...
... screen may find slightly uneven brightness on the screen depending on the desktop pattern you use. • The LCD screen has effective pixels of the time. • Due to replace parts. SPECIAL NOTES ON LCD MONITORS The following symptoms are normal with LCD monitors and do not indicate a problem. • You may remain after switching the image when the same image has been displayed for a long time.The monitor...
User Guide
Page 9
DVI Cable (Optional) 6. Quick Setup Guide 3. Power Cord 4. DP Cable (Optional) For safety and regulatory information, refer to the Product Notices document provided with your monitor. 9 BEFORE YOU OPERATE THE MONITOR FEATURES • V196bz: 47.0cm (18.5'') TFT Color LCD Monitor V203hz: 49.4cm (19.45'') TFT Color LCD Monitor V223hz: 54.6cm (21.5'') TFT Color LCD Monitor • Crisp, Clear Display for Windows • Recommend Resolutions: V196bz: 1366 x 768@60Hz V203hz: 1600 x 900@60Hz V223hz: 1920 x 1080...
DVI Cable (Optional) 6. Quick Setup Guide 3. Power Cord 4. DP Cable (Optional) For safety and regulatory information, refer to the Product Notices document provided with your monitor. 9 BEFORE YOU OPERATE THE MONITOR FEATURES • V196bz: 47.0cm (18.5'') TFT Color LCD Monitor V203hz: 49.4cm (19.45'') TFT Color LCD Monitor V223hz: 54.6cm (21.5'') TFT Color LCD Monitor • Crisp, Clear Display for Windows • Recommend Resolutions: V196bz: 1366 x 768@60Hz V203hz: 1600 x 900@60Hz V223hz: 1920 x 1080...

User Guide
Page 11
POWER CORD Power Source: 1. Please ensure you are using the correct power cord in either a wall power outlet or the power outlet socket on your PC, depending on the type of power cord supplied with your LCD monitor. 11 This LCD monitor has an external universal power supply that allows operation in your LCD monitor's power input socket.The AC- Connect the AC-power cord into your area. 2. power cord may be connected to either 100/120V AC or 220/240V AC voltage area (No user adjustment is required.) 3.
POWER CORD Power Source: 1. Please ensure you are using the correct power cord in either a wall power outlet or the power outlet socket on your PC, depending on the type of power cord supplied with your LCD monitor. 11 This LCD monitor has an external universal power supply that allows operation in your LCD monitor's power input socket.The AC- Connect the AC-power cord into your area. 2. power cord may be connected to either 100/120V AC or 220/240V AC voltage area (No user adjustment is required.) 3.

User Guide
Page 12
VGA Signal input 1 2 12 Power input 2. CONTROLS AND CONNECTORS SIGNAL CABLE • AC Power Connector Connects the AC power cord to the monitor. • DisplayPort Connects the DisplayPort cable to the monitor. • VGA Connects the VGA cable to the monitor. • DVI-D Connects the DVI-D cable to the monitor V196bz 1.
VGA Signal input 1 2 12 Power input 2. CONTROLS AND CONNECTORS SIGNAL CABLE • AC Power Connector Connects the AC power cord to the monitor. • DisplayPort Connects the DisplayPort cable to the monitor. • VGA Connects the VGA cable to the monitor. • DVI-D Connects the DVI-D cable to the monitor V196bz 1.

User Guide
Page 14
Hold the stand so you do not topple the monitor when you adjust the angle. You can adjust the tilted angle from 0° to catch your own preference. 2. ADJUSTING THE VIEWING ANGLE 1. It may cause damage or break the LCD screen. • Careful attention is recommended to look at the full face of the monitor, then adjust the monitor's angle to your fingers or hands when you adjust the angle. 14 For optimal viewing, it is required not to 90°. 90o NOTES • Do not touch the LCD screen when you adjust the monitor's angle. 3.
Hold the stand so you do not topple the monitor when you adjust the angle. You can adjust the tilted angle from 0° to catch your own preference. 2. ADJUSTING THE VIEWING ANGLE 1. It may cause damage or break the LCD screen. • Careful attention is recommended to look at the full face of the monitor, then adjust the monitor's angle to your fingers or hands when you adjust the angle. 14 For optimal viewing, it is required not to 90°. 90o NOTES • Do not touch the LCD screen when you adjust the monitor's angle. 3.

User Guide
Page 15
By changing these settings, the picture can be connected. 2. Power button 2. Auto Config. The power cord should be adjusted to the video card. 3. Connect the video cable from the monitor to your personal preferences. 1. MENU / ENTER 3. + / Image Ratio 4. - / ECO 5. button / Exit 15 Press the power button to turn the monitor on or off.The control buttons are located on the monitor.The power indicator will light up. 5 1 4 2 3 FRONT CONTROLS 1. OPERATING INSTRUCTIONS GENERAL INSTRUCTIONS Press the power button to turn on the front the monitor.
By changing these settings, the picture can be connected. 2. Power button 2. Auto Config. The power cord should be adjusted to the video card. 3. Connect the video cable from the monitor to your personal preferences. 1. MENU / ENTER 3. + / Image Ratio 4. - / ECO 5. button / Exit 15 Press the power button to turn the monitor on or off.The control buttons are located on the monitor.The power indicator will light up. 5 1 4 2 3 FRONT CONTROLS 1. OPERATING INSTRUCTIONS GENERAL INSTRUCTIONS Press the power button to turn on the front the monitor.

User Guide
Page 16
... Standby mode. button / Exit: 1. The Auto Adjustment function is off and then press power button to turn the monitor on , press to exit the OSD menu. When OSD menu is on . Orange - Never use strong solvents such as it was originally packed at the factory. • To keep the monitor looking new, periodically clean it may be removed with a cloth lightly dampened with a soft cloth. Off mode. • MENU / ENTER: Activate OSD menu...
... Standby mode. button / Exit: 1. The Auto Adjustment function is off and then press power button to turn the monitor on , press to exit the OSD menu. When OSD menu is on . Orange - Never use strong solvents such as it was originally packed at the factory. • To keep the monitor looking new, periodically clean it may be removed with a cloth lightly dampened with a soft cloth. Off mode. • MENU / ENTER: Activate OSD menu...

User Guide
Page 17
... highlighted, press the MENU-button to navigate through the sub-menu. Luminance Contrast 50 Brightness 90 Eco Mode Standard AUTO :Exit :Move MENU :Select 17 to navigate through the menu items. Once the desired item is highlighted, press MENU-button to display the OSD menu. 2. Press + or - To exit and save, press the EXIT-button. Press + or - HOW TO ADJUST A SETTING 1. again to enter. to adjust other settings, please repeat...
... highlighted, press the MENU-button to navigate through the sub-menu. Luminance Contrast 50 Brightness 90 Eco Mode Standard AUTO :Exit :Move MENU :Select 17 to navigate through the menu items. Once the desired item is highlighted, press MENU-button to display the OSD menu. 2. Press + or - To exit and save, press the EXIT-button. Press + or - HOW TO ADJUST A SETTING 1. again to enter. to adjust other settings, please repeat...
User Guide
Page 18
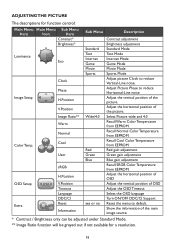
...User sRGB H.Position V.Position Timeout Language DDC/CI Reset Information Sub Menu Description Standard Text Internet Game Movie Sports Wide/4:3 Red Green Blue yes or no Contrast adjustment Brightness adjustment Standard Mode Text Mode Internet Mode Game Mode Movie Mode Sports Mode Adjust picture Clock to default. Red gain adjustment Green gain adjustment Blue gain adjustment Recall SRGB Color Temperature from EEPROM. Select Picture wide and 4:3 Recall Warm Color Temperature from EEPROM. Adjust the horizontal position of OSD Adjust the vertical position of the main image source...
...User sRGB H.Position V.Position Timeout Language DDC/CI Reset Information Sub Menu Description Standard Text Internet Game Movie Sports Wide/4:3 Red Green Blue yes or no Contrast adjustment Brightness adjustment Standard Mode Text Mode Internet Mode Game Mode Movie Mode Sports Mode Adjust picture Clock to default. Red gain adjustment Green gain adjustment Blue gain adjustment Recall SRGB Color Temperature from EEPROM. Select Picture wide and 4:3 Recall Warm Color Temperature from EEPROM. Adjust the horizontal position of OSD Adjust the vertical position of the main image source...

User Guide
Page 19
... to a "Screen Saver" feature except the display is completely off.The display is restored by reducing power consumption when there is no video-input signal present.When there is designed to an Standby mode.This reduces the monitor's internal power supply consumption. It allows the monitor to the VESA DDC STANDARD. PLUG AND PLAY Plug & Play DDC2B Feature This monitor is a bidirectional data channel based on the...
... to a "Screen Saver" feature except the display is completely off.The display is restored by reducing power consumption when there is no video-input signal present.When there is designed to an Standby mode.This reduces the monitor's internal power supply consumption. It allows the monitor to the VESA DDC STANDARD. PLUG AND PLAY Plug & Play DDC2B Feature This monitor is a bidirectional data channel based on the...
User Guide
Page 20
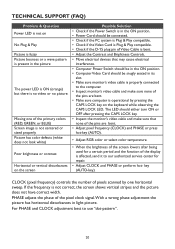
...; Adjust pixel frequency (CLOCK) and PHASE or press hot-key (AUTO). • Adjust RGB color or select color temperature. • When the brightness of the screen lowers after pressing the CAPS LOCK key. • Inspect the monitor's video cable and make sure that may cause electrical interference. • Computer Power Switch should be in the ON position. • Power Cord should be connected. • Check if the PC system is Plug & Play compatible. • Check...
...; Adjust pixel frequency (CLOCK) and PHASE or press hot-key (AUTO). • Adjust RGB color or select color temperature. • When the brightness of the screen lowers after pressing the CAPS LOCK key. • Inspect the monitor's video cable and make sure that may cause electrical interference. • Computer Power Switch should be in the ON position. • Power Cord should be connected. • Check if the PC system is Plug & Play compatible. • Check...
User Guide
Page 21
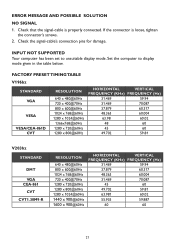
... signal-cable's connection pins for damage. Check that the signal-cable is loose, tighten the connector's screws. 2. Set the computer to unsuitable display mode. ERROR MESSAGE AND POSSIBLE SOLUTION NO SIGNAL 1. FACTORY PRESET TIMING TABLE V196bz STANDARD VGA VESA VESA/CEA-861D CVT RESOLUTION 640 x 480@60Hz 720 x 400@70Hz 800 x 600@60Hz 1024 x 768@60Hz 1280 x 1024@60Hz 1366x768@60Hz 1280 x 720@60Hz 1280 x 800@60Hz HORIZONTAL VERTICAL FREQUENCY (KHz) FREQUENCY...
... signal-cable's connection pins for damage. Check that the signal-cable is loose, tighten the connector's screws. 2. Set the computer to unsuitable display mode. ERROR MESSAGE AND POSSIBLE SOLUTION NO SIGNAL 1. FACTORY PRESET TIMING TABLE V196bz STANDARD VGA VESA VESA/CEA-861D CVT RESOLUTION 640 x 480@60Hz 720 x 400@70Hz 800 x 600@60Hz 1024 x 768@60Hz 1280 x 1024@60Hz 1366x768@60Hz 1280 x 720@60Hz 1280 x 800@60Hz HORIZONTAL VERTICAL FREQUENCY (KHz) FREQUENCY...
User Guide
Page 23
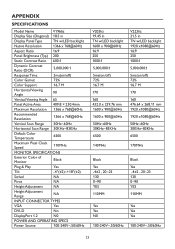
... Vertical Viewing Angle 65 Panel Active Area 409.8 × 230.4mm Maximum Resolution 1366 x 768@60Hz Recommended Resolution 1366 x 768@60Hz Vertical Scan Range 50Hz~60Hz Horizontal Scan Range 30KHz~83KHz Default Color Temperature 6500 Maximum Pixel Clock Speed 110MHz MONITOR SPECIFICATIONS Exterior Color of Monitor Black Plug & Play Yes Tilt -4°(±2)~+18°(±2) Swivel NA Pivot NA Height Adjustment NA Height Adjustment Range NA INPUT CONNECTOR TYPES VGA Yes DVI-D No DisplayPort 1.2 N0 POWER AND OPERATING SPECS Power Source...
... Vertical Viewing Angle 65 Panel Active Area 409.8 × 230.4mm Maximum Resolution 1366 x 768@60Hz Recommended Resolution 1366 x 768@60Hz Vertical Scan Range 50Hz~60Hz Horizontal Scan Range 30KHz~83KHz Default Color Temperature 6500 Maximum Pixel Clock Speed 110MHz MONITOR SPECIFICATIONS Exterior Color of Monitor Black Plug & Play Yes Tilt -4°(±2)~+18°(±2) Swivel NA Pivot NA Height Adjustment NA Height Adjustment Range NA INPUT CONNECTOR TYPES VGA Yes DVI-D No DisplayPort 1.2 N0 POWER AND OPERATING SPECS Power Source...
User Guide
Page 25
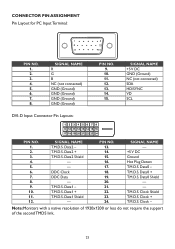
... NO. 1. 2. 3. 4. 5. 6. 7. 8. SIGNAL NAME R G B NC (not connected) GND (Ground) GND (Ground) GND (Ground) GND (Ground) DVI-D Input Connector Pin Layouts: 5 10 15 PIN NO. 9. 10. 11. 12. 13. 14. 15. DDC Clock DDC Data - Data1 + T.M.D.S. Data0 Shield - - Data1 Shield - SIGNAL NAME - +5 V DC Ground Hot Plug Detect T.M.D.S. Note:Monitors with a native resolution of 1920x1200 or less do not require the support of the...
... NO. 1. 2. 3. 4. 5. 6. 7. 8. SIGNAL NAME R G B NC (not connected) GND (Ground) GND (Ground) GND (Ground) GND (Ground) DVI-D Input Connector Pin Layouts: 5 10 15 PIN NO. 9. 10. 11. 12. 13. 14. 15. DDC Clock DDC Data - Data1 + T.M.D.S. Data0 Shield - - Data1 Shield - SIGNAL NAME - +5 V DC Ground Hot Plug Detect T.M.D.S. Note:Monitors with a native resolution of 1920x1200 or less do not require the support of the...


