
Security - Window Vista and Windows 7
Page 8
... place. For additional information about Windows passwords, such as they are not displayed as screen-saver passwords, select Start > Help and Support. 2 Chapter 2 Using passwords Several types of passwords can be any combination of up to 8 letters and numbers and is case sensitive. ● A password set in Setup Utility: ● A password can be easily discovered by the program. ● Write down your passwords and store them in a secure...
... place. For additional information about Windows passwords, such as they are not displayed as screen-saver passwords, select Start > Help and Support. 2 Chapter 2 Using passwords Several types of passwords can be any combination of up to 8 letters and numbers and is case sensitive. ● A password set in Setup Utility: ● A password can be easily discovered by the program. ● Write down your passwords and store them in a secure...

Setup Utility - Windows Vista and Windows 7
Page 10
... Key ◦ USB Hard drive ◦ Network adapter Diagnostics menu Select Hard Disk Self Test Secondary Hard Disk Self Test (select models only) Memory Test To do this Change the Setup Utility language. Set the following boot options: ● f9 and f10 Delay (sec.)―Set the delay for the f9 and f10 functions of the Setup Utility in DC mode. When enabled, saves power when the computer is called the Primary Hard Disk Self Test. Enabled/disable Fan Always On. Enable/disable LAN Power...
... Key ◦ USB Hard drive ◦ Network adapter Diagnostics menu Select Hard Disk Self Test Secondary Hard Disk Self Test (select models only) Memory Test To do this Change the Setup Utility language. Set the following boot options: ● f9 and f10 Delay (sec.)―Set the delay for the f9 and f10 functions of the Setup Utility in DC mode. When enabled, saves power when the computer is called the Primary Hard Disk Self Test. Enabled/disable Fan Always On. Enable/disable LAN Power...
Software Update - Windows Vista and Windows 7
Page 5
... installing applications, running utilities, or changing Windows settings. To update the software, follow these steps, which contains information regarding installing and troubleshooting the file. NOTE: The computer system BIOS is connected to a network, consult the network administrator before installing any software updates, especially system BIOS updates. Prepare for a system BIOS update by identifying the BIOS version currently installed on the system ROM. If your computer model, product category, and series or family. Access the updates on the HP...
... installing applications, running utilities, or changing Windows settings. To update the software, follow these steps, which contains information regarding installing and troubleshooting the file. NOTE: The computer system BIOS is connected to a network, consult the network administrator before installing any software updates, especially system BIOS updates. Prepare for a system BIOS update by identifying the BIOS version currently installed on the system ROM. If your computer model, product category, and series or family. Access the updates on the HP...

Software Update - Windows Vista and Windows 7
Page 6
... displayed, use the arrow keys to select Exit > Exit Discarding Changes, and then press enter. To exit the Setup Utility, use the Setup Utility for Startup Menu" message is displayed in an optional docking device, or connected to know the version of the screen, press f10. 2. b. During the download and installation, follow these instructions: Do not disconnect power from the AC outlet. To download a BIOS update: 1. Access the page on the screen to reliable external power using the AC adapter...
... displayed, use the arrow keys to select Exit > Exit Discarding Changes, and then press enter. To exit the Setup Utility, use the Setup Utility for Startup Menu" message is displayed in an optional docking device, or connected to know the version of the screen, press f10. 2. b. During the download and installation, follow these instructions: Do not disconnect power from the AC outlet. To download a BIOS update: 1. Access the page on the screen to reliable external power using the AC adapter...
Software Update - Windows Vista and Windows 7
Page 8
...-click the file to open a window containing additional information. 6. Proceed to http://www.hp.com/support, and select your computer. Select your hard drive. When the list of the device. 4 Updating software After the file is displayed, click an updated driver to install. 7. To do so, restart your Internet browser, go to step 6. 3. NOTE: In some locations you want a specific SoftPaq, enter the SoftPaq number in the Search box...
...-click the file to open a window containing additional information. 6. Proceed to http://www.hp.com/support, and select your computer. Select your hard drive. When the list of the device. 4 Updating software After the file is displayed, click an updated driver to install. 7. To do so, restart your Internet browser, go to step 6. 3. NOTE: In some locations you want a specific SoftPaq, enter the SoftPaq number in the Search box...
Wireless (Select Models Only) - Windows 7
Page 22
... a wireless networking device. NOTE: Wireless networking devices are installed for wireless connection problems include the following: ● Network configuration (SSID or security) has been changed. ● Wireless device is not listed in this chapter to diagnose and repair a computer that device drivers are included with select computer models only. If wireless networking is not installed correctly or has been disabled. ● Wireless device or router hardware has failed. ● Wireless device encountered interference from other devices. Before working your network...
... a wireless networking device. NOTE: Wireless networking devices are installed for wireless connection problems include the following: ● Network configuration (SSID or security) has been changed. ● Wireless device is not listed in this chapter to diagnose and repair a computer that device drivers are included with select computer models only. If wireless networking is not installed correctly or has been disabled. ● Wireless device or router hardware has failed. ● Wireless device encountered interference from other devices. Before working your network...
Wireless (Select Models Only) - Windows 7
Page 23
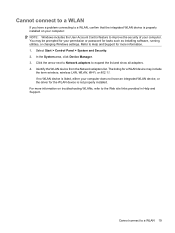
... WLAN device is not properly installed. Cannot connect to expand the list and show all adapters. 4. Select Start > Control Panel > System and Security. 2. Refer to improve the security of your permission or password for a WLAN device may be prompted for your computer. Identify the WLAN device from the Network adapters list. In the System area, click Device Manager. 3. The listing for tasks such as installing software, running utilities, or changing Windows settings. For...
... WLAN device is not properly installed. Cannot connect to expand the list and show all adapters. 4. Select Start > Control Panel > System and Security. 2. Refer to improve the security of your permission or password for a WLAN device may be prompted for your computer. Identify the WLAN device from the Network adapters list. In the System area, click Device Manager. 3. The listing for tasks such as installing software, running utilities, or changing Windows settings. For...
Drives - Windows Vista and Windows 7
Page 18
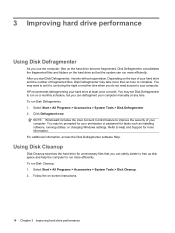
... tasks such as installing software, running utilities, or changing Windows settings. You may set it works without supervision. Click Defragment now. Select Start > All Programs > Accessories > System Tools > Disk Cleanup. 2. NOTE: Windows® includes the User Account Control feature to improve the security of your hard drive and the number of your computer. Using Disk Cleanup Disk Cleanup searches the hard drive for more efficiently. Refer to Help and Support for unnecessary...
... tasks such as installing software, running utilities, or changing Windows settings. You may set it works without supervision. Click Defragment now. Select Start > All Programs > Accessories > System Tools > Disk Cleanup. 2. NOTE: Windows® includes the User Account Control feature to improve the security of your hard drive and the number of your computer. Using Disk Cleanup Disk Cleanup searches the hard drive for more efficiently. Refer to Help and Support for unnecessary...

Drives - Windows Vista and Windows 7
Page 23
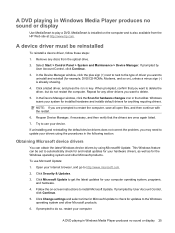
... Start > Control Panel > System and Maintenance > Device Manager. Look for hardware changes. NOTE: If the drive is already showing. Right-click the optical drive listing to update, disable, or uninstall drivers for installed hardware and installs any discs from the optical drive. 2. NOTE: You can click the Roll Back Driver option if the device fails after updating the driver. The computer does not detect the optical drive If the computer does not detect the optical drive, use Device Manager...
... Start > Control Panel > System and Maintenance > Device Manager. Look for hardware changes. NOTE: If the drive is already showing. Right-click the optical drive listing to update, disable, or uninstall drivers for installed hardware and installs any discs from the optical drive. 2. NOTE: You can click the Roll Back Driver option if the device fails after updating the driver. The computer does not detect the optical drive If the computer does not detect the optical drive, use Device Manager...
Drives - Windows Vista and Windows 7
Page 29
... & Updates. 3. Click a listed driver, and press the delete key. Windows scans your computer operating system, programs, and hardware. 4. If uninstalling and reinstalling the default device drivers does not correct the problem, you may need to update your Internet browser, and go to get the latest updates for hardware changes icon in the following section. If prompted by User Account Control, click Continue. 3. A DVD playing in Windows Media Player produces no sound or display 25...
... & Updates. 3. Click a listed driver, and press the delete key. Windows scans your computer operating system, programs, and hardware. 4. If uninstalling and reinstalling the default device drivers does not correct the problem, you may need to update your Internet browser, and go to get the latest updates for hardware changes icon in the following section. If prompted by User Account Control, click Continue. 3. A DVD playing in Windows Media Player produces no sound or display 25...
Notebook Tour - Windows 7
Page 8
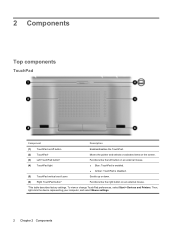
...or change TouchPad preferences, select Start > Devices and Printers. Scrolls up or down. (6) Right TouchPad button* Functions like the left button on an external mouse. *This table describes factory settings. Moves the pointer and selects or activates items on /off button (2) TouchPad* (3) Left TouchPad button* (4) TouchPad light (5) TouchPad vertical scroll zone Enables/disables the TouchPad. Then, right-click the device representing your computer, and select Mouse settings. 2 Chapter 2 Components Functions like the right button on an external mouse. ● Blue: TouchPad is...
...or change TouchPad preferences, select Start > Devices and Printers. Scrolls up or down. (6) Right TouchPad button* Functions like the left button on an external mouse. *This table describes factory settings. Moves the pointer and selects or activates items on /off button (2) TouchPad* (3) Left TouchPad button* (4) TouchPad light (5) TouchPad vertical scroll zone Enables/disables the TouchPad. Then, right-click the device representing your computer, and select Mouse settings. 2 Chapter 2 Components Functions like the right button on an external mouse. ● Blue: TouchPad is...
Notebook Tour - Windows 7
Page 21
... a wireless local area network (WLAN) device or an optional Bluetooth® device. You may need when you troubleshoot system problems or travel internationally with your computer. This certificate is unique to the bottom of the countries or regions in which the modem has been approved for use . You may need this information when traveling internationally. You may need the Product Key to update or troubleshoot the operating system...
... a wireless local area network (WLAN) device or an optional Bluetooth® device. You may need when you troubleshoot system problems or travel internationally with your computer. This certificate is unique to the bottom of the countries or regions in which the modem has been approved for use . You may need this information when traveling internationally. You may need the Product Key to update or troubleshoot the operating system...

Pointing Devices and Keyboard - Windows 7
Page 5
...Right TouchPad button* Functions like the left button on an external mouse. *This table describes factory settings. Component Description (1) TouchPad on the screen. Setting TouchPad preferences Use Mouse Properties in Windows® to customize settings for pointing devices, such as button configuration, click speed, and pointer options. Moves the pointer and selects or activates items on /off button (2) TouchPad* (3) Left TouchPad button* (4) TouchPad light (5) TouchPad scroll zone Enables/disables the TouchPad. To view or change TouchPad preferences, select Start > Devices and...
...Right TouchPad button* Functions like the left button on an external mouse. *This table describes factory settings. Component Description (1) TouchPad on the screen. Setting TouchPad preferences Use Mouse Properties in Windows® to customize settings for pointing devices, such as button configuration, click speed, and pointer options. Moves the pointer and selects or activates items on /off button (2) TouchPad* (3) Left TouchPad button* (4) TouchPad light (5) TouchPad scroll zone Enables/disables the TouchPad. To view or change TouchPad preferences, select Start > Devices and...

Pointing Devices and Keyboard - Windows 7
Page 14
... Start > Control Panel > Hardware and Sound > Pen and Touch. Click OK. 10 Chapter 2 Using the digitizer and touch screen To change or create a flick assignment. 4. These preferences apply to the touch screen and the computer. ▲ To set pointing device preferences such as pointer speed, click speed, and mouse trails, select Start > Devices and Printers. Select Start > Control Panel > Hardware and Sound > Pen and Touch > Pen Options tab. 2. After making any pointing device in the system. Select Start > Control Panel > Hardware...
... Start > Control Panel > Hardware and Sound > Pen and Touch. Click OK. 10 Chapter 2 Using the digitizer and touch screen To change or create a flick assignment. 4. These preferences apply to the touch screen and the computer. ▲ To set pointing device preferences such as pointer speed, click speed, and mouse trails, select Start > Devices and Printers. Select Start > Control Panel > Hardware and Sound > Pen and Touch > Pen Options tab. 2. After making any pointing device in the system. Select Start > Control Panel > Hardware...
Pointing Devices and Keyboard - Windows 7
Page 21
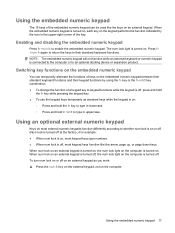
...-right corner of the key. Enabling and disabling the embedded numeric keypad Press fn+num lk to an optional docking device or expansion product. Using an optional external numeric keypad Keys on most keypad keys function like the keys on an external keypad. When num lock on an external keypad is turned off, the num lock light on , most keypad keys type numbers. ● When num lock is connected to the computer or...
...-right corner of the key. Enabling and disabling the embedded numeric keypad Press fn+num lk to an optional docking device or expansion product. Using an optional external numeric keypad Keys on most keypad keys function like the keys on an external keypad. When num lock on an external keypad is turned off, the num lock light on , most keypad keys type numbers. ● When num lock is connected to the computer or...
Multimedia - Windows 7
Page 29
... Windows device drivers by using the procedures in the System area, click Device Manager. 3. Press enter, and then follow these steps: 1. Repeat for hardware changes. Select your device. Obtaining the latest Windows device drivers You can check for example, DVD/CD-ROMs, Modems, and so on -screen instructions. In the Device Manager window, click Action, and then click Scan for any discs from the optical drive. 2. Then in the following section. Click Start...
... Windows device drivers by using the procedures in the System area, click Device Manager. 3. Press enter, and then follow these steps: 1. Repeat for hardware changes. Select your device. Obtaining the latest Windows device drivers You can check for example, DVD/CD-ROMs, Modems, and so on -screen instructions. In the Device Manager window, click Action, and then click Scan for any discs from the optical drive. 2. Then in the following section. Click Start...

Power Management - Windows 7
Page 5
... on the hard drive and the computer turns off. CAUTION: To prevent possible audio and video degradation, loss of audio or video playback functionality, or loss of information, do not initiate Sleep or Hibernation while reading from or writing to a disc or an external media card. Your work is initiated, the power lights blink and the screen clears. You can be changed using Power Options in the Sleep state, the computer initiates Hibernation. 1 Setting power options Using power-saving...
... on the hard drive and the computer turns off. CAUTION: To prevent possible audio and video degradation, loss of audio or video playback functionality, or loss of information, do not initiate Sleep or Hibernation while reading from or writing to a disc or an external media card. Your work is initiated, the power lights blink and the screen clears. You can be changed using Power Options in the Sleep state, the computer initiates Hibernation. 1 Setting power options Using power-saving...
Power Management - Windows 7
Page 21
... Never. 5. Insert the battery into external power until the battery is fully charged. Step 2: Disable Hibernation and Sleep 1. or - Record the Turn off the display settings to calibrate a new battery. Click Save changes. The battery light on . 3. Select Start > Control Panel > System and Security > Power Options. 2. Change the Turn off the display settings listed in the notification area, and then click More power options. - Record the On battery setting under the following conditions: ● When battery charge displays seem inaccurate ● When...
... Never. 5. Insert the battery into external power until the battery is fully charged. Step 2: Disable Hibernation and Sleep 1. or - Record the Turn off the display settings to calibrate a new battery. Click Save changes. The battery light on . 3. Select Start > Control Panel > System and Security > Power Options. 2. Change the Turn off the display settings listed in the notification area, and then click More power options. - Record the On battery setting under the following conditions: ● When battery charge displays seem inaccurate ● When...

Power Management - Windows 7
Page 23
... battery. 7. You can use the computer while the battery is recharging, but the battery will charge faster if the computer is fully recharged. Step 5: Reenable Hibernation and Sleep CAUTION: Failure to Hibernate after calibration may result in a full battery discharge and information loss if the computer reaches a critical battery level. 1. Select Start > Control Panel > System and Security > Power Options. 2. Click Change advanced power settings. 5. Click Save changes...
... battery. 7. You can use the computer while the battery is recharging, but the battery will charge faster if the computer is fully recharged. Step 5: Reenable Hibernation and Sleep CAUTION: Failure to Hibernate after calibration may result in a full battery discharge and information loss if the computer reaches a critical battery level. 1. Select Start > Control Panel > System and Security > Power Options. 2. Click Change advanced power settings. 5. Click Save changes...

HP Notebook Hard Drives & Solid State Drives Identifying, Preventing, Diagnosing and Recovering from Drive Failures Care and Mai
Page 6
.../support/SupportManual/c01600726/c01600726.pdf. Updates to the Intel Matrix Storage Manager driver are configured with Intel Matrix Storage Manager Technology. The Intel Matrix Storage Technology solution technology provides improved performance and reliability, as well as support for lower power consumption on computer systems equipped with Serial ATA hard disk drives. Page 6 Intel Matrix Storage Technology driver HP offers the Intel Matrix Storage Manager driver for notebook PC models...
.../support/SupportManual/c01600726/c01600726.pdf. Updates to the Intel Matrix Storage Manager driver are configured with Intel Matrix Storage Manager Technology. The Intel Matrix Storage Technology solution technology provides improved performance and reliability, as well as support for lower power consumption on computer systems equipped with Serial ATA hard disk drives. Page 6 Intel Matrix Storage Technology driver HP offers the Intel Matrix Storage Manager driver for notebook PC models...


