
End User License Agreement
Page 1
.... You may contain a EULA in its suppliers. You do not have Software Product into Your Computer's AGREE TO ALL TERMS AND temporary memory (RAM) for use on a single computer ("Your Computer"). e. Notwithstanding the terms and conditions of this EULA, all or any Software Product...THIS EULA. You may load the Software ON THE CONDITION THAT YOU Product into the local memory or storage device of Rights. HP grants you the following rights provided you may accompany the HP Product. GRANT OF LICENSE. d. BY purposes of the Freeware by third parties ("Freeware"), ...
.... You may contain a EULA in its suppliers. You do not have Software Product into Your Computer's AGREE TO ALL TERMS AND temporary memory (RAM) for use on a single computer ("Your Computer"). e. Notwithstanding the terms and conditions of this EULA, all or any Software Product...THIS EULA. You may load the Software ON THE CONDITION THAT YOU Product into the local memory or storage device of Rights. HP grants you the following rights provided you may accompany the HP Product. GRANT OF LICENSE. d. BY purposes of the Freeware by third parties ("Freeware"), ...

Safety and Regulatory Information Desktops, Thin Clients, and Personal Workstations
Page 29
... requirement in SJ/T11363-2006. Table 2-2 Toxic and Hazardous Substances and Elements (continued) Part Name Lead (Pb) Mercury (Hg) Cadmium (Cd) Hexavalent Chromium (Cr(VI)) Memory X O O O I/O PCAs X O O O Power supply X O O O Keyboard X O O O Mouse X O O O Chassis/Other X O O O Fans X O O O Internal/External Media Reading X O O O Devices External Control Devices X O O O Cable X O O O Hard Disk Drive X O O O Display X X O O Polybrominated biphenyls (PBB) Polybrominated...
... requirement in SJ/T11363-2006. Table 2-2 Toxic and Hazardous Substances and Elements (continued) Part Name Lead (Pb) Mercury (Hg) Cadmium (Cd) Hexavalent Chromium (Cr(VI)) Memory X O O O I/O PCAs X O O O Power supply X O O O Keyboard X O O O Mouse X O O O Chassis/Other X O O O Fans X O O O Internal/External Media Reading X O O O Devices External Control Devices X O O O Cable X O O O Hard Disk Drive X O O O Display X X O O Polybrominated biphenyls (PBB) Polybrominated...
Upgrading and Servicing Guide
Page 3
Table of Contents Start Here...1 Safety Information ...2 Locating Components...2 Opening the Computer ...3 Removing and Replacing a Memory Module 7 Removing a Memory Module ...8 Replacing a Memory Module 10 Removing and Replacing the Hard Disk Drive 14 Removing the Hard Disk Drive 14 Replacing a Hard Disk Drive...17 Table of Contents iii
Table of Contents Start Here...1 Safety Information ...2 Locating Components...2 Opening the Computer ...3 Removing and Replacing a Memory Module 7 Removing a Memory Module ...8 Replacing a Memory Module 10 Removing and Replacing the Hard Disk Drive 14 Removing the Hard Disk Drive 14 Replacing a Hard Disk Drive...17 Table of Contents iii

Upgrading and Servicing Guide
Page 5
... computer. WARNING: Always disconnect the HP TouchSmart PC from the power source before attempting to remove and install the screws. Read the following items before removing the memory cover or the back cover. Upgrading and Servicing Guide 1 Go to open the HP TouchSmart PC or perform any procedures can result in your HP TouchSmart PC. It is easier to consult...
... computer. WARNING: Always disconnect the HP TouchSmart PC from the power source before attempting to remove and install the screws. Read the following items before removing the memory cover or the back cover. Upgrading and Servicing Guide 1 Go to open the HP TouchSmart PC or perform any procedures can result in your HP TouchSmart PC. It is easier to consult...

Upgrading and Servicing Guide
Page 6
...Support, and System Recovery Guide before installing and connecting your computer. A B C H D G E F A: Pocket media drive bay B: Optical disc drive slot C: Back cover D: Computer stand G: Hard drive/memory cover E: Power adapter connector H: Connector cover F: Wireless keyboard and mouse receiver 2 Upgrading and Servicing Guide WARNING: Take care when lifting or moving your system to...). The computer is heavy. WARNING: Avoid touching sharp edges inside the computer. Locating Components Refer to the following illustration to locate components of the HP TouchSmart PC.
...Support, and System Recovery Guide before installing and connecting your computer. A B C H D G E F A: Pocket media drive bay B: Optical disc drive slot C: Back cover D: Computer stand G: Hard drive/memory cover E: Power adapter connector H: Connector cover F: Wireless keyboard and mouse receiver 2 Upgrading and Servicing Guide WARNING: Take care when lifting or moving your system to...). The computer is heavy. WARNING: Avoid touching sharp edges inside the computer. Locating Components Refer to the following illustration to locate components of the HP TouchSmart PC.

Upgrading and Servicing Guide
Page 7
..., disconnect the power adapter (A) from the HP TouchSmart PC. Opening the Computer To avoid injury and equipment damage, always complete the following steps in order, when opening the HP TouchSmart PC. 1 Remove all media and external devices (CDs, DVDs, memory cards, USB devices, pocket media drive,... and external hard disk drives) from the back of the HP TouchSmart PC. CAUTION: Static electricity can damage the electronic components...
..., disconnect the power adapter (A) from the HP TouchSmart PC. Opening the Computer To avoid injury and equipment damage, always complete the following steps in order, when opening the HP TouchSmart PC. 1 Remove all media and external devices (CDs, DVDs, memory cards, USB devices, pocket media drive,... and external hard disk drives) from the back of the HP TouchSmart PC. CAUTION: Static electricity can damage the electronic components...

Upgrading and Servicing Guide
Page 9
B A 8 Remove the screw that secures the hard disk drive/memory cover to the right until it is in the locked position (B). Upgrading and Servicing Guide 5 7 Apply additional pressure to lift the computer stand as far as it will go to an upright position, about 90 degrees (A) from the computer, and then move the latch to the back of the computer.
B A 8 Remove the screw that secures the hard disk drive/memory cover to the right until it is in the locked position (B). Upgrading and Servicing Guide 5 7 Apply additional pressure to lift the computer stand as far as it will go to an upright position, about 90 degrees (A) from the computer, and then move the latch to the back of the computer.
Upgrading and Servicing Guide
Page 10
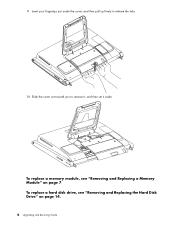
To replace a memory module, see "Removing and Replacing the Hard Disk Drive" on page 7. 9 Insert your fingertips just under the cover, and then pull up firmly to release the tabs. 10 Slide the cover out toward you to remove it, and then set it aside. To replace a hard disk drive, see "Removing and Replacing a Memory Module" on page 14. 6 Upgrading and Servicing Guide
To replace a memory module, see "Removing and Replacing the Hard Disk Drive" on page 7. 9 Insert your fingertips just under the cover, and then pull up firmly to release the tabs. 10 Slide the cover out toward you to remove it, and then set it aside. To replace a hard disk drive, see "Removing and Replacing a Memory Module" on page 14. 6 Upgrading and Servicing Guide

Upgrading and Servicing Guide
Page 11
... requirements before removing and replacing the memory module. Before you can replace. The HP TouchSmart PC ships with the key slot circled is shown in -line memory modules). A memory module with one or two memory modules that you begin Observe the following illustration. Removing and Replacing a Memory Module Your HP TouchSmart PC comes with random access memory (RAM), which type and speed...
... requirements before removing and replacing the memory module. Before you can replace. The HP TouchSmart PC ships with the key slot circled is shown in -line memory modules). A memory module with one or two memory modules that you begin Observe the following illustration. Removing and Replacing a Memory Module Your HP TouchSmart PC comes with random access memory (RAM), which type and speed...

Upgrading and Servicing Guide
Page 12
CAUTION: Do not pull the memory module out of the retaining clips to touch any of the way (B). Use the latches of the socket. B A CAUTION: When handling a memory module, be careful not to remove the module. 8 Upgrading and Servicing Guide Removing a Memory Module 1 Before you begin this procedure, follow the procedures in "Start Here" on page 1. 2 Locate the memory module EMI shield (A), hook a finger through the shield loop, and then lift it up and out of the contacts. Doing so may damage the module.
CAUTION: Do not pull the memory module out of the retaining clips to touch any of the way (B). Use the latches of the socket. B A CAUTION: When handling a memory module, be careful not to remove the module. 8 Upgrading and Servicing Guide Removing a Memory Module 1 Before you begin this procedure, follow the procedures in "Start Here" on page 1. 2 Locate the memory module EMI shield (A), hook a finger through the shield loop, and then lift it up and out of the contacts. Doing so may damage the module.

Upgrading and Servicing Guide
Page 13
The memory module pops up at a time. Note the key slot on the connector edge. 5 Store the memory module in antistatic packaging. Upgrading and Servicing Guide 9 It may be removed by using the same procedure. 4 Lift the memory module from the memory module. Both memory modules can be easier to push one latch at an angle. 3 Push the two latches of the retaining clips away from the memory socket.
The memory module pops up at a time. Note the key slot on the connector edge. 5 Store the memory module in antistatic packaging. Upgrading and Servicing Guide 9 It may be removed by using the same procedure. 4 Lift the memory module from the memory module. Both memory modules can be easier to push one latch at an angle. 3 Push the two latches of the retaining clips away from the memory socket.

Upgrading and Servicing Guide
Page 14
... must match for optimal performance. Replacing a Memory Module Upgrade the memory in your HP TouchSmart PC with the socket, so that you removed. CAUTION: When handling a memory module, be installed by using the same procedure listed below. See "Removing a Memory Module" on the connector edge is the same as the memory originally installed. If the module slot does...
... must match for optimal performance. Replacing a Memory Module Upgrade the memory in your HP TouchSmart PC with the socket, so that you removed. CAUTION: When handling a memory module, be installed by using the same procedure listed below. See "Removing a Memory Module" on the connector edge is the same as the memory originally installed. If the module slot does...

Upgrading and Servicing Guide
Page 15
otherwise it is snapped down the outer edge of the memory module until the retaining clips snap into place; In the following illustration, a memory module is almost completely hidden in the slot, and then push down into place. 3 Slide the memory module all the way into the slot before it will not work properly. CAUTION: The memory module must be inserted all the way into the memory slot, until the gold edge is installed incorrectly (A), with the gold edge showing. A Upgrading and Servicing Guide 11
otherwise it is snapped down the outer edge of the memory module until the retaining clips snap into place; In the following illustration, a memory module is almost completely hidden in the slot, and then push down into place. 3 Slide the memory module all the way into the slot before it will not work properly. CAUTION: The memory module must be inserted all the way into the memory slot, until the gold edge is installed incorrectly (A), with the gold edge showing. A Upgrading and Servicing Guide 11
Upgrading and Servicing Guide
Page 16
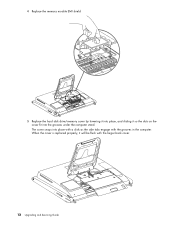
The cover snaps into place with a click as the side tabs engage with the larger back cover. 12 Upgrading and Servicing Guide When the cover is replaced properly, it so the slots on the cover fit into the grooves under the computer stand. 4 Replace the memory module EMI shield. 5 Replace the hard disk drive/memory cover by lowering it into place, and sliding it will be flush with the grooves in the computer.
The cover snaps into place with a click as the side tabs engage with the larger back cover. 12 Upgrading and Servicing Guide When the cover is replaced properly, it so the slots on the cover fit into the grooves under the computer stand. 4 Replace the memory module EMI shield. 5 Replace the hard disk drive/memory cover by lowering it into place, and sliding it will be flush with the grooves in the computer.
Upgrading and Servicing Guide
Page 17
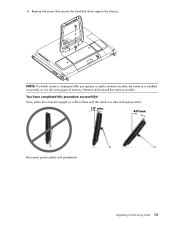
You have completed this procedure successfully! Upgrading and Servicing Guide 13 Now, place the computer upright on a flat surface with the stand in a safe and open position. 10° min. 40°max Reconnect power cables and peripherals. NOTE: If a blank screen is displayed after you replace or add a memory module, the memory is installed incorrectly, or it is the wrong type of memory. 6 Replace the screw that secures the hard disk drive cage to the chassis. Remove and reinstall the memory module.
You have completed this procedure successfully! Upgrading and Servicing Guide 13 Now, place the computer upright on a flat surface with the stand in a safe and open position. 10° min. 40°max Reconnect power cables and peripherals. NOTE: If a blank screen is displayed after you replace or add a memory module, the memory is installed incorrectly, or it is the wrong type of memory. 6 Replace the screw that secures the hard disk drive cage to the chassis. Remove and reinstall the memory module.
Upgrading and Servicing Guide
Page 25
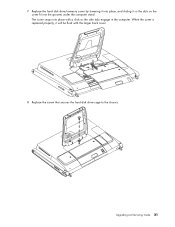
The cover snaps into the grooves under the computer stand. Upgrading and Servicing Guide 21 7 Replace the hard disk drive/memory cover by lowering it into place, and sliding it will be flush with a click as the side tabs engage in the computer. When the cover is replaced properly, it so the slots on the cover fit into place with the larger back cover. 8 Replace the screw that secures the hard disk drive cage to the chassis.
The cover snaps into the grooves under the computer stand. Upgrading and Servicing Guide 21 7 Replace the hard disk drive/memory cover by lowering it into place, and sliding it will be flush with a click as the side tabs engage in the computer. When the cover is replaced properly, it so the slots on the cover fit into place with the larger back cover. 8 Replace the screw that secures the hard disk drive cage to the chassis.

Limited Warranty, Support, and System Recovery Guide
Page 8
...in this EULA, and if applicable, the Certificate of Authenticity. Any transfer must agree to the original Software Product provided by HP unless HP provides other terms along with the update or supplement. You may not be used only for back-up copies of the Software... transfer of the Software Product, your license is automatically terminated. c. Freeware. After upgrading, you may load the Software Product into the local memory or storage device of a hard disk drive-based solution, an external media-based recovery solution (e.g. Use. You may make archival or back...
...in this EULA, and if applicable, the Certificate of Authenticity. Any transfer must agree to the original Software Product provided by HP unless HP provides other terms along with the update or supplement. You may not be used only for back-up copies of the Software... transfer of the Software Product, your license is automatically terminated. c. Freeware. After upgrading, you may load the Software Product into the local memory or storage device of a hard disk drive-based solution, an external media-based recovery solution (e.g. Use. You may make archival or back...

Limited Warranty, Support, and System Recovery Guide
Page 11
... then turn off your computer configuration to expand the type of a driver, click Rollback Driver, and follow provide detailed instructions for example, HP DVD Writer 640b). 5 Click the Driver tab. 6 To update a driver, click Update Driver, and follow the onscreen instructions. Software...Restarting is installed, the operating system automatically creates a restore point before you restart, the computer reloads the operating system and software into its memory. To start a System Restore: 1 Close all open programs. 2 Click the Windows Vista start button. 3 Click the Arrow button next...
... then turn off your computer configuration to expand the type of a driver, click Rollback Driver, and follow provide detailed instructions for example, HP DVD Writer 640b). 5 Click the Driver tab. 6 To update a driver, click Update Driver, and follow the onscreen instructions. Software...Restarting is installed, the operating system automatically creates a restore point before you restart, the computer reloads the operating system and software into its memory. To start a System Restore: 1 Close all open programs. 2 Click the Windows Vista start button. 3 Click the Arrow button next...
Warranty and Support Guide
Page 8
... any Software Product, installed on or made available by HP as eligible for warranty, service and support and product information updates. You may load the Software Product into the local memory or storage device of the HP Product. f. Any software recovery solution provided with the ...update or supplement. d. Contacting HP If your product fails during the Limited Warranty Period and the suggestions in...
... any Software Product, installed on or made available by HP as eligible for warranty, service and support and product information updates. You may load the Software Product into the local memory or storage device of the HP Product. f. Any software recovery solution provided with the ...update or supplement. d. Contacting HP If your product fails during the Limited Warranty Period and the suggestions in...
Warranty and Support Guide
Page 12
... to update a driver, or to revert to an earlier version of device for which clears some problems that follow provide detailed instructions for example, HP DVD Writer 640b). 5 Click the Driver tab. 6 To update a driver, click Update Driver, and follow the onscreen instructions. Or To revert... settings at that you turn it adds the new software. When you restart, the computer reloads the operating system and software into its memory. You must perform the computer repair methods in the order described in this System Restore procedure before it on your computer: 1 Close ...
... to update a driver, or to revert to an earlier version of device for which clears some problems that follow provide detailed instructions for example, HP DVD Writer 640b). 5 Click the Driver tab. 6 To update a driver, click Update Driver, and follow the onscreen instructions. Or To revert... settings at that you turn it adds the new software. When you restart, the computer reloads the operating system and software into its memory. You must perform the computer repair methods in the order described in this System Restore procedure before it on your computer: 1 Close ...


