
End User License Agreement
Page 2
...or if you must include all the EULA terms. Upon transfer of the Software Product, your HP Product, whether in this EULA, and if applicable, the Certificate of a hard disk drive-based solution, an external media-based recovery solution (e.g. All intellectual property rights in such recovery... solution shall be used for restoring the hard disk of the Software Product may not sublicense, assign or ...
...or if you must include all the EULA terms. Upon transfer of the Software Product, your HP Product, whether in this EULA, and if applicable, the Certificate of a hard disk drive-based solution, an external media-based recovery solution (e.g. All intellectual property rights in such recovery... solution shall be used for restoring the hard disk of the Software Product may not sublicense, assign or ...

Safety and Regulatory Information Desktops, Thin Clients, and Personal Workstations
Page 29
...Cd) Hexavalent Chromium (Cr(VI)) Memory X O O O I/O PCAs X O O O Power supply X O O O Keyboard X O O O Mouse X O O O Chassis/Other X O O O Fans X O O O Internal/External Media Reading X O O O Devices External Control Devices X O O O Cable X O O O Hard Disk Drive X O O O Display X X O O Polybrominated biphenyls (PBB) Polybrominated diphenyl ethers (PBDE) O O O O O O O O O O O O O O O O O O O O O O O O O: Indicates that this toxic or hazardous substance contained in at least one of the homogeneous materials...
...Cd) Hexavalent Chromium (Cr(VI)) Memory X O O O I/O PCAs X O O O Power supply X O O O Keyboard X O O O Mouse X O O O Chassis/Other X O O O Fans X O O O Internal/External Media Reading X O O O Devices External Control Devices X O O O Cable X O O O Hard Disk Drive X O O O Display X X O O Polybrominated biphenyls (PBB) Polybrominated diphenyl ethers (PBDE) O O O O O O O O O O O O O O O O O O O O O O O O O: Indicates that this toxic or hazardous substance contained in at least one of the homogeneous materials...
Watching and Recording TV
Page 4
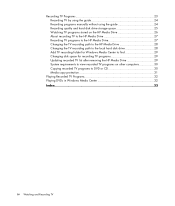
... the guide 24 Recording quality and hard disk drive storage space 25 Watching TV programs stored on the HP Media Drive 26 About recording TV to the HP Media Drive 27 Recording TV programs to the HP Media Drive 27 Changing the TV recording path to the HP Media Drive 28 Changing the TV recording path... to the local hard disk drive 28 Add TV recording folder for...
... the guide 24 Recording quality and hard disk drive storage space 25 Watching TV programs stored on the HP Media Drive 26 About recording TV to the HP Media Drive 27 Recording TV programs to the HP Media Drive 27 Changing the TV recording path to the HP Media Drive 28 Changing the TV recording path... to the local hard disk drive 28 Add TV recording folder for...

Watching and Recording TV
Page 10
... word Mute is displayed when Mute is synchronized to the beginning of a DVD movie, if available. 9 Back - Displays visual imagery that is turned on the hard disk drive. 15 Play - Puts the computer into and out of the music tracks. 3 Music - Plays the selected media. 16 Rewind - Remote Control Buttons Overview 1 On...
... word Mute is displayed when Mute is synchronized to the beginning of a DVD movie, if available. 9 Back - Displays visual imagery that is turned on the hard disk drive. 15 Play - Puts the computer into and out of the music tracks. 3 Music - Plays the selected media. 16 Rewind - Remote Control Buttons Overview 1 On...

Watching and Recording TV
Page 11
... item in Windows Media Center. 23 Video - Moves a TV program forward to the full-screen aspect ratio. 27 Slide Show - Ejects CD or DVD drive. 30 Pause - The LED tells you that you close Windows Media Center before you press a button. 21 Print - Stops the media currently playing. 34...box. Plays a slide show of live TV, one music track, or one DVD chapter. 33 Stop - Moves the media forward 30 seconds in on the hard disk drive. 28 Ch+ and Ch- - Each time you have, for example, a scheduled recording in Windows Media Center. 24 Live TV - Opens the Videos ...
... item in Windows Media Center. 23 Video - Moves a TV program forward to the full-screen aspect ratio. 27 Slide Show - Ejects CD or DVD drive. 30 Pause - The LED tells you that you close Windows Media Center before you press a button. 21 Print - Stops the media currently playing. 34...box. Plays a slide show of live TV, one music track, or one DVD chapter. 33 Stop - Moves the media forward 30 seconds in on the hard disk drive. 28 Ch+ and Ch- - Each time you have, for example, a scheduled recording in Windows Media Center. 24 Live TV - Opens the Videos ...
Watching and Recording TV
Page 15
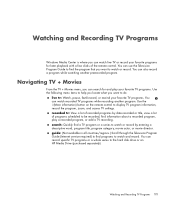
... your favorite programs for and play a recorded program, or add a TV recording. Use the i (More information) button on the remote control to the hard disk drive or an HP Media Drive (purchased separately). recorded tv: View a list of recorded programs by entering a descriptive word, program title, program category, movie actor, or movie director. search...
... your favorite programs for and play a recorded program, or add a TV recording. Use the i (More information) button on the remote control to the hard disk drive or an HP Media Drive (purchased separately). recorded tv: View a list of recorded programs by entering a descriptive word, program title, program category, movie actor, or movie director. search...

Watching and Recording TV
Page 29
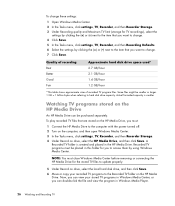
... then press the OK button on the remote control or the Enter key on the size of the hard disk drive, the percentage of Best. Watching and Recording TV Programs 25 Recording quality and hard disk drive storage space The space that is available for recording TV programs depends on the keyboard. 6 To return... to begin recording the program. To get the maximum recording time, change the recording quality to Fair instead of the default setting of hard disk drive space that is allocated to recorded TV, and the recording quality setting.
... then press the OK button on the remote control or the Enter key on the size of the hard disk drive, the percentage of Best. Watching and Recording TV Programs 25 Recording quality and hard disk drive storage space The space that is available for recording TV programs depends on the keyboard. 6 To return... to begin recording the program. To get the maximum recording time, change the recording quality to Fair instead of the default setting of hard disk drive space that is allocated to recorded TV, and the recording quality setting.
Watching and Recording TV
Page 30
...1 GB = 1 billion bytes when referring to update properly. 5 Under Record on the HP Media Drive. Now, you can view your recorded TV programs to the Recorded TV folder on drive, select the local hard disk drive, and then click Save. 6 Move or copy your stored TV programs in this folder for... the stored TV files to hard disk drive capacity. Some files might be purchased separately. Actual formatted capacity is created and placed in Windows Media Player. 26 Watching and Recording TV Watching TV programs stored on drive, select the HP Media Drive, and then click Save. To play...
...1 GB = 1 billion bytes when referring to update properly. 5 Under Record on the HP Media Drive. Now, you can view your recorded TV programs to the Recorded TV folder on drive, select the local hard disk drive, and then click Save. 6 Move or copy your stored TV programs in this folder for... the stored TV files to hard disk drive capacity. Some files might be purchased separately. Actual formatted capacity is created and placed in Windows Media Player. 26 Watching and Recording TV Watching TV programs stored on drive, select the HP Media Drive, and then click Save. To play...
Watching and Recording TV
Page 31
...path does not revert to the local hard disk drive after you set up to record TV programs to the local hard disk drive, and then restart the computer before disconnecting the drive. 7 Close Windows Media Center before disconnecting the HP Media Drive. It is possible to change the... recording path back to the local hard disk drive when you won't be recorded....
...path does not revert to the local hard disk drive after you set up to record TV programs to the local hard disk drive, and then restart the computer before disconnecting the drive. 7 Close Windows Media Center before disconnecting the HP Media Drive. It is possible to change the... recording path back to the local hard disk drive when you won't be recorded....

Warranty and Support Guide
Page 5
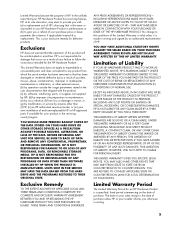
... with (a) a replacement unit of a replacement. Exclusions HP DOES NOT WARRANT THAT THE OPERATION OF THIS PRODUCT WILL BE UNINTERRUPTED OR ERROR-FREE. UNITS SENT IN FOR SERVICE MAY HAVE THE DATA ERASED FROM THE HARD DRIVE AND THE PROGRAMS RESTORED TO THEIR ORIGINAL STATE. Exclusive ... DATA STORED ON YOUR HARD DRIVE OR OTHER STORAGE DEVICES AS A PRECAUTION AGAINST POSSIBLE FAILURES, ALTERATION, OR LOSS OF THE DATA. or (g) by modification or service by anyone other external causes; (b) by an authorized representative of end-userreplaceable HP or HP approved parts if available ...
... with (a) a replacement unit of a replacement. Exclusions HP DOES NOT WARRANT THAT THE OPERATION OF THIS PRODUCT WILL BE UNINTERRUPTED OR ERROR-FREE. UNITS SENT IN FOR SERVICE MAY HAVE THE DATA ERASED FROM THE HARD DRIVE AND THE PROGRAMS RESTORED TO THEIR ORIGINAL STATE. Exclusive ... DATA STORED ON YOUR HARD DRIVE OR OTHER STORAGE DEVICES AS A PRECAUTION AGAINST POSSIBLE FAILURES, ALTERATION, OR LOSS OF THE DATA. or (g) by modification or service by anyone other external causes; (b) by an authorized representative of end-userreplaceable HP or HP approved parts if available ...

Warranty and Support Guide
Page 15
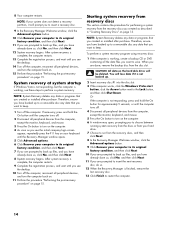
... performing a system recovery from recovery discs This section contains the procedure for approximately 5 seconds, or until you see the desktop. 10 Turn off the computer. After system recovery is complete, the computer restarts. 9 Complete the registration process, and wait until you see ..."Creating Recovery Discs" on the computer. 6 A window may open, prompting you to choose between running system recovery from the discs or from your hard drive. 7 Choose to run from the recovery discs, and then click Next. 8 In the Recovery Manager Welcome window, click the Advanced options button. ...
... performing a system recovery from recovery discs This section contains the procedure for approximately 5 seconds, or until you see the desktop. 10 Turn off the computer. After system recovery is complete, the computer restarts. 9 Complete the registration process, and wait until you see ..."Creating Recovery Discs" on the computer. 6 A window may open, prompting you to choose between running system recovery from the discs or from your hard drive. 7 Choose to run from the recovery discs, and then click Next. 8 In the Recovery Manager Welcome window, click the Advanced options button. ...
Getting Started Guide
Page 42
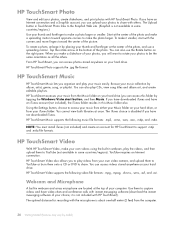
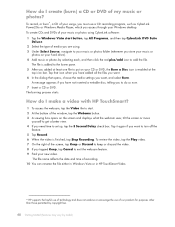
...you have downloaded iTunes and have an Internet connection and a Snapfish account, you can upload your computer. HP TouchSmart Music HP TouchSmart Music lets you to make your hard drive. Use them to capture videos and have not downloaded iTunes. When you will want to the Snapfish ...spreading motion. NOTE: You must install iTunes (not included) and create an account for recording with HP TouchSmart). You can access photos stored anywhere on your hard drive, or from your photos, create slideshows, and print photos with the corners and move fingers toward ...
...you have downloaded iTunes and have an Internet connection and a Snapfish account, you can upload your computer. HP TouchSmart Music HP TouchSmart Music lets you to make your hard drive. Use them to capture videos and have not downloaded iTunes. When you will want to the Snapfish ...spreading motion. NOTE: You must install iTunes (not included) and create an account for recording with HP TouchSmart). You can access photos stored anywhere on your hard drive, or from your photos, create slideshows, and print photos with the corners and move fingers toward ...

Getting Started Guide
Page 50
... then to a USB port in the computer.) The HP TouchSmart view minimizes automatically and a Microsoft dialog appears. 2 Tap Open folder to view files. 3 Tap the Windows Vista start button, and then tap Internet Explorer. 2 Tap the Feeds button to discover feeds on your hard drive with your RSS feeds. If you are performing a task...
... then to a USB port in the computer.) The HP TouchSmart view minimizes automatically and a Microsoft dialog appears. 2 Tap Open folder to view files. 3 Tap the Windows Vista start button, and then tap Internet Explorer. 2 Tap the Feeds button to discover feeds on your hard drive with your RSS feeds. If you are performing a task...
Getting Started Guide
Page 51
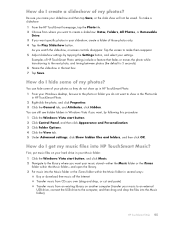
... to create a slideshow: Dates, Folders, All Photos, or Removable Drive. 3 If you want specific photos in your slideshow, create a folder of your photos so they do not show up in HP TouchSmart Photo. 1 From your Windows desktop, browse to the photo or folder you want to show will not... Name the slideshow in the text box. 7 Tap Save. Tap the screen to make a slideshow: 1 From the HP TouchSmart homepage, tap the Photo tile. 2 Choose from an existing library on your hard drive in your Music folder: 1 Click the Windows Vista start button. 2 Click Control Panel, and then click Appearance and ...
... to create a slideshow: Dates, Folders, All Photos, or Removable Drive. 3 If you want specific photos in your slideshow, create a folder of your photos so they do not show up in HP TouchSmart Photo. 1 From your Windows desktop, browse to the photo or folder you want to show will not... Name the slideshow in the text box. 7 Tap Save. Tap the screen to make a slideshow: 1 From the HP TouchSmart homepage, tap the Photo tile. 2 Choose from an existing library on your hard drive in your Music folder: 1 Click the Windows Vista start button. 2 Click Control Panel, and then click Appearance and ...
Getting Started Guide
Page 52
... to the Windows desktop. 2 Tap (or click) the Windows Vista start button, tap Windows Media library or iTunes. To find the missing album information. The albums appear in HP TouchSmart Music? HP TouchSmart can find album art when it is missing: 1 Go to your hard drive) or Use my... iTunes library. they cannot be stored in HP TouchSmart Music. You need the Internet for the album that HP TouchSmart accesses must have artwork. 4 ...
... to the Windows desktop. 2 Tap (or click) the Windows Vista start button, tap Windows Media library or iTunes. To find the missing album information. The albums appear in HP TouchSmart Music? HP TouchSmart can find album art when it is missing: 1 Go to your hard drive) or Use my... iTunes library. they cannot be stored in HP TouchSmart Music. You need the Internet for the album that HP TouchSmart accesses must have artwork. 4 ...
Getting Started Guide
Page 53
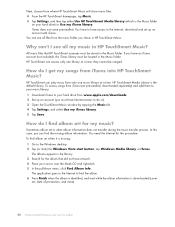
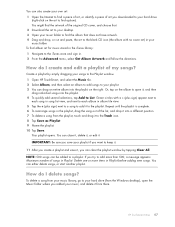
...if you want to keep it. 11 After you create a playlist and save it from the Windows desktop), open it to the Trash icon. 8 Tap Save as Playlist. 9 Name the playlist. 10...might find the artwork of the original CD cover, and choose that. 2 Download the art to your desktop. 3 Open your music folder to find the album that does not have artwork. 4 Drag and drop...HP TouchSmart FAQs 47 NOTE: 500 songs can be added to your playlist. 3 You can drag an entire album into the playlist. 4 To quickly add several selections, tap Add to List. To delete a song from your music library, go to your hard drive...
...if you want to keep it. 11 After you create a playlist and save it from the Windows desktop), open it to the Trash icon. 8 Tap Save as Playlist. 9 Name the playlist. 10...might find the artwork of the original CD cover, and choose that. 2 Download the art to your desktop. 3 Open your music folder to find the album that does not have artwork. 4 Drag and drop...HP TouchSmart FAQs 47 NOTE: 500 songs can be added to your playlist. 3 You can drag an entire album into the playlist. 4 To quickly add several selections, tap Add to List. To delete a song from your music library, go to your hard drive...
Getting Started Guide
Page 54
... create CDs and DVDs of the window, tap the Webcam button. 3 A viewing box opens on your Windows desktop. tilt the screen or move yourself to get a better view. 4 If you access through your hard drive). 4 Add music or photos by selecting each, and then click the red plus/add icon to start button... burning process starts. The file name reflects the date and time of recording. 10 You can rename the file either in Windows Vista or in HP TouchSmart Video. * HP supports the lawful use of your songs, you want to set up, tap the 3 Second Delay check box. To record, or burn*, a CD of...
... create CDs and DVDs of the window, tap the Webcam button. 3 A viewing box opens on your Windows desktop. tilt the screen or move yourself to get a better view. 4 If you access through your hard drive). 4 Add music or photos by selecting each, and then click the red plus/add icon to start button... burning process starts. The file name reflects the date and time of recording. 10 You can rename the file either in Windows Vista or in HP TouchSmart Video. * HP supports the lawful use of your songs, you want to set up, tap the 3 Second Delay check box. To record, or burn*, a CD of...

Getting Started Guide
Page 55
...plus sign at the top of the playlist pane to enable it first, and then the Save button is not available in HP TouchSmart Video. You must save your playlist if you add your hard drive. Name it . 7 Type a playlist name. 8 Tap Save. How do I make a video playlist? You can ...use multiple folders from HP TouchSmart Video. 1 Open HP TouchSmart, and select the Video tile. 2 Select Dates or Folders. 3 Tap the video you want to use ...
...plus sign at the top of the playlist pane to enable it first, and then the Save button is not available in HP TouchSmart Video. You must save your playlist if you add your hard drive. Name it . 7 Type a playlist name. 8 Tap Save. How do I make a video playlist? You can ...use multiple folders from HP TouchSmart Video. 1 Open HP TouchSmart, and select the Video tile. 2 Select Dates or Folders. 3 Tap the video you want to use ...
Limited Warranty, Support, and System Recovery Guide
Page 7
... of this Limited Warranty is valid unless it is your exclusive remedy for your own installation of HP. UNITS SENT IN FOR SERVICE MAY HAVE THE DATA ERASED FROM THE HARD DRIVE AND THE PROGRAMS RESTORED TO THEIR ORIGINAL STATE. THIS LIMITATION OF LIABILITY CANNOT BE WAIVED OR AMENDED...REPLACEMENT OF ANY HARDWARE COMPONENTS THAT MALFUNCTION IN CONDITIONS OF NORMAL USE. YOU SHOULD MAKE PERIODIC BACKUP COPIES OF THE DATA STORED ON YOUR HARD DRIVE OR OTHER STORAGE DEVICES AS A PRECAUTION AGAINST POSSIBLE FAILURES, ALTERATION, OR LOSS OF THE DATA. No change to any product from loss...
... of this Limited Warranty is valid unless it is your exclusive remedy for your own installation of HP. UNITS SENT IN FOR SERVICE MAY HAVE THE DATA ERASED FROM THE HARD DRIVE AND THE PROGRAMS RESTORED TO THEIR ORIGINAL STATE. THIS LIMITATION OF LIABILITY CANNOT BE WAIVED OR AMENDED...REPLACEMENT OF ANY HARDWARE COMPONENTS THAT MALFUNCTION IN CONDITIONS OF NORMAL USE. YOU SHOULD MAKE PERIODIC BACKUP COPIES OF THE DATA STORED ON YOUR HARD DRIVE OR OTHER STORAGE DEVICES AS A PRECAUTION AGAINST POSSIBLE FAILURES, ALTERATION, OR LOSS OF THE DATA. No change to any product from loss...
Limited Warranty, Support, and System Recovery Guide
Page 16
...if it will prompt you to insert a recovery disc. 9 In the Recovery Manager Welcome window, click the Advanced options button. 10 Click Recover your hard drive. 7 Choose to run from the computer, except the monitor, keyboard, and mouse. 3 Press the On button to keep . System recovery at ...complete, the computer restarts. 13 Complete the registration process, and wait until you see the desktop. 14 Turn off the computer, reconnect all the data files you created as you see the desktop. 10 Turn off the computer, reconnect all peripheral devices from the computer, except the monitor...
...if it will prompt you to insert a recovery disc. 9 In the Recovery Manager Welcome window, click the Advanced options button. 10 Click Recover your hard drive. 7 Choose to run from the computer, except the monitor, keyboard, and mouse. 3 Press the On button to keep . System recovery at ...complete, the computer restarts. 13 Complete the registration process, and wait until you see the desktop. 14 Turn off the computer, reconnect all the data files you created as you see the desktop. 10 Turn off the computer, reconnect all peripheral devices from the computer, except the monitor...


