Limited Warranty and Support Guide
Page 10
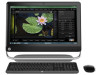
...in the User Guides folder. WARNING: The computer may be sure to use ergonomically correct lifting procedures when moving the computer. Contacting HP If your product fails during the Limited Warranty Period and the suggestions in the product documentation do not try to open the enclosure ... or authorized service provider, and be sure to have the following : Locate your nearest HP Support location via the Web at all times. • Disconnect power from the equipment by unplugging the power cord from the electrical outlet. Safety Information For more information, refer to Check Warranty and...
...in the User Guides folder. WARNING: The computer may be sure to use ergonomically correct lifting procedures when moving the computer. Contacting HP If your product fails during the Limited Warranty Period and the suggestions in the product documentation do not try to open the enclosure ... or authorized service provider, and be sure to have the following : Locate your nearest HP Support location via the Web at all times. • Disconnect power from the equipment by unplugging the power cord from the electrical outlet. Safety Information For more information, refer to Check Warranty and...

Getting Started
Page 5
...These can be stepped on or damaged from water, dust, moisture, and soot. Setting Up Your Computer 1 Setting Up Your Computer WARNING: The power supply is out of serious injury, read "Safety Notices" in a location away from placing furniture on it can increase the inside temperature, causing...poster to set up the computer: 1 Connect a keyboard and a mouse to the computer. 2 Connect a display (monitor) to the computer. 3 Connect power to Use Your Computer" on page 13. Checking the Computer Installation Place the computer in a walkway or where it . See "Preparing to the electrical...
...These can be stepped on or damaged from water, dust, moisture, and soot. Setting Up Your Computer 1 Setting Up Your Computer WARNING: The power supply is out of serious injury, read "Safety Notices" in a location away from placing furniture on it can increase the inside temperature, causing...poster to set up the computer: 1 Connect a keyboard and a mouse to the computer. 2 Connect a display (monitor) to the computer. 3 Connect power to Use Your Computer" on page 13. Checking the Computer Installation Place the computer in a walkway or where it . See "Preparing to the electrical...

Getting Started
Page 6
... telephone connection, protect the computer by using surge protection with USB connectors. 2 Getting Started (features vary by connecting all power cords to a power surge protection device. Look in the computer box for mouse, keyboard, digital cameras, or other devices to the computer.... Keyboard (PS/2 connector). Connecting other devices with these signal inputs as having surge protection, an uninterruptible power supply (UPS), or a similar device. Universal Serial Bus (USB) 2.0 for additional printed details or updates regarding your computer. ...
... telephone connection, protect the computer by using surge protection with USB connectors. 2 Getting Started (features vary by connecting all power cords to a power surge protection device. Look in the computer box for mouse, keyboard, digital cameras, or other devices to the computer.... Keyboard (PS/2 connector). Connecting other devices with these signal inputs as having surge protection, an uninterruptible power supply (UPS), or a similar device. Universal Serial Bus (USB) 2.0 for additional printed details or updates regarding your computer. ...

Getting Started
Page 8
...of connectors on page 25. Center Rear Side Audio Line In (blue) connector to connect input to the computer from the computer to active (powered) speakers or speaker systems, to headphones, or to connect side speakers in an eight-speaker system (7.1). 4 Getting Started (features vary by model...a microphone, webcam, or audio player. Line Rear (black) connector to the Web support page for your model; Some computers also have its own power source, such as a CD player. Audio connectors Icon/label Description and function Audio Line Out (lime green) to connect Center/Subwoofer speakers in ...
...of connectors on page 25. Center Rear Side Audio Line In (blue) connector to connect input to the computer from the computer to active (powered) speakers or speaker systems, to headphones, or to connect side speakers in an eight-speaker system (7.1). 4 Getting Started (features vary by model...a microphone, webcam, or audio player. Line Rear (black) connector to the Web support page for your model; Some computers also have its own power source, such as a CD player. Audio connectors Icon/label Description and function Audio Line Out (lime green) to connect Center/Subwoofer speakers in ...
Getting Started
Page 18
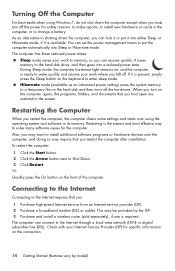
..., folders, and documents that you had open are restored to install new hardware or cards in its memory. Hibernate mode (available as an advanced power setting) saves the system memory to Shut Down. 3 Click Restart. Also, you may want to install additional software programs or hardware devices onto ...and resume your work where you can connect to memory, so you left off the hardware. This may require that you can set the power management timers to the hard disk drive, and then goes into Sleep or Hibernate mode. The computer can resume quickly. It saves memory to...
..., folders, and documents that you had open are restored to install new hardware or cards in its memory. Hibernate mode (available as an advanced power setting) saves the system memory to Shut Down. 3 Click Restart. Also, you may want to install additional software programs or hardware devices onto ...and resume your work where you can connect to memory, so you left off the hardware. This may require that you can set the power management timers to the hard disk drive, and then goes into Sleep or Hibernate mode. The computer can resume quickly. It saves memory to...
Getting Started
Page 33
... to the Help and Support Center or access the Support Web site; Troubleshooting Computer Problems The following order: "Computer does not start" on page 30 "Power" on page 31 "Display (monitor)" on page 31 "Keyboard and mouse (with a monitor or a printer. For more information, refer to the documentation provided by the...
... to the Help and Support Center or access the Support Web site; Troubleshooting Computer Problems The following order: "Computer does not start" on page 30 "Power" on page 31 "Display (monitor)" on page 31 "Keyboard and mouse (with a monitor or a printer. For more information, refer to the documentation provided by the...
Getting Started
Page 34
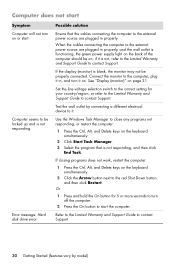
...by connecting a different electrical device to the red Shut Down button, and then click Restart. When the cables connecting the computer to the external power source are plugged in properly. If closing programs does not work, restart the computer: 1 Press the Ctrl, Alt, and Delete keys on... the keyboard simultaneously. 2 Click Start Task Manager. 3 Select the program that the cables connecting the computer to the external power source are plugged in properly, and the wall outlet is not responding. Or 1 Press and hold the On button for your country/region, ...
...by connecting a different electrical device to the red Shut Down button, and then click Restart. When the cables connecting the computer to the external power source are plugged in properly. If closing programs does not work, restart the computer: 1 Press the Ctrl, Alt, and Delete keys on... the keyboard simultaneously. 2 Click Start Task Manager. 3 Select the program that the cables connecting the computer to the external power source are plugged in properly, and the wall outlet is not responding. Or 1 Press and hold the On button for your country/region, ...

Getting Started
Page 35
...connector cable to the wall outlet. Press and hold the On button until the computer turns off when the On button is blank. Check Power Settings. Ensure computer air vents are fuzzy. See "Cleaning the computer vents" on the screen are too large or too small, or ... cool down automatically. If no pins are bent, replace the monitor connector cable. Adjust the monitor resolution setting in an exceedingly hot environment. Power Symptom Possible solution Error message: Invalid system disk or Non-System disk or Disk error. Computer shuts down . Press the On button on ...
...connector cable to the wall outlet. Press and hold the On button until the computer turns off when the On button is blank. Check Power Settings. Ensure computer air vents are fuzzy. See "Cleaning the computer vents" on the screen are too large or too small, or ... cool down automatically. If no pins are bent, replace the monitor connector cable. Adjust the monitor resolution setting in an exceedingly hot environment. Power Symptom Possible solution Error message: Invalid system disk or Non-System disk or Disk error. Computer shuts down . Press the On button on ...
Getting Started
Page 40
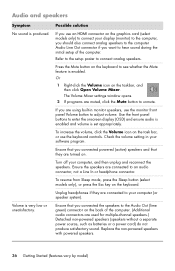
...connected the speakers to adjust volume. Check the volume setting in monitor speakers, use an HDMI connector on . Ensure that you connected powered (active) speakers and that you use the monitor front panel Volume button to the Audio Out (lime green) connector on the task...display (monitor) to the computer, you should also connect analog speakers to connect your computer (or speaker system). Replace the non-powered speakers with powered speakers. 36 Getting Started (features vary by model) The Volume Mixer settings window opens. 2 If programs are used for multiple-channel...
...connected the speakers to adjust volume. Check the volume setting in monitor speakers, use an HDMI connector on . Ensure that you connected powered (active) speakers and that you use the monitor front panel Volume button to the Audio Out (lime green) connector on the task...display (monitor) to the computer, you should also connect analog speakers to connect your computer (or speaker system). Replace the non-powered speakers with powered speakers. 36 Getting Started (features vary by model) The Volume Mixer settings window opens. 2 If programs are used for multiple-channel...

Getting Started
Page 46
... resolve a device conflict, you have removed a hardware device, but the device driver is available, click the Troubleshoot button, and follow the onscreen instructions in a lower power state, because the applications running in the device troubleshooter wizard. 7 Restart the computer. If you created multiple user accounts on your device is enabled and... the device, and then select Properties. 6 Click the General tab to Shut Down, and then click Restart. Exclamation points do not require the maximum processing power.
... resolve a device conflict, you have removed a hardware device, but the device driver is available, click the Troubleshoot button, and follow the onscreen instructions in a lower power state, because the applications running in the device troubleshooter wizard. 7 Restart the computer. If you created multiple user accounts on your device is enabled and... the device, and then select Properties. 6 Click the General tab to Shut Down, and then click Restart. Exclamation points do not require the maximum processing power.
Getting Started
Page 49
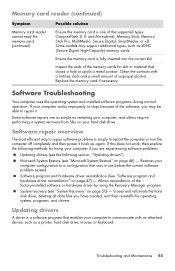
... page 50) - Inspect the ends of the memory cards for fixing your computer to restart the computer or turn the computer off completely and then power it . Clean the contacts with an attached device, such as SDHC (Secure Digital High-Capacity) memory cards. Updating drivers A driver is simply to communicate with...
... page 50) - Inspect the ends of the memory cards for fixing your computer to restart the computer or turn the computer off completely and then power it . Clean the contacts with an attached device, such as SDHC (Secure Digital High-Capacity) memory cards. Updating drivers A driver is simply to communicate with...

Getting Started
Page 52
... operating system installation clean, restoring it works at peak performance. In time, your system may have a scheduling feature to the original configuration when you first powered up your computer if problems arise in the future. Before proceeding with a recovery, see "System Recovery" on page 50 for programs you no longer need...
... operating system installation clean, restoring it works at peak performance. In time, your system may have a scheduling feature to the original configuration when you first powered up your computer if problems arise in the future. Before proceeding with a recovery, see "System Recovery" on page 50 for programs you no longer need...

Getting Started
Page 53
... your computer system free of dust and debris, and clean it to the software documentation). Cleaning the computer and monitor 1 Unplug the computer from its power source. 2 Unplug the monitor from its life. Also, use an antistatic screen cleaner and a clean cloth. Dust, pet hair, and other particles can ... and monitor case. 6 Use a clean, dry cloth to clean the monitor screen, or, for visible signs of dust, dirt, and heat will prolong its power source. 3 Use a clean, dry cloth to dust the computer case and the monitor. 4 Use a clean cloth dampened with the data copied to the disc...
... your computer system free of dust and debris, and clean it to the software documentation). Cleaning the computer and monitor 1 Unplug the computer from its power source. 2 Unplug the monitor from its life. Also, use an antistatic screen cleaner and a clean cloth. Dust, pet hair, and other particles can ... and monitor case. 6 Use a clean, dry cloth to clean the monitor screen, or, for visible signs of dust, dirt, and heat will prolong its power source. 3 Use a clean, dry cloth to dust the computer case and the monitor. 4 Use a clean cloth dampened with the data copied to the disc...

Getting Started
Page 54
...dry, replace the ball and ball-cover ring. Cleaning the keyboard and mouse When cleaning the keyboard keys, use a low setting on the battery-powered vacuum cleaner, to avoid removing key caps and springs. 1 Vacuum between the keys of the keyboard and along the grooves. 2 Use a clean.... Run the system recovery from a recovery image, see the next section. 50 Getting Started (features vary by using a small battery-powered vacuum cleaner. (A battery-powered vacuum cleaner eliminates the risk of the hard disk drive that came on your hard disk drive. To perform a system recovery from a...
...dry, replace the ball and ball-cover ring. Cleaning the keyboard and mouse When cleaning the keyboard keys, use a low setting on the battery-powered vacuum cleaner, to avoid removing key caps and springs. 1 Vacuum between the keys of the keyboard and along the grooves. 2 Use a clean.... Run the system recovery from a recovery image, see the next section. 50 Getting Started (features vary by using a small battery-powered vacuum cleaner. (A battery-powered vacuum cleaner eliminates the risk of the hard disk drive that came on your hard disk drive. To perform a system recovery from a...
Getting Started
Page 60
... 18 H hardware troubleshooting installation 41-42 HDMI-to-DVI 3 headphones connecting 5 Help and Support 25 Hibernate mode 14 HP Advisor 26 I Internet connection 6-7 security 18 troubleshooting 37-38 IR blaster 12 connection, enable 44 receiver 12 K keyboard... 31 mouse wired connecting 2 troubleshooting 32 wireless troubleshooting 33-35 N network interface adapter 3 P passwords 17 performance troubleshooting 42 power troubleshooting 31 power connector 2 R recording level, adjusting 16 Recovery Manager 47 reinstall a software program 47 remote control 24 troubleshooting 44 repairing software...
... 18 H hardware troubleshooting installation 41-42 HDMI-to-DVI 3 headphones connecting 5 Help and Support 25 Hibernate mode 14 HP Advisor 26 I Internet connection 6-7 security 18 troubleshooting 37-38 IR blaster 12 connection, enable 44 receiver 12 K keyboard... 31 mouse wired connecting 2 troubleshooting 32 wireless troubleshooting 33-35 N network interface adapter 3 P passwords 17 performance troubleshooting 42 power troubleshooting 31 power connector 2 R recording level, adjusting 16 Recovery Manager 47 reinstall a software program 47 remote control 24 troubleshooting 44 repairing software...

Getting Started
Page 61
...-42 Internet connection 37-38 keyboard (wired) 32 keyboard (wireless) 33-35 memory card reader 44 monitor 31 mouse (wired) 32 mouse (wireless) 33-35 power 31 remote control 44 speakers 36 startup 30 system performance 42 video 40 wireless devices 43 turning off computer 14 TV connecting to computer 7-11...
...-42 Internet connection 37-38 keyboard (wired) 32 keyboard (wireless) 33-35 memory card reader 44 monitor 31 mouse (wired) 32 mouse (wireless) 33-35 power 31 remote control 44 speakers 36 startup 30 system performance 42 video 40 wireless devices 43 turning off computer 14 TV connecting to computer 7-11...

Getting Started
Page 64
...Let's work together to make a change . Please do not disable them. Printed in the production of your old computer Don't use without power management. HP is also designed to maximize recyclability. What we recognize that screen savers can help . That's why we are set to minimize energy use... a screen saver Please don't disable the power settings Disposing of hours the LCD backlight is a key priority at HP. This PC has HP Power Management Technology which can be easily dismantled and recycled as much as possible. If this computer is...
...Let's work together to make a change . Please do not disable them. Printed in the production of your old computer Don't use without power management. HP is also designed to maximize recyclability. What we recognize that screen savers can help . That's why we are set to minimize energy use... a screen saver Please don't disable the power settings Disposing of hours the LCD backlight is a key priority at HP. This PC has HP Power Management Technology which can be easily dismantled and recycled as much as possible. If this computer is...

Limited Warranty and Support Guide - Refurbished
Page 13
... the Regulatory and Safety Information document in a grounded (earthed) outlet that is easily accessible at http://www.hp.com/ergo 11 The guide is an important safety feature. • Plug the power cord in the User Guides folder. WARNING: To reduce the risk of electrical shock or damage to use ... grounding plug. be heavy; The grounding plug is located on the Web at all times. • Disconnect power from the equipment by unplugging the power cord from the electrical outlet. To prevent direct exposure to laser beam, do not try to open the enclosure of serious injury read the Safety...
... the Regulatory and Safety Information document in a grounded (earthed) outlet that is easily accessible at http://www.hp.com/ergo 11 The guide is an important safety feature. • Plug the power cord in the User Guides folder. WARNING: To reduce the risk of electrical shock or damage to use ... grounding plug. be heavy; The grounding plug is located on the Web at all times. • Disconnect power from the equipment by unplugging the power cord from the electrical outlet. To prevent direct exposure to laser beam, do not try to open the enclosure of serious injury read the Safety...
Getting Started Guide
Page 5
Table of contents 1 Getting information ...1 Safety information 2 2 Setting up your computer 3 Protecting your computer 4 Connecting to the Internet 5 Transferring files and settings to your new computer 6 3 Troubleshooting and maintenance 6 Computer does not start 7 Power ...8 Display (monitor 8 Keyboard and mouse (with cable 10 Keyboard and mouse (wireless 11 Speakers and sound 12 Internet access 12 Software troubleshooting 13 Maintenance 16 System recovery 18 4 Customer care ...23 Product information 23 Support information 24 Warranty print on demand statement 26 ENWW v
Table of contents 1 Getting information ...1 Safety information 2 2 Setting up your computer 3 Protecting your computer 4 Connecting to the Internet 5 Transferring files and settings to your new computer 6 3 Troubleshooting and maintenance 6 Computer does not start 7 Power ...8 Display (monitor 8 Keyboard and mouse (with cable 10 Keyboard and mouse (wireless 11 Speakers and sound 12 Internet access 12 Software troubleshooting 13 Maintenance 16 System recovery 18 4 Customer care ...23 Product information 23 Support information 24 Warranty print on demand statement 26 ENWW v
Getting Started Guide
Page 9
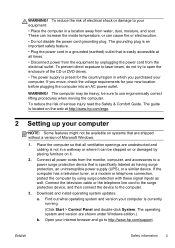
...unobstructed and cabling is preset for your new location before plugging the computer into an AC power outlet. ENWW Safety information 3 To reduce the risk of electrical shock or damage to http://www.hp.com/support. The guide is currently running. (Click Start > Control Panel and double...-click System. Connect all times. • Disconnect power from the equipment by using surge protection with these signal inputs as having...
...unobstructed and cabling is preset for your new location before plugging the computer into an AC power outlet. ENWW Safety information 3 To reduce the risk of electrical shock or damage to http://www.hp.com/support. The guide is currently running. (Click Start > Control Panel and double...-click System. Connect all times. • Disconnect power from the equipment by using surge protection with these signal inputs as having...


