Regulatory, Safety and Environmental Notices
Page 6
... amount of time listening at high levels. To reduce potential safety issues, only the AC adapter provided with the tablet computer, a replacement AC adapter provided by attaching a 2-pin adapter. China safety notices China: Altitude notice Altitude warning for products not certified for use in...HP, or an AC adapter purchased as an accessory from the tablet computer). For your own safety, headsets or earphones used with the tablet computer. The grounding pin is the same. Travel notice Å WARNING! To reduce the risk of in tropical regions 5 User-replaceable battery ...
... amount of time listening at high levels. To reduce potential safety issues, only the AC adapter provided with the tablet computer, a replacement AC adapter provided by attaching a 2-pin adapter. China safety notices China: Altitude notice Altitude warning for products not certified for use in...HP, or an AC adapter purchased as an accessory from the tablet computer). For your own safety, headsets or earphones used with the tablet computer. The grounding pin is the same. Travel notice Å WARNING! To reduce the risk of in tropical regions 5 User-replaceable battery ...
Quick Start Guide
Page 7
... telephone numbers. ■ Locate HP service center locations. ■ Access User Guide. Follow the local laws and regulations in the box. For worldwide support, go /contact HP. Google For Google support, go to http://www.hp.com/go to remove or replace the factory-sealed battery. You can also go to ...http://www.hp.com/go to http://www.google.com/mobile/android. ■ Access ...
... telephone numbers. ■ Locate HP service center locations. ■ Access User Guide. Follow the local laws and regulations in the box. For worldwide support, go /contact HP. Google For Google support, go to http://www.hp.com/go to remove or replace the factory-sealed battery. You can also go to ...http://www.hp.com/go to http://www.google.com/mobile/android. ■ Access ...
HP Tablet 7 Maintenance and Service Guide
Page 5
...model number 4 Tablet major components ...5 Trim Kit contents ...7 Miscellaneous parts ...7 Sequential part number listing ...8 4 Removal and replacement procedures preliminary requirements 9 Tools required ...9 Service considerations ...9 Plastic parts ...9 Cables and connectors 10 Drive handling ...10 Grounding guidelines... discharge damage 11 Packaging and transporting guidelines 12 Workstation guidelines 12 Removal and replacement procedures 14 Component replacement procedures 14 Rear cover 14 Battery ...16 System board 18 Webcam 21 USB connector 23 Antenna board 24 Speakers...
...model number 4 Tablet major components ...5 Trim Kit contents ...7 Miscellaneous parts ...7 Sequential part number listing ...8 4 Removal and replacement procedures preliminary requirements 9 Tools required ...9 Service considerations ...9 Plastic parts ...9 Cables and connectors 10 Drive handling ...10 Grounding guidelines... discharge damage 11 Packaging and transporting guidelines 12 Workstation guidelines 12 Removal and replacement procedures 14 Component replacement procedures 14 Rear cover 14 Battery ...16 System board 18 Webcam 21 USB connector 23 Antenna board 24 Speakers...
HP Tablet 7 Maintenance and Service Guide
Page 7
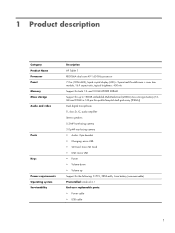
1 Product description Category Product Name Processor Panel Memory Mass storage Audio and video Ports Keys Power requirements Operating system Serviceability Description HP Tablet 7 RK3066A dual core A9 1.60-GHz processor 7.0-in 169-pin thin profile fine-pitch ball grid array {TFBGA]) Dual digital microphones TI, ...display (LCD) + 5-point multiTouchScreen + cover lens module, 16:9 aspect ratio, typical brightness: 400 nits Support for the following: 3.70-V, 3850-mAh, Li-ion battery (non-removable) Preinstalled: Android 4.1 End user replaceable parts: ● Power cable ● USB cable 1
1 Product description Category Product Name Processor Panel Memory Mass storage Audio and video Ports Keys Power requirements Operating system Serviceability Description HP Tablet 7 RK3066A dual core A9 1.60-GHz processor 7.0-in 169-pin thin profile fine-pitch ball grid array {TFBGA]) Dual digital microphones TI, ...display (LCD) + 5-point multiTouchScreen + cover lens module, 16:9 aspect ratio, typical brightness: 400 nits Support for the following: 3.70-V, 3850-mAh, Li-ion battery (non-removable) Preinstalled: Android 4.1 End user replaceable parts: ● Power cable ● USB cable 1
HP Tablet 7 Maintenance and Service Guide
Page 22
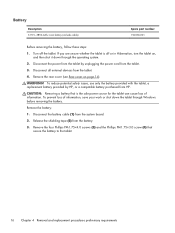
..., turn the tablet on page 14). To reduce potential safety issues, use only the battery provided with the tablet, a replacement battery provided by unplugging the power cord from the tablet. 3. Disconnect the battery cable (1) from the battery. 3. Remove the four Phillips PM1.75×4.0 screws (3) and the Phillips PM1.75... these steps: 1. Release the shielding tape (2) from the system board. 2. Disconnect the power from the tablet by HP, or a compatible battery purchased from the tablet. 4. Remove the rear cover (see Rear cover on , and then shut it down the tablet through the...
..., turn the tablet on page 14). To reduce potential safety issues, use only the battery provided with the tablet, a replacement battery provided by unplugging the power cord from the tablet. 3. Disconnect the battery cable (1) from the battery. 3. Remove the four Phillips PM1.75×4.0 screws (3) and the Phillips PM1.75... these steps: 1. Release the shielding tape (2) from the system board. 2. Disconnect the power from the tablet by HP, or a compatible battery purchased from the tablet. 4. Remove the rear cover (see Rear cover on , and then shut it down the tablet through the...
HP Tablet 7 Maintenance and Service Guide
Page 23
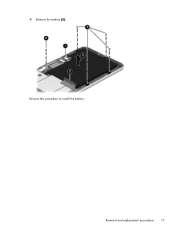
Removal and replacement procedures 17 Remove the battery (5). 4. Reverse this procedure to install the battery.
Removal and replacement procedures 17 Remove the battery (5). 4. Reverse this procedure to install the battery.

HP Tablet 7 Maintenance and Service Guide
Page 24
... an RK3066A dual core A9 1.60-GHz processor and 8-GB of system memory Equipped with the tablet, a replacement battery provided by unplugging the power cord from HP. Disconnect the power from the tablet by HP, or a compatible battery purchased from the tablet. 3. Disconnect all external devices from the tablet. 4. Turn off or in Hibernation, turn...
... an RK3066A dual core A9 1.60-GHz processor and 8-GB of system memory Equipped with the tablet, a replacement battery provided by unplugging the power cord from HP. Disconnect the power from the tablet by HP, or a compatible battery purchased from the tablet. 3. Disconnect all external devices from the tablet. 4. Turn off or in Hibernation, turn...
HP Tablet 7 Maintenance and Service Guide
Page 27
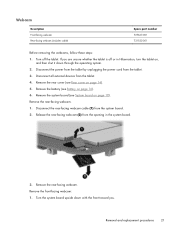
... webcam. Turn the system board upside down through the operating system. 2. Remove the system board (see Rear cover on page 18). Removal and replacement procedures 21 Remove the rear-facing webcam: 1. Remove the front-facing webcam: 1. Remove the rear cover (see System board on page 14). 5. ...Remove the battery (see Battery on , and then shut it down with the front toward you are unsure whether the tablet is off the tablet. Disconnect all external devices...
... webcam. Turn the system board upside down through the operating system. 2. Remove the system board (see Rear cover on page 18). Removal and replacement procedures 21 Remove the rear-facing webcam: 1. Remove the front-facing webcam: 1. Remove the rear cover (see System board on page 14). 5. ...Remove the battery (see Battery on , and then shut it down with the front toward you are unsure whether the tablet is off the tablet. Disconnect all external devices...
HP Tablet 7 Maintenance and Service Guide
Page 29
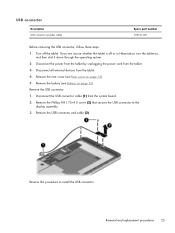
... connector to install the USB connector. Remove the USB connector: 1. Remove the USB connector and cable (3). Remove the rear cover (see Battery on page 16). Disconnect all external devices from the system board. 2. Disconnect the USB connector cable (1) from the tablet. 4. Reverse ...this procedure to the display assembly. 3. Removal and replacement procedures 23 Disconnect the power from the tablet by unplugging the power cord from the tablet. 3. If you are unsure whether the tablet...
... connector to install the USB connector. Remove the USB connector: 1. Remove the USB connector and cable (3). Remove the rear cover (see Battery on page 16). Disconnect all external devices from the system board. 2. Disconnect the USB connector cable (1) from the tablet. 4. Reverse ...this procedure to the display assembly. 3. Removal and replacement procedures 23 Disconnect the power from the tablet by unplugging the power cord from the tablet. 3. If you are unsure whether the tablet...
HP Tablet 7 Maintenance and Service Guide
Page 30
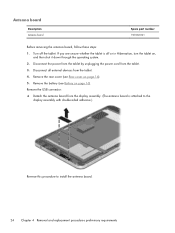
... board Spare part number 727662-001 Before removing the antenna board, follow these steps: 1. Remove the battery (see Rear cover on page 14). 5. Disconnect all external devices from the tablet. 3. Remove the rear cover (see Battery on , and then shut it down through the operating system. 2. Disconnect the power from the tablet... whether the tablet is attached to the display assembly with double-sided adhesive.) Reverse this procedure to install the antenna board. 24 Chapter 4 Removal and replacement procedures preliminary requirements
... board Spare part number 727662-001 Before removing the antenna board, follow these steps: 1. Remove the battery (see Rear cover on page 14). 5. Disconnect all external devices from the tablet. 3. Remove the rear cover (see Battery on , and then shut it down through the operating system. 2. Disconnect the power from the tablet... whether the tablet is attached to the display assembly with double-sided adhesive.) Reverse this procedure to install the antenna board. 24 Chapter 4 Removal and replacement procedures preliminary requirements
HP Tablet 7 Maintenance and Service Guide
Page 31
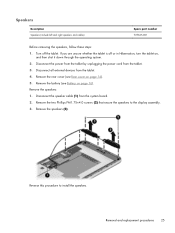
Disconnect the power from the tablet by unplugging the power cord from the tablet. 4. Remove the battery (see Rear cover on page 16). Removal and replacement procedures 25 Turn off or in Hibernation, turn the tablet on, and then shut it down through the operating system. 2. Disconnect all external devices from ...
Disconnect the power from the tablet by unplugging the power cord from the tablet. 4. Remove the battery (see Rear cover on page 16). Removal and replacement procedures 25 Turn off or in Hibernation, turn the tablet on, and then shut it down through the operating system. 2. Disconnect all external devices from ...
HP Tablet 7 Maintenance and Service Guide
Page 32
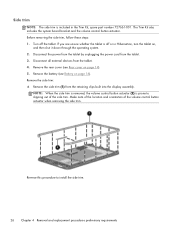
...of the side trim. Reverse this procedure to slipping out of the volume control button actuator when removing the side trim. Remove the battery (see Rear cover on page 16). The Trim Kit also includes the system board bracket and the volume control button actuator. Side trim... NOTE: The side trim is prone to install the side trim. 26 Chapter 4 Removal and replacement procedures preliminary requirements Remove the rear cover (see Battery on page 14). 5. NOTE: When the side trim is removed, the volume control button actuator (2) is included in ...
...of the side trim. Reverse this procedure to slipping out of the volume control button actuator when removing the side trim. Remove the battery (see Rear cover on page 16). The Trim Kit also includes the system board bracket and the volume control button actuator. Side trim... NOTE: The side trim is prone to install the side trim. 26 Chapter 4 Removal and replacement procedures preliminary requirements Remove the rear cover (see Battery on page 14). 5. NOTE: When the side trim is removed, the volume control button actuator (2) is included in ...
HP Tablet 7 Maintenance and Service Guide
Page 39
... 24 spare part number 6, 8, 24 audio, product description 1 B battery removal 16 spare part number 6, 8, 16 C cables, service considerations... number 6, 8, 21 G grounding guidelines 11 guidelines equipment 13 grounding 11 packaging 12 transporting 12 workstation 12 H HP Tablet 7, spare part numbers 7, 8 I I/O bezel removal 14 spare part number 5, 8, 15 K keys,... spare part numbers 5, 8, 14 rear-facing webcam removal 21 spare part number 6, 8, 21 removal/replacement procedures 14 S Screw Kit, spare part number 7, 8 service considerations cables 10 connectors 10 plastic parts 9 serviceability, ...
... 24 spare part number 6, 8, 24 audio, product description 1 B battery removal 16 spare part number 6, 8, 16 C cables, service considerations... number 6, 8, 21 G grounding guidelines 11 guidelines equipment 13 grounding 11 packaging 12 transporting 12 workstation 12 H HP Tablet 7, spare part numbers 7, 8 I I/O bezel removal 14 spare part number 5, 8, 15 K keys,... spare part numbers 5, 8, 14 rear-facing webcam removal 21 spare part number 6, 8, 21 removal/replacement procedures 14 S Screw Kit, spare part number 7, 8 service considerations cables 10 connectors 10 plastic parts 9 serviceability, ...


