User Guide
Page 2
... days for a full refund subject to the refund policy of USB Implementers Forum. Software terms By installing, copying, downloading, or otherwise using any further information or to most products. For any software product preinstalled on your product. Nothing herein should be bound by the Video Electronics Standards Association (VESA) in the United States and/or other countries. Windows is a trademark or registered...
... days for a full refund subject to the refund policy of USB Implementers Forum. Software terms By installing, copying, downloading, or otherwise using any further information or to most products. For any software product preinstalled on your product. Nothing herein should be bound by the Video Electronics Standards Association (VESA) in the United States and/or other countries. Windows is a trademark or registered...
User Guide
Page 3
About this guide This guide provides basic information about using and setting up this product. IMPORTANT: Indicates information considered important but not hazard-related (for completing a task. TIP: Provides helpful hints for example, messages related to complete a task. CAUTION: Indicates a hazardous situation that , if not avoided, could result in damage to hardware or software. NOTE: Contains additional information...
About this guide This guide provides basic information about using and setting up this product. IMPORTANT: Indicates information considered important but not hazard-related (for completing a task. TIP: Provides helpful hints for example, messages related to complete a task. CAUTION: Indicates a hazardous situation that , if not avoided, could result in damage to hardware or software. NOTE: Contains additional information...

User Guide
Page 4
... ...1 Countertop components...2 Countertop rear components ...3 Printer components ...4 Pedestal components ...5 Serial number location ...6 2 Setup...8 Mounting the countertop stand to a table using the HP Engage Express Countertop Mount 8 Installing a display head onto a countertop stand ...10 Installing the barcode scanner to the countertop stand...13 Mounting the pedestal stand to the floor...16 Installing a display head onto a pedestal stand ...18 Installing the HP Engage 2D G2 Barcode Scanner...
... ...1 Countertop components...2 Countertop rear components ...3 Printer components ...4 Pedestal components ...5 Serial number location ...6 2 Setup...8 Mounting the countertop stand to a table using the HP Engage Express Countertop Mount 8 Installing a display head onto a countertop stand ...10 Installing the barcode scanner to the countertop stand...13 Mounting the pedestal stand to the floor...16 Installing a display head onto a pedestal stand ...18 Installing the HP Engage 2D G2 Barcode Scanner...
User Guide
Page 7
...9679; Add-on left, right, or bottom of head unit - Pedestal stand shelves - available on options: - HP Engage Express Countertop BCS cradle (includes HP Engage ...head unit - only available in the following sizes: NOTE: Display sold separately. HP Engage Express Countertop Mount - Pedestal stand bag holder ● Peripheral options: - Barcode scanner; Custom Modus3 Printer - integrated into the head unit as ordered; HP Engage 2D G2 Barcode Scanner - Biometric fingerprint reader Countertop components To identify the countertop components, use this illustration and table...
...9679; Add-on left, right, or bottom of head unit - Pedestal stand shelves - available on options: - HP Engage Express Countertop BCS cradle (includes HP Engage ...head unit - only available in the following sizes: NOTE: Display sold separately. HP Engage Express Countertop Mount - Pedestal stand bag holder ● Peripheral options: - Barcode scanner; Custom Modus3 Printer - integrated into the head unit as ordered; HP Engage 2D G2 Barcode Scanner - Biometric fingerprint reader Countertop components To identify the countertop components, use this illustration and table...

User Guide
Page 8
Table 1-1 Identifying the countertop components Countertop components 1 Display head 5 Payment arm4 2 Printer drawer pin hole1 6 Indicator light5 3 Custom Modus 3 Printer2 7 HP Engage 2D G2 Barcode Scanner 4 Payment device3 8 HP Engage Express Countertop Barcode Scanner Cradle 1 Printer configurations include metal pin. 2 Printer only available installed from the factory. 3 Only available in the United States and does not include integrated battery. 4 75 mm VESA; The indicator light...
Table 1-1 Identifying the countertop components Countertop components 1 Display head 5 Payment arm4 2 Printer drawer pin hole1 6 Indicator light5 3 Custom Modus 3 Printer2 7 HP Engage 2D G2 Barcode Scanner 4 Payment device3 8 HP Engage Express Countertop Barcode Scanner Cradle 1 Printer configurations include metal pin. 2 Printer only available installed from the factory. 3 Only available in the United States and does not include integrated battery. 4 75 mm VESA; The indicator light...
User Guide
Page 9
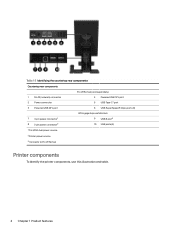
Table 1-2 Identifying the countertop rear components Countertop rear components Pro VESA hub (sold separately) 1 RJ-45 (network) connector 4 Powered USB 12 V port 2 Power connector 5 USB Type-C® port 3 Powered USB 24 V port 6 USB SuperSpeed 5 Gbps ports (3) HP Engage Express Mini Hub 7 4-pin power connector1 9 USB-B port3 8 2-pin power connector2 10 USB ports (4) 1 Pro VESA hub power source 2 Printer power source 3 Connects to Pro VESA hub Printer components To identify the printer components, use this illustration and table. 4 Chapter 1 Product features
Table 1-2 Identifying the countertop rear components Countertop rear components Pro VESA hub (sold separately) 1 RJ-45 (network) connector 4 Powered USB 12 V port 2 Power connector 5 USB Type-C® port 3 Powered USB 24 V port 6 USB SuperSpeed 5 Gbps ports (3) HP Engage Express Mini Hub 7 4-pin power connector1 9 USB-B port3 8 2-pin power connector2 10 USB ports (4) 1 Pro VESA hub power source 2 Printer power source 3 Connects to Pro VESA hub Printer components To identify the printer components, use this illustration and table. 4 Chapter 1 Product features

User Guide
Page 10
... in the United States and does not include integrated battery. NOTE: Display head sold separately. Pedestal components To identify the pedestal components, use this illustration and table. NOTE: Configuration varies by model. Table 1-3 Identifying the printer components Printer components 1 Printer presenter1 5 Printer drawer 2 Custom Modus3 Printer2 6 Payment arm adjustment screw 3 Paper roll 7 Payment arm3 4 Countertop stand 8 Payment device4 1 Prevents paper jams 2 Printer only available installed from the factory. 3 75 mm...
... in the United States and does not include integrated battery. NOTE: Display head sold separately. Pedestal components To identify the pedestal components, use this illustration and table. NOTE: Configuration varies by model. Table 1-3 Identifying the printer components Printer components 1 Printer presenter1 5 Printer drawer 2 Custom Modus3 Printer2 6 Payment arm adjustment screw 3 Paper roll 7 Payment arm3 4 Countertop stand 8 Payment device4 1 Prevents paper jams 2 Printer only available installed from the factory. 3 75 mm...
User Guide
Page 11
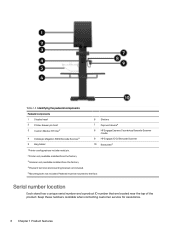
... customer service for assistance. 6 Chapter 1 Product features Table 1-4 Identifying the pedestal components Pedestal components 1 Display head 6 Shelves 2 Printer drawer pin hole1 7 Payment device4 3 Custom Modus 3 Printer2 8 HP Engage Express Countertop Barcode Scanner Cradle 4 Datalogic Magellan 1500i Barcode Scanner3 9 HP Engage 2D G2 Barcode Scanner 5 Bag holder 10 Base plate5 1 Printer configurations include metal pin. 2 Printer only available installed from the factory. 3 Scanner only available installed...
... customer service for assistance. 6 Chapter 1 Product features Table 1-4 Identifying the pedestal components Pedestal components 1 Display head 6 Shelves 2 Printer drawer pin hole1 7 Payment device4 3 Custom Modus 3 Printer2 8 HP Engage Express Countertop Barcode Scanner Cradle 4 Datalogic Magellan 1500i Barcode Scanner3 9 HP Engage 2D G2 Barcode Scanner 5 Bag holder 10 Base plate5 1 Printer configurations include metal pin. 2 Printer only available installed from the factory. 3 Scanner only available installed...
User Guide
Page 15
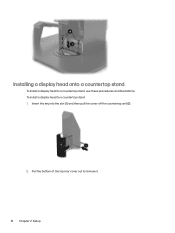
Insert the key into the slot (1), and then pull the cover off the countertop unit (2). 2. Installing a display head onto a countertop stand To install a display head to remove it. 10 Chapter 2 Setup Pull the bottom of the top rear cover out to a countertop stand, use these procedures and illustrations. To install a display head to a countertop stand: 1.
Insert the key into the slot (1), and then pull the cover off the countertop unit (2). 2. Installing a display head onto a countertop stand To install a display head to remove it. 10 Chapter 2 Setup Pull the bottom of the top rear cover out to a countertop stand, use these procedures and illustrations. To install a display head to a countertop stand: 1.

User Guide
Page 23
To install a display head to remove it from the pedestal stand. 18 Chapter 2 Setup Lift from the bottom of the top rear cover to a pedestal stand: 1. Insert the key into the slot (1), and then pull the middle cover off the pedestal stand (2). 2. Installing a display head onto a pedestal stand To install a display head to a pedestal stand, use these procedures and illustrations.
To install a display head to remove it from the pedestal stand. 18 Chapter 2 Setup Lift from the bottom of the top rear cover to a pedestal stand: 1. Insert the key into the slot (1), and then pull the middle cover off the pedestal stand (2). 2. Installing a display head onto a pedestal stand To install a display head to a pedestal stand, use these procedures and illustrations.
User Guide
Page 39
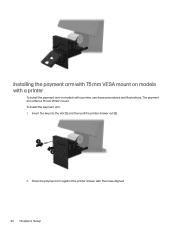
Insert the key into the slot (1), and then pull the printer drawer out (2). 2. To install the payment arm: 1. Place the payment arm against the printer drawer with a printer, use these procedures and illustrations. Installing the payment arm with 75 mm VESA mount on models with a printer To install the payment arm on models with the holes aligned. 34 Chapter 2 Setup The payment arm offers a 75 mm VESA® mount.
Insert the key into the slot (1), and then pull the printer drawer out (2). 2. To install the payment arm: 1. Place the payment arm against the printer drawer with a printer, use these procedures and illustrations. Installing the payment arm with 75 mm VESA mount on models with a printer To install the payment arm on models with the holes aligned. 34 Chapter 2 Setup The payment arm offers a 75 mm VESA® mount.
User Guide
Page 42
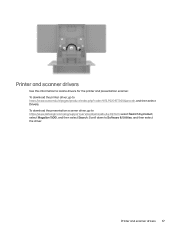
Scroll down to https://www.datalogic.com/eng/support-service/downloads-dw-82.html, select Search by product, select Magellan 1500i, and then select Search. To download the presentation scanner driver, go to locate drivers for the printer and presentation scanner. To download the printer driver, go to Software & Utilities, and then select the driver. Printer and scanner drivers 37 Printer and scanner drivers Use this information to https://www.custom4u.it/pages/product/index.php?code=915LF02015T300&qrcode, and then select Drivers.
Scroll down to https://www.datalogic.com/eng/support-service/downloads-dw-82.html, select Search by product, select Magellan 1500i, and then select Search. To download the presentation scanner driver, go to locate drivers for the printer and presentation scanner. To download the printer driver, go to Software & Utilities, and then select the driver. Printer and scanner drivers 37 Printer and scanner drivers Use this information to https://www.custom4u.it/pages/product/index.php?code=915LF02015T300&qrcode, and then select Drivers.

User Guide
Page 43
... display to the product. IMPORTANT: Keep liquids away from your product. 1. Wipe carefully in any flexible cables, like power cord, keyboard cable, and USB cables. 6. Clean your hands immediately after you are the recommended steps to clean the surfaces with any openings. Cleaning your product on or plugged in. 3. A disinfectant that is within HP's cleaning guidelines is turned...
... display to the product. IMPORTANT: Keep liquids away from your product. 1. Wipe carefully in any flexible cables, like power cord, keyboard cable, and USB cables. 6. Clean your hands immediately after you are the recommended steps to clean the surfaces with any openings. Cleaning your product on or plugged in. 3. A disinfectant that is within HP's cleaning guidelines is turned...

User Guide
Page 44
... not use any of the display to turn off your device and unplug the power cord and other connected external devices. Wipe carefully in one direction, and move from the product. Moisten a microfiber cloth with a soft, lint-free cloth. Discard the gloves after you remove the ...To prevent electric shock or damage to the product. Clean your display before turning the device on the product. HP recommends that surfaces have completely air-dried before cleaning. Start with the moistened cloth. Touch screen maintenance Keep your touch sensor. The cloth should be moist,...
... not use any of the display to turn off your device and unplug the power cord and other connected external devices. Wipe carefully in one direction, and move from the product. Moisten a microfiber cloth with a soft, lint-free cloth. Discard the gloves after you remove the ...To prevent electric shock or damage to the product. Clean your display before turning the device on the product. HP recommends that surfaces have completely air-dried before cleaning. Start with the moistened cloth. Touch screen maintenance Keep your touch sensor. The cloth should be moist,...
User Guide
Page 45
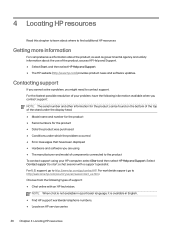
...; Error messages that have been displayed ● Hardware and software you might need to http://welcome.hp.com/country/us/en/wwcontact_us.html. NOTE: When chat is not available in a particular language, it is available in English. ● Find HP support worldwide telephone numbers. ● Locate an HP service center. 40 Chapter 4 Locating HP resources Select Contact support to the product To contact support using...
...; Error messages that have been displayed ● Hardware and software you might need to http://welcome.hp.com/country/us/en/wwcontact_us.html. NOTE: When chat is not available in a particular language, it is available in English. ● Find HP support worldwide telephone numbers. ● Locate an HP service center. 40 Chapter 4 Locating HP resources Select Contact support to the product To contact support using...
User Guide
Page 47
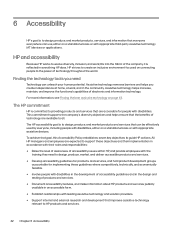
... issues within HP, and provide employees with the training they need Technology can use, either on page 43. Finding the technology tools you create independence at home, at work /life into the fabric of electronic and information technology. Assistive technology removes barriers and helps you need to design, produce, market, and deliver accessible products and services. ● Develop...
... issues within HP, and provide employees with the training they need Technology can use, either on page 43. Finding the technology tools you create independence at home, at work /life into the fabric of electronic and information technology. Assistive technology removes barriers and helps you need to design, produce, market, and deliver accessible products and services. ● Develop...

User Guide
Page 48
..., type Accessibility in the results. ● HP Shopping, peripherals for HP products: Go to industry standards and guidelines for newsletters, and learn from many AT products. Accessibility for your potential. International Association of electronic and information technology. Finding the best assistive technology Everyone, including people with disabilities or age-related limitations, should allow you select the specific...
..., type Accessibility in the results. ● HP Shopping, peripherals for HP products: Go to industry standards and guidelines for newsletters, and learn from many AT products. Accessibility for your potential. International Association of electronic and information technology. Finding the best assistive technology Everyone, including people with disabilities or age-related limitations, should allow you select the specific...
User Guide
Page 49
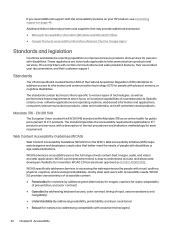
... ISO/IEC 40500:2012. Specific criteria cover software applications and operating systems, web-based information and applications, computers, telecommunications products, video and multimedia, and self-contained closed products. If you need additional support with the accessibility features on your HP product, see Contacting support on functional capabilities of people with disabilities or age-related limitations. WCAG specifically addresses barriers to accessing...
... ISO/IEC 40500:2012. Specific criteria cover software applications and operating systems, web-based information and applications, computers, telecommunications products, video and multimedia, and self-contained closed products. If you need additional support with the accessibility features on your HP product, see Contacting support on functional capabilities of people with disabilities or age-related limitations. WCAG specifically addresses barriers to accessing...

User Guide
Page 51
... of HP products: - HP comfort and safety guide HP public sector sales Contacting support HP offers technical support and assistance with accessibility options for customers with Disabilities Act) Technical Assistance Program ● ILO Global Business and Disability network ● EnableMart ● European Disability Forum ● Job Accommodation Network ● Microsoft Enable HP links These HP-specific links provide information that relates to 9 p.m. to disabilities and age-related limitations.
... of HP products: - HP comfort and safety guide HP public sector sales Contacting support HP offers technical support and assistance with accessibility options for customers with Disabilities Act) Technical Assistance Program ● ILO Global Business and Disability network ● EnableMart ● European Disability Forum ● Job Accommodation Network ● Microsoft Enable HP links These HP-specific links provide information that relates to 9 p.m. to disabilities and age-related limitations.
User Guide
Page 52
... E electrostatic discharge 41 H HP Assistive Policy 42 HP Help and Support 40 I indicator light, illustrated 3 installing bag holder 29 barcode scanner to countertop stand 13 barcode scanner to pedestal stand 22 display head onto pedestal stand 18 display head to countertop stand 10 drivers 37 payment arm on models without a printer 35 payment arm on printer models 34 printer drivers 37 printer paper 30 scanner drivers 37 internal shelf...
... E electrostatic discharge 41 H HP Assistive Policy 42 HP Help and Support 40 I indicator light, illustrated 3 installing bag holder 29 barcode scanner to countertop stand 13 barcode scanner to pedestal stand 22 display head onto pedestal stand 18 display head to countertop stand 10 drivers 37 payment arm on models without a printer 35 payment arm on printer models 34 printer drivers 37 printer paper 30 scanner drivers 37 internal shelf...


