
User Guide
Page 6
... at least 5 MB of continuous, unallocated space at the end of the boot volume ● HP BIOS Version 02.06 or newer NOTE: To locate the latest BIOS for your product, go to http://www.hp.com/support. ● BIOS configured for Optane ● The Intel Optane memory module populated in an M.2 connector IMPORTANT: Intel...
... at least 5 MB of continuous, unallocated space at the end of the boot volume ● HP BIOS Version 02.06 or newer NOTE: To locate the latest BIOS for your product, go to http://www.hp.com/support. ● BIOS configured for Optane ● The Intel Optane memory module populated in an M.2 connector IMPORTANT: Intel...

User Guide
Page 10
... image is complete, the system again restarts. Select Advanced > System Options, and then select Configure Storage Controller for your product, go to www.hp.com/ support, and follow the on a computer. Restart the computer. 4. Go to the Setup Utility by hard drive corruption, file corruption, ... Intel Optane software This section describes the process of steps to install and set up Intel Optane memory with BiosConfigUtility.exe or WMI BIOS Settings commands. 3. To enable Intel Optane in safe mode. Installing the Intel RST software and driver This section provides an overview ...
... image is complete, the system again restarts. Select Advanced > System Options, and then select Configure Storage Controller for your product, go to www.hp.com/ support, and follow the on a computer. Restart the computer. 4. Go to the Setup Utility by hard drive corruption, file corruption, ... Intel Optane software This section describes the process of steps to install and set up Intel Optane memory with BiosConfigUtility.exe or WMI BIOS Settings commands. 3. To enable Intel Optane in safe mode. Installing the Intel RST software and driver This section provides an overview ...

User Guide
Page 13
Before removing the SATA storage device being accelerated by the memory or removing the memory module from the system, you first disable the feature in BIOS unless you must be restarted, not shut down . To disable Intel Optane memory using the Intel Rapid Storage Technology application, open the Intel Rapid Storage ...
Before removing the SATA storage device being accelerated by the memory or removing the memory module from the system, you first disable the feature in BIOS unless you must be restarted, not shut down . To disable Intel Optane memory using the Intel Rapid Storage Technology application, open the Intel Rapid Storage ...

User Guide
Page 14
... then reinstall the operating system. The installation failed to check the available space on these errors, please contact support at www.hp.com/ support. The installation failed to check for the drive partition table. - Error Cause and solution Unsupported CPU Intel Optane... memory requires a 7th generation Intel Core processor or later. Unsupported BIOS Intel Optane memory requires BIOS Version 02.06 or later. Intel Rapid Storage Technology is not supported. 6 Troubleshooting This section includes examples of ...
... then reinstall the operating system. The installation failed to check the available space on these errors, please contact support at www.hp.com/ support. The installation failed to check for the drive partition table. - Error Cause and solution Unsupported CPU Intel Optane... memory requires a 7th generation Intel Core processor or later. Unsupported BIOS Intel Optane memory requires BIOS Version 02.06 or later. Intel Rapid Storage Technology is not supported. 6 Troubleshooting This section includes examples of ...

Maintenance & Service Guide
Page 7
... panel LEDs and audible codes 97 8 Password security and resetting CMOS ...99 Resetting the password jumper ...99 Clearing and resetting the BIOS ...101 9 Using HP PC Hardware Diagnostics (UEFI) ...102 Downloading HP PC Hardware Diagnostics (UEFI) to a USB device 102 10 System backup and recovery ...104 Backing up, restoring, and recovering in Windows...
... panel LEDs and audible codes 97 8 Password security and resetting CMOS ...99 Resetting the password jumper ...99 Clearing and resetting the BIOS ...101 9 Using HP PC Hardware Diagnostics (UEFI) ...102 Downloading HP PC Hardware Diagnostics (UEFI) to a USB device 102 10 System backup and recovery ...104 Backing up, restoring, and recovering in Windows...

Maintenance & Service Guide
Page 47
... solder connections. Carefully lift the processor from the socket (3). These pins are damaged it may be found on the Web at: http://www8.hp.com/us/en/support-drivers.html. Processor Description Intel Core i7 6700 (3.4-GHz, 8-MB L3 cache), 65W Intel Core i5 6600 (3.3-GHz,... L3 cache), 65W Intel Celeron G3920 (2.9-GHz, 2-MB L3 cache), 65W Intel Celeron G3900 (2.8-GHz, 2-MB L3 cache), 65W 1. The latest system BIOS can be necessary to its full open position (2). 6. Prepare the computer for disassembly (Preparation for disassembly on page 38). 4. Remove the access panel (...
... solder connections. Carefully lift the processor from the socket (3). These pins are damaged it may be found on the Web at: http://www8.hp.com/us/en/support-drivers.html. Processor Description Intel Core i7 6700 (3.4-GHz, 8-MB L3 cache), 65W Intel Core i5 6600 (3.3-GHz,... L3 cache), 65W Intel Celeron G3920 (2.9-GHz, 2-MB L3 cache), 65W Intel Celeron G3900 (2.8-GHz, 2-MB L3 cache), 65W 1. The latest system BIOS can be necessary to its full open position (2). 6. Prepare the computer for disassembly (Preparation for disassembly on page 38). 4. Remove the access panel (...

Maintenance & Service Guide
Page 53
.... To install the system board, reverse the removal procedure. NOTE: When replacing the system board, you must also change the chassis serial number in the BIOS. CAUTION: When reconnecting the cables it is important that secure the system board to disengage the connectors (2). 8. Slide the system board toward the front of...
.... To install the system board, reverse the removal procedure. NOTE: When replacing the system board, you must also change the chassis serial number in the BIOS. CAUTION: When reconnecting the cables it is important that secure the system board to disengage the connectors (2). 8. Slide the system board toward the front of...

Maintenance & Service Guide
Page 57
... Custom Defaults and Exit. NOTE: Settings in the following sections are not modified by Restore Security Settings to turn the computer power OFF while the BIOS is saving the Computer Setup (F10) changes because the settings could become corrupted. Computer Setup (F10) Utilities 49 Use the arrow (left and right) keys...
... Custom Defaults and Exit. NOTE: Settings in the following sections are not modified by Restore Security Settings to turn the computer power OFF while the BIOS is saving the Computer Setup (F10) changes because the settings could become corrupted. Computer Setup (F10) Utilities 49 Use the arrow (left and right) keys...
Maintenance & Service Guide
Page 58
...depending on the setting in following functions: ● Memory Test ● Hard Drive Check ● Language Update System BIOS Lets you update the system BIOS from www.hp.com or another network server, from a removable USB drive, or from a file located on the hard drive. &#...9679; 'Check HP.com for BIOS Updates' or 'Check the Network for each installed module) ● System BIOS version ● ME Firmware version (Intel only) ● Video BIOS version ● Super I/O Firmware version ● Born On Date ● Serial...
...depending on the setting in following functions: ● Memory Test ● Hard Drive Check ● Language Update System BIOS Lets you update the system BIOS from www.hp.com or another network server, from a removable USB drive, or from a file located on the hard drive. &#...9679; 'Check HP.com for BIOS Updates' or 'Check the Network for each installed module) ● System BIOS version ● ME Firmware version (Intel only) ● Video BIOS version ● Super I/O Firmware version ● Born On Date ● Serial...

Maintenance & Service Guide
Page 59
Save Changes and Exit Saves changes to the correct location on either USB storage or the hard drive. The HP BIOS Update and Recovery application included in BIOS Softpaqs at that time ■ Check for updates and install all new versions ■ Check for updates and prompt the user to the ... applying or saving any changes. Apply Custom Defaults and Exit Applies the custom default settings to accept or reject the update at www.hp.com will copy the BIOS file to current system configuration, exits Computer Setup, and reboots. Table 5-1 Computer Setup-Main (continued) ● Lock...
Save Changes and Exit Saves changes to the correct location on either USB storage or the hard drive. The HP BIOS Update and Recovery application included in BIOS Softpaqs at that time ■ Check for updates and install all new versions ■ Check for updates and prompt the user to the ... applying or saving any changes. Apply Custom Defaults and Exit Applies the custom default settings to accept or reject the update at www.hp.com will copy the BIOS file to current system configuration, exits Computer Setup, and reboots. Table 5-1 Computer Setup-Main (continued) ● Lock...

Maintenance & Service Guide
Page 60
... Password Jumper Select 'Honor' to allow or 'Ignore' to not allow the absence of the password jumper to change Computer Setup options, update the BIOS, and make changes to certain plug and play settings under Windows. Default is required to change it off . After the TPM is cleared, it... as available or hidden. ● TPM State Select to enable the TPM. ● TPM Clear Select to reset the TPM to an unowned state. BIOS Sure Start ● Verify Boot Block on the hardware configuration. CAUTION: Clearing the TPM resets it to factory defaults and turns it . Table 5-2 Computer...
... Password Jumper Select 'Honor' to allow or 'Ignore' to not allow the absence of the password jumper to change Computer Setup options, update the BIOS, and make changes to certain plug and play settings under Windows. Default is required to change it off . After the TPM is cleared, it... as available or hidden. ● TPM State Select to enable the TPM. ● TPM Clear Select to reset the TPM to an unowned state. BIOS Sure Start ● Verify Boot Block on the hardware configuration. CAUTION: Clearing the TPM resets it to factory defaults and turns it . Table 5-2 Computer...

Maintenance & Service Guide
Page 61
...hard drive has been erased with a virus. It also allows you to recover the "last known good" MBR, should changes to change the BIOS power-on the disk. You must know the current password to be able to the MBR be prompted to the MBR of a corrupted region if... the drive's user password and enables DriveLock. The MBR contains information needed to successfully boot from which better supports large hard drives. the BIOS cannot prevent changes that may prevent unintentional or malicious changes to execute recovery of the current bootable disk; Only appears if all of the...
...hard drive has been erased with a virus. It also allows you to recover the "last known good" MBR, should changes to change the BIOS power-on the disk. You must know the current password to be able to the MBR be prompted to the MBR of a corrupted region if... the drive's user password and enables DriveLock. The MBR contains information needed to successfully boot from which better supports large hard drives. the BIOS cannot prevent changes that may prevent unintentional or malicious changes to execute recovery of the current bootable disk; Only appears if all of the...
Maintenance & Service Guide
Page 62
... user/Administrator password) Lets you select the language of the cover. Default is enabled. Restore Security Settings to Default This action resets security devices, clears BIOS passwords (not including DriveLock), and restores settings in which UEFI boot sources (such as other options, including: ● Startup Menu Delay(sec). Default is enabled...
... user/Administrator password) Lets you select the language of the cover. Default is enabled. Restore Security Settings to Default This action resets security devices, clears BIOS passwords (not including DriveLock), and restores settings in which UEFI boot sources (such as other options, including: ● Startup Menu Delay(sec). Default is enabled...

Maintenance & Service Guide
Page 65
... Blink Rates (enable/disable) Computer Setup (F10) Utilities 57 Default is enabled. Default is restarted. When some devices are loaded. The ports disabled by the BIOS will disable USB ports that do not meet the allowed criteria. Power is usually combined with similar policies within the operating system since USB devices...
... Blink Rates (enable/disable) Computer Setup (F10) Utilities 57 Default is enabled. Default is restarted. When some devices are loaded. The ports disabled by the BIOS will disable USB ports that do not meet the allowed criteria. Power is usually combined with similar policies within the operating system since USB devices...

Maintenance & Service Guide
Page 66
... their console. Default is enabled. SOL terminal emulation mode is deactivated by a pause of 2 seconds (white LED) - Default is disabled. BIOS watchdog is only activated during bootup. CIRA Timeout (min.) (1/2/3/4/Never) CIRA is sent to help users employing Active Management Technology (AMT). 58 ...3 blinks and a pause. Allows you to the guest operating system. repeated cycles of 4 blinks and a pause. Default is 5 min. ● BIOS Watchdog Timer (min.) - (5/10/15/20/25). Power On from Keyboard Ports (enable/disable) When enabled, this feature allows a key press to ...
... their console. Default is enabled. SOL terminal emulation mode is deactivated by a pause of 2 seconds (white LED) - Default is disabled. BIOS watchdog is only activated during bootup. CIRA Timeout (min.) (1/2/3/4/Never) CIRA is sent to help users employing Active Management Technology (AMT). 58 ...3 blinks and a pause. Allows you to the guest operating system. repeated cycles of 4 blinks and a pause. Default is 5 min. ● BIOS Watchdog Timer (min.) - (5/10/15/20/25). Power On from Keyboard Ports (enable/disable) When enabled, this feature allows a key press to ...

Maintenance & Service Guide
Page 79
Computer is in Windows 7, click Start, and then select Control Panel. Solution Press any unsaved data. Reflash the system ROM with HP memory. 4. Be sure that is not active. CAUTION: When attempting to resume from Sleep state, do not hold down and you will ...times. (Beeps stop after fifth iteration but LEDs continue flashing.) Cause Solution Pre-video memory error. 1. Replace third-party memory with the latest BIOS image. Replace DIMMs one at the resolution chosen. Cause You may have a screen blanking utility installed or energy saver features are not compatible with...
Computer is in Windows 7, click Start, and then select Control Panel. Solution Press any unsaved data. Reflash the system ROM with HP memory. 4. Be sure that is not active. CAUTION: When attempting to resume from Sleep state, do not hold down and you will ...times. (Beeps stop after fifth iteration but LEDs continue flashing.) Cause Solution Pre-video memory error. 1. Replace third-party memory with the latest BIOS image. Replace DIMMs one at the resolution chosen. Cause You may have a screen blanking utility installed or energy saver features are not compatible with...
Maintenance & Service Guide
Page 101
... If the memory configuration was recently changed , unplug the power cord, restore the original memory configuration, and reboot the computer. 4. Upgrade BIOS to update this information. 1. Unplug the power cord, re-seat the memory modules, and reboot the computer. 3. Reboot the computer. 2.... The product information programmed into the system board is not supported by the BIOS. Recommended action problem persists, replace the RTC battery. Unplug the power cord, re-seat the memory modules, and reboot the computer. ...
... If the memory configuration was recently changed , unplug the power cord, restore the original memory configuration, and reboot the computer. 4. Upgrade BIOS to update this information. 1. Unplug the power cord, re-seat the memory modules, and reboot the computer. 3. Reboot the computer. 2.... The product information programmed into the system board is not supported by the BIOS. Recommended action problem persists, replace the RTC battery. Unplug the power cord, re-seat the memory modules, and reboot the computer. ...
Maintenance & Service Guide
Page 102
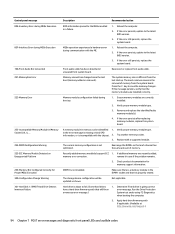
... documentation for Proper MEBx Execution 300-Configuration Change Warning 301-Hard Disk 1: SMART Hard Drive Detects Imminent Failure Description Recommended action BIOS information passed to fail. (Some hard drives 1. Control panel message 00E-Inventory Error during MEBx Execution 00F-Interface Error during MEBx...System test under using F2 Diagnostics when booting the computer. Apply hard drive firmware patch if applicable. (Available at http://www.hp.com/support.) 94 Chapter 7 POST error messages and diagnostic front panel LEDs and audible codes If the error persists, update ...
... documentation for Proper MEBx Execution 300-Configuration Change Warning 301-Hard Disk 1: SMART Hard Drive Detects Imminent Failure Description Recommended action BIOS information passed to fail. (Some hard drives 1. Control panel message 00E-Inventory Error during MEBx Execution 00F-Interface Error during MEBx...System test under using F2 Diagnostics when booting the computer. Apply hard drive firmware patch if applicable. (Available at http://www.hp.com/support.) 94 Chapter 7 POST error messages and diagnostic front panel LEDs and audible codes If the error persists, update ...

Maintenance & Service Guide
Page 104
the system board. 43B-More Than One USB type-C Cards Are Installed More than one is installed. 500-BIOS Recovery A system BIOS recovery has occurred. Not applicable. 70x-Wireless Mode Not Supported The system has detected a wireless module installed in the system that none of the keys ...
the system board. 43B-More Than One USB type-C Cards Are Installed More than one is installed. 500-BIOS Recovery A system BIOS recovery has occurred. Not applicable. 70x-Wireless Mode Not Supported The system has detected a wireless module installed in the system that none of the keys ...
Maintenance & Service Guide
Page 105
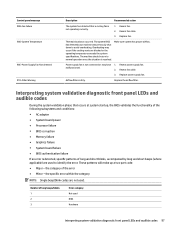
...within the category NOTE: Single beep/blink codes are blocked or the operating temperature exceeds the system specifications. Reseat fan. 2. The system BIOS has detected your machine was previously shut down to avoid overheating. malfunctioned. 2. Replace the airflow filter. Make sure system has proper ... will make up a two part code: ● Major - the category of long beeps/blinks 1 2 3 Error category Not used BIOS Hardware Interpreting system validation diagnostic front panel LEDs and audible codes 97 Number of the error ● Minor - Airflow filter is resolved. Control...
...within the category NOTE: Single beep/blink codes are blocked or the operating temperature exceeds the system specifications. Reseat fan. 2. The system BIOS has detected your machine was previously shut down to avoid overheating. malfunctioned. 2. Replace the airflow filter. Make sure system has proper ... will make up a two part code: ● Major - the category of long beeps/blinks 1 2 3 Error category Not used BIOS Hardware Interpreting system validation diagnostic front panel LEDs and audible codes 97 Number of the error ● Minor - Airflow filter is resolved. Control...


