

Maintenance and Service Guide
Page 6
5 Removal and replacement procedures for authorized service provider parts 29 Component replacement procedures ...29 Preparation for disassembly ...29 Bottom cover ...29 Battery ...30 Touchpad ...31 Solid-state drive ...32 Memory modules ...34 WLAN module ...37 RTC battery ...38 Rear camera module and board ...39 Fan ...41 Heat sink ...42 Display assembly ...43 System board ...45 Speaker ...47 Fingerprint sensor ...48 Power connector cable ...49 Keyboard with top cover ...50 6 Computer Setup (BIOS), TPM, and HP Sure Start 53 Using Computer...
5 Removal and replacement procedures for authorized service provider parts 29 Component replacement procedures ...29 Preparation for disassembly ...29 Bottom cover ...29 Battery ...30 Touchpad ...31 Solid-state drive ...32 Memory modules ...34 WLAN module ...37 RTC battery ...38 Rear camera module and board ...39 Fan ...41 Heat sink ...42 Display assembly ...43 System board ...45 Speaker ...47 Fingerprint sensor ...48 Power connector cable ...49 Keyboard with top cover ...50 6 Computer Setup (BIOS), TPM, and HP Sure Start 53 Using Computer...

Maintenance and Service Guide
Page 61
... the computer restarts. NOTE: Restoring defaults will not change the hard drive mode. NOTE: If you are using arrow keys to highlight your computer. Navigating and selecting in Computer Setup To return all the input and output devices on the system (such as hard drives, display, keyboard, mouse, and printer). 6 Computer Setup (BIOS), TPM, and HP Sure Start HP provides several tools to help set at the factory, follow the on or...
... the computer restarts. NOTE: Restoring defaults will not change the hard drive mode. NOTE: If you are using arrow keys to highlight your computer. Navigating and selecting in Computer Setup To return all the input and output devices on the system (such as hard drives, display, keyboard, mouse, and printer). 6 Computer Setup (BIOS), TPM, and HP Sure Start HP provides several tools to help set at the factory, follow the on or...

Maintenance and Service Guide
Page 63
... Boot Device Options menu. 2. Follow any software updates, especially system BIOS updates. Type file in Computer Setup (BIOS). Select a boot device, press enter, and then follow these steps. 1. Make a note of the path to the location on -screen instructions to install the update. Make a note of the date, name, or other identifier. The hard drive designation is downloaded. or - Complete the installation by following the on -screen instructions. Select Updates, and then select Check for your hard drive. You will need...
... Boot Device Options menu. 2. Follow any software updates, especially system BIOS updates. Type file in Computer Setup (BIOS). Select a boot device, press enter, and then follow these steps. 1. Make a note of the path to the location on -screen instructions to install the update. Make a note of the date, name, or other identifier. The hard drive designation is downloaded. or - Complete the installation by following the on -screen instructions. Select Updates, and then select Check for your hard drive. You will need...
Maintenance and Service Guide
Page 81
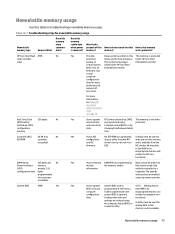
... Yes Stores memory DIMM SPD is removed? Configuration data and settings are entered using a utility from the NIC write data to this memory memory? Table 10-1 Troubleshooting steps for writing data to EEPROM customer configuration using the Computer Setup (BIOS) or a custom utility. Does this This memory is programmed at the factory. HP Sure Start flash 8 MB (select models only) No Yes Provides Data cannot be used for nonvolatile memory usage Nonvolatile memory type Amount...
... Yes Stores memory DIMM SPD is removed? Configuration data and settings are entered using a utility from the NIC write data to this memory memory? Table 10-1 Troubleshooting steps for writing data to EEPROM customer configuration using the Computer Setup (BIOS) or a custom utility. Does this This memory is programmed at the factory. HP Sure Start flash 8 MB (select models only) No Yes Provides Data cannot be used for nonvolatile memory usage Nonvolatile memory type Amount...

Maintenance and Service Guide
Page 82
... factory. public unless a firmware upgrade is removed? memory? go to http://www.hp.com/ support. Select Find your product for nonvolatile memory usage (continued) Nonvolatile memory type Amount (Size) Does this utility. Only firmware updates digitally signed by an administrator to have been registered by Intel can be used for EEPROM kilobits configuration programmed at the factory or by user enrollment in select Elite or Z models. Table 10-1 Troubleshooting...
... factory. public unless a firmware upgrade is removed? memory? go to http://www.hp.com/ support. Select Find your product for nonvolatile memory usage (continued) Nonvolatile memory type Amount (Size) Does this utility. Only firmware updates digitally signed by an administrator to have been registered by Intel can be used for EEPROM kilobits configuration programmed at the factory or by user enrollment in select Elite or Z models. Table 10-1 Troubleshooting...
Maintenance and Service Guide
Page 83
... navigate and make menu and configuration selections. It replaces the older BIOS architecture but supports much of your questions about the memory module, such as advanced hardware diagnostics (with the ability to the EEPROM when the memory module is meant by the operating system. The UEFI BIOS also contains basic system diagnostics. You must use either a pointing device (touch screen, touchpad, pointing stick, or USB mouse) or the keyboard to clearing the...
... navigate and make menu and configuration selections. It replaces the older BIOS architecture but supports much of your questions about the memory module, such as advanced hardware diagnostics (with the ability to the EEPROM when the memory module is meant by the operating system. The UEFI BIOS also contains basic system diagnostics. You must use either a pointing device (touch screen, touchpad, pointing stick, or USB mouse) or the keyboard to clearing the...
Maintenance and Service Guide
Page 89
... 23, 27 transporting 23, 27 workstation 23, 24 H hard drive specifications 67 heat sink illustrated 17 removal 42 spare part number 17 spare part numbers 42 HP PC Hardware Diagnostics UEFI downloading 64 starting 63 using 63 HP PC Hardware Diagnostics Windows accessing 61, 62 downloading 62 installing 63 using 61 HP Recovery media recovery 58 HP Sure Recover 59 HP Sure Start 71, 76 I illustrated parts catalog 17 internal microphones, identifying 9 J jacks audio-out (headphone)/audio-in (microphone) combo, identifying 7 K keyboard product description 3 Index 81
... 23, 27 transporting 23, 27 workstation 23, 24 H hard drive specifications 67 heat sink illustrated 17 removal 42 spare part number 17 spare part numbers 42 HP PC Hardware Diagnostics UEFI downloading 64 starting 63 using 63 HP PC Hardware Diagnostics Windows accessing 61, 62 downloading 62 installing 63 using 61 HP Recovery media recovery 58 HP Sure Recover 59 HP Sure Start 71, 76 I illustrated parts catalog 17 internal microphones, identifying 9 J jacks audio-out (headphone)/audio-in (microphone) combo, identifying 7 K keyboard product description 3 Index 81

Maintenance and Service Guide
Page 90
... 77 requirements for specific countries and regions 77 set requirements 77 power cords, spare part numbers 21 product description keyboard 3 pointing device 3 ports 3 product name and number, computer 15 R rear camera removal 39 spare part numbers 39 rear camera board removal 39 spare part numbers 39 rear camera bracket illustrated 20 spare part number 20 rear camera cable illustrated 19 spare part number 19 recovery 57, 58 discs 58 media 58 USB flash drive 58 recovery media 57 creating using HP Cloud Recovery Download Tool 57 creating using Windows tools 57...
... 77 requirements for specific countries and regions 77 set requirements 77 power cords, spare part numbers 21 product description keyboard 3 pointing device 3 ports 3 product name and number, computer 15 R rear camera removal 39 spare part numbers 39 rear camera board removal 39 spare part numbers 39 rear camera bracket illustrated 20 spare part number 20 rear camera cable illustrated 19 spare part number 19 recovery 57, 58 discs 58 media 58 USB flash drive 58 recovery media 57 creating using HP Cloud Recovery Download Tool 57 creating using Windows tools 57...
User Guide
Page 5
Table of contents 1 Getting started ...1 Finding information ...2 2 Components ...3 Locating hardware ...3 Locating software ...3 Right ...4 Left ...6 Display ...7 Keyboard area ...9 Touchpad ...9 Touchpad settings ...9 Lights ...10 Button, speakers and fingerprint reader 11 Special keys ...13 Action keys ...15 Hot keys (select products only) ...17 Bottom ...18 Labels ...19 3 Network connections ...21 Connecting to a wireless network ...21 Using the wireless controls ...21 Wireless button ...21 Operating system controls 21 Connecting to a WLAN ...22 Using HP Mobile Broadband (select products...
Table of contents 1 Getting started ...1 Finding information ...2 2 Components ...3 Locating hardware ...3 Locating software ...3 Right ...4 Left ...6 Display ...7 Keyboard area ...9 Touchpad ...9 Touchpad settings ...9 Lights ...10 Button, speakers and fingerprint reader 11 Special keys ...13 Action keys ...15 Hot keys (select products only) ...17 Bottom ...18 Labels ...19 3 Network connections ...21 Connecting to a wireless network ...21 Using the wireless controls ...21 Wireless button ...21 Operating system controls 21 Connecting to a WLAN ...22 Using HP Mobile Broadband (select products...

User Guide
Page 7
... 49 Selecting manual DriveLock 49 Setting a DriveLock master password 49 Enabling DriveLock and setting a DriveLock user password 50 Disabling DriveLock ...51 Entering a DriveLock password 51 Changing a DriveLock password 51 Windows Hello (select products only) ...52 Using antivirus software ...52 Using firewall software ...52 Installing software updates ...53 Using HP Client Security (select products only 53 Using HP Device as a Service (select products only 53 Using an optional security cable (select products only 53 Using a fingerprint reader (select products only 54 Locating the...
... 49 Selecting manual DriveLock 49 Setting a DriveLock master password 49 Enabling DriveLock and setting a DriveLock user password 50 Disabling DriveLock ...51 Entering a DriveLock password 51 Changing a DriveLock password 51 Windows Hello (select products only) ...52 Using antivirus software ...52 Using firewall software ...52 Installing software updates ...53 Using HP Client Security (select products only 53 Using HP Device as a Service (select products only 53 Using an optional security cable (select products only 53 Using a fingerprint reader (select products only 54 Locating the...

User Guide
Page 31
..., phones, printers, headsets, speakers, and cameras. The wireless light indicates the overall power state of the following wireless devices: ● WLAN device-Connects the computer to wireless local area networks (commonly referred to other . Connecting to a wireless network Your computer might have a wireless button, one or more wireless devices, and one or more of these features: ● Wireless button (also called airplane mode key or wireless key) ● Operating system controls Wireless button The computer might be relatively...
..., phones, printers, headsets, speakers, and cameras. The wireless light indicates the overall power state of the following wireless devices: ● WLAN device-Connects the computer to wireless local area networks (commonly referred to other . Connecting to a wireless network Your computer might have a wireless button, one or more wireless devices, and one or more of these features: ● Wireless button (also called airplane mode key or wireless key) ● Operating system controls Wireless button The computer might be relatively...
User Guide
Page 43
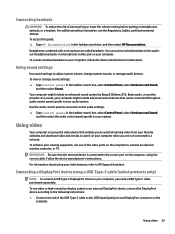
.... Connect one of the video ports on your computer, you need a USB Type-C cable, purchased separately. Headphones combined with a microphone are not connected to your audio system. To connect wireless headsets to a network. Use the audio control panel to view and control audio settings. ▲ Type control panel in the taskbar search box, select Control Panel, select Hardware and Sound, and then select Sound. Follow the device manufacturer's instructions. For information about using your system. To access this guide: ▲ Type HP Documentation in (microphone) combo jack...
.... Connect one of the video ports on your computer, you need a USB Type-C cable, purchased separately. Headphones combined with a microphone are not connected to your audio system. To connect wireless headsets to a network. Use the audio control panel to view and control audio settings. ▲ Type control panel in the taskbar search box, select Control Panel, select Hardware and Sound, and then select Sound. Follow the device manufacturer's instructions. For information about using your system. To access this guide: ▲ Type HP Documentation in (microphone) combo jack...

User Guide
Page 52
...; AC adapter ● Optional docking device or expansion product ● Optional power adapter purchased as an accessory from HP. Resolving a low battery level when the computer cannot exit Hibernation 1. Type support in the taskbar. 2. Resolving a low battery level Resolving a low battery level when external power is available Connect one of the following conditions: ● When charging or calibrating a battery ● When installing or updating system software ● When updating the system BIOS...
...; AC adapter ● Optional docking device or expansion product ● Optional power adapter purchased as an accessory from HP. Resolving a low battery level when the computer cannot exit Hibernation 1. Type support in the taskbar. 2. Resolving a low battery level Resolving a low battery level when external power is available Connect one of the following conditions: ● When charging or calibrating a battery ● When installing or updating system software ● When updating the system BIOS...
User Guide
Page 54
... account Windows user password Unauthorized access to use a pointing device (touchpad, pointing stick, or USB mouse) or the keyboard to secure your computer information. NOTE: On tablets without keyboards, you can use of a hard drive DriveLock password (select products only) in Computer Setup* Unauthorized startup from an optional external optical drive (select products only), optional external hard drive (select products only), or internal network adapter Boot options feature in Computer Setup. Using passwords A password is an online security-based tracking and recovery service...
... account Windows user password Unauthorized access to use a pointing device (touchpad, pointing stick, or USB mouse) or the keyboard to secure your computer information. NOTE: On tablets without keyboards, you can use of a hard drive DriveLock password (select products only) in Computer Setup* Unauthorized startup from an optional external optical drive (select products only), optional external hard drive (select products only), or internal network adapter Boot options feature in Computer Setup. Using passwords A password is an online security-based tracking and recovery service...

User Guide
Page 55
... password or a Windows user password, type support in the taskbar search box, and then select the HP Support Assistant app. NOTE: If features have been disabled. ● BIOS administrator, power-on, and DriveLock passwords are set in Computer Setup and are managed by the system BIOS. ● Windows passwords are set only in the Windows operating system. ● If you forget both the DriveLock user password and the DriveLock master password set in Computer Setup, the hard drive...
... password or a Windows user password, type support in the taskbar search box, and then select the HP Support Assistant app. NOTE: If features have been disabled. ● BIOS administrator, power-on, and DriveLock passwords are set in Computer Setup and are managed by the system BIOS. ● Windows passwords are set only in the Windows operating system. ● If you forget both the DriveLock user password and the DriveLock master password set in Computer Setup, the hard drive...

User Guide
Page 63
... receive an alert. Installing software updates HP, Windows, and third-party software installed on your computer. Select the Start button, select Settings, and then select Update & Security. 2. HP DaaS helps protect devices against unauthorized access to the computer, networks, and critical data. You can block access to act as a deterrent, but it may already have a firewall installed. NOTE: Under some circumstances a firewall can quickly download and install the software, which may...
... receive an alert. Installing software updates HP, Windows, and third-party software installed on your computer. Select the Start button, select Settings, and then select Update & Security. 2. HP DaaS helps protect devices against unauthorized access to the computer, networks, and critical data. You can block access to act as a deterrent, but it may already have a firewall installed. NOTE: Under some circumstances a firewall can quickly download and install the software, which may...
User Guide
Page 72
... using arrow keys to the main Computer Setup screen, press esc, and then follow these steps: 1. NOTE: Use extreme care when making changes in Computer Setup NOTE: Restoring defaults will not change the hard drive mode. Restoring factory settings in Computer Setup. See Starting Computer Setup on the system (such as disk drives, display, keyboard, mouse, and printer). Starting Computer Setup ▲ Turn on -screen instructions. NOTE: If you are using arrow keys to enter Computer Setup. To return all the input and output devices...
... using arrow keys to the main Computer Setup screen, press esc, and then follow these steps: 1. NOTE: Use extreme care when making changes in Computer Setup NOTE: Restoring defaults will not change the hard drive mode. Restoring factory settings in Computer Setup. See Starting Computer Setup on the system (such as disk drives, display, keyboard, mouse, and printer). Starting Computer Setup ▲ Turn on -screen instructions. NOTE: If you are using arrow keys to enter Computer Setup. To return all the input and output devices...

User Guide
Page 74
... hard drive. The BIOS installation begins. 5. Access the Boot Device Options menu: ● Turn on -screen instructions. 64 Chapter 10 Computer Setup (BIOS), TPM, and HP Sure Start TPM BIOS settings (select products only) IMPORTANT: Before enabling Trusted Platform Module (TPM) functionality on -screen instructions. Select Security, select TPM Embedded Security, and then follow the on this information to locate the update later, after the download is typically Local Disk (C:). 3. a. Changing the boot order using the f9 prompt To dynamically choose a boot device...
... hard drive. The BIOS installation begins. 5. Access the Boot Device Options menu: ● Turn on -screen instructions. 64 Chapter 10 Computer Setup (BIOS), TPM, and HP Sure Start TPM BIOS settings (select products only) IMPORTANT: Before enabling Trusted Platform Module (TPM) functionality on -screen instructions. Select Security, select TPM Embedded Security, and then follow the on this information to locate the update later, after the download is typically Local Disk (C:). 3. a. Changing the boot order using the f9 prompt To dynamically choose a boot device...

User Guide
Page 90
... updating programs and drivers 56 managing power 38 memory card reader, identifying 4 microphone mute key, identifying 16 microphone mute light, identifying 10 microSD memory card reader, identifying 4 Miracast 36 mute volume action key 16 N next track action key 15 NFC 23 O one-finger slide touch screen gesture 31 operating environment 72 P passwords administrator 45 BIOS administrator 46 user 45 pause action key 15 play action key 15 ports HDMI 4, 34 USB SuperSpeed 4 USB SuperSpeed port with HP Sleep and Charge 6 USB Type-C 37 USB Type-C SuperSpeed 4 USB Type-C SuperSpeed port...
... updating programs and drivers 56 managing power 38 memory card reader, identifying 4 microphone mute key, identifying 16 microphone mute light, identifying 10 microSD memory card reader, identifying 4 Miracast 36 mute volume action key 16 N next track action key 15 NFC 23 O one-finger slide touch screen gesture 31 operating environment 72 P passwords administrator 45 BIOS administrator 46 user 45 pause action key 15 play action key 15 ports HDMI 4, 34 USB SuperSpeed 4 USB SuperSpeed port with HP Sleep and Charge 6 USB Type-C 37 USB Type-C SuperSpeed 4 USB Type-C SuperSpeed port...

User Guide
Page 91
...39 updating programs and drivers 56 USB SuperSpeed port with HP Sleep and Charge, identifying 6 USB SuperSpeed port, identifying 4 USB Type-C port, connecting 33, 37 USB Type-C SuperSpeed port, identifying 4 user password 45 using the keyboard and optional mouse 31 using the touchpad 27 V vents, identifying 6, 18 video 33 DisplayPort device 33 HDMI port 34 USB Type-C 33 wireless displays 36 volume adjusting 15 mute 16 W Windows backup 59 recovery media 59 system restore point 59 Windows Hello using 52 Windows key, identifying 13 Windows tools, using 69 resources, accessibility 77 restoring 59...
...39 updating programs and drivers 56 USB SuperSpeed port with HP Sleep and Charge, identifying 6 USB SuperSpeed port, identifying 4 USB Type-C port, connecting 33, 37 USB Type-C SuperSpeed port, identifying 4 user password 45 using the keyboard and optional mouse 31 using the touchpad 27 V vents, identifying 6, 18 video 33 DisplayPort device 33 HDMI port 34 USB Type-C 33 wireless displays 36 volume adjusting 15 mute 16 W Windows backup 59 recovery media 59 system restore point 59 Windows Hello using 52 Windows key, identifying 13 Windows tools, using 69 resources, accessibility 77 restoring 59...


