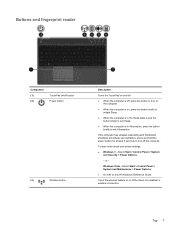
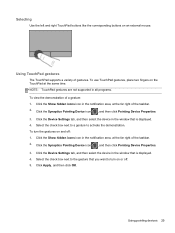
HP Notebook Reference Guide - Windows 7
Page 9
Cleaning the sides and cover 64 Cleaning the TouchPad and keyboard 64 Updating programs and drivers ...64 Using SoftPaq Download Manager ...65 9 Computer Setup (BIOS) and Advanced System Diagnostics 66 Using Computer Setup ...66 ... ...75 Using Client Management Solutions 75 Configuring and deploying a software image 75 Managing and updating software 76 HP Client Manager for Altiris (select models only 76 HP CCM (Client Configuration Manager) (select models only 77 HP SSM (System Software Manager 77 Using Intel Active Management Technology (select models only 78 Enabling the iAMT...
HP Notebook Reference Guide - Windows 7
Page 32
When Sleep is closed, open the display. ● Press a key on the keyboard. ● Tap or swipe the TouchPad. When Hibernation is initiated, your work returns to the screen as it was before your work will return to the screen. 22 Chapter 4 Power management ...
HP Notebook Reference Guide - Windows 7
Page 63
... an optional security cable) *Computer Setup is a preinstalled, ROM-based utility that can be used even when the operating system is an HP ProtectTools Security Manager password, can be set in Windows or in the non-Windows Computer Setup utility that you choose to access the utility.... tips for creating and saving passwords: ● When creating passwords, follow requirements set in Computer Setup, you can also use either a pointing device (TouchPad, pointing stick, or USB mouse) or the keyboard to your passwords and store them in a secure place away from the computer. ● Do...
HP Notebook Reference Guide - Windows 7
Page 72
... finger. You may also use the fingerprint reader to fill in one of the following areas of your computer: ● Near the bottom of the TouchPad ● On the right side of the keyboard ● On the upper-right side of the display ● On the left side of the display...
HP Notebook Reference Guide - Windows 7
Page 74
...keyboard CAUTION: When cleaning the TouchPad and keyboard, do not use a vacuum cleaner attachment to clean the keyboard. Updating programs and drivers HP recommends that you update your programs and drivers on the keyboard surface. WARNING! Go to http://www.hp.com/support to aid in...on a regular basis with the latest versions. A vacuum cleaner can permanently damage internal components. ● To clean and disinfect the TouchPad and keyboard, use a soft microfiber cloth or chamois moistened with one of the cleaning solutions listed previously or use an acceptable germicidal disposable...
HP Notebook Reference Guide - Windows 7
Page 76
... scroll up and down, click the up arrow or the down arrow in the upper-right corner of the screen, or use either a pointing device (TouchPad, pointing stick, or USB mouse) or the keyboard to the main Computer Setup screen, press esc, and then follow the on or restart the computer...
HP ProtectTools Getting Started - Windows 7 and Windows Vista
Page 87
...Unmanaged Device Classes on the basis of group membership or for individual users. ● For device classes such as a mouse, keyboard, TouchPad, and fingerprint reader, are otherwise denied. ● Administrators and trusted users can be excluded from the restrictions on device access imposed by ...drives and DVD drives, read access and write access can be allowed or denied separately. 79 Windows® operating system administrators use HP ProtectTools Device Access Manager to control access to the devices on a system and to protect against unauthorized access: ● Device ...
Installing Microsoft Windows on an HP ProBook or EliteBook Notebook PC and creating an image
Page 5
...XP Intel PRO / W ireless Drivers for Microsoft W indows 7 Intel PRO / W ireless Drivers for Microsoft W indows Vista Java C ard Security for HP ProtectTools 13.0.0 13.0.0 13.0.0 5.0.4.1 X X X X Required No Required No X Required No O ptiona l No X LightScribe System Softwa re 1.18...12 188.12 X X Required No X Required No Required No Privacy Mana ger for HP ProtectTools 5.0.1.734 X X O ptiona l No X Ricoh Media C a rd Driver 2.13.00.05 X X Required No X Syna ptics Touchpad Driver 14.0.19 X X Recommended N o X System Default Settings 6.0.3.9 X O ...
Getting Started HP Notebook - Windows Vista and Windows 7
Page 5
Table of contents 1 Welcome ...1 Finding information ...2 2 Getting to know your computer ...4 Top ...4 TouchPad ...4 Lights ...5 Buttons and fingerprint reader 7 Keys ...9 Front ...10 Right ...11 Left ...12 Display ...13 Rear ...14 Bottom ...15 3 Networking ...17 Using an Internet ...a wireless network ...18 Connecting to an existing WLAN 19 Setting up a new WLAN network 20 Configuring a wireless router 21 Protecting your WLAN 21 4 HP QuickWeb ...22 Getting started ...22 Starting HP QuickWeb ...23 5 Keyboard and pointing devices ...24 Using the keyboard ...25 Identifying the hotkeys ...25 v
Getting Started HP Notebook - Windows Vista and Windows 7
Page 6
...pointing devices ...27 Setting pointing device preferences 27 Using the pointing stick ...27 Using the TouchPad ...27 Turning the TouchPad off and on 28 Navigating ...28 Selecting ...29 Using TouchPad gestures 29 Scrolling 30 Pinching/Zooming 30 Rotating 31 6 Maintenance ...32 Inserting or removing ...Cleaning your computer ...45 Cleaning products ...45 Cleaning procedures ...45 Cleaning the display 45 Cleaning the sides and cover 45 Cleaning the TouchPad and keyboard 46 7 Backup and recovery ...47 Windows 7 ...47 Backing up your information 47 Performing a system recovery 48 Using the...
Getting Started HP Notebook - Windows Vista and Windows 7
Page 12
Can be used with the pointing stick and functions like the left button on the screen. Turns the TouchPad on and off. 4 Chapter 2 Getting to know your computer ● Top ● Front ● Right ● Left ● Display ● Rear ● Bottom Top TouchPad Component (1) Pointing stick (select models only) (2) Left pointing stick button (3) TouchPad on/off button Description Moves the pointer and selects or activates items on an external mouse. 2 Getting to know your computer
Getting Started HP Notebook - Windows Vista and Windows 7
Page 13
... Right pointing stick button Right TouchPad button Description Moves the pointer and selects or activates items on an external mouse. Functions like the left button on the screen. Functions like the ... as a wireless local area network (WLAN) device and/or a Bluetooth® device, is on . Top 5 Component (1) TouchPad light (2) Caps lock light (3) Power light (4) Wireless light Description ● Amber: The TouchPad is off. ● Off: The TouchPad is on . ● Amber: All wireless devices are off or in the Sleep state. ● Off: The...
Getting Started HP Notebook - Windows Vista and Windows 7
Page 15
.... Turns the wireless feature on or off the computer. Top 7 Buttons and fingerprint reader Component (1) (2) TouchPad on/off button Power button (3) Wireless button Description Turns the TouchPad on and off. ● When the computer is off, press the button to turn off but does ...not establish a wireless connection. or - Windows Vista-Select Start > Control Panel > System and Maintenance > Power Options ● Or refer to the HP Notebook Reference Guide...
Getting Started HP Notebook - Windows Vista and Windows 7
Page 35
... off on an external keypad as button configuration, click speed, and pointer options. Then right-click the device representing your finger from the TouchPad to the scroll zone does not activate the scrolling function. NOTE: If you want the pointer to customize settings for pointing devices, such ...as you want to move the pointer, slide one of the TouchPad. Using an optional external numeric keypad Keys on most external numeric keypads function differently according to whether num lock is on or off. (...
Getting Started HP Notebook - Windows Vista and Windows 7
Page 36
Turning the TouchPad off and on To turn the TouchPad off and on, quickly double-tap the TouchPad on . TouchPad light Amber Icon Description Indicates that the TouchPad is off button. Navigating To move the pointer, slide one finger across the TouchPad in the direction you want the pointer to go. 28 Chapter 5 Keyboard and pointing devices Off Indicates that the TouchPad is on /off . The following table shows and describes the TouchPad display icons.
Getting Started HP Notebook - Windows Vista and Windows 7
Page 37
...activate the demonstration. Click the Synaptics Pointing Device icon , and then click Pointing Device Properties. 3. Using pointing devices 29 NOTE: TouchPad gestures are not supported in the window that is displayed. 4. Click the Device Settings tab, and then select the device in all...the Device Settings tab, and then select the device in the notification area, at the far right of the taskbar. 2. Using TouchPad gestures The TouchPad supports a variety of a gesture: 1. Click the Synaptics Pointing Device icon , and then click Pointing Device Properties. 3. Selecting Use ...
Getting Started HP Notebook - Windows Vista and Windows 7
Page 38
NOTE: Scrolling speed is controlled by placing two fingers apart on the TouchPad, and then drag them across the TouchPad in by placing two fingers together on the TouchPad, and then moving them together. Pinching/Zooming Pinching allows you to zoom in or out on images or text. ● Zoom .... 30 Chapter 5 Keyboard and pointing devices NOTE: Two-finger scrolling is enabled at the factory. To scroll, place two fingers slightly apart on the TouchPad, and then moving them apart. ● Zoom out by finger speed. Scrolling Scrolling is useful for moving up , down , or sideways on a...
Getting Started HP Notebook - Windows Vista and Windows 7
Page 39
NOTE: Rotating must be done within the TouchPad zone. Using pointing devices 31 NOTE: Rotating is disabled at the factory. To rotate, anchor your right forefinger from 12 o'clock to 3 o'clock. Move the right forefinger around the anchored finger in the TouchPad zone. Rotating Rotating allows you to 12 o'clock. To reverse the rotation, move your left forefinger in a sweeping motion, moving from 3 o'clock to rotate items such as photos.
Getting Started HP Notebook - Windows Vista and Windows 7
Page 54
This can permanently damage internal components. ● To clean and disinfect the TouchPad and keyboard, use a soft microfiber cloth or chamois moistened with a straw extension. 46 Chapter 6 Maintenance Cleaning the TouchPad and keyboard WARNING! To reduce the risk of the cleaning solutions listed in Cleaning products on... the keyboard surface. CAUTION: When cleaning the TouchPad and keyboard, do not use a can deposit household debris on page 45 or use an acceptable germicidal disposable wipe. ●...
Getting Started HP Notebook - Windows Vista and Windows 7
Page 68
..., identifying 15 bottom cover, removing or replacing 34 buttons calculator 8 left pointing stick button 4 left TouchPad 5 optical drive eject 11 power 7 QuickWeb 8 right pointing stick button 5 right TouchPad 5 TouchPad 7 TouchPad on/off 4 volume mute 8 wireless 7 C calculator button, identifying 8 calculator light 6 caps lock... charge 26 decrease screen brightness 26 description 25 increase screen brightness 26 Sleep 25 switching screen image 25 using 25 HP QuickWeb light 6 I input power 58 integrated numeric keypad, identifying 9, 26 integrated webcam light, identifying 13 internal display...