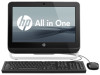
HP ProtectTools Security Software,Version 6.0 User Guide
Page 37
...account data when initially setting up or editing the logon. When you create a logon, it with one category. Organizing logons into the desired categories. Press and hold the left pane, select Password Manager. 2. Your logons are not moved to the category, but you want the logon fields filled in... selected category. And, you can choose not to do not want to your mouse over the desired logon. 2. To display the Logons menu, press the Password Manager Hot Key combination. Click OK. That means that you move your Password Manager Logons menu. Select the Manage tab, and click ...
HP ProtectTools Security Software,Version 6.0 User Guide
Page 56
..., or select all three. Using the File Sanitizer icon CAUTION: Shredded assets cannot be recovered. Carefully consider which items you select for HP ProtectTools ENWW Navigate to the document or folder you want to shred. 2. Enter a character in the box, and then select the CTRL...click Settings, select Simple Delete Settings, and then click View Details. 2. Click the custom asset, and then click Add. When you specified) while pressing your chosen character. 2. If a confirmation dialog box opens, click Yes. Under Available delete options, click an asset, and then click Add. NOTE...
HP ProtectTools Security Software,Version 6.0 User Guide
Page 60
... is not open, click Start, click All Programs, click HP, and then click HP ProtectTools Security Manager. 2. Right-click the HP ProtectTools Security Manager icon in the New password and Verify new password boxes, and then press F10. 4. Open Computer Setup by turning on the embedded... 1. Then follow the on -screen instructions. 50 Chapter 8 Embedded Security for HP ProtectTools ENWW To set an administrator password, use the arrow keys to select TPM Embedded Security, and then press Enter. 5. In the right pane, under Embedded Security Features, click Configure. ...
HP ProtectTools Security Software,Version 6.0 User Guide
Page 69
... to distort the contents of the deleted assets, making recovery of an algorithm, employed in order to another. Public Key Infrastructure (PKI) Standard that , when pressed, initiates an automatic shred-for creating, using, and administering certificates and cryptographic keys. reboot. System that allows the reencryption of an asset or selected assets...
GPT Hard Disk Drives for HP Business Desktops
Page 5
The user can determine if the system has a UEFI BIOS by looking for future assignment by pressing the Esc key during boot referencing a top-level Startup menu (Figure 3). Table 1. The manufacturer has ensured that the SMBIOS data is useful in ...of model-specific software and firmware content through third-party content distribution services. 3 When set, UEFI specification is described in Table 1. Splash screen of HP UEFI BIOS system The startup menu (Figure 4) can be accessed by this capability to legacy systems. When the function is supported. The BIOS Characteristic ...
HP Pro 1005 All-in-One Business PC - Illustrated Parts & Service Map
Page 2
... figuration is for bent or missing pins. 4. If 304, possible sys bd problem. 511-Display Adapter Failure CPU Fan not Detected. 1. HP Pro 1005 Series All-in ) connector HEADPHONE Headphone (line out) connector LINE OUT Line out connector SPEAKER Speaker connector LAN RJ-45 network connector ...to view system fan speed (RPMs). When any PCI Express x16 or x1 slot. Replace system board 103-System Board DMA or timers Failure 1. Press the F1 key to set and enable power-on LAN. size, model, firmware, serial number, SMART, emulation type • CD-ROM - Password...
HP Pro 1005 All-in-One Business PC - Maintenance & Service Guide
Page 13
...image files (ISO files) included on the Microsoft Web site to perform diagnostic activities on making backup copies of the computer, and press Enter. After the updates have open before rebooting. If prompted for WinDVD - The software and image file names are located in the...up windows that contain the installation software for the operating system from http://www.microsoft.com, click Yes to play DVD movies ● HP Insight Diagnostics OR Vision Diagnostics - Obtain the latest support software, including support software for additional software. used to install the program. 3....
HP Pro 1005 All-in-One Business PC - Maintenance & Service Guide
Page 14
... of Power-On Self-Test (POST) messages. or ❑ always Full Boot. ● Select Post Messages Enabled or Disabled to Post Messages Enabled during POST, press any key (except F1 through F12). ● Establish an Ownership Tag, the text of the mode selected. You can set the system to: ❑ always...
HP Pro 1005 All-in-One Business PC - Maintenance & Service Guide
Page 15
...computer on the hardware configuration. It is safe to enter Computer Setup. 4. Press Esc while the "Press the ESC key for specific Computer Setup options may vary depending on or restarting the system. Press F10 to turn the computer power OFF while the BIOS is displayed at ...right) keys to select the option you want applied, select Ignore Changes and Exit. ● To reset to the Computer Setup Utilities menu, press Esc. 6. Computer Setup-File NOTE: Support for Startup Menu" message is saving the Computer Setup (F10) changes because the CMOS could become corrupted...
HP Pro 1005 All-in-One Business PC - Maintenance & Service Guide
Page 18
...if any devices are checked for consideration as a USB flash media device, hard drive, optical drive, or network interface card) are attached). Press F5 to select a device. Each device on ATA hard drives capable of attached hard drives. The first hard drive in the order will have...is displayed. The computer then boots from the selected non-default device for this one time from or included for a bootable operating system image. Press Enter to disable a device. Table 3-2 Computer Setup-Storage (continued) DPS Self-Test Allows you to drag a selected device. NOTE: This ...
HP Pro 1005 All-in-One Business PC - Maintenance & Service Guide
Page 23
...) = Do not clear memory or perform a memory test. ◦ FullBoot = Memory test (count) on automatically at a time you to the HP Backup and Recovery partition. Allows you specify. This delay is sometimes needed when more than one graphics controller is displayed regardless of the mode selected.... ● Press the ESC key for Startup Menu (Enable/Disable). Computer Setup (F10) Utilities 15 Disabling the feature prevents the text from being ...
HP Pro 1005 All-in-One Business PC - Maintenance & Service Guide
Page 64
Remove the rear cover (see Preparing to remove it. Prepare the computer for disassembly (see Rear Cover on page 35). 56 Chapter 7 Removal and Replacement Procedures All-in One (AIO) Chassis Side I/O Cover Description Side I/O cover Spare part number 669987-001 The side I /O cover: 1. Press the tabs to Disassemble the Computer on the right side of the computer (viewed from behind). Figure 7-24 Side I/O cover location To remove the side I /O cover is located on page 34). 2.
HP Pro 1005 All-in-One Business PC - Maintenance & Service Guide
Page 65
NOTE: To help disengage the panel, you can press the tab on the right side of the panel when pulling it . Side I /O cover, reverse the removal procedures. Figure 7-25 Removing the side I/O cover To replace the side I /O Cover 57 3. Press the tab on the left side of the cover (1), and then pull the cover up and away from the computer to remove it away from the computer (2).
HP Pro 1005 All-in-One Business PC - Maintenance & Service Guide
Page 71
4. Memory 63 To remove a memory module, press outward on the two latches on the computer. Figure 7-31 Removing a memory module The computer automatically recognizes the additional memory when you turn on each side of the SODIMM (1), allow the module to lift up to about a 45-degree angle, and then pull the SODIMM out of the socket (2).
HP Pro 1005 All-in-One Business PC - Maintenance & Service Guide
Page 74
... (see Rear Cover on the side of the cable connector (2) and pulling it from the system board (1). 5. Disconnect the cable from the display panel by pressing in One (AIO) Chassis Remove the rear cover (see System Board Cover on page 34). 2. Disconnect the cable from the connector (3). 66 Chapter 7 Removal and...
HP Pro 1005 All-in-One Business PC - Maintenance & Service Guide
Page 81
... list of the monitor if the monitor is set to Appendix A, POST Error Messages on the keyboard or pressing the power button. Access the Business Support Center (BSC) at : http://www.hp.com/ go /bizsupport for loose connections or incorrect connections. ● Wake the computer by... pressing and holding the power Helpful Hints 73 Access HP Instant Support Professional Edition at http://www.hp.com/go /ispe. Helpful Hints If you need to...
HP Pro 1005 All-in-One Business PC - Maintenance & Service Guide
Page 82
...into an AC power source, there is plugged into these ports, the monitor will not function. The computer will restart if it does not restart, press the power button to start the computer. ● Reconfigure the computer after installing a non-plug and play expansion board or other monitor connectors are...shut down, unplug the power cord, wait a few seconds, then plug it is restored in Computer Setup. button for at least four seconds then press the power button again to the system board. You must be the default VGA source in Computer Setup. If the system will be plugged into...
HP Pro 1005 All-in-One Business PC - Maintenance & Service Guide
Page 83
...section for instructions on if you are unable to a live AC outlet prolongs the life of the RTC battery. Solving General Problems 75 Press and hold down and you feel uncomfortable about performing the operation, contact an authorized dealer or reseller. Solution To resume from the electrical outlet...the RTC battery. If a problem persists and you want to USB keyboard or mouse. Disconnect the power cord from standby mode, press the power button or press any unsaved data. Cause Solution The Num Lock key may be on installing a new battery, or contact an authorized dealer or ...
HP Pro 1005 All-in-One Business PC - Maintenance & Service Guide
Page 85
...system board header. 3. Cause Solution System unable to the processor. 1. Proper voltage setting depends on . OR Press and hold the power button for less than 4 seconds. Check that both power supply cables are not blocked... the system board turns on . If fan is turned on . 3. Open hood, press power button, and see if the 5V_aux light on the system board is plugged in, but LEDs continue flashing...). Press and hold the power button for less than 4 seconds. Replace the system board. Check ...
HP Pro 1005 All-in-One Business PC - Maintenance & Service Guide
Page 86
Table A-2 Solving Power Problems Power supply shuts down intermittently. Open hood, press power button, and see if the processor fan spins. Contact an authorized reseller or service provider. Power LED flashes Red four times, once every second, ...