Drives
Page 5
...on the computer. Refer to the following cautions before writing to which they apply. Do not use x-rays instead of power, ensure that the battery pack is off or in a bubble-pack mailer or other suitable protective packaging and label the package "FRAGILE." Avoid exposing a drive to liquids.... Do not type on luggage, such as conveyor belts, use excessive force when inserting a drive into a drive bay. When the battery pack is sensitive to a drive, or loss of the drive. Avoid exposing a drive to another. ENWW 1 CAUTION To reduce the risk of damage to...
...on the computer. Refer to the following cautions before writing to which they apply. Do not use x-rays instead of power, ensure that the battery pack is off or in a bubble-pack mailer or other suitable protective packaging and label the package "FRAGILE." Avoid exposing a drive to liquids.... Do not type on luggage, such as conveyor belts, use excessive force when inserting a drive into a drive bay. When the battery pack is sensitive to a drive, or loss of the drive. Avoid exposing a drive to another. ENWW 1 CAUTION To reduce the risk of damage to...
Drives
Page 9
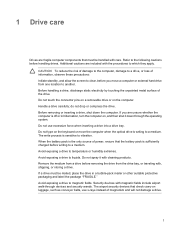
... drive CAUTION To prevent system lockup and loss of information: Shut down the computer before removing the hard drive from the AC outlet. 5. Remove the battery from the computer. 7. Then shut down the computer and close the display. 3.
... drive CAUTION To prevent system lockup and loss of information: Shut down the computer before removing the hard drive from the AC outlet. 5. Remove the battery from the computer. 7. Then shut down the computer and close the display. 3.
Drives
Page 15
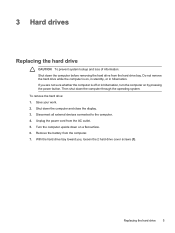
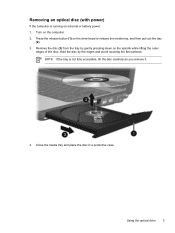
... the drive bezel to release the media tray, and then pull out the tray (2). 3. Removing an optical disc (with power) 11 Turn on external or battery power: 1. Close the media tray and place the disc in a protective case.
... the drive bezel to release the media tray, and then pull out the tray (2). 3. Removing an optical disc (with power) 11 Turn on external or battery power: 1. Close the media tray and place the disc in a protective case.
Drives
Page 16
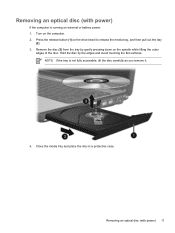
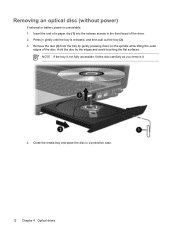
Press in gently until the tray is unavailable: 1. Removing an optical disc (without power) If external or battery power is released, and then pull out the tray (2). 3. NOTE If the tray is not fully accessible, tilt the disc carefully as you remove it. 4. ...
Press in gently until the tray is unavailable: 1. Removing an optical disc (without power) If external or battery power is released, and then pull out the tray (2). 3. NOTE If the tray is not fully accessible, tilt the disc carefully as you remove it. 4. ...
Memory Modules
Page 5
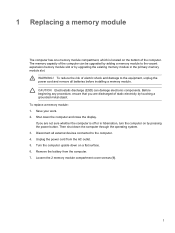
...the computer on by touching a grounded metal object. Disconnect all external devices connected to the equipment, unplug the power cord and remove all batteries before installing a memory module. Unplug the power cord from the computer. 7. To replace a memory module: 1. If you are not sure... of static electricity by pressing the power button. WARNING! The memory capacity of electric shock and damage to the computer. 4. Remove the battery from the AC outlet. 5. ENWW 1 Before beginning any procedure, ensure that you are discharged of the computer. 1 Replacing a memory ...
...the computer on by touching a grounded metal object. Disconnect all external devices connected to the equipment, unplug the power cord and remove all batteries before installing a memory module. Unplug the power cord from the computer. 7. To replace a memory module: 1. If you are not sure... of static electricity by pressing the power button. WARNING! The memory capacity of electric shock and damage to the computer. 4. Remove the battery from the AC outlet. 5. ENWW 1 Before beginning any procedure, ensure that you are discharged of the computer. 1 Replacing a memory ...

Memory Modules
Page 9
ENWW 5 14. Reconnect external power and external devices. 16. Turn on the computer. Replace the battery. 15.
ENWW 5 14. Reconnect external power and external devices. 16. Turn on the computer. Replace the battery. 15.
Multimedia Guide
Page 7
... you remove it. 4. ENWW Using the optical drive 3 Hold the disc by gently pressing down on the computer. 2. Press the release button (1) on external or battery power: 1. Close the media tray and place the disc in a protective case. Remove the disc (3) from the tray by the edges and avoid touching the...
... you remove it. 4. ENWW Using the optical drive 3 Hold the disc by gently pressing down on the computer. 2. Press the release button (1) on external or battery power: 1. Close the media tray and place the disc in a protective case. Remove the disc (3) from the tray by the edges and avoid touching the...

Multimedia Guide
Page 8
... gently until the tray is not fully accessible, tilt the disc carefully as you remove it. 4. Removing an optical disc (without power) If external or battery power is unavailable: 1.
... gently until the tray is not fully accessible, tilt the disc carefully as you remove it. 4. Removing an optical disc (without power) If external or battery power is unavailable: 1.
Multimedia Guide
Page 17
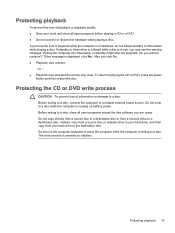
..., copy from a source disc or network drive to your hard drive, and then copy from a network drive to a disc while the computer is running on battery power. ENWW Protecting playback 13 The write process is writing to playing the CD or DVD, press the power button and then restart the disc...
..., copy from a source disc or network drive to your hard drive, and then copy from a network drive to a disc while the computer is running on battery power. ENWW Protecting playback 13 The write process is writing to playing the CD or DVD, press the power button and then restart the disc...
Notebook Tour Guide
Page 7
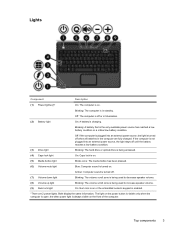
... of the computer. If the computer is not plugged into an external power source, the light is turned off until the battery reaches a low-battery condition. (3) Drive light Blinking: The hard drive or optical drive is being used to increase speaker volume. (9) Num lock...Power lights (2)* On: The computer is on or the embedded numeric keypad is enabled. *There are fully charged. Blinking: A battery that is charging. Blinking: The computer is in hibernation. (2) Battery light On: A battery is the only available power source has reached a lowbattery condition or a critical low...
... of the computer. If the computer is not plugged into an external power source, the light is turned off until the battery reaches a low-battery condition. (3) Drive light Blinking: The hard drive or optical drive is being used to increase speaker volume. (9) Num lock...Power lights (2)* On: The computer is on or the embedded numeric keypad is enabled. *There are fully charged. Blinking: A battery that is charging. Blinking: The computer is in hibernation. (2) Battery light On: A battery is the only available power source has reached a lowbattery condition or a critical low...
Notebook Tour Guide
Page 16
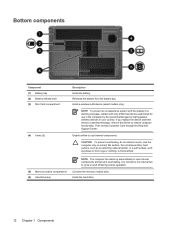
Holds a wireless LAN device (select models only). Contains the memory module slots. CAUTION To prevent overheating, do not obstruct vents. Releases the battery from the battery bay. Then contact Customer Care through the Help and Support Center. Holds the hard drive. 12 Chapter 1 Components ENWW Enable airflow to cool ... operation. If you replace the device and then receive a warning message, remove the device to cycle on a hard, flat surface. Bottom components Component (1) Battery bay (2) Battery release latch (3) Mini Card compartment (4) Vents (3) Description Holds the...
Holds a wireless LAN device (select models only). Contains the memory module slots. CAUTION To prevent overheating, do not obstruct vents. Releases the battery from the battery bay. Then contact Customer Care through the Help and Support Center. Holds the hard drive. 12 Chapter 1 Components ENWW Enable airflow to cool ... operation. If you replace the device and then receive a warning message, remove the device to cycle on a hard, flat surface. Bottom components Component (1) Battery bay (2) Battery release latch (3) Mini Card compartment (4) Vents (3) Description Holds the...
Notebook Tour Guide
Page 19
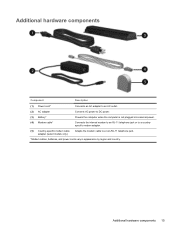
... only) Adapts the modem cable to DC power. Additional hardware components Component Description (1) Power cord* Connects an AC adapter to an AC outlet. (2) AC adapter (3) Battery* (4) Modem cable* Converts AC power to a non-RJ-11 telephone jack. *Modem cables...
... only) Adapts the modem cable to DC power. Additional hardware components Component Description (1) Power cord* Connects an AC adapter to an AC outlet. (2) AC adapter (3) Battery* (4) Modem cable* Converts AC power to a non-RJ-11 telephone jack. *Modem cables...
Notebook Tour Guide
Page 23
... 14 applications key, Windows 5 audio-in (microphone) jack, identifying 7 audio-out (headphone) jack, identifying 7 B battery bay 12, 16 battery light, identifying 3 battery release latch, identifying 12 battery, identifying 15 bays battery 12, 16 hard drive 12 Bluetooth label 16 buttons media 4 power 4 TouchPad 2 TouchPad on/off 2 volume mute ... Microsoft Certificate of Authenticity 16 modem approval 16 regulatory 16 service tag 16 wireless certification 16 WLAN 16 latch, battery release 12 lights battery 3 caps lock 3 drive 3 media button 3 Memory Reader 10 mute 3 num lock 3 ENWW Index 19
... 14 applications key, Windows 5 audio-in (microphone) jack, identifying 7 audio-out (headphone) jack, identifying 7 B battery bay 12, 16 battery light, identifying 3 battery release latch, identifying 12 battery, identifying 15 bays battery 12, 16 hard drive 12 Bluetooth label 16 buttons media 4 power 4 TouchPad 2 TouchPad on/off 2 volume mute ... Microsoft Certificate of Authenticity 16 modem approval 16 regulatory 16 service tag 16 wireless certification 16 WLAN 16 latch, battery release 12 lights battery 3 caps lock 3 drive 3 media button 3 Memory Reader 10 mute 3 num lock 3 ENWW Index 19
Notebook Tour Guide
Page 24
... name and number, computer 16 R rated input power specifications 18 regulatory information modem approval label 16 regulatory label 16 wireless certification labels 16 release latch, battery 12 RJ-11 (modem) cable, identifying 15 RJ-11 (modem) jack, identifying 9 RJ-45 (network) jack, identifying 10, 11 S S-Video-out jack, identifying 10, 11...
... name and number, computer 16 R rated input power specifications 18 regulatory information modem approval label 16 regulatory label 16 wireless certification labels 16 release latch, battery 12 RJ-11 (modem) cable, identifying 15 RJ-11 (modem) jack, identifying 9 RJ-45 (network) jack, identifying 10, 11 S S-Video-out jack, identifying 10, 11...
Power
Page 3
... 13 Displaying the Power Meter icon ...14 Setting or changing a power scheme 15 Setting a security prompt ...15 6 Processor performance controls 7 Batteries Inserting or removing a battery ...20 Charging a battery ...22 Monitoring the charge of a battery 22 Obtaining accurate charge information 22 Displaying charge information on the screen 23 Viewing charge displays 23 Interpreting charge indicators...
... 13 Displaying the Power Meter icon ...14 Setting or changing a power scheme 15 Setting a security prompt ...15 6 Processor performance controls 7 Batteries Inserting or removing a battery ...20 Charging a battery ...22 Monitoring the charge of a battery 22 Obtaining accurate charge information 22 Displaying charge information on the screen 23 Viewing charge displays 23 Interpreting charge indicators...
Power
Page 4
... power source is available 25 When the computer cannot restore from hibernation 25 Calibrating a battery ...26 When to calibrate ...26 How to calibrate ...26 Step 1: Charging the battery 26 Step 2: Discharging the battery 27 Step 3: Recharging the battery 28 Conserving battery power ...29 Conserving power as you work 29 Selecting power conservation settings 29 Storing...
... power source is available 25 When the computer cannot restore from hibernation 25 Calibrating a battery ...26 When to calibrate ...26 How to calibrate ...26 Step 1: Charging the battery 26 Step 2: Discharging the battery 27 Step 3: Recharging the battery 28 Conserving battery power ...29 Conserving power as you work 29 Selecting power conservation settings 29 Storing...
Power
Page 6
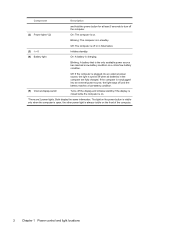
... the computer is the only available power source has reached a low-battery condition or a critical low-battery condition. Blinking: The computer is charging. Off: The computer is off or in hibernation. (3) fn+f5 Initiates standby. (4) Battery light On: A battery is in the computer are 2 power lights. Off: If the ...(5) Internal display switch Turns off the display and initiates standby if the display is closed while the computer is turned off when all batteries in standby. If the computer is not plugged into an external power source, the light is on. *There are fully charged. the...
... the computer is the only available power source has reached a low-battery condition or a critical low-battery condition. Blinking: The computer is charging. Off: The computer is off or in hibernation. (3) fn+f5 Initiates standby. (4) Battery light On: A battery is in the computer are 2 power lights. Off: If the ...(5) Internal display switch Turns off the display and initiates standby if the display is closed while the computer is turned off when all batteries in standby. If the computer is not plugged into an external power source, the light is on. *There are fully charged. the...
Power
Page 7
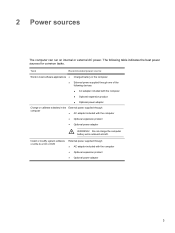
...; AC adapter included with the computer ● Optional expansion product ● Optional power adapter WARNING! Do not charge the computer battery while onboard aircraft. Install or modify system software or write to a CD or DVD External power supplied through computer ● AC... devices: ● AC adapter included with the computer ● Optional expansion product ● Optional power adapter Charge or calibrate a battery in the computer External power supplied through one of the following table indicates the best power sources for common tasks. 2 Power sources The...
...; AC adapter included with the computer ● Optional expansion product ● Optional power adapter WARNING! Do not charge the computer battery while onboard aircraft. Install or modify system software or write to a CD or DVD External power supplied through computer ● AC... devices: ● AC adapter included with the computer ● Optional expansion product ● Optional power adapter Charge or calibrate a battery in the computer External power supplied through one of the following table indicates the best power sources for common tasks. 2 Power sources The...
Power
Page 9
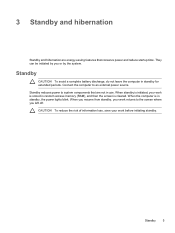
... use. When standby is initiated, your work returns to the screen where you left off. When the computer is cleared. Standby CAUTION To avoid a complete battery discharge, do not leave the computer in standby, the power lights blink. ENWW Standby 5 Standby reduces power to an external power source. They can be...
... use. When standby is initiated, your work returns to the screen where you left off. When the computer is cleared. Standby CAUTION To avoid a complete battery discharge, do not leave the computer in standby, the power lights blink. ENWW Standby 5 Standby reduces power to an external power source. They can be...
Power
Page 10
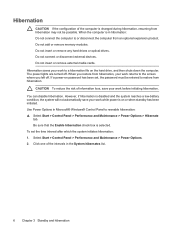
... external devices. Use Power Options in the System hibernates list. 6 Chapter 3 Standby and hibernation ENWW However, if hibernation is disabled and the system reaches a low-battery condition, the system will not automatically save your work before initiating hibernation. Do not insert or remove external media cards. Hibernation saves your work to...
... external devices. Use Power Options in the System hibernates list. 6 Chapter 3 Standby and hibernation ENWW However, if hibernation is disabled and the system reaches a low-battery condition, the system will not automatically save your work before initiating hibernation. Do not insert or remove external media cards. Hibernation saves your work to...


