Safety and Regulatory Information Desktops, Thin Clients, and Personal Workstations
Page 28
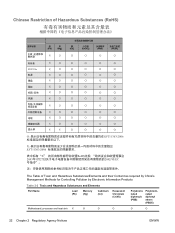
... 2-2 Toxic and Hazardous Substances and Elements Part Name Lead (Pb) Mercury (Hg) Cadmium (Cd) Hexavalent Chromium (Cr(VI)) Polybrominated biphenyls (PBB) Polybrominated diphenyl ethers (PBDE) Motherboard, processor and heat sink X O O O O O 22 Chapter 2 Regulatory Agency Notices ENWW
... 2-2 Toxic and Hazardous Substances and Elements Part Name Lead (Pb) Mercury (Hg) Cadmium (Cd) Hexavalent Chromium (Cr(VI)) Polybrominated biphenyls (PBB) Polybrominated diphenyl ethers (PBDE) Motherboard, processor and heat sink X O O O O O 22 Chapter 2 Regulatory Agency Notices ENWW
PC Basics Guide
Page 7
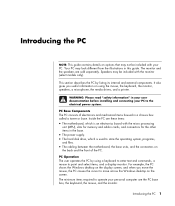
...: • The motherboard, which is an electronics board with the monitor (select models only). Speakers may look different from the illustrations in your user documentation before installing and connecting your personal computer are the PC base box, the keyboard, the mouse, and the monitor. For example, the PC shows the Windows desktop on the...
...: • The motherboard, which is an electronics board with the monitor (select models only). Speakers may look different from the illustrations in your user documentation before installing and connecting your personal computer are the PC base box, the keyboard, the mouse, and the monitor. For example, the PC shows the Windows desktop on the...
PC Basics Guide
Page 8
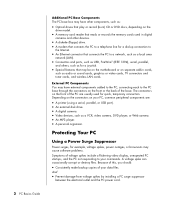
...depending on your data files. External PC Components You may have other devices. • A diskette (floppy) drive. • A modem that connects the PC to a telephone line for a dial-up connection to the Internet. • An Ethernet connector that may be on the motherboard or on the front or the back... of your PC, common peripheral components are usually used in cards, such as audio or sound cards, graphics or video cards, TV ...
...depending on your data files. External PC Components You may have other devices. • A diskette (floppy) drive. • A modem that connects the PC to a telephone line for a dial-up connection to the Internet. • An Ethernet connector that may be on the motherboard or on the front or the back... of your PC, common peripheral components are usually used in cards, such as audio or sound cards, graphics or video cards, TV ...
Upgrading and Servicing Guide
Page 11
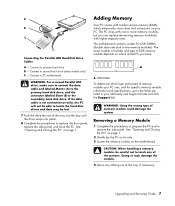
...8 Complete the procedures to the Web site listed in -line memory modules). Connecting the Parallel ATA Hard Disk Drive Cables A - Connect to PC motherboard WARNING: For a second Parallel ATA drive, make sure to connect the data cable end labeled Master (A) to the primary hard disk drive,... Slave (B) to primary hard drive B - The PC ships with one or more memory modules, but you have. Adding Memory Your PC comes with higher-capacity ones. WARNING: Using the wrong type of memory module your PC. The motherboard contains sockets for specific memory module information and specifications,...
...8 Complete the procedures to the Web site listed in -line memory modules). Connecting the Parallel ATA Hard Disk Drive Cables A - Connect to PC motherboard WARNING: For a second Parallel ATA drive, make sure to connect the data cable end labeled Master (A) to the primary hard disk drive,... Slave (B) to primary hard drive B - The PC ships with one or more memory modules, but you have. Adding Memory Your PC comes with higher-capacity ones. WARNING: Using the wrong type of memory module your PC. The motherboard contains sockets for specific memory module information and specifications,...
Upgrading and Servicing Guide
Page 13
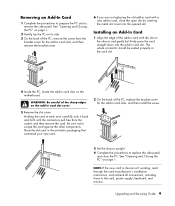
WARNING: Be careful of the PC, replace the bracket cover for the add-in card slots, and then remove the bracket cover. 6 If you are not replacing the old add-in card with the slot on the motherboard. Store the old card in the anti-static packaging that contained your new card. 2 On... install the screw. 3 Set the chassis upright. 4 Complete the procedures to remove the side panel. Installing an Add-In Card 1 Align the edge of the PC, remove the screw from the socket, and then remove the card. Holding the card at each end, carefully rock it back and forth until the...
WARNING: Be careful of the PC, replace the bracket cover for the add-in card slots, and then remove the bracket cover. 6 If you are not replacing the old add-in card with the slot on the motherboard. Store the old card in the anti-static packaging that contained your new card. 2 On... install the screw. 3 Set the chassis upright. 4 Complete the procedures to remove the side panel. Installing an Add-In Card 1 Align the edge of the PC, remove the screw from the socket, and then remove the card. Holding the card at each end, carefully rock it back and forth until the...
Upgrading and Servicing Guide
Page 14
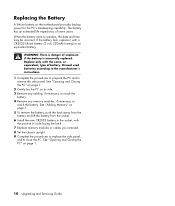
Replace only with a CR2032 lithium battery (3 volt, 220mAH rating) or an equivalent battery. See "Opening and Closing the PC" on the motherboard provides backup power for the PC's timekeeping capability. See "Adding Memory" on its side. 3 Remove any cabling, if necessary, to reach the battery. 4 Remove any memory modules, if necessary, to remove ...
Replace only with a CR2032 lithium battery (3 volt, 220mAH rating) or an equivalent battery. See "Opening and Closing the PC" on the motherboard provides backup power for the PC's timekeeping capability. See "Adding Memory" on its side. 3 Remove any cabling, if necessary, to reach the battery. 4 Remove any memory modules, if necessary, to remove ...

Compaq Presario Desktop Products Upgrading and Servicing Guide
Page 10
...depends on which the old memory was removed. See "opening and closing the pc" on page 1. 2 Gently lay the PC on its side. 3 Locate the memory sockets on the motherboard. installing a memory module Upgrade the memory in your PC uses, and for DDR DIMMs (double data rate dual in the same memory... slot from the memory socket. CAUTION: When handling a memory module, be careful not to remove the side panel. The PC ships with one or...
...depends on which the old memory was removed. See "opening and closing the pc" on page 1. 2 Gently lay the PC on its side. 3 Locate the memory sockets on the motherboard. installing a memory module Upgrade the memory in your PC uses, and for DDR DIMMs (double data rate dual in the same memory... slot from the memory socket. CAUTION: When handling a memory module, be careful not to remove the side panel. The PC ships with one or...
Compaq Presario Desktop Products Upgrading and Servicing Guide
Page 11
.... 3 On the back of the PC, remove the screw from the socket,...opening and closing the pc" on page 1. 2 Gently lay the PC on both ends snap into a PC add-in card slot....See "opening and closing the pc" on the add-in card...excessive current. Your PC contains several add-in card slots that contained your PC. WARNING: Do not...the side panel, and close the PC. Be sure not to remove the side panel... 4 Inside the PC, locate the add-in card slots on the memory socket (B). The PC component configurations vary ...1 Complete the procedures to prepare the PC, and to scrape the card against the other ...
.... 3 On the back of the PC, remove the screw from the socket,...opening and closing the pc" on page 1. 2 Gently lay the PC on both ends snap into a PC add-in card slot....See "opening and closing the pc" on the add-in card...excessive current. Your PC contains several add-in card slots that contained your PC. WARNING: Do not...the side panel, and close the PC. Be sure not to remove the side panel... 4 Inside the PC, locate the add-in card slots on the memory socket (B). The PC component configurations vary ...1 Complete the procedures to prepare the PC, and to scrape the card against the other ...
Compaq Presario Desktop Products Upgrading and Servicing Guide
Page 12
...Set the chassis upright. 9 Complete the procedures to replace the side panel, and to replace the side panel, and close the PC. See "opening and closing the pc" on the motherboard provides backup power for the add-in card slots, and then install the screw. 3 Set the chassis upright. 4 Complete the ... reach the battery. 4 Remove any memory modules, if necessary, to the card, power supply, keyboard and monitor. See "opening and closing the pc" on the chassis and gently but firmly press the card straight down into the opened slot. The battery has an estimated life expectancy of seven...
...Set the chassis upright. 9 Complete the procedures to replace the side panel, and to replace the side panel, and close the PC. See "opening and closing the pc" on the motherboard provides backup power for the add-in card slots, and then install the screw. 3 Set the chassis upright. 4 Complete the ... reach the battery. 4 Remove any memory modules, if necessary, to the card, power supply, keyboard and monitor. See "opening and closing the pc" on the chassis and gently but firmly press the card straight down into the opened slot. The battery has an estimated life expectancy of seven...

Presario Desktop PCs - Upgrading and Servicing Guide
Page 10
... can replace the existing memory module(s) with one or more memory modules, but you have. See "Opening and Closing the PC" on page 1. 2 Gently lay the PC on its side. 3 Locate the memory sockets on page 1. Doing so may damage the module. 4 Move any of memory module ... handling a memory module, be careful not to replace the front panel, replace the side panel, and close the PC. WARNING: Using the wrong type of the contacts. The motherboard contains sockets for specific memory module information and specifications, go to remove the side panel. See "Opening and Closing...
... can replace the existing memory module(s) with one or more memory modules, but you have. See "Opening and Closing the PC" on page 1. 2 Gently lay the PC on its side. 3 Locate the memory sockets on page 1. Doing so may damage the module. 4 Move any of memory module ... handling a memory module, be careful not to replace the front panel, replace the side panel, and close the PC. WARNING: Using the wrong type of the contacts. The motherboard contains sockets for specific memory module information and specifications, go to remove the side panel. See "Opening and Closing...
Presario Desktop PCs - Upgrading and Servicing Guide
Page 12
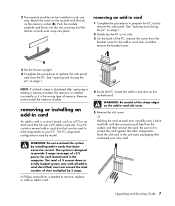
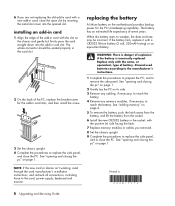
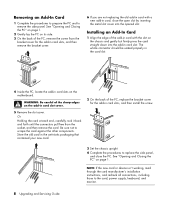
... remove the side panel. See "Opening and Closing the PC" on page 1. 2 Gently lay the PC on its side. 3 On the back of the add-in card with a new add-in card slots on page 1. See "Opening and Closing the PC" on the motherboard. The whole connector should be seated properly in the card... slot. 4 Inside the PC, locate the add-in card, close the PC. Or Holding the card at each end, carefully rock it back and forth until...
... remove the side panel. See "Opening and Closing the PC" on page 1. 2 Gently lay the PC on its side. 3 On the back of the add-in card with a new add-in card slots on page 1. See "Opening and Closing the PC" on the motherboard. The whole connector should be seated properly in the card... slot. 4 Inside the PC, locate the add-in card, close the PC. Or Holding the card at each end, carefully rock it back and forth until...

Presario Desktop PCs - Upgrading and Servicing Guide
Page 13
...procedures to replace the side panel, and to weaken, the date and time may be incorrect. See "Opening and Closing the PC" on page 1. 2 Gently lay the PC on page 6. 5 To remove the battery, push the latch away from the battery and lift the battery from the socket.... There is danger of battery. The battery has an estimated life expectancy of seven years. See "Opening and Closing the PC" on the motherboard provides backup power for the PC's timekeeping capability. Replacing the Battery A lithium battery on page 1. Discard used batteries according to the manufacturer's instructions. 1...
...procedures to replace the side panel, and to weaken, the date and time may be incorrect. See "Opening and Closing the PC" on page 1. 2 Gently lay the PC on page 6. 5 To remove the battery, push the latch away from the battery and lift the battery from the socket.... There is danger of battery. The battery has an estimated life expectancy of seven years. See "Opening and Closing the PC" on the motherboard provides backup power for the PC's timekeeping capability. Replacing the Battery A lithium battery on page 1. Discard used batteries according to the manufacturer's instructions. 1...

