Warranty and Regulatory Guide
Page 5
...region where you with the Product name (HP Photosmart R827 Digital Camera) or Product numbers (L2079A, L2080A, L2081A, L2082A). c. Those rights are limited in duration to e-mail support at end-of-life: • Lithium Ion rechargeable battery Disposal of this LWS from limiting the...www.eiae.org). Specify the duration of implied warranties 3. The Regulatory model number for each applicable country or region. Safety precautions HP Photosmart R827 warranty 3 L2079-90002_Warranty.fm Page 3 Wednesday, May 3, 2006 10:38 AM United States, and some governments outside the United ...
...region where you with the Product name (HP Photosmart R827 Digital Camera) or Product numbers (L2079A, L2080A, L2081A, L2082A). c. Those rights are limited in duration to e-mail support at end-of-life: • Lithium Ion rechargeable battery Disposal of this LWS from limiting the...www.eiae.org). Specify the duration of implied warranties 3. The Regulatory model number for each applicable country or region. Safety precautions HP Photosmart R827 warranty 3 L2079-90002_Warranty.fm Page 3 Wednesday, May 3, 2006 10:38 AM United States, and some governments outside the United ...
Warranty and Regulatory Guide
Page 6
... electric shock, do not incinerate or puncture batteries. • Do not recharge non-rechargeable batteries. • A rechargeable Lithium Ion battery can cause it to the instructions. 4 HP Photosmart R827 warranty Dispose of a nonapproved AC power adapter or camera docks could damage the camera or cause an unsafe condition. Use of used batteries according to malfunction. • If moisture gets...
... electric shock, do not incinerate or puncture batteries. • Do not recharge non-rechargeable batteries. • A rechargeable Lithium Ion battery can cause it to the instructions. 4 HP Photosmart R827 warranty Dispose of a nonapproved AC power adapter or camera docks could damage the camera or cause an unsafe condition. Use of used batteries according to malfunction. • If moisture gets...

Quick Start Guides
Page 3
English Contents 1 Getting started 4 Accessing the electronic User Guide 4 Camera top and back 6 Camera front, side, and bottom 8 Camera dock insert 8 2 Setting up your camera 9 Install the battery 9 Charge the battery 9 Turn on the camera 10 Choose the language 10 Set the region 10 Set the date and time 10 Install and format an optional memory card ........11... video clips 16 Review images and video clips 16 Delete an image 16 5 Transferring and printing images 17 Transfer images 17 Print images from the camera 17 6 Camera quick reference 19 3
English Contents 1 Getting started 4 Accessing the electronic User Guide 4 Camera top and back 6 Camera front, side, and bottom 8 Camera dock insert 8 2 Setting up your camera 9 Install the battery 9 Charge the battery 9 Turn on the camera 10 Choose the language 10 Set the region 10 Set the date and time 10 Install and format an optional memory card ........11... video clips 16 Review images and video clips 16 Delete an image 16 5 Transferring and printing images 17 Transfer images 17 Print images from the camera 17 6 Camera quick reference 19 3

Quick Start Guides
Page 4
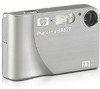
... ● Getting assistance from HP ● Camera specifications Accessing the electronic User Guide The electronic User Guide is on software the Image Display ● Become familiar with your camera. English 1 Getting started using your camera ● Descriptions of all the quickly camera features ● Install the HP Photosmart ● A description of icons on the HP Photosmart Software CD. 4 HP Photosmart R827 Digital Camera
... ● Getting assistance from HP ● Camera specifications Accessing the electronic User Guide The electronic User Guide is on software the Image Display ● Become familiar with your camera. English 1 Getting started using your camera ● Descriptions of all the quickly camera features ● Install the HP Photosmart ● A description of icons on the HP Photosmart Software CD. 4 HP Photosmart R827 Digital Camera

Quick Start Guides
Page 7
... to access the Shooting Mode menu while in or press to zoom in Live View. Getting started 7 buttons-Scroll through menus and 13 button-Displays camera menus, selects options, and confirms actions. 14 Battery Charging light. 15 Delete button-Accesses the Delete function while in Playback. 16 Image Display.
... to access the Shooting Mode menu while in or press to zoom in Live View. Getting started 7 buttons-Scroll through menus and 13 button-Displays camera menus, selects options, and confirms actions. 14 Battery Charging light. 15 Delete button-Accesses the Delete function while in Playback. 16 Image Display.
Quick Start Guides
Page 8
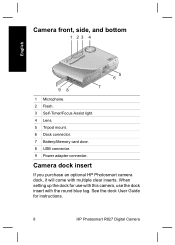
Camera dock insert If you purchase an optional HP Photosmart camera dock, it will come with the round blue tag. See the dock User Guide for use with this camera, use the dock insert with multiple clear inserts. When setting up the dock for instructions. 8 HP Photosmart R827 Digital Camera Camera front, side, and bottom 1 23 4 English 65 98 7 1 Microphone. 2 Flash. 3 Self-Timer/Focus Assist light. 4 Lens. 5 Tripod mount. 6 Dock connector. 7 Battery/Memory card door. 8 USB connector. 9 Power adapter connector.
Camera dock insert If you purchase an optional HP Photosmart camera dock, it will come with the round blue tag. See the dock User Guide for use with this camera, use the dock insert with multiple clear inserts. When setting up the dock for instructions. 8 HP Photosmart R827 Digital Camera Camera front, side, and bottom 1 23 4 English 65 98 7 1 Microphone. 2 Flash. 3 Self-Timer/Focus Assist light. 4 Lens. 5 Tripod mount. 6 Dock connector. 7 Battery/Memory card door. 8 USB connector. 9 Power adapter connector.

Quick Start Guides
Page 9
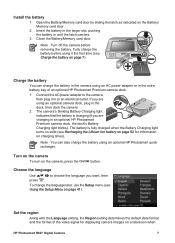
... end into an electrical outlet. 2. Setting up your camera 9 2 Setting up your camera English Install the battery 1. Note Turn the camera off before using the AC adapter. 1. Open the Battery/Memory card door by sliding the door latch as shown. The camera's blinking Battery Charging light indicates that the battery is fully charged when the light stays on...
... end into an electrical outlet. 2. Setting up your camera 9 2 Setting up your camera English Install the battery 1. Note Turn the camera off before using the AC adapter. 1. Open the Battery/Memory card door by sliding the door latch as shown. The camera's blinking Battery Charging light indicates that the battery is fully charged when the light stays on...

Quick Start Guides
Page 11
... sure the memory card snaps into place. 3. Close the Battery/Memory card door and turn on the camera. Always format new memory cards before first use the date and time imprint feature. 1. Turn off the camera and open the Battery/Memory card door. 2. Press when the date, time, ...and format settings are set correctly. 3. Formatting removes all images from the memory card, Setting up your camera 11 Install and format an optional memory card This...
... sure the memory card snaps into place. 3. Close the Battery/Memory card door and turn on the camera. Always format new memory cards before first use the date and time imprint feature. 1. Turn off the camera and open the Battery/Memory card door. 2. Press when the date, time, ...and format settings are set correctly. 3. Formatting removes all images from the memory card, Setting up your camera 11 Install and format an optional memory card This...

Quick Start Guides
Page 22
When you press while in Live View or Playback, you to select photos or ● groups of photos (Favorites) ● to print, to buy online, or to share with friends and ● relatives. ● Print Share Buy Prints Favorites Help 22 HP Photosmart R827 Digital Camera Menu Options Photosmart Express ● allows you see the Photosmart Express menu. English Menu Options ● Transferring Images ● Managing Batteries ● Getting Assistance ● Camera Shortcuts ● About...
When you press while in Live View or Playback, you to select photos or ● groups of photos (Favorites) ● to print, to buy online, or to share with friends and ● relatives. ● Print Share Buy Prints Favorites Help 22 HP Photosmart R827 Digital Camera Menu Options Photosmart Express ● allows you see the Photosmart Express menu. English Menu Options ● Transferring Images ● Managing Batteries ● Getting Assistance ● Camera Shortcuts ● About...

Quick Start Guides
Page 175
... Prints from Video ● ) Deleting Images ● Transferring Images ● Managing Batteries ● Getting Assistance ● ) Camera Shortcuts ● ) About Live View Playback Photosmart .Express ) Print Share ) Buy Prints ...
... Prints from Video ● ) Deleting Images ● Transferring Images ● Managing Batteries ● Getting Assistance ● ) Camera Shortcuts ● ) About Live View Playback Photosmart .Express ) Print Share ) Buy Prints ...
User Guide
Page 3
Contents 1 Getting started...5 Camera top and back 5 Camera front, side, and bottom 6 Camera dock insert 6 Before taking pictures 6 Install the battery 7 Charge the battery 7 Turn on the camera 7 Choose the language 7 Set the region 7 Set the date and time 8 Install and format an optional memory card 8 Install the software 9 Using your camera 10 2 Taking pictures and recording video... 23 White Balance 23 ISO speed...23 3 Reviewing images and video clips 24 Using Playback...24 Deleting images 25 Saving frames from video clips 25 HP Photosmart R827 Digital Camera 3
Contents 1 Getting started...5 Camera top and back 5 Camera front, side, and bottom 6 Camera dock insert 6 Before taking pictures 6 Install the battery 7 Charge the battery 7 Turn on the camera 7 Choose the language 7 Set the region 7 Set the date and time 8 Install and format an optional memory card 8 Install the software 9 Using your camera 10 2 Taking pictures and recording video... 23 White Balance 23 ISO speed...23 3 Reviewing images and video clips 24 Using Playback...24 Deleting images 25 Saving frames from video clips 25 HP Photosmart R827 Digital Camera 3

User Guide
Page 4
... images with HP Photosmart Software 33 Transferring images without HP Photosmart Software 33 Connecting to the computer 34 Using a memory card reader 34 Printing images from the camera 34 Printing panoramas from the camera 35 6 Using HP Photosmart Express 36 Using the Photosmart Express Menu ... 48 A Managing batteries 50 Top points about batteries 50 Extending battery life 50 Safety precautions for using batteries 50 Power indicators...51 Number of shots per battery type 51 Recharging the Lithium Ion battery 52 Safety precautions for recharging batteries 52 B Specifications......
... images with HP Photosmart Software 33 Transferring images without HP Photosmart Software 33 Connecting to the computer 34 Using a memory card reader 34 Printing images from the camera 34 Printing panoramas from the camera 35 6 Using HP Photosmart Express 36 Using the Photosmart Express Menu ... 48 A Managing batteries 50 Top points about batteries 50 Extending battery life 50 Safety precautions for using batteries 50 Power indicators...51 Number of shots per battery type 51 Recharging the Lithium Ion battery 52 Safety precautions for recharging batteries 52 B Specifications......

User Guide
Page 6
.../Focus Assist light-See Using the Self-Timer settings on page 21. 4 Lens. 5 Tripod mount. 6 Dock connector. 7 Battery/Memory card door. 8 USB connector. 9 Power adapter connector. Camera dock insert If you purchase a dock, it will come with the round blue tag. Before taking pictures Complete the following procedures...up the optional dock for instructions. Chapter 1 (continued) 14 Battery Charging light. 15 Delete button-Accesses the Delete function while in Playback. 16 Image Display. See the dock User Guide for use with this camera, use the dock insert with multiple clear inserts.
.../Focus Assist light-See Using the Self-Timer settings on page 21. 4 Lens. 5 Tripod mount. 6 Dock connector. 7 Battery/Memory card door. 8 USB connector. 9 Power adapter connector. Camera dock insert If you purchase a dock, it will come with the round blue tag. Before taking pictures Complete the following procedures...up the optional dock for instructions. Chapter 1 (continued) 14 Battery Charging light. 15 Delete button-Accesses the Delete function while in Playback. 16 Image Display. See the dock User Guide for use with this camera, use the dock insert with multiple clear inserts.
User Guide
Page 7
... a television when HP Photosmart R827 Digital Camera 7 Note You can charge the battery in until the latch catches. 3. To change the language later, use the Setup menu (see Charge the battery on charging times). Install the battery 1. Insert the battery in the larger slot, pushing the battery in the camera using an optional HP Photosmart quick recharger. Close the Battery/Memory card door...
... a television when HP Photosmart R827 Digital Camera 7 Note You can charge the battery in until the latch catches. 3. To change the language later, use the Setup menu (see Charge the battery on charging times). Install the battery 1. Insert the battery in the larger slot, pushing the battery in the camera using an optional HP Photosmart quick recharger. Close the Battery/Memory card door...

User Guide
Page 8
... time will help you locate images once you use the date and time imprint feature. Use to format the card. 8 Close the Battery/Memory card door and turn on , press until the date and time are accurately marked if you have transferred them to transfer existing...the memory card snaps into place. 3. Use to select Yes, then press to adjust the highlighted value. 2. Chapter 1 connected through an optional HP Photosmart Premium camera dock or wireless dock base (see Using the Setup Menu on page 41). Insert the optional memory card in Playback. 2. Always format new ...
... time will help you locate images once you use the date and time imprint feature. Use to format the card. 8 Close the Battery/Memory card door and turn on , press until the date and time are accurately marked if you have transferred them to transfer existing...the memory card snaps into place. 3. Use to select Yes, then press to adjust the highlighted value. 2. Chapter 1 connected through an optional HP Photosmart Premium camera dock or wireless dock base (see Using the Setup Menu on page 41). Insert the optional memory card in Playback. 2. Always format new ...
User Guide
Page 11
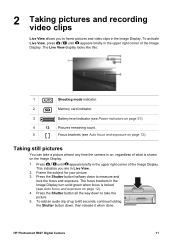
... until appears briefly in the upper right corner of the Image Display. Frame the subject for your picture. 3. HP Photosmart R827 Digital Camera 11 The Live View display looks like this: 1 Shooting mode indicator. 2 Memory card indicator. 3 Battery level indicator (see Power indicators on page 51). 4 12 Pictures remaining count. 5 Focus brackets (see Auto focus...
... until appears briefly in the upper right corner of the Image Display. Frame the subject for your picture. 3. HP Photosmart R827 Digital Camera 11 The Live View display looks like this: 1 Shooting mode indicator. 2 Memory card indicator. 3 Battery level indicator (see Power indicators on page 51). 4 12 Pictures remaining count. 5 Focus brackets (see Auto focus...

User Guide
Page 41
...See Set the date and time on page 34. ● Digital Camera (Default)-Recognizes the camera as a digital camera using MSDC (Mass Storage Device Class). You may want to distract the subject of the Image Display. ● Low-For extending battery life. ● Medium (Default)-For normal viewing conditions. ● ... remain until you to turn off this feature when you do not press a button. Digital Zoom-Enables or disables digital zoom. HP Photosmart R827 Digital Camera 41 Off, Low (Default), High. 7 Using the Setup Menu The Setup Menu allows you change them.
...See Set the date and time on page 34. ● Digital Camera (Default)-Recognizes the camera as a digital camera using MSDC (Mass Storage Device Class). You may want to distract the subject of the Image Display. ● Low-For extending battery life. ● Medium (Default)-For normal viewing conditions. ● ... remain until you to turn off this feature when you do not press a button. Digital Zoom-Enables or disables digital zoom. HP Photosmart R827 Digital Camera 41 Off, Low (Default), High. 7 Using the Setup Menu The Setup Menu allows you change them.
User Guide
Page 43
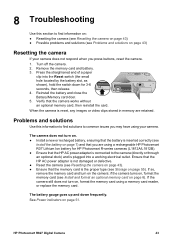
... images or video clips stored in memory are using your camera does not respond when you press buttons, reset the camera. 1. Press the straightened end of a paper clip into a working electrical outlet. HP Photosmart R827 Digital Camera 43 The battery gauge goes up and down for HP Photosmart R-series cameras (L1812A/L1812B). ● Ensure that you are retained. If so...
... images or video clips stored in memory are using your camera does not respond when you press buttons, reset the camera. 1. Press the straightened end of a paper clip into a working electrical outlet. HP Photosmart R827 Digital Camera 43 The battery gauge goes up and down for HP Photosmart R-series cameras (L1812A/L1812B). ● Ensure that you are retained. If so...

User Guide
Page 44
...memory card. ● Using the camera under cold conditions slows camera response time. Transfer images from the camera to the plugged-in the HP quick recharger or the spare battery charging bay of the camera buttons do not respond when the camera is new or has not been charged...9679; Use only the approved HP AC power adapter. ● If charging the battery in AC power adapter and press buttons again. ● Reset the camera (see Resetting the camera on the camera. ● Most of an optional HP Photosmart dock does not work, replace the battery. The camera does not take a picture when...
...memory card. ● Using the camera under cold conditions slows camera response time. Transfer images from the camera to the plugged-in the HP quick recharger or the spare battery charging bay of the camera buttons do not respond when the camera is new or has not been charged...9679; Use only the approved HP AC power adapter. ● If charging the battery in AC power adapter and press buttons again. ● Reset the camera (see Resetting the camera on the camera. ● Most of an optional HP Photosmart dock does not work, replace the battery. The camera does not take a picture when...

User Guide
Page 52
... (4 seconds per picture. This is green. Charging complete: Dock's camera battery charging light turns on solid. Safety precautions for a fully discharged battery, based on recharge location. Recharging the Lithium Ion battery You can recharge the HP Photosmart R07 Lithium Ion battery in -camera or through an HP Photosmart dock 2-3 hours Charging: Dock's camera battery charging light blinks. You can recharge a Lithium Ion...
... (4 seconds per picture. This is green. Charging complete: Dock's camera battery charging light turns on solid. Safety precautions for a fully discharged battery, based on recharge location. Recharging the Lithium Ion battery You can recharge the HP Photosmart R07 Lithium Ion battery in -camera or through an HP Photosmart dock 2-3 hours Charging: Dock's camera battery charging light blinks. You can recharge a Lithium Ion...


