
Quick Start Guide
Page 3
... 1 Getting started 4 Accessing the electronic User Guide 5 Camera top and back 6 Camera front, side, and bottom 8 Camera dock insert 8 2 Setting up your camera 9 Install the batteries 9 Turn on the camera 10 Choose the language 10 Set the region 10 Set the date and time 10 Install and format an optional memory...
... 1 Getting started 4 Accessing the electronic User Guide 5 Camera top and back 6 Camera front, side, and bottom 8 Camera dock insert 8 2 Setting up your camera 9 Install the batteries 9 Turn on the camera 10 Choose the language 10 Set the region 10 Set the date and time 10 Install and format an optional memory...

Quick Start Guide
Page 4
... guide will help The electronic User Guide you to : includes: ● Start using the essential features of the power indicator icons ● Getting assistance from HP ● Troubleshooting ● Camera specifications 4 HP Photosmart M527 Digital Camera Extending battery life - For detailed information about camera features, see the electronic User Guide.
... guide will help The electronic User Guide you to : includes: ● Start using the essential features of the power indicator icons ● Getting assistance from HP ● Troubleshooting ● Camera specifications 4 HP Photosmart M527 Digital Camera Extending battery life - For detailed information about camera features, see the electronic User Guide.
Quick Start Guide
Page 7
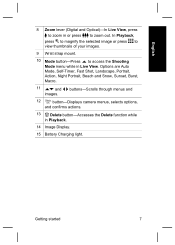
... Snow, Sunset, Burst, Macro. 11 and images. English 8 Zoom lever (Digital and Optical)-In Live View, press to zoom in Playback. 14 Image Display. 15 Battery Charging light. buttons-Scrolls through menus and 12 button-Displays camera menus, selects options, and confirms actions. 13 Delete button-Accesses the Delete function while...
... Snow, Sunset, Burst, Macro. 11 and images. English 8 Zoom lever (Digital and Optical)-In Live View, press to zoom in Playback. 14 Image Display. 15 Battery Charging light. buttons-Scrolls through menus and 12 button-Displays camera menus, selects options, and confirms actions. 13 Delete button-Accesses the Delete function while...

Quick Start Guide
Page 8
See the dock User Guide for use with this camera, use the dock insert with multiple clear inserts. When setting up the dock for instructions. 8 HP Photosmart M527 Digital Camera Camera dock insert If you purchase an optional HP Photosmart camera dock, it will come with the square green tag. English Camera front, side, and bottom 1 2 3 8 7 6 54 1 Flash. 2 Self-Timer light. 3 Microphone. 4 USB connector. 5 Power adapter connector. 6 Tripod mount. 7 Dock connector. 8 Battery/Memory card door.
See the dock User Guide for use with this camera, use the dock insert with multiple clear inserts. When setting up the dock for instructions. 8 HP Photosmart M527 Digital Camera Camera dock insert If you purchase an optional HP Photosmart camera dock, it will come with the square green tag. English Camera front, side, and bottom 1 2 3 8 7 6 54 1 Flash. 2 Self-Timer light. 3 Microphone. 4 USB connector. 5 Power adapter connector. 6 Tripod mount. 7 Dock connector. 8 Battery/Memory card door.
Quick Start Guide
Page 9
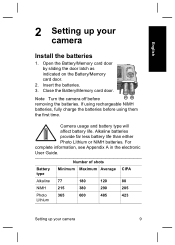
Note Turn the camera off before using them the first time. Alkaline batteries provide far less battery life than either Photo Lithium or NiMH batteries. Battery type Alkaline NiMH Photo Lithium Number of shots Minimum Maximum Average CIPA 77 180 120... batteries 1. Camera usage and battery type will affect battery life. Open the Battery/Memory card door by sliding the door latch as indicated on the Battery/Memory card door. 2. If using rechargeable NiMH batteries, fully charge the batteries before removing the batteries. Close the Battery/Memory card door. Insert the batteries....
Note Turn the camera off before using them the first time. Alkaline batteries provide far less battery life than either Photo Lithium or NiMH batteries. Battery type Alkaline NiMH Photo Lithium Number of shots Minimum Maximum Average CIPA 77 180 120... batteries 1. Camera usage and battery type will affect battery life. Open the Battery/Memory card door by sliding the door latch as indicated on the Battery/Memory card door. 2. If using rechargeable NiMH batteries, fully charge the batteries before removing the batteries. Close the Battery/Memory card door. Insert the batteries....
Quick Start Guide
Page 11
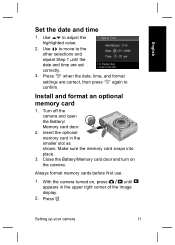
... display. 2. Install and format an optional memory card 1. With the camera turned on the camera. Use to confirm. Press . Close the Battery/Memory card door and turn on , press until the date and time are correct, then press again to adjust the highlighted value. 2. Always... format memory cards before first use. 1. Turn off the camera and open the Battery/ Memory card door. 2. Use to move to the other selections and repeat Step 1 until appears in the smaller slot as shown. Make...
... display. 2. Install and format an optional memory card 1. With the camera turned on the camera. Use to confirm. Press . Close the Battery/Memory card door and turn on , press until the date and time are correct, then press again to adjust the highlighted value. 2. Always... format memory cards before first use. 1. Turn off the camera and open the Battery/ Memory card door. 2. Use to move to the other selections and repeat Step 1 until appears in the smaller slot as shown. Make...

Quick Start Guide
Page 21
Menu Photosmart Express allows you see the Photosmart Express menu. When you press from either Live View or Playback, you to share your photos with friends and relatives. Options ● Print ● Buy Prints Online ● Share Menu Setup Camera quick reference 21 English Menu Options ● Sharing Images ● Printing Images ● Recording Audio Clips ● Recording Video Clips ● Reviewing Images and Videos ● Deleting Images ● Transferring Images ● Managing Batteries ● Getting Assistance ● Camera Shortcuts ● About...
Menu Photosmart Express allows you see the Photosmart Express menu. When you press from either Live View or Playback, you to share your photos with friends and relatives. Options ● Print ● Buy Prints Online ● Share Menu Setup Camera quick reference 21 English Menu Options ● Sharing Images ● Printing Images ● Recording Audio Clips ● Recording Video Clips ● Reviewing Images and Videos ● Deleting Images ● Transferring Images ● Managing Batteries ● Getting Assistance ● Camera Shortcuts ● About...

User Guide
Page 3
Contents 1 Getting started...5 Camera top and back 5 Camera front, side, and bottom 6 Camera dock insert 6 Before taking pictures 6 Install the batteries 7 Charge the batteries 7 Turn on the camera 7 Choose the language 7 Set the region 8 Set the date and time 8 Install and format an optional memory card 8 Install the software 9 ... images 21 4 Using the Design Gallery Menu 22 Removing red eyes 22 Applying artistic effects 23 Modifying colors...23 Adding borders...23 Recording audio...24 HP Photosmart M527 Digital Camera 3
Contents 1 Getting started...5 Camera top and back 5 Camera front, side, and bottom 6 Camera dock insert 6 Before taking pictures 6 Install the batteries 7 Charge the batteries 7 Turn on the camera 7 Choose the language 7 Set the region 8 Set the date and time 8 Install and format an optional memory card 8 Install the software 9 ... images 21 4 Using the Design Gallery Menu 22 Removing red eyes 22 Applying artistic effects 23 Modifying colors...23 Adding borders...23 Recording audio...24 HP Photosmart M527 Digital Camera 3
User Guide
Page 4
...to the computer 26 Using a memory card reader 26 Printing images from the camera 26 6 Using HP Photosmart Express 28 Using the Photosmart Express Menu 28 Setting up online destinations in the camera 28 Sending images to online destinations 29 Selecting... Getting assistance 36 A Managing batteries 38 Top points about batteries 38 Extending battery life 38 Safety precautions for using batteries 38 Power indicators...39 Number of shots per battery type 39 Battery performance 40 Recharging NiMH batteries 40 Safety precautions for recharging batteries 41 B Specifications...42 Memory ...
...to the computer 26 Using a memory card reader 26 Printing images from the camera 26 6 Using HP Photosmart Express 28 Using the Photosmart Express Menu 28 Setting up online destinations in the camera 28 Sending images to online destinations 29 Selecting... Getting assistance 36 A Managing batteries 38 Top points about batteries 38 Extending battery life 38 Safety precautions for using batteries 38 Power indicators...39 Number of shots per battery type 39 Battery performance 40 Recharging NiMH batteries 40 Safety precautions for recharging batteries 41 B Specifications...42 Memory ...

User Guide
Page 6
... instructions. See the dock User Guide for use with this camera, use the dock insert with multiple clear inserts. Chapter 1 (continued) 14 Image Display. 15 Battery Charging light. Camera front, side, and bottom 1 2 3 8 7 6 54 1 Flash. 2 Self-Timer light-See Using the Self-Timer mode on page 16. 3 Microphone. 4 USB connector. 5 Power...
... instructions. See the dock User Guide for use with this camera, use the dock insert with multiple clear inserts. Chapter 1 (continued) 14 Image Display. 15 Battery Charging light. Camera front, side, and bottom 1 2 3 8 7 6 54 1 Flash. 2 Self-Timer light-See Using the Self-Timer mode on page 16. 3 Microphone. 4 USB connector. 5 Power...

User Guide
Page 7
.... The camera's blinking Battery Charging light indicates that the battery is fully charged when the Battery Charging light turns on the Battery/Memory card door. 2. The battery is charging (if you want, then press . Install the batteries 1. Open the Battery/Memory card door by sliding the latch as indicated on solid (approximately 12-15 hours). HP Photosmart M527 Digital Camera 7
.... The camera's blinking Battery Charging light indicates that the battery is fully charged when the Battery Charging light turns on the Battery/Memory card door. 2. The battery is charging (if you want, then press . Install the batteries 1. Open the Battery/Memory card door by sliding the latch as indicated on solid (approximately 12-15 hours). HP Photosmart M527 Digital Camera 7

User Guide
Page 8
...card, rather than in the upper right corner of the video signal for displaying camera images on a television when connected through an optional HP Photosmart Premium camera dock or wireless dock base (see Using the Setup Menu on page 22. Install and format an optional memory card 1. ... sure the memory card snaps into place. 3. Press . 3. Press when the date, time, and format settings are set correctly. 3. Close the Battery/Memory card door and turn on page 31). Always format memory cards before first use internal memory and view images stored there, remove the memory...
...card, rather than in the upper right corner of the video signal for displaying camera images on a television when connected through an optional HP Photosmart Premium camera dock or wireless dock base (see Using the Setup Menu on page 22. Install and format an optional memory card 1. ... sure the memory card snaps into place. 3. Press . 3. Press when the date, time, and format settings are set correctly. 3. Close the Battery/Memory card door and turn on page 31). Always format memory cards before first use internal memory and view images stored there, remove the memory...

User Guide
Page 11
... View display looks like this: 1 Shooting mode indicator. 2 Battery level indicator (see Power indicators on page 39). 3 Memory card indicator. 4 12 Pictures remaining count. 5 Focus brackets (see Auto focus and exposure on page 12). 4. Taking still pictures You can take the picture. 5. HP Photosmart M527 Digital Camera 11 2 Taking pictures and recording video clips...
... View display looks like this: 1 Shooting mode indicator. 2 Battery level indicator (see Power indicators on page 39). 3 Memory card indicator. 4 12 Pictures remaining count. 5 Focus brackets (see Auto focus and exposure on page 12). 4. Taking still pictures You can take the picture. 5. HP Photosmart M527 Digital Camera 11 2 Taking pictures and recording video clips...

User Guide
Page 20
.... When viewing video clips, press the individual frames. 3. For information about each image or video clip. 1 Battery indicator (see Power indicators on page 39). 2 Memory card indicator. 3 1 Number of electronic Photosmart Share destinations (see Using HP Photosmart Express on page 28). 4 Number of images to scroll through your images and video clips (video clips...
.... When viewing video clips, press the individual frames. 3. For information about each image or video clip. 1 Battery indicator (see Power indicators on page 39). 2 Memory card indicator. 3 1 Number of electronic Photosmart Share destinations (see Using HP Photosmart Express on page 28). 4 Number of images to scroll through your images and video clips (video clips...

User Guide
Page 31
...using MSDC (Mass Storage Device Class). On (Default), Off. TV Configuration-Sets the video signal format for the camera's behavior. 1. HP Photosmart M527 Digital Camera 31 See Connecting to the computer on page 26. ● Digital Camera (Default)-Recognizes the camera as a digital camera ... (Language)-Sets the language. While in Europe, Uruguay, Paraguay, Argentina, and parts of the Image Display. ● Low-For extending battery life. ● Medium (Default)-For normal viewing conditions. ● High-For very bright lighting conditions. Use to highlight a menu option...
...using MSDC (Mass Storage Device Class). On (Default), Off. TV Configuration-Sets the video signal format for the camera's behavior. 1. HP Photosmart M527 Digital Camera 31 See Connecting to the computer on page 26. ● Digital Camera (Default)-Recognizes the camera as a digital camera ... (Language)-Sets the language. While in Europe, Uruguay, Paraguay, Argentina, and parts of the Image Display. ● Low-For extending battery life. ● Medium (Default)-For normal viewing conditions. ● High-For very bright lighting conditions. Use to highlight a menu option...

User Guide
Page 32
...an optional dock) and is not damaged or defective. ● Reset the camera (see Resetting the camera on page 38. ● New batteries or batteries that the camera works without an optional memory card, reinsert the memory card (if you choose. If so, remove the memory card and ... page 32) Resetting the camera If your camera. Ensure that the HP AC power adapter is plugged into a working electrical outlet. I have to recharge the NiMH batteries frequently. ● See Extending battery life on page 32). ● Ensure that the HP AC power adapter is connected to their factory defaults.
...an optional dock) and is not damaged or defective. ● Reset the camera (see Resetting the camera on page 38. ● New batteries or batteries that the camera works without an optional memory card, reinsert the memory card (if you choose. If so, remove the memory card and ... page 32) Resetting the camera If your camera. Ensure that the HP AC power adapter is plugged into a working electrical outlet. I have to recharge the NiMH batteries frequently. ● See Extending battery life on page 32). ● Ensure that the HP AC power adapter is connected to their factory defaults.

User Guide
Page 33
...AC power adapter into the camera. ● Reset the camera (see Resetting the camera on the camera. ● Most of an optional HP Photosmart dock does not work, replace the batteries. The camera does not take a picture when I press a button. ● Turn on page 32). ● The AC power ...see Resetting the camera on , remove the batteries and connect to finish processing the last image before taking another picture. If the Image Display does not turn on page 32). ● Check to see if the memory card is defective. HP Photosmart M527 Digital Camera 33 The camera does not respond ...
...AC power adapter into the camera. ● Reset the camera (see Resetting the camera on the camera. ● Most of an optional HP Photosmart dock does not work, replace the batteries. The camera does not take a picture when I press a button. ● Turn on page 32). ● The AC power ...see Resetting the camera on , remove the batteries and connect to finish processing the last image before taking another picture. If the Image Display does not turn on page 32). ● Check to see if the memory card is defective. HP Photosmart M527 Digital Camera 33 The camera does not respond ...

User Guide
Page 34
... not using. Reformat the card (see if the images are missing on page 43 for tips about memory cards. Then examine the camera and the batteries for cards marked High Performance, Pro, Ultra, or High Speed. The camera responds sluggishly when trying to improve, use the flash (see Setting the flash...
... not using. Reformat the card (see if the images are missing on page 43 for tips about memory cards. Then examine the camera and the batteries for cards marked High Performance, Pro, Ultra, or High Speed. The camera responds sluggishly when trying to improve, use the flash (see Setting the flash...

User Guide
Page 38
... time. ● Always insert the batteries in Playback without extending the lens. ● Connect the camera to an optional dock or HP AC power adapter. ● The performance of a battery if, while using, charging, or storing the battery, the battery emits an unusual smell, feels excessively hot... (note that it is normal for using rechargeable batteries and are turning on the camera only...
... time. ● Always insert the batteries in Playback without extending the lens. ● Connect the camera to an optional dock or HP AC power adapter. ● The performance of a battery if, while using, charging, or storing the battery, the battery emits an unusual smell, feels excessively hot... (note that it is normal for using rechargeable batteries and are turning on the camera only...

User Guide
Page 39
... power down . Optical zoom (both directions) are used on the camera. Power indicators When the batteries are low or the camera is depleted. HP Photosmart M527 Digital Camera 39 If no battery icon appears in the Image Display. Blinking Battery is connected to AC power, one of the following table shows the minimum, maximum, and average...
... power down . Optical zoom (both directions) are used on the camera. Power indicators When the batteries are low or the camera is depleted. HP Photosmart M527 Digital Camera 39 If no battery icon appears in the Image Display. Blinking Battery is connected to AC power, one of the following table shows the minimum, maximum, and average...


