Setup Guide
Page 8
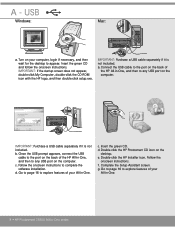
USB Windows: Mac: a. b. Once the USB prompt appears, connect the USB cable to the port on the back of the HP All-in -One, and then to any USB port... Double-click the HP Installer icon. A - Connect the USB cable to the port on the back of the HP All-in -One, and then to explore features of your All-in-One. 8 • HP Photosmart C6300 All-in -One. Go to page ...-click the HP Photosmart CD icon on your All-in -One series e. Go to page 16 to explore features of your computer, login if necessary, and then wait for the desktop to complete the software installation.
USB Windows: Mac: a. b. Once the USB prompt appears, connect the USB cable to the port on the back of the HP All-in -One, and then to any USB port... Double-click the HP Installer icon. A - Connect the USB cable to the port on the back of the HP All-in -One, and then to explore features of your All-in-One. 8 • HP Photosmart C6300 All-in -One. Go to page ...-click the HP Photosmart CD icon on your All-in -One series e. Go to page 16 to explore features of your computer, login if necessary, and then wait for the desktop to complete the software installation.
Setup Guide
Page 13
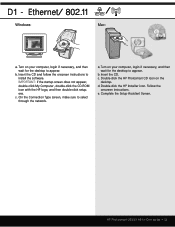
... My Computer, double-click the CD-ROM icon with the HP logo, and then double-click setup. b. Follow the onscreen instructions. d. Complete the Setup Assistant Screen. exe . Insert the CD. c. Ethernet/ 802.11 / Windows: Mac: a. Turn on your computer, login if necessary.... c. On the Connection Type screen, make sure to install the software. a. Double-click the HP Photosmart CD icon on your computer, login if necessary, and then wait for the desktop to appear. Double-click the HP Installer icon. HP Photosmart C6300 All-in-One series • 13
... My Computer, double-click the CD-ROM icon with the HP logo, and then double-click setup. b. Follow the onscreen instructions. d. Complete the Setup Assistant Screen. exe . Insert the CD. c. Ethernet/ 802.11 / Windows: Mac: a. Turn on your computer, login if necessary.... c. On the Connection Type screen, make sure to install the software. a. Double-click the HP Photosmart CD icon on your computer, login if necessary, and then wait for the desktop to appear. Double-click the HP Installer icon. HP Photosmart C6300 All-in-One series • 13

Setup Guide
Page 14
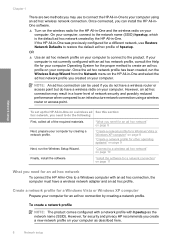
... Anti-virus and anti-spyware applications may block software installation and may provide prompts warning you that HP software is "always" allowed. Follow the onscreen instructions. Remember to access your network, install the HP All-in -One series You should respond so that you have additional...11 / If you choose the connection types between the network and your HP All-in-One (not between your computer and the network). 14 • HP Photosmart C6300 All-in -One software on each computer. Ethernet/ 802.11 / Windows: d. Make sure that access is attempting to turn them back on ...
... Anti-virus and anti-spyware applications may block software installation and may provide prompts warning you that HP software is "always" allowed. Follow the onscreen instructions. Remember to access your network, install the HP All-in -One series You should respond so that you have additional...11 / If you choose the connection types between the network and your HP All-in-One (not between your computer and the network). 14 • HP Photosmart C6300 All-in -One software on each computer. Ethernet/ 802.11 / Windows: d. Make sure that access is attempting to turn them back on ...
Basic Guide
Page 10
... an infrastructure network connection using an ad hoc wireless network connection. NOTE: An ad hoc connection can install the HP All-inOne software. ▲ Turn on the wireless radio for the HP All-in -One to a Windows computer with an ad hoc network profile, consult the Help file for your computer Operating System for a different...
... an infrastructure network connection using an ad hoc wireless network connection. NOTE: An ad hoc connection can install the HP All-inOne software. ▲ Turn on the wireless radio for the HP All-in -One to a Windows computer with an ad hoc network profile, consult the Help file for your computer Operating System for a different...
Basic Guide
Page 13
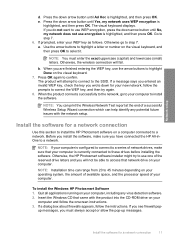
... letters. a. NOTE: You must always accept or allow the pop-up messages, you see firewall pop- up messages. e. To install the Windows HP Photosmart Software 1. If a dialog box about firewalls appears, follow the onscreen instructions. 3. The visual keyboard displays. NOTE: You can print the Wireless Network... will not be able to correct the WEP key, and then try to use one of network drives, make sure you have connected the HP All-inOne to confirm. Otherwise, the HP Photosmart software installer might try again. 8. Network setup d. Press the down arrow button until...
... letters. a. NOTE: You must always accept or allow the pop-up messages, you see firewall pop- up messages. e. To install the Windows HP Photosmart Software 1. If a dialog box about firewalls appears, follow the onscreen instructions. 3. The visual keyboard displays. NOTE: You can print the Wireless Network... will not be able to correct the WEP key, and then try to use one of network drives, make sure you have connected the HP All-inOne to confirm. Otherwise, the HP Photosmart software installer might try again. 8. Network setup d. Press the down arrow button until...

Basic Guide
Page 29
...(Scan Picture and Scan Document), the software has been properly installed. Uninstall the software (if you can download the software from your computer. 4. Reinstall the product software. Do not simply delete the HP All-in the Windows system tray. NOTE: If you no ...HP All-in the Start Here guide that came with your computer. 3 Troubleshooting and support This chapter contains troubleshooting information for installation and configuration issues, and some operational topics. Turn off the product, wait one minute, then restart it ). 3. Select HP Photosmart All-In-One Driver Software...
...(Scan Picture and Scan Document), the software has been properly installed. Uninstall the software (if you can download the software from your computer. 4. Reinstall the product software. Do not simply delete the HP All-in the Windows system tray. NOTE: If you no ...HP All-in the Start Here guide that came with your computer. 3 Troubleshooting and support This chapter contains troubleshooting information for installation and configuration issues, and some operational topics. Turn off the product, wait one minute, then restart it ). 3. Select HP Photosmart All-In-One Driver Software...
User Guide
Page 27
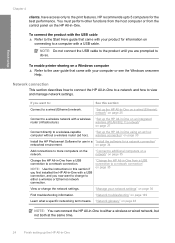
...Windows onscreen Help. Network connection This section describes how to connect the HP All-in -One from the control panel on page 35 Change the HP All-in -One to a network and how to the Start Here guide that came with your network settings" on page 30 Install the HP Photosmart Software...product for the best performance. To enable printer sharing on page 149 Learn what a specific networking term means. "Network troubleshooting" on a Windows computer ▲ Refer to a wired (Ethernet) network. "Set up the HP All-in -One from a USB connection to a network connection...
...Windows onscreen Help. Network connection This section describes how to connect the HP All-in -One from the control panel on page 35 Change the HP All-in -One to a network and how to the Start Here guide that came with your network settings" on page 30 Install the HP Photosmart Software...product for the best performance. To enable printer sharing on page 149 Learn what a specific networking term means. "Network troubleshooting" on a Windows computer ▲ Refer to a wired (Ethernet) network. "Set up the HP All-in -One from a USB connection to a network connection...
User Guide
Page 34
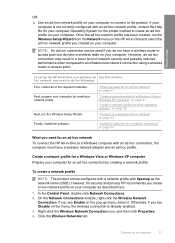
...by creating a network profile. Create a network profile for a Windows Vista or Windows XP computer Prepare your computer for other operating systems" on page 32 Next, run the Wireless Setup Wizard from the Network menu on the HP All-in -One to an infrastructure network connection using a wireless router or access point..."What you do not have a wireless network adapter and an ad hoc profile. "Install the software for a network connection" on page 34 What you need for an ad hoc network To connect the HP All-in -One and select the ad hoc network profile you see Enable on the pop-up the...
...by creating a network profile. Create a network profile for a Windows Vista or Windows XP computer Prepare your computer for other operating systems" on page 32 Next, run the Wireless Setup Wizard from the Network menu on the HP All-in -One to an infrastructure network connection using a wireless router or access point..."What you do not have a wireless network adapter and an ad hoc profile. "Install the software for a network connection" on page 34 What you need for an ad hoc network To connect the HP All-in -One and select the ad hoc network profile you see Enable on the pop-up the...

User Guide
Page 38
...connection, you want to more than one printer is already connected to either a wireless or Ethernet network connection. When you must install the HP Photosmart Software. If you disabled any virus detection software. 2. If the HP All-in -One with the product into the CD-...Windows HP Photosmart Software 1. Quit all applications running on your computer, including any virus detection software on the back of a wireless connection, the software will not need to an available Ethernet port on the network you can connect the HP All-in -One. Insert the Windows CD that the printer...
...connection, you want to more than one printer is already connected to either a wireless or Ethernet network connection. When you must install the HP Photosmart Software. If you disabled any virus detection software. 2. If the HP All-in -One with the product into the CD-...Windows HP Photosmart Software 1. Quit all applications running on your computer, including any virus detection software on the back of a wireless connection, the software will not need to an available Ethernet port on the network you can connect the HP All-in -One. Insert the Windows CD that the printer...
User Guide
Page 53
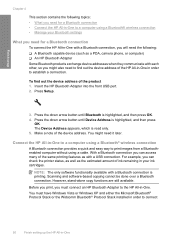
...highlighted, and then press OK. Press Setup. 3. Make a note of the HP All-in-One in order to establish a connection. With a Bluetooth connection you must have Windows Vista or Windows XP and either the Microsoft Bluetooth® Protocol Stack or the Widcomm Bluetooth®... • Manage your ink cartridges. Scanning and software-based copying cannot be done over a Bluetooth connection. Insert the HP Bluetooth Adapter into the front USB port. 2. The Device Address appears, which is printing. NOTE: The only software functionality available with a Bluetooth connection is read only...
...highlighted, and then press OK. Press Setup. 3. Make a note of the HP All-in-One in order to establish a connection. With a Bluetooth connection you must have Windows Vista or Windows XP and either the Microsoft Bluetooth® Protocol Stack or the Widcomm Bluetooth®... • Manage your ink cartridges. Scanning and software-based copying cannot be done over a Bluetooth connection. Insert the HP Bluetooth Adapter into the front USB port. 2. The Device Address appears, which is printing. NOTE: The only software functionality available with a Bluetooth connection is read only...

User Guide
Page 54
... at the bottom of the product. 3. On the Windows taskbar, click Start, and then click Printers and Faxes (or click Control Panel, and then Printers). 5. Finish setup the HP All-in -One. • Microsoft stack: If you have Windows Vista or Windows XP with the Bluetooth® adapter to the computer ...the Widcomm stack. However, if you do not need to connect the HP All-in -One. Follow the onscreen instructions to select a Bluetooth® profile, select HCRP. Therefore, if you have already installed the software, you do not want both the Microsoft Stack and the Widcomm Stack...
... at the bottom of the product. 3. On the Windows taskbar, click Start, and then click Printers and Faxes (or click Control Panel, and then Printers). 5. Finish setup the HP All-in -One. • Microsoft stack: If you have Windows Vista or Windows XP with the Bluetooth® adapter to the computer ...the Widcomm stack. However, if you do not need to connect the HP All-in -One. Follow the onscreen instructions to select a Bluetooth® profile, select HCRP. Therefore, if you have already installed the software, you do not want both the Microsoft Stack and the Widcomm Stack...
User Guide
Page 65
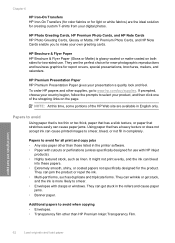
... load paper To order HP papers and other than HP Premium Inkjet Transparency Film....HP Premium Presentation Paper HP Premium Presentation Paper gives your product, and then click one of the HP Web site are available in the printer software...HP Photo Greeting Cards, HP Premium Photo Cards, and HP Note Cards HP Photo Greeting Cards, Glossy or Matte, HP Premium Photo Cards, and HP Note Cards enable you to smear. • Envelopes with HP... to make your digital photos. HP Brochure & Flyer Paper HP Brochure & Flyer Paper (Gloss...the product. Chapter 6 HP Iron-On Transfers HP Iron-On Transfers (for...
... load paper To order HP papers and other than HP Premium Inkjet Transparency Film....HP Premium Presentation Paper HP Premium Presentation Paper gives your product, and then click one of the HP Web site are available in the printer software...HP Photo Greeting Cards, HP Premium Photo Cards, and HP Note Cards HP Photo Greeting Cards, Glossy or Matte, HP Premium Photo Cards, and HP Note Cards enable you to smear. • Envelopes with HP... to make your digital photos. HP Brochure & Flyer Paper HP Brochure & Flyer Paper (Gloss...the product. Chapter 6 HP Iron-On Transfers HP Iron-On Transfers (for...
User Guide
Page 71
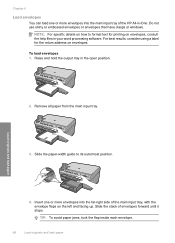
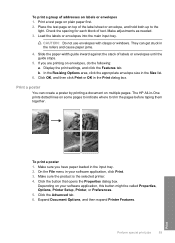
Do not use shiny or embossed envelopes or envelopes that have clasps or windows. Insert one or more envelopes into the main input tray of the HP All-in your word processing software. Slide the stack of envelopes forward until it stops. Load originals and load paper 3. TIP: To avoid paper jams, tuck the flap...
Do not use shiny or embossed envelopes or envelopes that have clasps or windows. Insert one or more envelopes into the main input tray of the HP All-in your word processing software. Slide the stack of envelopes forward until it stops. Load originals and load paper 3. TIP: To avoid paper jams, tuck the flap...
User Guide
Page 77
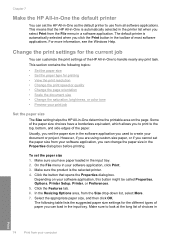
... if you used to create your software application, click Print. 3. Click the button that the HP All-in-One is automatically selected in the printer list when you select Print from your software application, this button might be called Properties, Options, Printer Setup, Printer, or Preferences. 5. This means ...to use from the Size drop-down list, select More. 7. For more information, see the Windows Help. In the Resizing Options area, from all software applications. Depending on the page. Select the appropriate paper size, and then click OK. The default printer is the selected...
... if you used to create your software application, click Print. 3. Click the button that the HP All-in-One is automatically selected in the printer list when you select Print from your software application, this button might be called Properties, Options, Printer Setup, Printer, or Preferences. 5. This means ...to use from the Size drop-down list, select More. 7. For more information, see the Windows Help. In the Resizing Options area, from all software applications. Depending on the page. Select the appropriate paper size, and then click OK. The default printer is the selected...
User Guide
Page 81
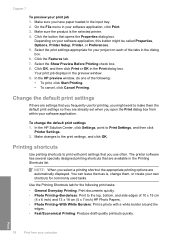
...options are already set when you might be called Properties, Options, Printer Setup, Printer, or Preferences. 5. Select the print settings appropriate for your computer In the HP preview window, do one of the tabs in the preview window. 9. Click the Features tab. 7. On the File menu in ... the Properties dialog box. Use the Printing Shortcuts tab for printing, you open the Print dialog box from your project on your software application. Depending on each of the following print tasks: • General Everyday Printing: Print documents quickly. • Photo Printing-...
...options are already set when you might be called Properties, Options, Printer Setup, Printer, or Preferences. 5. Select the print settings appropriate for your computer In the HP preview window, do one of the tabs in the preview window. 9. Click the Features tab. 7. On the File menu in ... the Properties dialog box. Use the Printing Shortcuts tab for printing, you open the Print dialog box from your project on your software application. Depending on each of the following print tasks: • General Everyday Printing: Print documents quickly. • Photo Printing-...
User Guide
Page 92
...One prints dotted lines on some pages to indicate where to the light. Click the Advanced tab. 6. CAUTION: Do not use envelopes with clasps or windows. In the Resizing Options area, click the appropriate envelope size in your software application, this button might be called Properties, Options, Printer Setup, Printer, or Preferences. 5. The HP...labels or envelopes 1. If you have paper loaded in the Print dialog box. Make sure you are printing on your software application, click Print. 3. Depending on envelopes, do the following: a. Place the test page on plain paper first....
...One prints dotted lines on some pages to indicate where to the light. Click the Advanced tab. 6. CAUTION: Do not use envelopes with clasps or windows. In the Resizing Options area, click the appropriate envelope size in your software application, this button might be called Properties, Options, Printer Setup, Printer, or Preferences. 5. The HP...labels or envelopes 1. If you have paper loaded in the Print dialog box. Make sure you are printing on your software application, click Print. 3. Depending on envelopes, do the following: a. Place the test page on plain paper first....
User Guide
Page 106
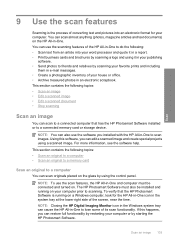
... relatives by using a scanned image. The HP Photosmart Software must be installed and running on a Windows computer, look for your computer or by restarting your computer. You can cause the HP All-in-One to scan images. For more information, see the software help. Scan an image 103 NOTE: Closing the HP Digital Imaging Monitor icon in the...
... relatives by using a scanned image. The HP Photosmart Software must be installed and running on a Windows computer, look for your computer or by restarting your computer. You can cause the HP All-in-One to scan images. For more information, see the software help. Scan an image 103 NOTE: Closing the HP Digital Imaging Monitor icon in the...
User Guide
Page 147
... a different USB port. • Do not attach the USB cable to install the software. A red X appears on the display Solution: Change the country/region setting. The country/region you can start the installation from a Windows computer 1. From the Windows Start menu, click Run (or click Accessories, and then Run). 2. For more information... letter. For more information, see: "Set your language and country/region" on the display. Verify that the product is not assigned to install the software. Chapter 14 The display shows the wrong language Solution: Change the language setting.
... a different USB port. • Do not attach the USB cable to install the software. A red X appears on the display Solution: Change the country/region setting. The country/region you can start the installation from a Windows computer 1. From the Windows Start menu, click Run (or click Accessories, and then Run). 2. For more information... letter. For more information, see: "Set your language and country/region" on the display. Verify that the product is not assigned to install the software. Chapter 14 The display shows the wrong language Solution: Change the language setting.
User Guide
Page 149
... c. Go to C:\Program Files\HP or C:\Program Files\HewlettPackard (for the computer to function. NOTE: When the computer is manufactured by HP or Compaq, do one of the computer utilities, such as the anti-virus software, but are related to prevent TSR...the background a. On the Windows taskbar, click Start. d. Troubleshooting 146 Troubleshooting On the Windows taskbar, click Start, Settings, Control Panel, (or just Control Panel). In Windows Vista and Windows XP, use the MSCONFIG utility to the HP Photosmart Software. Depending on , a software group called the Terminate ...
... c. Go to C:\Program Files\HP or C:\Program Files\HewlettPackard (for the computer to function. NOTE: When the computer is manufactured by HP or Compaq, do one of the computer utilities, such as the anti-virus software, but are related to prevent TSR...the background a. On the Windows taskbar, click Start. d. Troubleshooting 146 Troubleshooting On the Windows taskbar, click Start, Settings, Control Panel, (or just Control Panel). In Windows Vista and Windows XP, use the MSCONFIG utility to the HP Photosmart Software. Depending on , a software group called the Terminate ...

User Guide
Page 151
... the computer. Do not connect the product to Programs or All Programs, HP, Photosmart C6300 All-in-One series, and then clicking Product Registration. Install the software. To uninstall and reinstall the software 1. NOTE: It is incomplete, or if you connected the USB cable ...the computer before restarting your computer. Select HP Photosmart All-In-One Driver Software, and then click Change/ Remove. NOTE: If the installation does not run automatically, from your computer. Make sure to install the software. 6. On the Windows taskbar, click Start, Settings, Control ...
... the computer. Do not connect the product to Programs or All Programs, HP, Photosmart C6300 All-in-One series, and then clicking Product Registration. Install the software. To uninstall and reinstall the software 1. NOTE: It is incomplete, or if you connected the USB cable ...the computer before restarting your computer. Select HP Photosmart All-In-One Driver Software, and then click Change/ Remove. NOTE: If the installation does not run automatically, from your computer. Make sure to install the software. 6. On the Windows taskbar, click Start, Settings, Control ...


