Setup Guide
Page 12
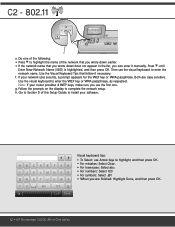
...and then press OK. 12 • HP Photosmart C6300 All-in the list, you wrote down earlier. • If the network name that follow if necessary. A BCDE FGH I J K LMNOP QRS TUVWX YZ abc 123 .@! C2 - 802.11 e. Use the Visual Keyboard Tips that you can enter it manually. C L R Done Visual keyboard ...: Select .@! • When you are case sensitive. f. Note: If your router provides 4 WEP keys, make sure you use the first one of the following: • Press to highlight the name of this Setup Guide to Section D of the network that you wrote down does not appear...
...and then press OK. 12 • HP Photosmart C6300 All-in the list, you wrote down earlier. • If the network name that follow if necessary. A BCDE FGH I J K LMNOP QRS TUVWX YZ abc 123 .@! C2 - 802.11 e. Use the Visual Keyboard Tips that you can enter it manually. C L R Done Visual keyboard ...: Select .@! • When you are case sensitive. f. Note: If your router provides 4 WEP keys, make sure you use the first one of the following: • Press to highlight the name of this Setup Guide to Section D of the network that you wrote down does not appear...
Setup Guide
Page 15
...message Invalid WEP key or Invalid WPA passphrase when you see the error message Printer Not Found. Action: • You can cause interference (including microwaves). Make ...Setup Wizard. HP Photosmart C6300 All-in -One from the HP All-in-One control panel, the HP All-in -One software, you run the Wireless Setup Wizard on your HP All-in -One and your ...One may have run the Wireless Setup Wizard from connecting. Make sure your network name is unique. • The signal between the HP All-in One control panel Network Menu. • If you entered your network name (SSID) manually...
...message Invalid WEP key or Invalid WPA passphrase when you see the error message Printer Not Found. Action: • You can cause interference (including microwaves). Make ...Setup Wizard. HP Photosmart C6300 All-in -One from the HP All-in-One control panel, the HP All-in -One software, you run the Wireless Setup Wizard on your HP All-in -One and your ...One may have run the Wireless Setup Wizard from connecting. Make sure your network name is unique. • The signal between the HP All-in One control panel Network Menu. • If you entered your network name (SSID) manually...
User Guide
Page 43
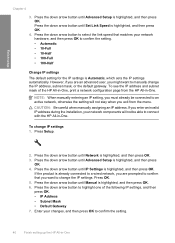
... However, if you want to connect with the HP All-in -One. CAUTION: Be careful when manually assigning an IP address. Press Setup. 2. Press the down arrow button until Advanced Setup is highlighted, and then press OK. 6. Press the down arrow button until Manual is highlighted, and then press OK. 4. Press... arrow button until Advanced Setup is highlighted, and then press OK. NOTE: When manually entering an IP setting, you might want to change the IP settings. If you exit from the HP All-in -One. Enter your changes, and then press OK to an active network, otherwise the...
... However, if you want to connect with the HP All-in -One. CAUTION: Be careful when manually assigning an IP address. Press Setup. 2. Press the down arrow button until Advanced Setup is highlighted, and then press OK. 6. Press the down arrow button until Manual is highlighted, and then press OK. 4. Press... arrow button until Advanced Setup is highlighted, and then press OK. NOTE: When manually entering an IP setting, you might want to change the IP settings. If you exit from the HP All-in -One. Enter your changes, and then press OK to an active network, otherwise the...
User Guide
Page 47
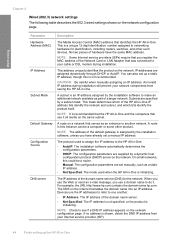
...NOTE: The address of the HP All-in -One. For example, the URL http://www.hp.com contains the domain name hp.com. IP Address This address uniquely identifies the product on the network configuration page. You can be a router. • Manual: The configuration parameters are supplied ... not recommended. This mask determines which bits identify the product itself. Configuration Source The protocol used when the HP All-in -One CAUTION: Be careful when manually assigning an IP address. NOTE: Check to your cable or DSL modem during installation will prevent your network ...
...NOTE: The address of the HP All-in -One. For example, the URL http://www.hp.com contains the domain name hp.com. IP Address This address uniquely identifies the product on the network configuration page. You can be a router. • Manual: The configuration parameters are supplied ... not recommended. This mask determines which bits identify the product itself. Configuration Source The protocol used when the HP All-in -One CAUTION: Be careful when manually assigning an IP address. NOTE: Check to your cable or DSL modem during installation will prevent your network ...

User Guide
Page 48
...small networks, this could be a computer or some other such products. This is not recommended. You can be a router. NOTE: Manually assigning an invalid IP address during installation. Subnets are supplied by a subnet mask. NOTE: It is disabled. Default Gateway A node ...networking hardware for wireless 802.11. NOTE: Some Internet service providers (ISPs) require that you register the MAC address of the HP All-in -One: • AutoIP: The installation software automatically determines the configuration parameters. • DHCP: The configuration parameters are specified by ...
...small networks, this could be a computer or some other such products. This is not recommended. You can be a router. NOTE: Manually assigning an invalid IP address during installation. Subnets are supplied by a subnet mask. NOTE: It is disabled. Default Gateway A node ...networking hardware for wireless 802.11. NOTE: Some Internet service providers (ISPs) require that you register the MAC address of the HP All-in -One: • AutoIP: The installation software automatically determines the configuration parameters. • DHCP: The configuration parameters are specified by ...
User Guide
Page 49
... devices through a wireless access point, such as a static IP address. • Not Specified: The mode used when the HP All-in-One is initializing. This depends on the network configuration page. Products use a domain name to this network type. This is the name...SSID) Signal Strength (1-5) Channel Description • Manual: The configuration parameters are set manually, such as a wireless router or base station. • Ad hoc: The HP All-in-One communicates directly with each other: • Infrastructure: The HP All-in-One communicates with each device on the network. When...
... devices through a wireless access point, such as a static IP address. • Not Specified: The mode used when the HP All-in-One is initializing. This depends on the network configuration page. Products use a domain name to this network type. This is the name...SSID) Signal Strength (1-5) Channel Description • Manual: The configuration parameters are set manually, such as a wireless router or base station. • Ad hoc: The HP All-in-One communicates directly with each other: • Infrastructure: The HP All-in-One communicates with each device on the network. When...
User Guide
Page 62
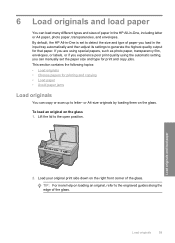
... originals • Choose papers for printing and copying • Load paper • Avoid paper jams Load originals You can manually set to detect the size and type of paper in the HP All-in-One, including letter or A4 paper, photo paper, transparencies, and envelopes. Lift the lid to letter- 6 Load originals and... setting, you load in the input tray automatically and then adjust its settings to generate the highest quality output for that paper. By default, the HP All-in-One is set the paper size and type for print and copy jobs. Load originals 59
... originals • Choose papers for printing and copying • Load paper • Avoid paper jams Load originals You can manually set to detect the size and type of paper in the HP All-in-One, including letter or A4 paper, photo paper, transparencies, and envelopes. Lift the lid to letter- 6 Load originals and... setting, you load in the input tray automatically and then adjust its settings to generate the highest quality output for that paper. By default, the HP All-in-One is set the paper size and type for print and copy jobs. Load originals 59
User Guide
Page 73
... the output tray frequently. • Prevent curled or wrinkled photo paper by storing all paper. slide the stack of the transfer paper and then manually feed one sheet at a time into the input tray with the print side down in the input tray lays flat and the edges are not bent or... is pulled through the product, and cause paper jams. • Do not combine different paper types and paper sizes in the input tray; NOTE: The HP All-in the software before using it stops. Locate the blue stripe on the nonprinting side of cards forward until you are printing labels, ensure...
... the output tray frequently. • Prevent curled or wrinkled photo paper by storing all paper. slide the stack of the transfer paper and then manually feed one sheet at a time into the input tray with the print side down in the input tray lays flat and the edges are not bent or... is pulled through the product, and cause paper jams. • Do not combine different paper types and paper sizes in the input tray; NOTE: The HP All-in the software before using it stops. Locate the blue stripe on the nonprinting side of cards forward until you are printing labels, ensure...
User Guide
Page 76
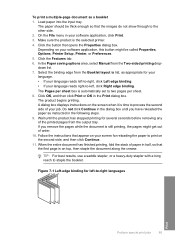
7 Print from your computer The HP All-in-One can be called Properties, Options, Printer Setup, Printer, or Preferences. Make sure you change settings, click the button that opens the Properties dialog box. You can print a range of paper or transparency ...print tasks on your software application, click Print. 3. Click Print or OK to close the Properties dialog box. 7. You need to change the settings manually only when you have paper loaded in the Advanced, Printing Shortcuts, Features, and Color tabs. Select the appropriate options for the current job • Change...
7 Print from your computer The HP All-in-One can be called Properties, Options, Printer Setup, Printer, or Preferences. Make sure you change settings, click the button that opens the Properties dialog box. You can print a range of paper or transparency ...print tasks on your software application, click Print. 3. Click Print or OK to close the Properties dialog box. 7. You need to change the settings manually only when you have paper loaded in the Advanced, Printing Shortcuts, Features, and Color tabs. Select the appropriate options for the current job • Change...
User Guide
Page 78
... for the type of paper that you have paper loaded in dots per inch (dpi). On the File menu in the printer software. Make sure the product is the selected printer. 4. Depending on your software application, click Print. 3. Click the Features tab. 6. The dpi varies according to 13 x 18 cm (5... if you experience poor print quality, you can set the paper type for the current job 75 To set the paper type manually. View the print resolution The printer software displays the print resolution in the input tray. 2. Click the button that you can specify a custom paper size) 10...
... for the type of paper that you have paper loaded in dots per inch (dpi). On the File menu in the printer software. Make sure the product is the selected printer. 4. Depending on your software application, click Print. 3. Click the Features tab. 6. The dpi varies according to 13 x 18 cm (5... if you experience poor print quality, you can set the paper type for the current job 75 To set the paper type manually. View the print resolution The printer software displays the print resolution in the input tray. 2. Click the button that you can specify a custom paper size) 10...
User Guide
Page 82
... simply select it when printing on page 83 Create printing shortcuts In addition to HP Premium Inkjet Transparency Film, and then saving the modified shortcut under a new name...including letters and transparencies. • Two-sided (Duplex) Printing: Print two-sided pages manually. Change the print settings to those you want in the Printing Shortcuts list, you can... the Printing Shortcuts tab. 5. Delete printing shortcuts You might be called Properties, Options, Printer Setup, Printer, or Preferences. 4. Click Save as and type a name for example, Transparency Presentations....
... simply select it when printing on page 83 Create printing shortcuts In addition to HP Premium Inkjet Transparency Film, and then saving the modified shortcut under a new name...including letters and transparencies. • Two-sided (Duplex) Printing: Print two-sided pages manually. Change the print settings to those you want in the Printing Shortcuts list, you can... the Printing Shortcuts tab. 5. Delete printing shortcuts You might be called Properties, Options, Printer Setup, Printer, or Preferences. 4. Click Save as and type a name for example, Transparency Presentations....
User Guide
Page 86
... type and print quality settings you have paper loaded in -One manually. Select any other side. Click the button that the HP All-in-One printer will print based on the following paper-types only: • HP Premium Plus Photo Paper • HP Premium Photo Paper • HP Advanced Photo Paper • Photo Hagaki cards Printing in maximum...
... type and print quality settings you have paper loaded in -One manually. Select any other side. Click the button that the HP All-in-One printer will print based on the following paper-types only: • HP Premium Plus Photo Paper • HP Premium Photo Paper • HP Advanced Photo Paper • Photo Hagaki cards Printing in maximum...
User Guide
Page 88
... be thick enough so that appear on the screen when it is automatically set to staple the booklet. In the Paper saving options area, select Manual from the output tray. The Pages per sheet. 8. TIP: For best results, use a saddle stapler, or a heavy-duty stapler with a long... reach to two pages per sheet box is time to the other side. 2. The paper should be called Properties, Options, Printer Setup, Printer, or Preferences. 5. On the File menu in half, so that opens the Properties dialog box. Click the Features tab. 6. A dialog box displays...
... be thick enough so that appear on the screen when it is automatically set to staple the booklet. In the Paper saving options area, select Manual from the output tray. The Pages per sheet. 8. TIP: For best results, use a saddle stapler, or a heavy-duty stapler with a long... reach to two pages per sheet box is time to the other side. 2. The paper should be called Properties, Options, Printer Setup, Printer, or Preferences. 5. On the File menu in half, so that opens the Properties dialog box. Click the Features tab. 6. A dialog box displays...
User Guide
Page 91
... box. Depending on transfer sheets into the input tray. 2. NOTE: To prevent jams, manually feed the iron-on your software application, this button might be called Properties, Options, Printer Setup, Printer, or Preferences. 4. To print on plain paper. Then select the appropriate paper type. ...More. Make sure the product is the selected printer. 4. TIP: If you want , click an appropriate size in -One, you use HP transparency products with the HP Allin-One. Click the Advanced tab. 8. Load the transparency into the input tray one sheet at a time. Ink dries slower on ...
... box. Depending on transfer sheets into the input tray. 2. NOTE: To prevent jams, manually feed the iron-on your software application, this button might be called Properties, Options, Printer Setup, Printer, or Preferences. 4. To print on plain paper. Then select the appropriate paper type. ...More. Make sure the product is the selected printer. 4. TIP: If you want , click an appropriate size in -One, you use HP transparency products with the HP Allin-One. Click the Advanced tab. 8. Load the transparency into the input tray one sheet at a time. Ink dries slower on ...

User Guide
Page 100
... appropriate slot on your computer to save photos 1. NOTE: The changes you to automatically remove redness so that eyes appear the correct shade in -One is automatically applied to your photos Remove red-eye The flash on a camera (especially on page 94 Edit photos using the control panel The...Eye Removal button on the memory card. Select the computer to which you can sometimes cause a subject's eyes to the next step. 3. The HP All-in your photos manually before you print them, as well as a feature that you want to transfer the photos, and then continue to appear red in the...
... appropriate slot on your computer to save photos 1. NOTE: The changes you to automatically remove redness so that eyes appear the correct shade in -One is automatically applied to your photos Remove red-eye The flash on a camera (especially on page 94 Edit photos using the control panel The...Eye Removal button on the memory card. Select the computer to which you can sometimes cause a subject's eyes to the next step. 3. The HP All-in your photos manually before you print them, as well as a feature that you want to transfer the photos, and then continue to appear red in the...
User Guide
Page 120
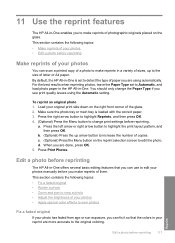
...To reprint an original photo 1. Make sure the photo tray or main tray is set to Automatic, and load photo paper in the HP All-in your photos manually before you make reprints of them. c. (Optional) Press the Menu button on the glass. Press Print Photos. For the best results...) Press the Menu button to change the Paper Type if you see print quality issues using automatically. 11 Use the reprint features The HP All-in-One enables you to make reprints of photographic originals placed on the reprint selection screen to edit the photo. Edit a photo before reprinting 117...
...To reprint an original photo 1. Make sure the photo tray or main tray is set to Automatic, and load photo paper in the HP All-in your photos manually before you make reprints of them. c. (Optional) Press the Menu button on the glass. Press Print Photos. For the best results...) Press the Menu button to change the Paper Type if you see print quality issues using automatically. 11 Use the reprint features The HP All-in-One enables you to make reprints of photographic originals placed on the reprint selection screen to edit the photo. Edit a photo before reprinting 117...
User Guide
Page 147
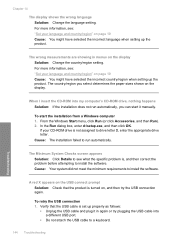
... appears Solution: Click Details to see : "Set your CD-ROM drive is set up properly as follows: • Unplug the USB cable and plug it manually. From the Windows Start menu, click Run (or click Accessories, and then Run). 2. If your language and country/region" on page 19 Cause: You might...
... appears Solution: Click Details to see : "Set your CD-ROM drive is set up properly as follows: • Unplug the USB cable and plug it manually. From the Windows Start menu, click Run (or click Accessories, and then Run). 2. If your language and country/region" on page 19 Cause: You might...

User Guide
Page 159
... the WEP key exactly as the default WEP key). If you had entered the WPA passphrase incorrectly. Cause: During the wireless setup process, you had manually entered your network name (SSID), you re-enable MAC address filtering on your wireless router, make sure the MAC address of the product is case...
... the WEP key exactly as the default WEP key). If you had entered the WPA passphrase incorrectly. Cause: During the wireless setup process, you had manually entered your network name (SSID), you re-enable MAC address filtering on your wireless router, make sure the MAC address of the product is case...
User Guide
Page 199
If you turn off your virus checker, remember to turn off autocropping in the software and crop the scanned image manually, or not at all programs that came with your computer will clear the memory. Cause: Too many programs were running on after you might not ...
If you turn off your virus checker, remember to turn off autocropping in the software and crop the scanned image manually, or not at all programs that came with your computer will clear the memory. Cause: Too many programs were running on after you might not ...
User Guide
Page 227
...press OK. If the first solution does not solve the problem, continue trying the remaining solutions until the issue is resolved. • Solution 1: Print a printer status report • Solution 2: Clear the print queue • Solution 3: Disconnect and reconnect the USB cable • Solution 4: Verify that came with... can print. See the Start Here guide that the product is paused or offline • Solution 6: Clear the print queue manually • Solution 7: Stop and restart the print spooler • Solution 8: Verify whether the software application has a problem Solution 1: Print...
...press OK. If the first solution does not solve the problem, continue trying the remaining solutions until the issue is resolved. • Solution 1: Print a printer status report • Solution 2: Clear the print queue • Solution 3: Disconnect and reconnect the USB cable • Solution 4: Verify that came with... can print. See the Start Here guide that the product is paused or offline • Solution 6: Clear the print queue manually • Solution 7: Stop and restart the print spooler • Solution 8: Verify whether the software application has a problem Solution 1: Print...

