Setup Guide
Page 1
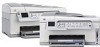
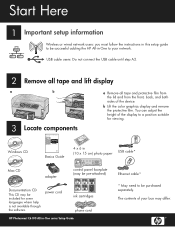
Windows CD Basics Guide 4 x 6 in -One series Setup Guide Ethernet cable* * May need to be purchased separately. USB cable users: Do not connect the USB cable until step A2. 2 Remove all tape and lift display a b 3 Locate components HP Photosmart C6100 All-in -One to your box may be included for viewing. The contents of your network. You...
Windows CD Basics Guide 4 x 6 in -One series Setup Guide Ethernet cable* * May need to be purchased separately. USB cable users: Do not connect the USB cable until step A2. 2 Remove all tape and lift display a b 3 Locate components HP Photosmart C6100 All-in -One to your box may be included for viewing. The contents of your network. You...
Setup Guide
Page 7
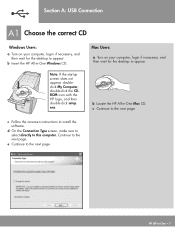
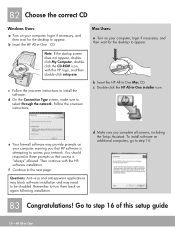
c Follow the onscreen instructions to appear b Insert the HP All-in-One Windows CD.. Section A: USB Connection A1 Choose the correct CD Windows Users: a Turn on your computer, login if necessary, and then wait for the desktop to the next page. b Locate the HP All-in -One • 7 d On the Connection Type screen, make sure to select...
c Follow the onscreen instructions to appear b Insert the HP All-in-One Windows CD.. Section A: USB Connection A1 Choose the correct CD Windows Users: a Turn on your computer, login if necessary, and then wait for the desktop to the next page. b Locate the HP All-in -One • 7 d On the Connection Type screen, make sure to select...
Setup Guide
Page 8
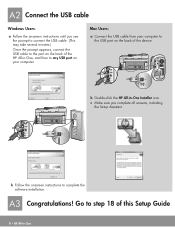
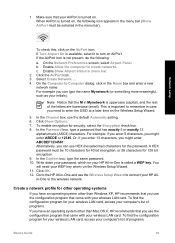
A2 Connect the USB cable Windows Users: a Follow the onscreen instructions until you complete all screens, including the Setup Assistant. b Follow the onscreen instructions to the USB port on your computer to complete the software installation. Go to step 18 of the HP All-in -One Installer icon. Mac Users: a ...Connect the USB cable from your computer. b Double-click the HP All-in -One, and then to any USB port on the back of the device. c Make sure...
A2 Connect the USB cable Windows Users: a Follow the onscreen instructions until you complete all screens, including the Setup Assistant. b Follow the onscreen instructions to the USB port on your computer to complete the software installation. Go to step 18 of the HP All-in -One Installer icon. Mac Users: a ...Connect the USB cable from your computer. b Double-click the HP All-in -One, and then to any USB port on the back of the device. c Make sure...
Setup Guide
Page 10
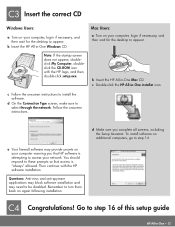
...back on additional computers, go to step 14. d Make sure you that access is attempting to access your network. b Insert the HP All-in -One Mac CD. c Follow the onscreen instructions to select through the network. e Your firewall software may need to these prompts so that...following installation. Then continue with the HP logo, and then double-click setup.exe. c Double-click the HP All-in -One Follow the onscreen instructions. Go to step 16 of this setup guide 10 • HP All-in -One installer icon. B2 Choose the correct CD Windows Users: a Turn on your computer...
...back on additional computers, go to step 14. d Make sure you that access is attempting to access your network. b Insert the HP All-in -One Mac CD. c Follow the onscreen instructions to select through the network. e Your firewall software may need to these prompts so that...following installation. Then continue with the HP logo, and then double-click setup.exe. c Double-click the HP All-in -One Follow the onscreen instructions. Go to step 16 of this setup guide 10 • HP All-in -One installer icon. B2 Choose the correct CD Windows Users: a Turn on your computer...
Setup Guide
Page 13
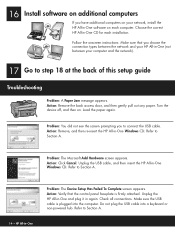
..., doubleclick My Computer, doubleclick the CD-ROM icon with the HP software installation. c Double-click the HP All-in -One Mac CD. Follow the onscreen instructions. You should respond to step 16 of this setup guide HP All-in -One Windows CD Mac Users: a Turn on again following installation. d... Make sure you that access is attempting to install the software. C3 Insert the correct CD Windows Users: a Turn on additional computers, go to step 14. b Insert the HP All-in -One installer icon. To install software on your computer, login if necessary, and then wait for ...
..., doubleclick My Computer, doubleclick the CD-ROM icon with the HP software installation. c Double-click the HP All-in -One Mac CD. Follow the onscreen instructions. You should respond to step 16 of this setup guide HP All-in -One Windows CD Mac Users: a Turn on again following installation. d... Make sure you that access is attempting to install the software. C3 Insert the correct CD Windows Users: a Turn on additional computers, go to step 14. b Insert the HP All-in -One installer icon. To install software on your computer, login if necessary, and then wait for ...
Setup Guide
Page 14
...Action: Remove, and then re-insert the HP All-in -One Windows CD. Make sure the USB cable is firmly attached. Refer to Section A. 14 • HP All-in -One CD for each computer. Unplug the USB cable, and then insert the HP All-in -One Windows CD. Refer to Section A. Turn the device... off, and then on each installation. Action: Verify that you choose the connection types between the network and your HP All-in-One (not between your network, install the HP All-in again. Unplug the HP All-in-One and ...
...Action: Remove, and then re-insert the HP All-in -One Windows CD. Make sure the USB cable is firmly attached. Refer to Section A. 14 • HP All-in -One CD for each computer. Unplug the USB cable, and then insert the HP All-in -One Windows CD. Refer to Section A. Turn the device... off, and then on each installation. Action: Verify that you choose the connection types between the network and your HP All-in-One (not between your network, install the HP All-in again. Unplug the HP All-in-One and ...
Basics Guide
Page 3
...permission of Intel Corporation or its subsidiaries in the express warranty statements accompanying such products and services. Nothing herein should be liable for HP products and services are set forth in the United States and other countries. The only warranties for technical or editorial errors or ... of Hewlett-Packard, except as constituting an additional warranty. Adobe® and the Acrobat logo® are U.S. All rights reserved. Windows®, Windows NT®, Windows ME®, Windows XP®, and Windows 2000® are trademarks of Microsoft Corporation.
...permission of Intel Corporation or its subsidiaries in the express warranty statements accompanying such products and services. Nothing herein should be liable for HP products and services are set forth in the United States and other countries. The only warranties for technical or editorial errors or ... of Hewlett-Packard, except as constituting an additional warranty. Adobe® and the Acrobat logo® are U.S. All rights reserved. Windows®, Windows NT®, Windows ME®, Windows XP®, and Windows 2000® are trademarks of Microsoft Corporation.

Basics Guide
Page 10
...the display. Press Photo Fix to print. Zoom Out: Zooms out to adjust the crop box when printing. If you are zooming in -One to make prints of copies, paper size, and paper type. Photo Fix: Automatically adjusts a photo for viewing or printing when turned on the... brightness, frames, and red-eye removal. See the display for printing, saving, editing, and sharing photos. You can also use the HP Photosmart software (Windows) or the HP Photosmart Mac software (Mac) that you to other basic software features, such as number of your scan. Copy Menu: Selects copy options, such...
...the display. Press Photo Fix to print. Zoom Out: Zooms out to adjust the crop box when printing. If you are zooming in -One to make prints of copies, paper size, and paper type. Photo Fix: Automatically adjusts a photo for viewing or printing when turned on the... brightness, frames, and red-eye removal. See the display for printing, saving, editing, and sharing photos. You can also use the HP Photosmart software (Windows) or the HP Photosmart Mac software (Mac) that you to other basic software features, such as number of your scan. Copy Menu: Selects copy options, such...
Basics Guide
Page 11
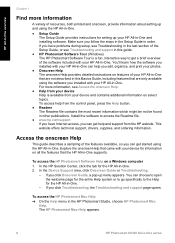
... on features of your HP All-in-One that are not described in this guide. ● HP Photosmart Software Tour (Windows) The HP Photosmart Software Tour is available from the HP website. Install the software to access the Readme file. ● www.hp.com/support If you have... you follow the steps in the Setup Guide in order. The HP Photosmart Mac Help appears. 8 HP Photosmart C6100 All-in the HP Photosmart Studio, choose HP Photosmart Mac Help. You can get started using the HP All-in-One. Make sure you click Troubleshooting, the Troubleshooting and support page opens...
... on features of your HP All-in-One that are not described in this guide. ● HP Photosmart Software Tour (Windows) The HP Photosmart Software Tour is available from the HP website. Install the software to access the Readme file. ● www.hp.com/support If you have... you follow the steps in the Setup Guide in order. The HP Photosmart Mac Help appears. 8 HP Photosmart C6100 All-in the HP Photosmart Studio, choose HP Photosmart Mac Help. You can get started using the HP All-in-One. Make sure you click Troubleshooting, the Troubleshooting and support page opens...
Basics Guide
Page 15
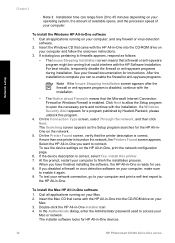
...the firewall or anti-spyware program is correct, select Yes, install this program. 4. To install the Windows HP All-in -One into the CD-ROM drive on the network, the Printers Found screen appears. See your Mac. 3. Click Next to allow the Setup program to 45 minutes depending...your Mac or network. The installer software looks for the HP All-inOne on your computer, make sure to access your computer to firewalls appears, respond as the Setup program searches for HP All-in-One devices. 12 HP Photosmart C6100 All-in -One you disabled a firewall or virus detection software on the ...
...the firewall or anti-spyware program is correct, select Yes, install this program. 4. To install the Windows HP All-in -One into the CD-ROM drive on the network, the Printers Found screen appears. See your Mac. 3. Click Next to allow the Setup program to 45 minutes depending...your Mac or network. The installer software looks for the HP All-inOne on your computer, make sure to access your computer to firewalls appears, respond as the Setup program searches for HP All-in-One devices. 12 HP Photosmart C6100 All-in -One you disabled a firewall or virus detection software on the ...
Basics Guide
Page 19
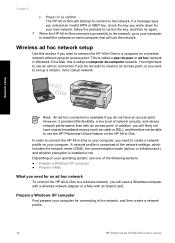
... the following sections: ● Prepare a Windows XP computer ● Prepare a Mac What you will attempt to connect to install the software on the HP All-in -One to confirm. Press OK to a wireless network, you need to the network, and then create a network profile. 16 HP Photosmart C6100 All-in -One to set up a simpler, more casual...
... the following sections: ● Prepare a Windows XP computer ● Prepare a Mac What you will attempt to connect to install the software on the HP All-in -One to confirm. Press OK to a wireless network, you need to the network, and then create a network profile. 16 HP Photosmart C6100 All-in -One to set up a simpler, more casual...
Basics Guide
Page 20
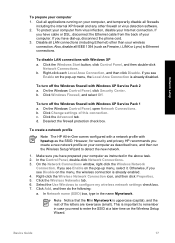
... as described here, and then run the Wireless Setup Wizard to detect the new network. 1. To create a network profile Note The HP All-in-One comes configured with a network profile with Windows XP Service Pack 1 a. Right-click the Wireless Network Connection icon, and then click Properties. 5. In Network name (SSID) box, type in...
... as described here, and then run the Wireless Setup Wizard to detect the new network. 1. To create a network profile Note The HP All-in-One comes configured with a network profile with Windows XP Service Pack 1 a. Right-click the Wireless Network Connection icon, and then click Properties. 5. In Network name (SSID) box, type in...

Basics Guide
Page 21
...enter your WEP key incorrectly on your computer ➔ Quit all firewalls. i. Click OK again to the HP All-in-One and use a WEP key. Go to close the Wireless network properties window, and then click OK again. To prepare your computer and temporarily disable all applications running on the...ASCII) characters. In the Network key box, type a WEP key that the check box is not selected next to detect the new network. 18 HP Photosmart C6100 All-in order to the next step. wireless access points are examples only. e. In the Data encryption list, select WEP. Write down the WEP...
...enter your WEP key incorrectly on your computer ➔ Quit all firewalls. i. Click OK again to the HP All-in-One and use a WEP key. Go to close the Wireless network properties window, and then click OK again. To prepare your computer and temporarily disable all applications running on the...ASCII) characters. In the Network key box, type a WEP key that the check box is not selected next to detect the new network. 18 HP Photosmart C6100 All-in order to the next step. wireless access points are examples only. e. In the Data encryption list, select WEP. Write down the WEP...
Basics Guide
Page 22
... be selected in menu bar. 2. Or, if you enter 13 characters, you can type the name Mynetwork (or something more meaningful, such as your HP Allin-One to enter the SSID at a later time on , the following : a. Click OK. 12. Alternatively, you might enter ABCDE or 12345. In the... Make sure that came with your computer's list of programs. If you have an operating system other than Windows XP, HP recommends that you use the configuration program that your HP All-in -One and use the configuration program that came with your WEP key when run the Wireless Setup Wizard. 11....
... be selected in menu bar. 2. Or, if you enter 13 characters, you can type the name Mynetwork (or something more meaningful, such as your HP Allin-One to enter the SSID at a later time on , the following : a. Click OK. 12. Alternatively, you might enter ABCDE or 12345. In the... Make sure that came with your computer's list of programs. If you have an operating system other than Windows XP, HP recommends that you use the configuration program that your HP All-in -One and use the configuration program that came with your WEP key when run the Wireless Setup Wizard. 11....
Basics Guide
Page 25
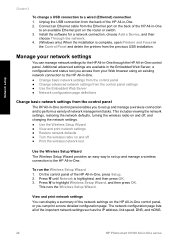
...a Device, and then choose Through the network. 4. (Windows only) When the installation is highlighted, and then press OK. 3. Install the software for the HP All-in-One through the HP All-in the Control Panel and delete the printers from your network settings You can print a more detailed ... Ethernet cable from the back of the important network settings such as the IP address, link speed, DNS, and mDNS. 22 HP Photosmart C6100 All-in -One, press Setup. 2. This includes viewing the network settings, restoring the network defaults, turning the wireless radio on and off, and...
...a Device, and then choose Through the network. 4. (Windows only) When the installation is highlighted, and then press OK. 3. Install the software for the HP All-in-One through the HP All-in the Control Panel and delete the printers from your network settings You can print a more detailed ... Ethernet cable from the back of the important network settings such as the IP address, link speed, DNS, and mDNS. 22 HP Photosmart C6100 All-in -One, press Setup. 2. This includes viewing the network settings, restoring the network defaults, turning the wireless radio on and off, and...
Basics Guide
Page 37
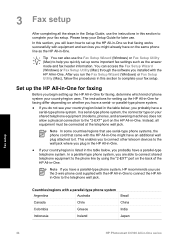
... you probably have a parallel-type telephone system. You can also use the Fax Setup Wizard (Windows) or Fax Setup Utility (Mac) to help you run the Fax Setup Wizard (Windows) or Fax Setup Utility (Mac), follow the procedures in this section to complete your fax setup...you installed with a parallel-type phone system Argentina Australia Brazil Canada Chile China Colombia Greece India Indonesia Ireland Japan Fax setup 34 HP Photosmart C6100 All-in -One. In this section to it. This enables you to connect other telecom devices to the "2-EXT" port on whether you use...
... you probably have a parallel-type telephone system. You can also use the Fax Setup Wizard (Windows) or Fax Setup Utility (Mac) to help you run the Fax Setup Wizard (Windows) or Fax Setup Utility (Mac), follow the procedures in this section to complete your fax setup...you installed with a parallel-type phone system Argentina Australia Brazil Canada Chile China Colombia Greece India Indonesia Ireland Japan Fax setup 34 HP Photosmart C6100 All-in -One. In this section to it. This enables you to connect other telecom devices to the "2-EXT" port on whether you use...

Basics Guide
Page 64
...panel. The HP All-in-One software must be installed and running on the glass by starting the HP Photosmart Software. ● Scan an original to fit snugly against all paper. Load your computer prior to begin copying. Note Closing the HP Digital Imaging Monitor icon in the Windows system tray ...can make a copy from the control panel of the HP All-in-One only. ●...
...panel. The HP All-in-One software must be installed and running on the glass by starting the HP Photosmart Software. ● Scan an original to fit snugly against all paper. Load your computer prior to begin copying. Note Closing the HP Digital Imaging Monitor icon in the Windows system tray ...can make a copy from the control panel of the HP All-in-One only. ●...
Basics Guide
Page 69
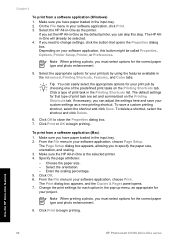
... shortcut, select the shortcut and click Save. To print from a software application (Windows) 1. From the File menu in your print job by choosing one of print task in -One as appropriate for each option in -One series The Page Setup dialog box appears, allowing you must select options for the ..., choose Page Setup. Note When printing a photo, you to begin printing. Click Print to close the Properties dialog box. 7. Use the HP All-in-One features 66 HP Photosmart C6100 All-in the pop-up menu, as the default printer, you can skip this button might be selected. 4.
... shortcut, select the shortcut and click Save. To print from a software application (Windows) 1. From the File menu in your print job by choosing one of print task in -One as appropriate for each option in -One series The Page Setup dialog box appears, allowing you must select options for the ..., choose Page Setup. Note When printing a photo, you to begin printing. Click Print to close the Properties dialog box. 7. Use the HP All-in-One features 66 HP Photosmart C6100 All-in the pop-up menu, as the default printer, you can skip this button might be selected. 4.

Basics Guide
Page 76
... instructions and the instructions provided in the Setup Guide that you disconnect the HP All-in the Windows system tray. Select the HP All-in -One software. Insert the HP All-in -One. Caution Do not connect the USB cable to your computer. Specific information is...installation and configuration issues, and some operational topics. Reinstall the HP All-in -One, and then click Change/Remove. Do not connect the HP All-in -One from a Windows computer and then reinstall 1. Disconnect the HP All-in -One to the computer until after you have reinstalled the software....
... instructions and the instructions provided in the Setup Guide that you disconnect the HP All-in the Windows system tray. Select the HP All-in -One software. Insert the HP All-in -One. Caution Do not connect the USB cable to your computer. Specific information is...installation and configuration issues, and some operational topics. Reinstall the HP All-in -One, and then click Change/Remove. Do not connect the HP All-in -One from a Windows computer and then reinstall 1. Disconnect the HP All-in -One to the computer until after you have reinstalled the software....
Basics Guide
Page 96
... 3. Right-click My Computer. 2. b. Make sure your LAN card is set up under Network Adapters. 5. To check your LAN card (Windows) 1. Solution Check to the documentation that your card shows up properly. To see if you have an active network connection. Troubleshooting and support... problems you might encounter setting up a wired network. ● The computer is unable to discover the HP All-in-One ● I received a System Requirements Error: No TCP/IP ● The Printer not Found screen appears during installation ● I am using a cable modem without a router and I...
... 3. Right-click My Computer. 2. b. Make sure your LAN card is set up under Network Adapters. 5. To check your LAN card (Windows) 1. Solution Check to the documentation that your card shows up properly. To see if you have an active network connection. Troubleshooting and support... problems you might encounter setting up a wired network. ● The computer is unable to discover the HP All-in-One ● I received a System Requirements Error: No TCP/IP ● The Printer not Found screen appears during installation ● I am using a cable modem without a router and I...


