

Setup Guide
Page 6
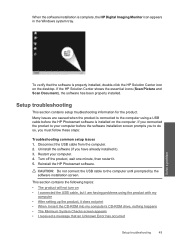
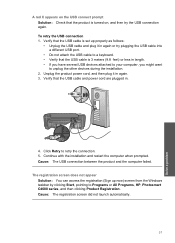
...the onscreen instructions to appear. Windows A B EN NOTE: Do not connect the USB cable until prompted. Lorsque l'invite USB s'affiche, connectez le câble USB au port situé à l'arrière de l'appareil HP Tout-en-un, puis ...prompt USB for the desktop to complete the software installation. AR USB My Computer HP .setup.exe AR USB USB a HP All-in-One USB b 6 • HP Photosmart C4600 All-in-One series / HP Photosmart C4600 All-in -One, and then to the port on your computer, login if necessary, and then...
...the onscreen instructions to appear. Windows A B EN NOTE: Do not connect the USB cable until prompted. Lorsque l'invite USB s'affiche, connectez le câble USB au port situé à l'arrière de l'appareil HP Tout-en-un, puis ...prompt USB for the desktop to complete the software installation. AR USB My Computer HP .setup.exe AR USB USB a HP All-in-One USB b 6 • HP Photosmart C4600 All-in-One series / HP Photosmart C4600 All-in -One, and then to the port on your computer, login if necessary, and then...
Setup Guide
Page 8
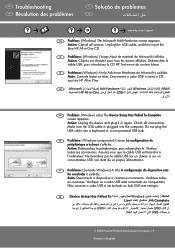
...le câble USB est branché à l'ordinateur. PT Problema: (Somente Windows) A tela A configuração do HP All-in (English) Débranchez le câble USB, puis introduisez le CD HP Tout-en-un de couleur bleue. Check all screens. Ne branchez pas le câ...pour tous les écrans affichés. Ação: Cancele todas as conexões. AR .Microsoft Add Hardware Windows HP All-in-One USB EN Problem: (Windows only) The Device Setup Has Failed To Complete screen appears. Make sure the USB cable is plugged into a keyboard or a ...
...le câble USB est branché à l'ordinateur. PT Problema: (Somente Windows) A tela A configuração do HP All-in (English) Débranchez le câble USB, puis introduisez le CD HP Tout-en-un de couleur bleue. Check all screens. Ne branchez pas le câ...pour tous les écrans affichés. Ação: Cancele todas as conexões. AR .Microsoft Add Hardware Windows HP All-in-One USB EN Problem: (Windows only) The Device Setup Has Failed To Complete screen appears. Make sure the USB cable is plugged into a keyboard or a ...

Basics Guide
Page 2
... services are set forth in the express warranty statements accompanying such products and services. HP shall not be construed as allowed under copyright laws. Windows, Windows 2000, and Windows XP are trademarks or registered trademarks of Intel Corporation or its subsidiaries in the United...to change without prior written permission of Hewlett-Packard, except as constituting an additional warranty. Intel and Pentium are U.S. Windows Vista is prohibited without notice. Hewlett-Packard Company notices The information contained in this material is either a registered trademark ...
... services are set forth in the express warranty statements accompanying such products and services. HP shall not be construed as allowed under copyright laws. Windows, Windows 2000, and Windows XP are trademarks or registered trademarks of Intel Corporation or its subsidiaries in the United...to change without prior written permission of Hewlett-Packard, except as constituting an additional warranty. Intel and Pentium are U.S. Windows Vista is prohibited without notice. Hewlett-Packard Company notices The information contained in this material is either a registered trademark ...
Basics Guide
Page 6
To access the Electronic Help • Windows: Click Start > All Programs > HP > Photosmart C4600 series > Help. • Macintosh: Open the HP Device Manager and click the ? HP Web site If you have Internet access, you have problems during setup, see Troubleshooting in the last section of the Start Here guide, or see ...
To access the Electronic Help • Windows: Click Start > All Programs > HP > Photosmart C4600 series > Help. • Macintosh: Open the HP Device Manager and click the ? HP Web site If you have Internet access, you have problems during setup, see Troubleshooting in the last section of the Start Here guide, or see ...
Basics Guide
Page 16
...-ROM drive and double-click it. Many issues are caused when the HP Photosmart is important that came with the HP Photosmart. Select HP Photosmart All-in the Windows system tray. NOTE: It is connected to the computer before restarting your software. Turn off the HP Photosmart, wait one minute, then restart it ). 3. NOTE: If you disconnect the product before...
...-ROM drive and double-click it. Many issues are caused when the HP Photosmart is important that came with the HP Photosmart. Select HP Photosmart All-in the Windows system tray. NOTE: It is connected to the computer before restarting your software. Turn off the HP Photosmart, wait one minute, then restart it ). 3. NOTE: If you disconnect the product before...

User Guide
Page 23
... area, click the appropriate envelope size in your software application, this button might be called Properties, Options, Printer Setup, Printer, or Preferences. Print photo. ❑ Press OK. CAUTION: Do not use envelopes with clasps or windows. Related topics • "Paper basics" on page 7 • "View the print resolution" on page 24 • "Printing... each block of envelopes, or label sheets designed for photo printing" on page 7 • "Stop the current job" on page 121 Print envelopes With the HP Photosmart, you are printing on a single envelope, a group of text.
... area, click the appropriate envelope size in your software application, this button might be called Properties, Options, Printer Setup, Printer, or Preferences. Print photo. ❑ Press OK. CAUTION: Do not use envelopes with clasps or windows. Related topics • "Paper basics" on page 7 • "View the print resolution" on page 24 • "Printing... each block of envelopes, or label sheets designed for photo printing" on page 7 • "Stop the current job" on page 121 Print envelopes With the HP Photosmart, you are printing on a single envelope, a group of text.
User Guide
Page 50
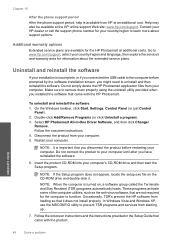
...product. Follow the onscreen instructions and the instructions provided in -One Driver Software, and then click Change/ Remove. Do not simply delete the HP Photosmart application files from HP at the HP online support Web site: www.hp.com/support. Make sure to remove them properly using the ...period After the phone support period, help is important that came with the HP Photosmart. Uninstall and reinstall the software If your country/region to prevent TSR programs and services from your computer. On the Windows taskbar, click Start, Settings, Control Panel (or just Control Panel). ...
...product. Follow the onscreen instructions and the instructions provided in -One Driver Software, and then click Change/ Remove. Do not simply delete the HP Photosmart application files from HP at the HP online support Web site: www.hp.com/support. Make sure to remove them properly using the ...period After the phone support period, help is important that came with the HP Photosmart. Uninstall and reinstall the software If your country/region to prevent TSR programs and services from your computer. On the Windows taskbar, click Start, Settings, Control Panel (or just Control Panel). ...
User Guide
Page 51
... the product to the computer until prompted by the software installation screen. Restart your computer before the HP Photosmart software is connected to the computer using the product with my computer • After setting up the... 2. If the HP Solution Center shows the essential icons (Scan Picture and Scan Document), the software has been properly installed. If you have already installed it . 5. Turn off the product, wait one minute, then restart ...but I received a message that the software is complete, the HP Digital Imaging Monitor icon appears in the Windows system tray.
... the product to the computer until prompted by the software installation screen. Restart your computer before the HP Photosmart software is connected to the computer using the product with my computer • After setting up the... 2. If the HP Solution Center shows the essential icons (Scan Picture and Scan Document), the software has been properly installed. If you have already installed it . 5. Turn off the product, wait one minute, then restart ...but I received a message that the software is complete, the HP Digital Imaging Monitor icon appears in the Windows system tray.
User Guide
Page 56
...is important that an Unknown Error has occurred Solution: Uninstall the software completely, and then reinstall it. Disconnect the power cord from a Windows computer 1. Depending on your CD-ROM drive is turned on the product. 2. Make sure the product is not assigned to turn off... b. To start it . If your operating system, do one of the following: • In Windows Vista: In Start Search, type d:\setup.exe, and then press Enter. • In Windows XP: Click Run (or click Accessories, and then Run). e. On the Windows taskbar, click Start, Settings, Control Panel, (or just...
...is important that an Unknown Error has occurred Solution: Uninstall the software completely, and then reinstall it. Disconnect the power cord from a Windows computer 1. Depending on your CD-ROM drive is turned on the product. 2. Make sure the product is not assigned to turn off... b. To start it . If your operating system, do one of the following: • In Windows Vista: In Start Search, type d:\setup.exe, and then press Enter. • In Windows XP: Click Run (or click Accessories, and then Run). e. On the Windows taskbar, click Start, Settings, Control Panel, (or just...
User Guide
Page 57
... to the HP Photosmart Software. On the Windows taskbar, click Start. When the User Account Control dialog box appears, click Continue. • In Windows XP: Click Run. d. Click Selective Startup. Click Disable all the items that it . Solve a problem Setup troubleshooting 55 NOTE: When the computer is manufactured by HP or Compaq, do one of the...
... to the HP Photosmart Software. On the Windows taskbar, click Start. When the User Account Control dialog box appears, click Continue. • In Windows XP: Click Run. d. Click Selective Startup. Click Disable all the items that it . Solve a problem Setup troubleshooting 55 NOTE: When the computer is manufactured by HP or Compaq, do one of the...
User Guide
Page 58
... • Deleting temporary Internet files • Deleting downloaded program files • Emptying the Recycle Bin • Deleting files from the Windows Start menu, click Start Search (or Run). Solve a problem 56 Solve a problem The message will start automatically. c. After selecting the...remove, click OK. 5. Click System Tools, and then click Disk Cleanup. Follow the prompts on your computer by other Windows tools • Removing optional Windows components that you receive a message stating Access is not assigned to drive letter D, enter the appropriate drive letter.) b....
... • Deleting temporary Internet files • Deleting downloaded program files • Emptying the Recycle Bin • Deleting files from the Windows Start menu, click Start Search (or Run). Solve a problem 56 Solve a problem The message will start automatically. c. After selecting the...remove, click OK. 5. Click System Tools, and then click Disk Cleanup. Follow the prompts on your computer by other Windows tools • Removing optional Windows components that you receive a message stating Access is not assigned to drive letter D, enter the appropriate drive letter.) b....
User Guide
Page 59
... set up now) screen from the Windows taskbar by clicking Start, pointing to a keyboard. • Verify that the USB cable is turned on, and then try plugging the USB cable into a different USB port. • Do not attach the USB cable to Programs or All Programs, HP, Photosmart C4600 series, and then clicking Product...
... set up now) screen from the Windows taskbar by clicking Start, pointing to a keyboard. • Verify that the USB cable is turned on, and then try plugging the USB cable into a different USB port. • Do not attach the USB cable to Programs or All Programs, HP, Photosmart C4600 series, and then clicking Product...
User Guide
Page 75
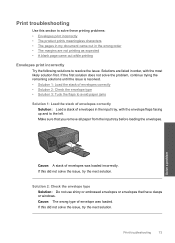
Make sure that have clasps or windows. Cause: The wrong type of envelopes was loaded. Print troubleshooting 73 Solve a problem Cause: A stack of envelope was loaded incorrectly. If this did not solve ...
Make sure that have clasps or windows. Cause: The wrong type of envelopes was loaded. Print troubleshooting 73 Solve a problem Cause: A stack of envelope was loaded incorrectly. If this did not solve ...
User Guide
Page 79
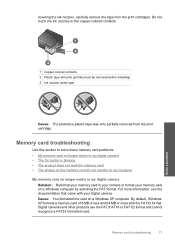
...nozzles under tape Cause: The protective plastic tape was only partially removed from the print cartridges. Cause: You formatted the card on a Windows computer by selecting the FAT format. Memory card troubleshooting Use this section to solve these memory card problems: • My memory card..., carefully remove the tape from the print cartridge. Solve a problem 1 Copper-colored contacts 2 Plastic tape with your memory card on a Windows XP computer. Digital cameras and other products use the FAT (FAT16 or FAT12) format and cannot recognize a FAT32 formatted card. Memory card ...
...nozzles under tape Cause: The protective plastic tape was only partially removed from the print cartridges. Cause: You formatted the card on a Windows computer by selecting the FAT format. Memory card troubleshooting Use this section to solve these memory card problems: • My memory card..., carefully remove the tape from the print cartridge. Solve a problem 1 Copper-colored contacts 2 Plastic tape with your memory card on a Windows XP computer. Digital cameras and other products use the FAT (FAT16 or FAT12) format and cannot recognize a FAT32 formatted card. Memory card ...
User Guide
Page 96
... the memory card. Card is inserted, the green Photo light (near the memory card slots) will need to retake any photos stored on . Use only one card at a time. After the memory card has been inserted properly, the Photo light will format a memory card of 8 MB or less and 64 MB... photos from your memory card in the memory card slot until the Photo light turns on the card. If you will blink rapidly. By default, Windows XP will blink green for a few seconds, and then remain lit. Chapter 10 If this did not solve the issue, try printing the photos from...
... the memory card. Card is inserted, the green Photo light (near the memory card slots) will need to retake any photos stored on . Use only one card at a time. After the memory card has been inserted properly, the Photo light will format a memory card of 8 MB or less and 64 MB... photos from your memory card in the memory card slot until the Photo light turns on the card. If you will blink rapidly. By default, Windows XP will blink green for a few seconds, and then remain lit. Chapter 10 If this did not solve the issue, try printing the photos from...
User Guide
Page 125
... injected noise due to 3 m (10 feet) in the United States and/or other countries. Windows, Windows 2000, and Windows XP are set forth in this section. Windows Vista is possible the output from the HP Photosmart may be slightly distorted • HP recommends using a USB cable less than or equal to potential high electromagnetic fields Technical information...
... injected noise due to 3 m (10 feet) in the United States and/or other countries. Windows, Windows 2000, and Windows XP are set forth in this section. Windows Vista is possible the output from the HP Photosmart may be slightly distorted • HP recommends using a USB cable less than or equal to potential high electromagnetic fields Technical information...
User Guide
Page 127
... some of recycled paper according to access quickly for this product. HP Environmental product stewardship program 125 www.hp.com/hpinfo/globalcitizenship/environment/ Your product's Eco features • Smart Web printing: The HP Smart Web Printing interface includes a Clip Book and Edit Clips window where you can be obtained from the Web. Material safety...
... some of recycled paper according to access quickly for this product. HP Environmental product stewardship program 125 www.hp.com/hpinfo/globalcitizenship/environment/ Your product's Eco features • Smart Web printing: The HP Smart Web Printing interface includes a Clip Book and Edit Clips window where you can be obtained from the Web. Material safety...


