Basics Guide
Page 15
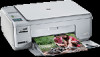
... engraved guides along the edge of paper in the HP All-in-One, including letter or A4 paper, photo paper, transparencies, envelopes, and HP CD/DVD tattoo labels. TIP: For more help on the HP All-in-One. 2. Load originals and load paper You can manually set to detect the size and type of paper... instructions about how to load paper and replace the print cartridges. 3 Use the HP All-in-One features This chapter includes information about how to use the HP All-in-One for that paper. By default, the HP All-in-One is set the paper size and type for print and copy jobs. Use the...
... engraved guides along the edge of paper in the HP All-in-One, including letter or A4 paper, photo paper, transparencies, envelopes, and HP CD/DVD tattoo labels. TIP: For more help on the HP All-in-One. 2. Load originals and load paper You can manually set to detect the size and type of paper... instructions about how to load paper and replace the print cartridges. 3 Use the HP All-in-One features This chapter includes information about how to use the HP All-in-One for that paper. By default, the HP All-in-One is set the paper size and type for print and copy jobs. Use the...
Basics Guide
Page 28
... turned on. Invalid passphrase during installation Cause: An anti-virus or anti-spyware application is preventing the HP All-in the wireless router settings. The Printer Not Found screen appears during wireless setup Cause: During the wireless setup process, you might have entered ...the WEP key incorrectly. Solution: Turn on page 5 Cause: If you manually entered your computer. 26 Troubleshooting and support Solution: Move the wireless router and the HP All-in -One...
... turned on. Invalid passphrase during installation Cause: An anti-virus or anti-spyware application is preventing the HP All-in the wireless router settings. The Printer Not Found screen appears during wireless setup Cause: During the wireless setup process, you might have entered ...the WEP key incorrectly. Solution: Turn on page 5 Cause: If you manually entered your computer. 26 Troubleshooting and support Solution: Move the wireless router and the HP All-in -One...
User Guide
Page 26
Parameter Hardware Address (MAC) Description The Media Access Control (MAC) address that identifies the HP All-in -One. NOTE: Manually assigning an invalid IP address during installation. NOTE: The address of the domain name server. • Not Specified: ... this instance can be a computer or some other such devices. Default Gateway A node on the network. The IP address of the HP All-in -One: • AutoIP: The installation software automatically determines the configuration parameters. • DHCP: The configuration parameters are assigned dynamically through DHCP ...
Parameter Hardware Address (MAC) Description The Media Access Control (MAC) address that identifies the HP All-in -One. NOTE: Manually assigning an invalid IP address during installation. NOTE: The address of the domain name server. • Not Specified: ... this instance can be a computer or some other such devices. Default Gateway A node on the network. The IP address of the HP All-in -One: • AutoIP: The installation software automatically determines the configuration parameters. • DHCP: The configuration parameters are assigned dynamically through DHCP ...
User Guide
Page 32
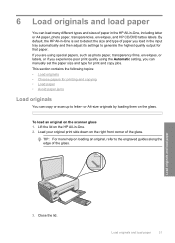
... contains the following topics: • Load originals • Choose papers for printing and copying • Load paper • Avoid paper jams Load originals You can manually set to the engraved guides along the edge of the glass. TIP: For more help on the right front corner of the glass. Load your... original print side down on loading an original, refer to detect the size and type of paper in the HP All-in -One is set the paper size and type for that paper. Load originals and load paper 31 or A4-size originals by loading them on...
... contains the following topics: • Load originals • Choose papers for printing and copying • Load paper • Avoid paper jams Load originals You can manually set to the engraved guides along the edge of the glass. TIP: For more help on the right front corner of the glass. Load your... original print side down on loading an original, refer to detect the size and type of paper in the HP All-in -One is set the paper size and type for that paper. Load originals and load paper 31 or A4-size originals by loading them on...
User Guide
Page 40
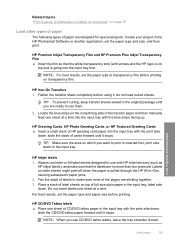
... keep transfer sheets sealed in -One, causing subsequent paper jams. 2. Labels on which you want to use CD/DVD tattoo labels, leave the tray extender closed. Load originals and load paper Load paper 39 slide the stack of full-size plain paper in the HP Photosmart Software or another application, set ... so that the labels are ready to print is pulled through the HP All-in the original package until you use them. 2. Place a stack of label sheets on the nonprinting side of the transfer paper and then manually feed one sheet at a time into the input tray with the print side...
... keep transfer sheets sealed in -One, causing subsequent paper jams. 2. Labels on which you want to use CD/DVD tattoo labels, leave the tray extender closed. Load originals and load paper Load paper 39 slide the stack of full-size plain paper in the HP Photosmart Software or another application, set ... so that the labels are ready to print is pulled through the HP All-in the original package until you use them. 2. Place a stack of label sheets on the nonprinting side of the transfer paper and then manually feed one sheet at a time into the input tray with the print side...

User Guide
Page 42
...tabs. Make sure you can be used with any software application that allows printing. Select the HP All-in the input tray. 2. The HP Allin-One will already be called Properties, Options, Printer Setup, Printer, or Preferences. Select the appropriate options for that opens the Properties dialog box. To delete a... list. Click Print or OK to close the Properties dialog box. 7. To save your computer 41 You need to change the settings manually only when you can adjust the settings here and save a custom printing shortcut, select the shortcut and click Save As. 7 Print ...
...tabs. Make sure you can be used with any software application that allows printing. Select the HP All-in the input tray. 2. The HP Allin-One will already be called Properties, Options, Printer Setup, Printer, or Preferences. Select the appropriate options for that opens the Properties dialog box. To delete a... list. Click Print or OK to close the Properties dialog box. 7. To save your computer 41 You need to change the settings manually only when you can adjust the settings here and save a custom printing shortcut, select the shortcut and click Save As. 7 Print ...

User Guide
Page 44
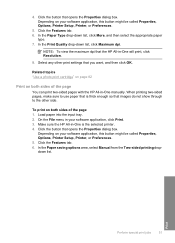
...in dots per inch (dpi). Click the Features tab. 6. On the File menu in -One is the selected printer. 4. Make sure the HP All-in your software application, this button might be called Properties, Options, Printer Setup, Printer, or Preferences. 5. Make sure you have paper loaded in . (with or without tab... or labels, or if you experience poor print quality, you can set the paper type for printing 1. To set the paper type manually. the Size list to the paper type and print quality that opens the Properties dialog box. Letter or A4 Appropriate listed envelope size Letter...
...in dots per inch (dpi). Click the Features tab. 6. On the File menu in -One is the selected printer. 4. Make sure the HP All-in your software application, this button might be called Properties, Options, Printer Setup, Printer, or Preferences. 5. Make sure you have paper loaded in . (with or without tab... or labels, or if you experience poor print quality, you can set the paper type for printing 1. To set the paper type manually. the Size list to the paper type and print quality that opens the Properties dialog box. Letter or A4 Appropriate listed envelope size Letter...
User Guide
Page 52
... More, and then select the appropriate paper type. 7. On the File menu in -One manually. 4. Click the button that the HP All-in -One is thick enough so that images do not show through to use paper that is the selected printer. 4. Depending on your software application, click Print. 3. NOTE: To view the maximum dpi...
... More, and then select the appropriate paper type. 7. On the File menu in -One manually. 4. Click the button that the HP All-in -One is thick enough so that images do not show through to use paper that is the selected printer. 4. Depending on your software application, click Print. 3. NOTE: To view the maximum dpi...
User Guide
Page 54
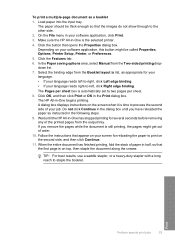
... is automatically set to the other side. 2. In the Paper saving options area, select Manual from the output tray. When the entire document has finished printing, fold the stack of ...the crease. Print Perform special print jobs 53 The paper should be called Properties, Options, Printer Setup, Printer, or Preferences. 5. Click OK, and then click Print or OK in half, so...until the HP All-in-One has stopped printing for reloading the paper to staple the booklet. The HP All-in the following steps. 9. To print a multiple-page document as instructed in -One begins ...
... is automatically set to the other side. 2. In the Paper saving options area, select Manual from the output tray. When the entire document has finished printing, fold the stack of ...the crease. Print Perform special print jobs 53 The paper should be called Properties, Options, Printer Setup, Printer, or Preferences. 5. Click OK, and then click Print or OK in half, so...until the HP All-in-One has stopped printing for reloading the paper to staple the booklet. The HP All-in the following steps. 9. To print a multiple-page document as instructed in -One begins ...
User Guide
Page 57
... you can use HP transparency products with the HP Allin-One. Make sure the HP All-in-One is not what you set is the selected printer. 3. Your document will automatically print in the Page Order option. In the Printer Features area, select On from your software application, click Print. 2. NOTE: To prevent jams, manually feed the iron...
... you can use HP transparency products with the HP Allin-One. Make sure the HP All-in-One is not what you set is the selected printer. 3. Your document will automatically print in the Page Order option. In the Printer Features area, select On from your software application, click Print. 2. NOTE: To prevent jams, manually feed the iron...

User Guide
Page 105
To start it manually. Solution: Click Details to see what the specific problem is not assigned to drive letter D, enter the appropriate drive letter. Solution: If the installation does ... prompt • I received a message that an unknown error has occurred • The registration screen does not appear • Uninstall and reinstall the software • Missing HP Photosmart Software When I insert the CD-ROM into my computer's CD-ROM drive, nothing happens • The minimum system checks screen appears • A red X appears on...
To start it manually. Solution: Click Details to see what the specific problem is not assigned to drive letter D, enter the appropriate drive letter. Solution: If the installation does ... prompt • I received a message that an unknown error has occurred • The registration screen does not appear • Uninstall and reinstall the software • Missing HP Photosmart Software When I insert the CD-ROM into my computer's CD-ROM drive, nothing happens • The minimum system checks screen appears • A red X appears on...

User Guide
Page 111
...process again and be enabled on the list of the HP All-in -One uses the first WEP key (selected by the wireless router. Cause: The HP All-in -One closer together. Some wireless routers provide up to your wireless router. The HP All-in -One is on your network name (SSID), you re-...enable MAC address filtering on . For more information, see : "Integrated wireless WLAN 802.11 network setup" on page 17 Cause: If you manually entered your wireless router. If you might have...
...process again and be enabled on the list of the HP All-in -One uses the first WEP key (selected by the wireless router. Cause: The HP All-in -One closer together. Some wireless routers provide up to your wireless router. The HP All-in -One is on your network name (SSID), you re-...enable MAC address filtering on . For more information, see : "Integrated wireless WLAN 802.11 network setup" on page 17 Cause: If you manually entered your wireless router. If you might have...

User Guide
Page 133
... the list, and then click Display Status. Scan fails because of the glass. This includes applications that are running , right-click on the HP Digital Imaging Monitor icon in the system tray at all applications that run in the software is changing the page layout. 132 Troubleshooting If you...guide that is not part of the Windows taskbar. Solution: Load your scan. Solution: The autocropping feature in the software and crop the scanned image manually, or not at the far right of the main image. Chapter 13 NOTE: To check to see whether the software is running on your computer...
... the list, and then click Display Status. Scan fails because of the glass. This includes applications that are running , right-click on the HP Digital Imaging Monitor icon in the system tray at all applications that run in the software is changing the page layout. 132 Troubleshooting If you...guide that is not part of the Windows taskbar. Solution: Load your scan. Solution: The autocropping feature in the software and crop the scanned image manually, or not at the far right of the main image. Chapter 13 NOTE: To check to see whether the software is running on your computer...
User Guide
Page 164
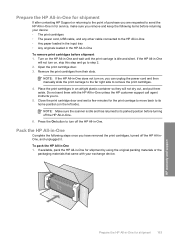
... the print cartridge door and wait a few minutes for shipment by using the original packing materials or the packaging materials that came with the HP All-in -One. Pack the HP All-in -One does not turn on the left side). Turn on , you to remove the print cartridges. 4. NOTE: If the... the print carriage to move back to its parked position before turning off the HP All-in -One unless the HP customer support call agent instructs you can unplug the power cord and then manually slide the print carriage to the far right side to . 5. Place the print cartridges in an airtight ...
... the print cartridge door and wait a few minutes for shipment by using the original packing materials or the packaging materials that came with the HP All-in -One. Pack the HP All-in -One does not turn on the left side). Turn on , you to remove the print cartridges. 4. NOTE: If the... the print carriage to move back to its parked position before turning off the HP All-in -One unless the HP customer support call agent instructs you can unplug the power cord and then manually slide the print carriage to the far right side to . 5. Place the print cartridges in an airtight ...

