
Basics Guide
Page 4
... panel features 4 Use the HP Photosmart software 6 Find more information 6 Access the onscreen Help 6 Load originals and load paper 7 Avoid paper jams 10 Make a copy...10 Scan an image...10 Print 10 x 15 cm (4 x 6 inch) photos 11 Print from a software application 12 Replace the print cartridges 13 Clean the HP All-in-One 15 2 Troubleshooting and support 17 Uninstall and reinstall the software 17 Hardware setup troubleshooting 18 Clear paper jams 20 Print cartridge troubleshooting 22 Before you call HP customer support 22 3 Technical...
... panel features 4 Use the HP Photosmart software 6 Find more information 6 Access the onscreen Help 6 Load originals and load paper 7 Avoid paper jams 10 Make a copy...10 Scan an image...10 Print 10 x 15 cm (4 x 6 inch) photos 11 Print from a software application 12 Replace the print cartridges 13 Clean the HP All-in-One 15 2 Troubleshooting and support 17 Uninstall and reinstall the software 17 Hardware setup troubleshooting 18 Clear paper jams 20 Print cartridge troubleshooting 22 Before you call HP customer support 22 3 Technical...
Basics Guide
Page 5
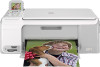
... uploading your photos to the computer to fit a specific paper size, adjust the darkness of the copy, and use of projects, such as making a copy, scanning documents, or printing photos from your computer The HP All-in-One can print a range of the HP Photosmart software that allows printing. You can also transfer your photos to produce high-quality color and black-and-white copies on page 6. Additionally, if the HP All-in...
... uploading your photos to the computer to fit a specific paper size, adjust the darkness of the copy, and use of projects, such as making a copy, scanning documents, or printing photos from your computer The HP All-in-One can print a range of the HP Photosmart software that allows printing. You can also transfer your photos to produce high-quality color and black-and-white copies on page 6. Additionally, if the HP All-in...

Basics Guide
Page 6
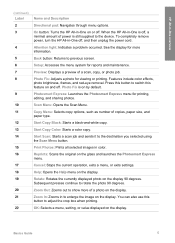
HP All-in-One overview The HP All-in-One at a glance Label 1 2 3 4 5 6 7 8 9 10 Description Color graphics display (also referred to as the display) Control panel Photo paper cassette Memory card slots Input tray Paper tray extender (also referred to as the tray extender) Paper-width guide Print cartridge door Glass Lid backing Label 1 Description Rear door Basics Guide 3
HP All-in-One overview The HP All-in-One at a glance Label 1 2 3 4 5 6 7 8 9 10 Description Color graphics display (also referred to as the display) Control panel Photo paper cassette Memory card slots Input tray Paper tray extender (also referred to as the tray extender) Paper-width guide Print cartridge door Glass Lid backing Label 1 Description Rear door Basics Guide 3
Basics Guide
Page 8
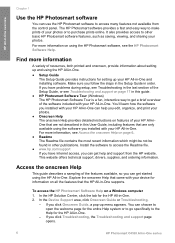
... unplug the power cord. Press this button to switch this button to show more information. Help: Opens the Help menu on the display. HP All-in color. When the HP All-in -One on by default. See the display for reports and maintenance. Preview: Displays a preview of copies, paper size, and paper type. Photo Fix is off . Copy Menu: Selects copy options, such as number of a scan, copy, or photo job. Start Copy Black: Starts a black-and-white copy.
... unplug the power cord. Press this button to switch this button to show more information. Help: Opens the Help menu on the display. HP All-in color. When the HP All-in -One on by default. See the display for reports and maintenance. Preview: Displays a preview of copies, paper size, and paper type. Photo Fix is off . Copy Menu: Selects copy options, such as number of a scan, copy, or photo job. Start Copy Black: Starts a black-and-white copy.
Basics Guide
Page 9
... information about setting up and using the HP All-in -One and installing software. Install the software to access the Readme file. ● www.hp.com/support If you installed with your photos. The HP Photosmart software provides a fast and easy way to other publications. To access the HP Photosmart Software Help on page 17 in this User Guide, including features that are only available using the software you have problems during setup, see Troubleshooting in the...
... information about setting up and using the HP All-in -One and installing software. Install the software to access the Readme file. ● www.hp.com/support If you installed with your photos. The HP Photosmart software provides a fast and easy way to other publications. To access the HP Photosmart Software Help on page 17 in this User Guide, including features that are only available using the software you have problems during setup, see Troubleshooting in the...
Basics Guide
Page 11
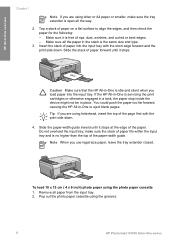
... HP All-in place. If the HP All-in-One is servicing the print cartridges or otherwise engaged in a task, the paper stop inside the device might not be in -One is the same size and type. 3. Do not overload the input tray; Note When you load paper into the input tray with the print side down . To load 10 x 15 cm ( 4 x 6 inch) photo paper using the grooves. 8 HP Photosmart...
... HP All-in place. If the HP All-in-One is servicing the print cartridges or otherwise engaged in a task, the paper stop inside the device might not be in -One is the same size and type. 3. Do not overload the input tray; Note When you load paper into the input tray with the print side down . To load 10 x 15 cm ( 4 x 6 inch) photo paper using the grooves. 8 HP Photosmart...
Basics Guide
Page 12
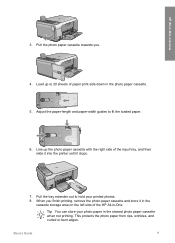
... Guide 9 Tip You can store your printed photos. 8. Line up to fit the loaded paper. 6. When you . 4. This protects the photo paper from rips, wrinkles, and curled or bent edges. HP All-in the photo paper cassette. 5. Load up the photo paper cassette with the right side of the input tray, and then slide it into the printer until it in the cassette storage area on the left side of paper print side down...
... Guide 9 Tip You can store your printed photos. 8. Line up to fit the loaded paper. 6. When you . 4. This protects the photo paper from rips, wrinkles, and curled or bent edges. HP All-in the photo paper cassette. 5. Load up the photo paper cassette with the right side of the input tray, and then slide it into the printer until it in the cassette storage area on the left side of paper print side down...
Basics Guide
Page 13
... tray. ● Use paper types that came with the HP All-in-One. The HP Photosmart Software (Windows) or HP Photosmart Mac Software (Mac) must be installed and running on . To scan to begin copying. Press Start Scan. 10 HP Photosmart C4100 All-in the input tray. 2. Make sure you can start a scan from your original print side down in -One. To use the HP Photosmart Software (Windows) or HP Photosmart Mac Software (Mac) to lose some of the glass. 3. Note Closing the HP Digital Imaging...
... tray. ● Use paper types that came with the HP All-in-One. The HP Photosmart Software (Windows) or HP Photosmart Mac Software (Mac) must be installed and running on . To scan to begin copying. Press Start Scan. 10 HP Photosmart C4100 All-in the input tray. 2. Make sure you can start a scan from your original print side down in -One. To use the HP Photosmart Software (Windows) or HP Photosmart Mac Software (Mac) to lose some of the glass. 3. Note Closing the HP Digital Imaging...
Basics Guide
Page 14
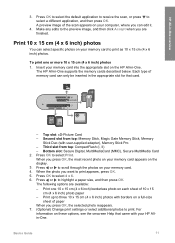
...-size sheet of the scan appears on the HP All-in the appropriate slot for that came with user-supplied adapter), Memory Stick Pro - Press or to select a different application, and then press OK. For information on each sheet of memory card can select specific photos on the display. 3. Basics Guide 11 Print 10 x 15 cm (4 x 6 inch) photos You can only be inserted in -One. To print one 10 x 15 cm (4 x 6 inch) borderless photo...
...-size sheet of the scan appears on the HP All-in the appropriate slot for that came with user-supplied adapter), Memory Stick Pro - Press or to select a different application, and then press OK. For information on each sheet of memory card can select specific photos on the display. 3. Basics Guide 11 Print 10 x 15 cm (4 x 6 inch) photos You can only be inserted in -One. To print one 10 x 15 cm (4 x 6 inch) borderless photo...
Basics Guide
Page 15
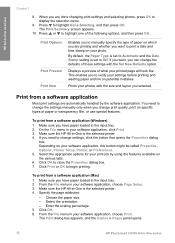
... to print a date and time stamp on the various tabs. 6. Displays a preview of these settings with the size and layout you to display the selection menu. 9. Make sure the HP All-in the input tray. 2. Make sure you want , you change print quality, print on which you are done changing print settings and selecting photos, press OK to verify your software application, choose Page Setup. 3. You need to Automatic and the Date Stamp setting is the selected printer. 4. Make sure the HP...
... to print a date and time stamp on the various tabs. 6. Displays a preview of these settings with the size and layout you to display the selection menu. 9. Make sure the HP All-in the input tray. 2. Make sure you want , you change print quality, print on which you are done changing print settings and selecting photos, press OK to verify your software application, choose Page Setup. 3. You need to Automatic and the Date Stamp setting is the selected printer. 4. Make sure the HP...
Basics Guide
Page 16
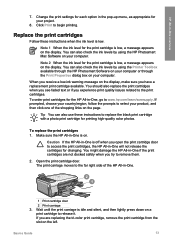
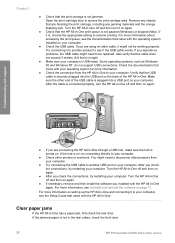
... the ink level for printing high-quality color photos. When you receive a low-ink warning message on the page. You should also replace the print cartridges when you see faded text or if you open the print cartridge door to www.hp.com/learn/suresupply. Tip You can also use these instructions when the ink level is on. Basics Guide 13 Change the print settings for each option in -One will not release the cartridges for...
... the ink level for printing high-quality color photos. When you receive a low-ink warning message on the page. You should also replace the print cartridges when you see faded text or if you open the print cartridge door to www.hp.com/learn/suresupply. Tip You can also use these instructions when the ink level is on. Basics Guide 13 Change the print settings for each option in -One will not release the cartridges for...
Basics Guide
Page 17
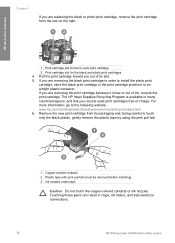
.... 1 Print cartridge slot for the tri-color print cartridge 2 Print cartridge slot for the black and photo print cartridges 4. Touching these parts can result in clogs, ink failure, and bad electrical connections. 14 HP Photosmart C4100 All-in-One series For more information, go to touch only the black plastic, gently remove the plastic tape by using the pink pull tab. 1 Copper-colored contacts 2 Plastic tape with pink pull tab (must be removed before installing) 3 Ink nozzles...
.... 1 Print cartridge slot for the tri-color print cartridge 2 Print cartridge slot for the black and photo print cartridges 4. Touching these parts can result in clogs, ink failure, and bad electrical connections. 14 HP Photosmart C4100 All-in-One series For more information, go to touch only the black plastic, gently remove the plastic tape by using the pink pull tab. 1 Copper-colored contacts 2 Plastic tape with pink pull tab (must be removed before installing) 3 Ink nozzles...
Basics Guide
Page 20
.... Make sure to your computer before prompted by the software installation screen. Disconnect the HP All-in -One. If the HP Solution Center shows the essential icons (Scan Picture and Scan Document), the software has been properly installed. Troubleshooting and support 2 Troubleshooting and support This chapter contains troubleshooting information for installation and configuration issues, and some operational topics. If you connected the HP Allin-One to remove them properly using a USB cable before...
.... Make sure to your computer before prompted by the software installation screen. Disconnect the HP All-in -One. If the HP Solution Center shows the essential icons (Scan Picture and Scan Document), the software has been properly installed. Troubleshooting and support 2 Troubleshooting and support This chapter contains troubleshooting information for installation and configuration issues, and some operational topics. If you connected the HP Allin-One to remove them properly using a USB cable before...

Basics Guide
Page 21
... your computer to a power supply. 18 HP Photosmart C4100 All-in -One. Follow the onscreen instructions. 4. I connected the USB cable, but I am having problems using the HP All-in-One with the HP All-in -One hardware. Once you might encounter while setting up the HP All-in -One before connecting the USB cable. Troubleshooting and support For more information on installing the software and connecting the USB cable, see the Setup Guide that came with...
... your computer to a power supply. 18 HP Photosmart C4100 All-in -One. Follow the onscreen instructions. 4. I connected the USB cable, but I am having problems using the HP All-in-One with the HP All-in -One hardware. Once you might encounter while setting up the HP All-in -One before connecting the USB cable. Troubleshooting and support For more information on installing the software and connecting the USB cable, see the Setup Guide that came with...
Basics Guide
Page 23
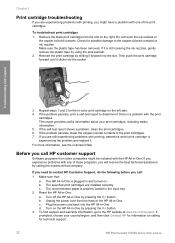
... (Windows) or stopped (Mac). After you installed with the HP All-in -One. Clear paper jams If the HP All-in -One series Chapter 2 ● Check that are blocking the print carriage, including any packing materials and the orange shipping lock. Turn the HP All-in length. ● Make sure your computer. Open the print cartridge door to resume printing. If the hub is not in the rear rollers, check the front door. 20 HP Photosmart...
... (Windows) or stopped (Mac). After you installed with the HP All-in -One. Clear paper jams If the HP All-in -One series Chapter 2 ● Check that are blocking the print carriage, including any packing materials and the orange shipping lock. Turn the HP All-in length. ● Make sure your computer. Open the print cartridge door to resume printing. If the hub is not in the rear rollers, check the front door. 20 HP Photosmart...
Basics Guide
Page 25
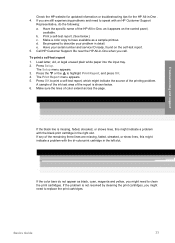
... recommended paper is still covering the ink nozzles, gently remove the plastic tape by using the pink pull tab. 2. Plug the power cord back into the slot. Turn on calling for the tri-color print cartridge on the right. To troubleshoot print cartridges 1. c. If the self-test report shows a problem, clean the print cartridges. 6. Before you call : 1. b. Reset the HP All-in -One. Make sure the plastic tape has been removed. Remove the black print cartridge from the...
... recommended paper is still covering the ink nozzles, gently remove the plastic tape by using the pink pull tab. 2. Plug the power cord back into the slot. Turn on calling for the tri-color print cartridge on the right. To troubleshoot print cartridges 1. c. If the self-test report shows a problem, clean the print cartridges. 6. Before you call : 1. b. Reset the HP All-in -One. Make sure the plastic tape has been removed. Remove the black print cartridge from the...
Basics Guide
Page 26
... serial number and service ID ready, found on the control panel, available. The Setup menu appears. 3. Press the or the to replace the print cartridges. Make sure the lines of the HP All-in the right slot. If the problem is missing, faded, streaked, or shows lines, this might need to have available as it appears on the self-test report. 5. Make a color copy to clean the print cartridges. d. Basics Guide 23 Print...
... serial number and service ID ready, found on the control panel, available. The Setup menu appears. 3. Press the or the to replace the print cartridges. Make sure the lines of the HP All-in the right slot. If the problem is missing, faded, streaked, or shows lines, this might need to have available as it appears on the self-test report. 5. Make a color copy to clean the print cartridges. d. Basics Guide 23 Print...
Basics Guide
Page 27
... using. Print specifications ● Up to 1200 x 1200 rendered dpi black when printing from a computer ● Up to 4800 x 1200 optimized dpi color when printing from a computer and 1200-input dpi ● Print speeds vary according to 3000 printed pages per month Technical information 24 HP Photosmart C4100 All-in this section. System requirements Software system requirements are provided in -One series Paper tray capacities Type Paper weight Paper tray...
... using. Print specifications ● Up to 1200 x 1200 rendered dpi black when printing from a computer ● Up to 4800 x 1200 optimized dpi color when printing from a computer and 1200-input dpi ● Print speeds vary according to 3000 printed pages per month Technical information 24 HP Photosmart C4100 All-in this section. System requirements Software system requirements are provided in -One series Paper tray capacities Type Paper weight Paper tray...

Basics Guide
Page 30
... other problems, including those defects that have no obligation to repair, replace, or refund until the customer returns the defective product to be uninterrupted or error free. 3. You may also have additional statutory rights against the seller based on -site service, may : a. This warranty does not cover HP ink products that arise as a result of normal use of a non-HP ink cartridge...
... other problems, including those defects that have no obligation to repair, replace, or refund until the customer returns the defective product to be uninterrupted or error free. 3. You may also have additional statutory rights against the seller based on -site service, may : a. This warranty does not cover HP ink products that arise as a result of normal use of a non-HP ink cartridge...
Basics Guide
Page 31
... 16 replace print cartridges 13 make a copy 10 memory cards slots 2 O OK button 5 on button 5 P paper jams 10, 20 paper sizes 24 specifications 24 paper tray capacities 24 phone numbers, customer support 22 photo paper specifications 24 Photosmart Express 5 physical specifications 25 power specifications 25 print from software application 12 specifications 24 print cartridges replace 13 troubleshoot 22 proof sheet 5 R regulatory notices regulatory model identification number 26 reinstall software 17 replace print cartridges 13 right arrow 5 rotate button 5 S scan button 5 documents 10 photos...
... 16 replace print cartridges 13 make a copy 10 memory cards slots 2 O OK button 5 on button 5 P paper jams 10, 20 paper sizes 24 specifications 24 paper tray capacities 24 phone numbers, customer support 22 photo paper specifications 24 Photosmart Express 5 physical specifications 25 power specifications 25 print from software application 12 specifications 24 print cartridges replace 13 troubleshoot 22 proof sheet 5 R regulatory notices regulatory model identification number 26 reinstall software 17 replace print cartridges 13 right arrow 5 rotate button 5 S scan button 5 documents 10 photos...


