
End User License Agreement
Page 2
... any other form, may collect and use the original Software Product that HP and its suppliers and are owned by HP or its affiliates may only be licensed for the upgrade. You shall not remove any term or condition of a hard disk drive-based solution, an external media-based recovery solution (e.g. You may not sublicense...
... any other form, may collect and use the original Software Product that HP and its suppliers and are owned by HP or its affiliates may only be licensed for the upgrade. You shall not remove any term or condition of a hard disk drive-based solution, an external media-based recovery solution (e.g. You may not sublicense...

Maintenance and Service Guide
Page 3
... PCI Card 2-7 Removing the Hard Disk Drive...2-9 Recovering the Factory Software...2-11 Replacing Small Parts ...2-12 Removing the Keyboard Cover...2-13 Removing the Speaker Assembly ...2-15 Removing the Keyboard ...2-16 Removing the Switchboard PCA ...2-19 Removing the CD/DVD Drive...2-20 Removing the Display Assembly...2-23 Removing the Top Case ...2-26 Removing the Floppy Drive...2-32 Removing the Infrared (I/R) PCA...2-36 Removing the Audio PCA...
... PCI Card 2-7 Removing the Hard Disk Drive...2-9 Recovering the Factory Software...2-11 Replacing Small Parts ...2-12 Removing the Keyboard Cover...2-13 Removing the Speaker Assembly ...2-15 Removing the Keyboard ...2-16 Removing the Switchboard PCA ...2-19 Removing the CD/DVD Drive...2-20 Removing the Display Assembly...2-23 Removing the Top Case ...2-26 Removing the Floppy Drive...2-32 Removing the Infrared (I/R) PCA...2-36 Removing the Audio PCA...
Maintenance and Service Guide
Page 4
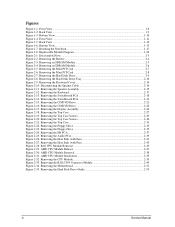
... 1-6. Bottom View...1-13 Figure 1-7. Removing the Hard Disk Drive Tray 2-10 Figure 2-9. Removing the Floppy Drive 2-33 Figure 2-23. AMD CPU Module Removal 2-38 Figure 2-31. Removing the RJ11/1394 Connector Module 2-49 Figure 2-34. Removing the Motherboard 2-51 Figure 2-35. Resetting the Notebook ...1-17 Figure 1-8. Removing an SDRAM Module 2-5 Figure 2-4. Removing the Keyboard ...2-17 Figure 2-13. Removing the Display Assembly 2-24...
... 1-6. Bottom View...1-13 Figure 1-7. Removing the Hard Disk Drive Tray 2-10 Figure 2-9. Removing the Floppy Drive 2-33 Figure 2-23. AMD CPU Module Removal 2-38 Figure 2-31. Removing the RJ11/1394 Connector Module 2-49 Figure 2-34. Removing the Motherboard 2-51 Figure 2-35. Resetting the Notebook ...1-17 Figure 1-8. Removing an SDRAM Module 2-5 Figure 2-4. Removing the Keyboard ...2-17 Figure 2-13. Removing the Display Assembly 2-24...
Maintenance and Service Guide
Page 26
to 60-GB removable hard drive with Ultra-DMA 100 interface 1.44-MB floppy drive (certain models) 24x CD-ROM, 8x DVD, CD-RW, or CD-RW/DVD drive (or higher) At least 128 MB SDRAM preinstalled HP Pavilion ze5x00, ze4x00, HP Compaq nx9010, nx9008, nx9005, Compaq Evo N1050v, Compaq Presario 2500, and Compaq Presario 2100: 2 slots for PC2100...
to 60-GB removable hard drive with Ultra-DMA 100 interface 1.44-MB floppy drive (certain models) 24x CD-ROM, 8x DVD, CD-RW, or CD-RW/DVD drive (or higher) At least 128 MB SDRAM preinstalled HP Pavilion ze5x00, ze4x00, HP Compaq nx9010, nx9008, nx9005, Compaq Evo N1050v, Compaq Presario 2500, and Compaq Presario 2100: 2 slots for PC2100...
Maintenance and Service Guide
Page 31
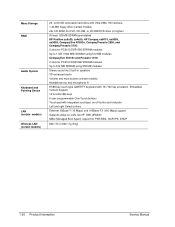
...keyboard (page 2-16) • Door, Mini PCI (page 2-7) • Door, SDRAM (page 2-5) Doors, PCMCIA (page 2-60) Drive, CD/DVD (page 2-20) Drive, floppy (page 2-32) • Drive, hard disk (page 2-9) • Feet, rubber (page 2-12) Heat sink (with fan) (page 2-40) • Keyboard (page 2-16...proper grounding when performing repairs. NOTE: Reassembly steps are user-replaceable. Service Manual Removal and Replacement 2-1 Reassembly notes are displayed throughout this chapter to remove and replace the notebook's components and assemblies. The items marked by • in the following table...
...keyboard (page 2-16) • Door, Mini PCI (page 2-7) • Door, SDRAM (page 2-5) Doors, PCMCIA (page 2-60) Drive, CD/DVD (page 2-20) Drive, floppy (page 2-32) • Drive, hard disk (page 2-9) • Feet, rubber (page 2-12) Heat sink (with fan) (page 2-40) • Keyboard (page 2-16...proper grounding when performing repairs. NOTE: Reassembly steps are user-replaceable. Service Manual Removal and Replacement 2-1 Reassembly notes are displayed throughout this chapter to remove and replace the notebook's components and assemblies. The items marked by • in the following table...
Maintenance and Service Guide
Page 39
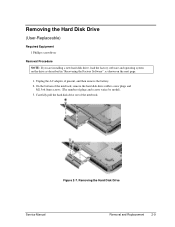
... by model). 3. On the bottom of the notebook, remove the hard disk drive rubber screw plugs and M2.5×6.0mm screws. (The number of the notebook. Removing the Hard Disk Drive Service Manual Removal and Replacement 2-9 Removing the Hard Disk Drive (User-Replaceable) Required Equipment 1 Phillips screwdriver Removal Procedure NOTE: If you are installing a new hard disk drive, load the factory software and operating system...
... by model). 3. On the bottom of the notebook, remove the hard disk drive rubber screw plugs and M2.5×6.0mm screws. (The number of the notebook. Removing the Hard Disk Drive Service Manual Removal and Replacement 2-9 Removing the Hard Disk Drive (User-Replaceable) Required Equipment 1 Phillips screwdriver Removal Procedure NOTE: If you are installing a new hard disk drive, load the factory software and operating system...
Maintenance and Service Guide
Page 40
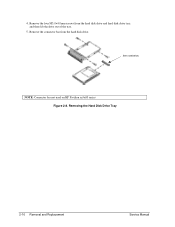
See note below NOTE: Connector bar not used on HP Pavilion ze5x00 series Figure 2-8. Remove the connector bar from the hard disk drive and hard disk drive tray, and then lift the drive out of the tray. 5. Removing the Hard Disk Drive Tray 2-10 Removal and Replacement Service Manual 4. Remove the four M3.0×4.0mm screws from the hard disk drive.
See note below NOTE: Connector bar not used on HP Pavilion ze5x00 series Figure 2-8. Remove the connector bar from the hard disk drive and hard disk drive tray, and then lift the drive out of the tray. 5. Removing the Hard Disk Drive Tray 2-10 Removal and Replacement Service Manual 4. Remove the four M3.0×4.0mm screws from the hard disk drive.
Maintenance and Service Guide
Page 41
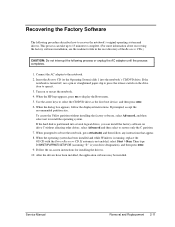
...enter. 6. Turn on -screen instructions for installing the drivers. 10. When the HP logo appears, press esc to restore only the C partition. 7. When the ... the on or restart the notebook. 4. Service Manual Removal and Replacement 2-11 If prompted, accept the recommended partition size. When prompted to the notebook. 2. If the notebook is running, replace the OS... the Utility partition without affecting other drives. If the hard disk is partitioned into the notebook's CD/DVD drive. Use the arrow keys to recover the notebook's original operating system and drivers. Recovering...
...enter. 6. Turn on -screen instructions for installing the drivers. 10. When the HP logo appears, press esc to restore only the C partition. 7. When the ... the on or restart the notebook. 4. Service Manual Removal and Replacement 2-11 If prompted, accept the recommended partition size. When prompted to the notebook. 2. If the notebook is running, replace the OS... the Utility partition without affecting other drives. If the hard disk is partitioned into the notebook's CD/DVD drive. Use the arrow keys to recover the notebook's original operating system and drivers. Recovering...
Maintenance and Service Guide
Page 54
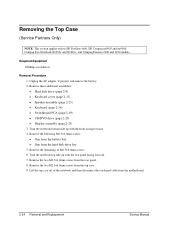
... Case (Service Partners Only) NOTE: This section applies only to HP Pavilion 4x00, HP Compaq nx9005 and nx9000, Compaq Evo Notebook N1050v and N1010v, and Compaq Presario 2100 and 1100 models. Remove these additional assemblies: • Hard disk drive (page 2-9) • Keyboard cover (page 2-13) • Speaker assembly (page 2-23) • Keyboard (page 2-16) • Switchboard PCA...
... Case (Service Partners Only) NOTE: This section applies only to HP Pavilion 4x00, HP Compaq nx9005 and nx9000, Compaq Evo Notebook N1050v and N1010v, and Compaq Presario 2100 and 1100 models. Remove these additional assemblies: • Hard disk drive (page 2-9) • Keyboard cover (page 2-13) • Speaker assembly (page 2-23) • Keyboard (page 2-16) • Switchboard PCA...
Maintenance and Service Guide
Page 56
NOTE: This section applies only to the notebook. 2-26 Removal and Replacement Service Manual Failure to follow this caution can result in damage to HP Pavilion 5x00, HP Compaq nx9010 and HP nx9008, and Compaq Presario 2500 models. Remove these additional assemblies: • Hard disk drive (page 2-9) • Keyboard cover (page 2-13) • Speaker assembly (page 2-15) • Keyboard (page...
NOTE: This section applies only to the notebook. 2-26 Removal and Replacement Service Manual Failure to follow this caution can result in damage to HP Pavilion 5x00, HP Compaq nx9010 and HP nx9008, and Compaq Presario 2500 models. Remove these additional assemblies: • Hard disk drive (page 2-9) • Keyboard cover (page 2-13) • Speaker assembly (page 2-15) • Keyboard (page...
Maintenance and Service Guide
Page 59
... adapter, if present, and remove the battery. 2. Required Equipment 1 Phillips screwdriver Removal Procedure 1. Service Manual Removal and Replacement 2-29 Remove the two M2.5×4.0mm screws (right side) that secure the hard disk drive guide to the motherboard. (Note that secure the floppy drive to HP Pavilion ze4x00, HP Compaq nx9005 and nx9000, Compaq Evo Notebook N1050v and N1010v, and Compaq...
... adapter, if present, and remove the battery. 2. Required Equipment 1 Phillips screwdriver Removal Procedure 1. Service Manual Removal and Replacement 2-29 Remove the two M2.5×4.0mm screws (right side) that secure the hard disk drive guide to the motherboard. (Note that secure the floppy drive to HP Pavilion ze4x00, HP Compaq nx9005 and nx9000, Compaq Evo Notebook N1050v and N1010v, and Compaq...
Maintenance and Service Guide
Page 60
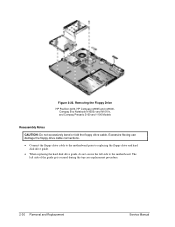
...hard disk drive guide, do not secure the left side of the guide gets secured during the top case replacement procedure. 2-30 Removal and Replacement Service Manual Figure 2-22. Excessive flexing can damage the floppy drive cable connections. • Connect the floppy drive cable to the motherboard prior to the motherboard. Removing the Floppy Drive HP Pavilion 4x00, HP... Compaq nx9005 and nx9000, Compaq Evo Notebook N1050v ...
...hard disk drive guide, do not secure the left side of the guide gets secured during the top case replacement procedure. 2-30 Removal and Replacement Service Manual Figure 2-22. Excessive flexing can damage the floppy drive cable connections. • Connect the floppy drive cable to the motherboard prior to the motherboard. Removing the Floppy Drive HP Pavilion 4x00, HP... Compaq nx9005 and nx9000, Compaq Evo Notebook N1050v ...
Maintenance and Service Guide
Page 61
... drive. 7. Remove the floppy drive bezel. Required Equipment • 1 Phillips screwdriver Removal Procedure 1. Remove these additional assemblies: • Hard disk drive (page 2-9) • Keyboard cover (page 2-13) • Keyboard (page 2-16) • Switchboard PCA (page 2-19) • Display assembly (page 2-23) • Top case (page 2-26) 3. Remove the M2.0×3.0mm screw that secures the floppy drive bezel to HP Pavilion...
... drive. 7. Remove the floppy drive bezel. Required Equipment • 1 Phillips screwdriver Removal Procedure 1. Remove these additional assemblies: • Hard disk drive (page 2-9) • Keyboard cover (page 2-13) • Keyboard (page 2-16) • Switchboard PCA (page 2-19) • Display assembly (page 2-23) • Top case (page 2-26) 3. Remove the M2.0×3.0mm screw that secures the floppy drive bezel to HP Pavilion...
Maintenance and Service Guide
Page 63
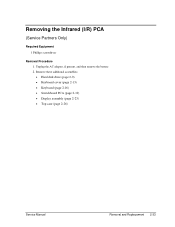
Removing the Infrared (I/R) PCA (Service Partners Only) Required Equipment 1 Phillips screwdriver Removal Procedure 1. Remove these additional assemblies: • Hard disk drive (page 2-9) • Keyboard cover (page 2-13) • Keyboard (page 2-16) • Switchboard PCA (page 2-19) • Display assembly (page 2-23) • Top case (page 2-26) Service Manual Removal and Replacement 2-33 Unplug the AC adapter, if present, and then remove the battery. 2.
Removing the Infrared (I/R) PCA (Service Partners Only) Required Equipment 1 Phillips screwdriver Removal Procedure 1. Remove these additional assemblies: • Hard disk drive (page 2-9) • Keyboard cover (page 2-13) • Keyboard (page 2-16) • Switchboard PCA (page 2-19) • Display assembly (page 2-23) • Top case (page 2-26) Service Manual Removal and Replacement 2-33 Unplug the AC adapter, if present, and then remove the battery. 2.
Maintenance and Service Guide
Page 65
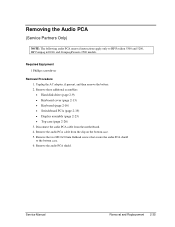
... two M2.0×3.0mm flathead screws that secure the audio PCA shield to HP Pavilion 5300 and 5200, HP Compaq nx9010, and Compaq Presario 2500 models. Remove these additional assemblies: • Hard disk drive (page 2-9) • Keyboard cover (page 2-13) • Keyboard (page 2-16) • Switchboard PCA (page 2-19) • Display assembly (page 2-23) • Top...
... two M2.0×3.0mm flathead screws that secure the audio PCA shield to HP Pavilion 5300 and 5200, HP Compaq nx9010, and Compaq Presario 2500 models. Remove these additional assemblies: • Hard disk drive (page 2-9) • Keyboard cover (page 2-13) • Keyboard (page 2-16) • Switchboard PCA (page 2-19) • Display assembly (page 2-23) • Top...
Maintenance and Service Guide
Page 67
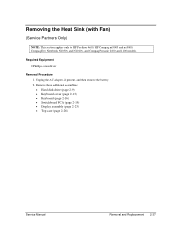
... 2-23) • Top case (page 2-26) Service Manual Removal and Replacement 2-37 Unplug the AC adapter, if present, and then remove the battery. 2. Removing the Heat Sink (with Fan) (Service Partners Only) NOTE: This section applies only to HP Pavilion 4x00, HP Compaq nx9005 and nx9000, Compaq Evo Notebook N1050v and N1010v, and Compaq Presario 2100 and...
... 2-23) • Top case (page 2-26) Service Manual Removal and Replacement 2-37 Unplug the AC adapter, if present, and then remove the battery. 2. Removing the Heat Sink (with Fan) (Service Partners Only) NOTE: This section applies only to HP Pavilion 4x00, HP Compaq nx9005 and nx9000, Compaq Evo Notebook N1050v and N1010v, and Compaq Presario 2100 and...
Maintenance and Service Guide
Page 100
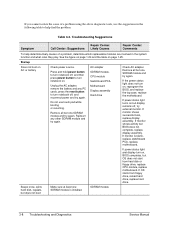
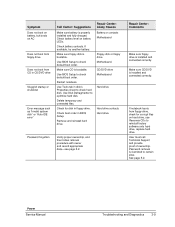
...PC cards, press the reset button to help determine likely causes of a problem using the above diagnostic tools, use touch pad while booting or resuming. SDRAM module Check AC adapter. If you cannot isolate the cause of a problem, determine which replaceable modules are involved in the following table to turn notebook... Repair Center: Likely Causes Repair Center: Comments To help find the problem. Remove all but OS does not start from floppy drive, reload hard drive, replace hard drive. 3-8 Troubleshooting and Diagnostics Service Manual See the figure on page 1-24 and...
...PC cards, press the reset button to help determine likely causes of a problem using the above diagnostic tools, use touch pad while booting or resuming. SDRAM module Check AC adapter. If you cannot isolate the cause of a problem, determine which replaceable modules are involved in the following table to turn notebook... Repair Center: Likely Causes Repair Center: Comments To help find the problem. Remove all but OS does not start from floppy drive, reload hard drive, replace hard drive. 3-8 Troubleshooting and Diagnostics Service Manual See the figure on page 1-24 and...
Maintenance and Service Guide
Page 101
... factory software onto hard drive, replace hard drive. Make sure CD/DVD is bootable. Delete temporary and unneeded files. If notebook boots from CD in floppy drive. Make sure floppy disk is installed and connected correctly. Check for corrupt files on hard drive, use Recovery CDs to certain sites. Remove and reinstall hard drive. CD/DVD drive Motherboard Hard drive Hard drive contacts Hard drive Password forgotten Verify...
... factory software onto hard drive, replace hard drive. Make sure CD/DVD is bootable. Delete temporary and unneeded files. If notebook boots from CD in floppy drive. Make sure floppy disk is installed and connected correctly. Check for corrupt files on hard drive, use Recovery CDs to certain sites. Remove and reinstall hard drive. CD/DVD drive Motherboard Hard drive Hard drive contacts Hard drive Password forgotten Verify...
Maintenance and Service Guide
Page 104
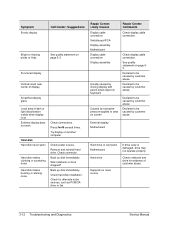
... connection. Declared to be caused by customer abuse. Remove and reinstall hard drive. Declared to area on keyboard Caused by customer abuse. Check hard disk installation. Press Fn+F5 several times. Declared ...notebook and drive for alternate noise sources, such as PCMCIA drive or fan. Try display on External display does not work Hard disk Hard disk never spins Hard disk makes clunking or scratching noise Hard disk makes buzzing or whining noise Check connections. Check for evidence of display. Back up disk immediately. External display Motherboard Hard drive...
... connection. Declared to be caused by customer abuse. Remove and reinstall hard drive. Declared to area on keyboard Caused by customer abuse. Check hard disk installation. Press Fn+F5 several times. Declared ...notebook and drive for alternate noise sources, such as PCMCIA drive or fan. Try display on External display does not work Hard disk Hard disk never spins Hard disk makes clunking or scratching noise Hard disk makes buzzing or whining noise Check connections. Check for evidence of display. Back up disk immediately. External display Motherboard Hard drive...
Maintenance and Service Guide
Page 127
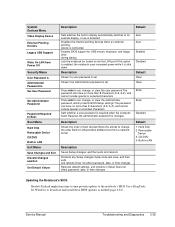
...characters (0-9, A-Z), and cannot include special or accented characters Press enter to download and install these BIOS updates as needed (page 2-61). Hard Disk 2. Removable Device 3. CD/DVD 4. System Devices Menu Video Display Device External Pointing Devices Legacy USB Support Wake On LAN from Power Off Security ... pointing device is connected Enables BIOS support for USB mouse, keyboard, and floppy drive during startup Lets the notebook be turned on via the LAN port If this option is enabled, the notebook uses increased power while it is shut down Description Shows if a user password...
...characters (0-9, A-Z), and cannot include special or accented characters Press enter to download and install these BIOS updates as needed (page 2-61). Hard Disk 2. Removable Device 3. CD/DVD 4. System Devices Menu Video Display Device External Pointing Devices Legacy USB Support Wake On LAN from Power Off Security ... pointing device is connected Enables BIOS support for USB mouse, keyboard, and floppy drive during startup Lets the notebook be turned on via the LAN port If this option is enabled, the notebook uses increased power while it is shut down Description Shows if a user password...


