
End User License Agreement
Page 2
... /for your license is automatically terminated. You shall not remove any Microsoft operating system software contained in any term or condition of the HP Product with any other applicable laws and international treaty provisions. CONSENT TO USE OF DATA. floppy disk, CD or DVD) or an ... an upgrade, you must first be used for restoring the hard disk of this EULA or if you may not reverse engineer, decompile, or disassemble the Software Product, except and only to the f. UPGRADES. a. The transfer may not sublicense, assign or transfer the license or Software Product...
... /for your license is automatically terminated. You shall not remove any Microsoft operating system software contained in any term or condition of the HP Product with any other applicable laws and international treaty provisions. CONSENT TO USE OF DATA. floppy disk, CD or DVD) or an ... an upgrade, you must first be used for restoring the hard disk of this EULA or if you may not reverse engineer, decompile, or disassemble the Software Product, except and only to the f. UPGRADES. a. The transfer may not sublicense, assign or transfer the license or Software Product...

Maintenance and Service Guide
Page 3
Contents Introduction...vii Product Information...1-1 Features ...1-8 Operation...1-14 Specifications ...1-18 Internal Design...1-24 Removal and Replacement 2-1 Disassembly Flowchart ...2-3 Removing the Battery ...2-4 Removing an SDRAM Module...2-5 Removing the Wireless LAN Mini PCI Card 2-7 Removing the Hard Disk Drive...2-9 Recovering the Factory Software...2-11 ...
Contents Introduction...vii Product Information...1-1 Features ...1-8 Operation...1-14 Specifications ...1-18 Internal Design...1-24 Removal and Replacement 2-1 Disassembly Flowchart ...2-3 Removing the Battery ...2-4 Removing an SDRAM Module...2-5 Removing the Wireless LAN Mini PCI Card 2-7 Removing the Hard Disk Drive...2-9 Recovering the Factory Software...2-11 ...
Maintenance and Service Guide
Page 4
Back View ...1-12 Figure 1-6. Resetting the Notebook ...1-17 Figure 1-8. Removing an SDRAM Module 2-6 Figure 2-5. Disconnecting the Speaker Cable 2-14 Figure 2-11. Removing the CD/DVD Drive 2-22 Figure 2-17. Removing... 2-29. Back View ...1-9 Figure 1-3. Front View...1-11 Figure 1-5. Removing the Switchboard PCA 2-19 Figure 2-15. Removing the Top Case Screws 2-29 Figure 2-20. Disassembly Flow...2-3 Figure 2-2. Removing the Keyboard ...2-17 Figure 2-13. Removing the Audio PCA ...2-39 Figure 2-26. Removing the Motherboard 2-51 Figure 2-35. Removing the Hard Disk...
Back View ...1-12 Figure 1-6. Resetting the Notebook ...1-17 Figure 1-8. Removing an SDRAM Module 2-6 Figure 2-5. Disconnecting the Speaker Cable 2-14 Figure 2-11. Removing the CD/DVD Drive 2-22 Figure 2-17. Removing... 2-29. Back View ...1-9 Figure 1-3. Front View...1-11 Figure 1-5. Removing the Switchboard PCA 2-19 Figure 2-15. Removing the Top Case Screws 2-29 Figure 2-20. Disassembly Flow...2-3 Figure 2-2. Removing the Keyboard ...2-17 Figure 2-13. Removing the Audio PCA ...2-39 Figure 2-26. Removing the Motherboard 2-51 Figure 2-35. Removing the Hard Disk...
Maintenance and Service Guide
Page 33
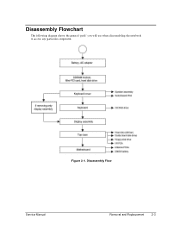
Figure 2-1. Disassembly Flow Service Manual Removal and Replacement 2-3 Disassembly Flowchart The following diagram shows the general "path" you will use when disassembling the notebook to access any particular component.
Figure 2-1. Disassembly Flow Service Manual Removal and Replacement 2-3 Disassembly Flowchart The following diagram shows the general "path" you will use when disassembling the notebook to access any particular component.


