
Maintenance and Service Guide
Page 3
... Operation...1-14 Specifications ...1-18 Internal Design...1-24 Removal and Replacement 2-1 Disassembly Flowchart ...2-3 Removing the Battery ...2-4 Removing an SDRAM Module...2-5 Removing the Wireless LAN Mini PCI Card 2-7 Removing the Hard Disk Drive...2-9 Recovering the Factory Software...2-11 Replacing Small Parts ...2-12 Removing the Keyboard Cover...2-13 Removing the Speaker Assembly ...2-15 Removing the Keyboard ...2-16 Removing the Switchboard PCA ...2-19 Removing the CD/DVD Drive...2-20 Removing the Display Assembly...2-23 Removing the Top Case ...2-26 Removing the Floppy Drive...
... Operation...1-14 Specifications ...1-18 Internal Design...1-24 Removal and Replacement 2-1 Disassembly Flowchart ...2-3 Removing the Battery ...2-4 Removing an SDRAM Module...2-5 Removing the Wireless LAN Mini PCI Card 2-7 Removing the Hard Disk Drive...2-9 Recovering the Factory Software...2-11 Replacing Small Parts ...2-12 Removing the Keyboard Cover...2-13 Removing the Speaker Assembly ...2-15 Removing the Keyboard ...2-16 Removing the Switchboard PCA ...2-19 Removing the CD/DVD Drive...2-20 Removing the Display Assembly...2-23 Removing the Top Case ...2-26 Removing the Floppy Drive...
Maintenance and Service Guide
Page 6
...://www.microsoft.com/ Restricted to install, configure, and repair these products. U.S. Information and updates for servicing the HP Pavilion ze5600, ze5500, ze5400, ze5300, ze5200, ze4700, ze4600, ze4500, ze4400, ze4300, ze4200, and ze4100 Notebook PCs, HP Compaq nx9010, nx9008, nx9005, and nx9000 Notebook PCs, Compaq Evo Notebook 1050v and 1010v Series, and Compaq Presario 2500, 2100, and 1100 Series Mobile PCs. Outside U.S. The manual is self-contained, so you...
...://www.microsoft.com/ Restricted to install, configure, and repair these products. U.S. Information and updates for servicing the HP Pavilion ze5600, ze5500, ze5400, ze5300, ze5200, ze4700, ze4600, ze4500, ze4400, ze4300, ze4200, and ze4100 Notebook PCs, HP Compaq nx9010, nx9008, nx9005, and nx9000 Notebook PCs, Compaq Evo Notebook 1050v and 1010v Series, and Compaq Presario 2500, 2100, and 1100 Series Mobile PCs. Outside U.S. The manual is self-contained, so you...
Maintenance and Service Guide
Page 26
... modules Up to 512 MB SDRAM using 256 MB modules Stereo sound via 2 built-in speakers 3D-enhanced audio Volume and mute buttons (certain models) Headphone-out and microphone-in 87/88-key touch-type QWERTY keyboard with integrated scroll pad, on-off button and indicator Left and right Select buttons Ethernet 10Base-T (10 Mbps) and 100Base-TX (100 Mbps) support Supports wake-on-LAN, fast IP, DMI, dRMON MBA (Managed Boot Agent) support...
... modules Up to 512 MB SDRAM using 256 MB modules Stereo sound via 2 built-in speakers 3D-enhanced audio Volume and mute buttons (certain models) Headphone-out and microphone-in 87/88-key touch-type QWERTY keyboard with integrated scroll pad, on-off button and indicator Left and right Select buttons Ethernet 10Base-T (10 Mbps) and 100Base-TX (100 Mbps) support Supports wake-on-LAN, fast IP, DMI, dRMON MBA (Managed Boot Agent) support...
Maintenance and Service Guide
Page 89
... unit, select Change Settings in the BIOS Setup utility-except for creating a BIOS floppy disk are running. 2. In some cases, however, you might be replaced separately. Undock the notebook if it . 3. If the notebook will boot sufficiently, use a Crisis Recovery floppy disk. Once the update process begins, do not interrupt it is docked, and remove any cables or equipment needed to connect to reprogram the BIOS IC. Installation utilities and instructions for BIOS passwords-so record...
... unit, select Change Settings in the BIOS Setup utility-except for creating a BIOS floppy disk are running. 2. In some cases, however, you might be replaced separately. Undock the notebook if it . 3. If the notebook will boot sufficiently, use a Crisis Recovery floppy disk. Once the update process begins, do not interrupt it is docked, and remove any cables or equipment needed to connect to reprogram the BIOS IC. Installation utilities and instructions for BIOS passwords-so record...
Maintenance and Service Guide
Page 100
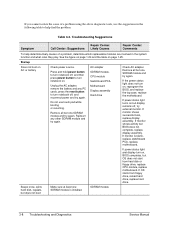
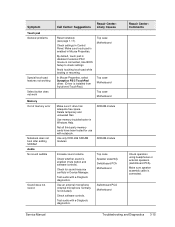
... the power status light does not turn notebook on but OS does not start from floppy drive, reload hard drive, replace hard drive. 3-8 Troubleshooting and Diagnostics Service Manual If monitor shows activity but one SDRAM module and try again. Troubleshooting Suggestions Symptom Call Center: Suggestions Repair Center: Likely Causes Repair Center: Comments To help find the problem. If monitor shows successful boot, replace display assembly. If monitor is installed. Startup Does not boot on page 1-25. Do not use the...
... the power status light does not turn notebook on but OS does not start from floppy drive, reload hard drive, replace hard drive. 3-8 Troubleshooting and Diagnostics Service Manual If monitor shows activity but one SDRAM module and try again. Troubleshooting Suggestions Symptom Call Center: Suggestions Repair Center: Likely Causes Repair Center: Comments To help find the problem. If monitor shows successful boot, replace display assembly. If monitor is installed. Startup Does not boot on page 1-25. Do not use the...
Maintenance and Service Guide
Page 101
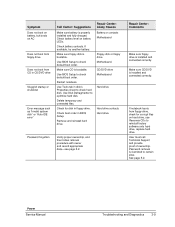
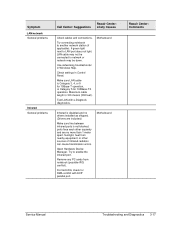
...battery contacts. Use Disk Defragmenter to check default boot order. Repair Center: Comments Make sure floppy drive is installed and connected correctly. Make sure CD/DVD is installed and connected correctly. User must call Technical Support and provide proof of ownership. See page 5-2. Power Service Manual Troubleshooting and Diagnostics 3-9 Check for corrupt files on battery LEDs. Remove and reinstall hard drive. Check battery level on hard drive, use Recovery CDs to reinstall factory software onto hard drive, replace hard drive. Restart notebook. Use BIOS Setup...
...battery contacts. Use Disk Defragmenter to check default boot order. Repair Center: Comments Make sure floppy drive is installed and connected correctly. Make sure CD/DVD is installed and connected correctly. User must call Technical Support and provide proof of ownership. See page 5-2. Power Service Manual Troubleshooting and Diagnostics 3-9 Check for corrupt files on battery LEDs. Remove and reinstall hard drive. Check battery level on hard drive, use Recovery CDs to reinstall factory software onto hard drive, replace hard drive. Restart notebook. Use BIOS Setup...
Maintenance and Service Guide
Page 103
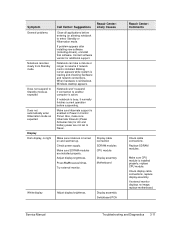
... hardware is installed properly, replace CPU module. If problem appears after installing new software (including drivers), uninstall that software. Make sure SDRAM modules are not set to resume if network card is installed. Display assembly Switchboard PCA Repair Center: Comments Check cable connections. Repair Center: Likely Causes Make sure notebook is loading and checking hardware and network connections. Display cable connection SDRAM modules CPU module Display assembly Motherboard White display Adjust display brightness. If external monitor displays no light...
... hardware is installed properly, replace CPU module. If problem appears after installing new software (including drivers), uninstall that software. Make sure SDRAM modules are not set to resume if network card is installed. Display assembly Switchboard PCA Repair Center: Comments Check cable connections. Repair Center: Likely Causes Make sure notebook is loading and checking hardware and network connections. Display cable connection SDRAM modules CPU module Display assembly Motherboard White display Adjust display brightness. If external monitor displays no light...
Maintenance and Service Guide
Page 104
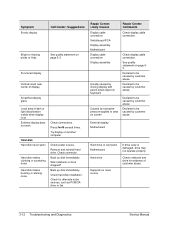
... display. See quality statement on External display does not work Hard disk Hard disk never spins Hard disk makes clunking or scratching noise Hard disk makes buzzing or whining noise Check connections. Punctured display Vertical crack near center of customer abuse. 3-12 Troubleshooting and Diagnostics Service Manual Scratched display glass Local area of dark or light discoloration visible when display is damaged, drive may not operate properly. Press Fn+F5 several times. Remove and reinstall hard drive...
... display. See quality statement on External display does not work Hard disk Hard disk never spins Hard disk makes clunking or scratching noise Hard disk makes buzzing or whining noise Check connections. Punctured display Vertical crack near center of customer abuse. 3-12 Troubleshooting and Diagnostics Service Manual Scratched display glass Local area of dark or light discoloration visible when display is damaged, drive may not operate properly. Press Fn+F5 several times. Remove and reinstall hard drive...
Maintenance and Service Guide
Page 107
... is enabled (mute button and software controls). Check whether sound is installed from \hp\drivers\TouchPad.) Top case Motherboard Top case Motherboard Top case Motherboard Make sure C drive has adequate free space. Test audio with notebook. Service Manual Troubleshooting and Diagnostics 3-15 SDRAM module SDRAM module Increase sound volume. Check for use with e-Diagtools diagnostics. Use an external microphone (internal microphone normally not included). Check settings in Windows Help. By default, touch pad is disabled if external PS/2 mouse is connected, Use BIOS Setup to...
... is enabled (mute button and software controls). Check whether sound is installed from \hp\drivers\TouchPad.) Top case Motherboard Top case Motherboard Top case Motherboard Make sure C drive has adequate free space. Test audio with notebook. Service Manual Troubleshooting and Diagnostics 3-15 SDRAM module SDRAM module Increase sound volume. Check for use with e-Diagtools diagnostics. Use an external microphone (internal microphone normally not included). Check settings in Windows Help. By default, touch pad is disabled if external PS/2 mouse is connected, Use BIOS Setup to...
Maintenance and Service Guide
Page 109
... errors. Test LAN with ECP parallel port. Open Hardware Device Manager. Try to network or network may not be down. Use networking troubleshooter in Control Panel. Sunlight, heat from notebook (possible IRQ conflict). Make sure LAN cable is Category 3, 4, or 5 for 10Base-T operation, or Category 5 for DMA conflict with e-Diagtools diagnostics. Motherboard Repair Center: Comments Service Manual Troubleshooting and Diagnostics 3-17 If green light next to LAN port does not light, LAN cable may be connected to enable the infrared port. Check settings in Windows...
... errors. Test LAN with ECP parallel port. Open Hardware Device Manager. Try to network or network may not be down. Use networking troubleshooter in Control Panel. Sunlight, heat from notebook (possible IRQ conflict). Make sure LAN cable is Category 3, 4, or 5 for 10Base-T operation, or Category 5 for DMA conflict with e-Diagtools diagnostics. Motherboard Repair Center: Comments Service Manual Troubleshooting and Diagnostics 3-17 If green light next to LAN port does not light, LAN cable may be connected to enable the infrared port. Check settings in Windows...
Maintenance and Service Guide
Page 113
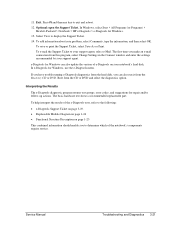
In Windows, select Start > All Programs (or Programs) > Hewlett-Packard > Notebook > HP e-Diagtools > e-Diagtools for Windows, use the e-Diagtools menu. To add information about your support agent. To save or print the Support Ticket, select Save As or Print. Service Manual Troubleshooting and Diagnostics 3-21 Press F3 and then any key to display the Support Ticket. 14. Optional: open the Support Ticket. Boot from the Recovery CD or DVD. To help interpret...
In Windows, select Start > All Programs (or Programs) > Hewlett-Packard > Notebook > HP e-Diagtools > e-Diagtools for Windows, use the e-Diagtools menu. To add information about your support agent. To save or print the Support Ticket, select Save As or Print. Service Manual Troubleshooting and Diagnostics 3-21 Press F3 and then any key to display the Support Ticket. 14. Optional: open the Support Ticket. Boot from the Recovery CD or DVD. To help interpret...

Maintenance and Service Guide
Page 114
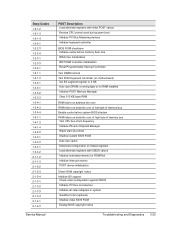
... enabled in which the terminal error occurred. If POST displays an error message or issues a beep code indicating an error, confirm the problem using other diagnostic tools. POST Terminal-Error Beep Codes POST Description One short beep before boot Search for information only. Remove all POST messages indicate a failure in the notebook-some messages are for option ROMs Verify Real Mode Disable Non-Maskable Interrupt (NMI) Get CPU type Initialize system hardware Disable...
... enabled in which the terminal error occurred. If POST displays an error message or issues a beep code indicating an error, confirm the problem using other diagnostic tools. POST Terminal-Error Beep Codes POST Description One short beep before boot Search for information only. Remove all POST messages indicate a failure in the notebook-some messages are for option ROMs Verify Real Mode Disable Non-Maskable Interrupt (NMI) Get CPU type Initialize system hardware Disable...
Maintenance and Service Guide
Page 115
...23 Beep Codes 1-2-1-2 1-2-1-3 1-2-1-4 1-2-2-1 1-2-2-3 1-2-2-4 1-2-3-1 1-2-3-3 1-2-4-1 1-3-1-1 1-3-1-3 1-3-2-1 1-3-3-1 1-3-3-2 1-3-3-3 1-3-4-1 1-3-4-3 1-3-4-4 1-4-1-1 1-4-1-3 1-4-1-4 1-4-2-3 1-4-3-1 1-4-3-3 1-4-4-1 1-4-4-2 2-1-1-2 2-1-1-3 2-1-2-2 2-1-2-3 2-1-2-4 2-1-3-1 2-1-3-2 2-1-3-3 2-1-3-4 2-1-4-1 2-1-4-3 Service Manual POST Description Load alternate registers with initial POST values Restore CPU control word during warm boot Initialize PCI Bus Mastering devices Initialize keyboard controller BIOS ROM checksum Initialize cache before system BIOS shadow RAM failure on motherboard) Set ES...
...23 Beep Codes 1-2-1-2 1-2-1-3 1-2-1-4 1-2-2-1 1-2-2-3 1-2-2-4 1-2-3-1 1-2-3-3 1-2-4-1 1-3-1-1 1-3-1-3 1-3-2-1 1-3-3-1 1-3-3-2 1-3-3-3 1-3-4-1 1-3-4-3 1-3-4-4 1-4-1-1 1-4-1-3 1-4-1-4 1-4-2-3 1-4-3-1 1-4-3-3 1-4-4-1 1-4-4-2 2-1-1-2 2-1-1-3 2-1-2-2 2-1-2-3 2-1-2-4 2-1-3-1 2-1-3-2 2-1-3-3 2-1-3-4 2-1-4-1 2-1-4-3 Service Manual POST Description Load alternate registers with initial POST values Restore CPU control word during warm boot Initialize PCI Bus Mastering devices Initialize keyboard controller BIOS ROM checksum Initialize cache before system BIOS shadow RAM failure on motherboard) Set ES...
Maintenance and Service Guide
Page 120
... is booted Memory size found by POST differed from CMOS 02B0 Diskette drive A error 02B2 Incorrect Drive A type-run SETUP Description Fixed (hard) disk is not working or not configured properly at offset nnnn Update to the latest BIOS version CMOS clock battery indicator shows that the CMOS battery is dead Connect the AC adapter for at offset nnnn of floppy drive A: not correctly identified in BIOS Setup, reset the notebook, enter BIOS Setup, and install the defaults or correct the error. Table...
... is booted Memory size found by POST differed from CMOS 02B0 Diskette drive A error 02B2 Incorrect Drive A type-run SETUP Description Fixed (hard) disk is not working or not configured properly at offset nnnn Update to the latest BIOS version CMOS clock battery indicator shows that the CMOS battery is dead Connect the AC adapter for at offset nnnn of floppy drive A: not correctly identified in BIOS Setup, reset the notebook, enter BIOS Setup, and install the defaults or correct the error. Table...
Maintenance and Service Guide
Page 122
... to start the boot process or to enter BIOS Setup and change the settings Press to display the previous screen (usually an initialization error of an Option ROM, such as an add-on card) Write down and follow the information shown on the screen Optional message displayed during POST PS/2 mouse identified System BIOS copied to shadow RAM Displays the address nnnn of the upper limit of Upper Memory Blocks (UMB), indicating...
... to start the boot process or to enter BIOS Setup and change the settings Press to display the previous screen (usually an initialization error of an Option ROM, such as an add-on card) Write down and follow the information shown on the screen Optional message displayed during POST PS/2 mouse identified System BIOS copied to shadow RAM Displays the address nnnn of the upper limit of Upper Memory Blocks (UMB), indicating...
Maintenance and Service Guide
Page 127
... Set User Password Set Administrator Password Password Required to Boot Boot Menu Hard Disk Removable Device CD/DVD Built-in LAN Exit Menu Save Changes and Exit Discard Changes and Exit Get Default Values Description Default Sets whether the built-in display automatically switches to an external display, if one is detected Disables the internal pointing devices when an external pointing device is connected Enables BIOS support for USB mouse, keyboard, and floppy drive during startup Lets the notebook be turned on via the LAN port If this option is enabled, the notebook uses increased power...
... Set User Password Set Administrator Password Password Required to Boot Boot Menu Hard Disk Removable Device CD/DVD Built-in LAN Exit Menu Save Changes and Exit Discard Changes and Exit Get Default Values Description Default Sets whether the built-in display automatically switches to an external display, if one is detected Disables the internal pointing devices when an external pointing device is connected Enables BIOS support for USB mouse, keyboard, and floppy drive during startup Lets the notebook be turned on via the LAN port If this option is enabled, the notebook uses increased power...
HP Pavilion ze4x00, ze5x00 and specific xt notebook series - Startup Guide
Page 35
In the BIOS Setup utility, try setting Video Display Device to Both in the System Devices menu. • If you're using a TV connected to the S-Video port, you might have with your notebook. • Use the Windows troubleshooters. Troubleshooting and Maintenance Troubleshooting Your Notebook Troubleshooting Your Notebook This chapter contains solutions to a few basic problems you must activate the TV. 28 Startup Guide Here are presented. If an external display does not work • Check the connections. • The external monitor may not...
In the BIOS Setup utility, try setting Video Display Device to Both in the System Devices menu. • If you're using a TV connected to the S-Video port, you might have with your notebook. • Use the Windows troubleshooters. Troubleshooting and Maintenance Troubleshooting Your Notebook Troubleshooting Your Notebook This chapter contains solutions to a few basic problems you must activate the TV. 28 Startup Guide Here are presented. If an external display does not work • Check the connections. • The external monitor may not...
HP Pavilion ze4x00, ze5x00 and specific xt notebook series - Startup Guide
Page 36
... restore normal operation. • If an external mouse is rebooting. If the TouchPad does not work • Press the TouchPad on-off button to turn on the keyboard to control Adjust the pointer controls. Select Start > Turn Off Computer > Restart. Troubleshooting and Maintenance Troubleshooting Your Notebook Hard drive problems If the notebook hard drive does not spin • Make sure the notebook has power. Keyboard and pointing device problems Use these suggestions for built-in pointing devices are corrupted • Open My Computer, select the disk...
... restore normal operation. • If an external mouse is rebooting. If the TouchPad does not work • Press the TouchPad on-off button to turn on the keyboard to control Adjust the pointer controls. Select Start > Turn Off Computer > Restart. Troubleshooting and Maintenance Troubleshooting Your Notebook Hard drive problems If the notebook hard drive does not spin • Make sure the notebook has power. Keyboard and pointing device problems Use these suggestions for built-in pointing devices are corrupted • Open My Computer, select the disk...
HP Pavilion ze4x00, ze5x00 and specific xt notebook series - Startup Guide
Page 37
.... 30 Startup Guide Then press the power button to end the application that the light on the adapter is on the bottom of memory (RAM). If the notebook stops responding • Press CTRL+ALT+DEL, then use Task Manager to turn off or putting it turns on . • To avoid lockup problems, avoid pressing the TV Now! One-Touch button to turn the notebook back on Battery power is low...
.... 30 Startup Guide Then press the power button to end the application that the light on the adapter is on the bottom of memory (RAM). If the notebook stops responding • Press CTRL+ALT+DEL, then use Task Manager to turn off or putting it turns on . • To avoid lockup problems, avoid pressing the TV Now! One-Touch button to turn the notebook back on Battery power is low...
HP Pavilion ze4x00, ze5x00 and specific xt notebook series - Startup Guide
Page 41
..., 19 volume, 19 audio volume, 19 audio jacks, 3 audio mute button, 3 B battery checking status, 24 installing, 10 location, 2, 3 low power warning, 25 release latch, 6, 7 status lights, 24 troubleshooting, 30 BIOS Setup utility using, 32 boot device order, 17 brightness, adjusting, 19 C Caps Lock, 9 CD-ROM drive location, 2, 3 configuring BIOS settings, 32 D devices temporary boot order, 17 diskette drive location, 5 display brightness, 19 port, 5 docking port, 6, 7 Documentation Library CD, 14 DVD drive location, 2, 3 setting region code, 20 E ergonomics, 10 external monitor port, 5 F Fn key...
..., 19 volume, 19 audio volume, 19 audio jacks, 3 audio mute button, 3 B battery checking status, 24 installing, 10 location, 2, 3 low power warning, 25 release latch, 6, 7 status lights, 24 troubleshooting, 30 BIOS Setup utility using, 32 boot device order, 17 brightness, adjusting, 19 C Caps Lock, 9 CD-ROM drive location, 2, 3 configuring BIOS settings, 32 D devices temporary boot order, 17 diskette drive location, 5 display brightness, 19 port, 5 docking port, 6, 7 Documentation Library CD, 14 DVD drive location, 2, 3 setting region code, 20 E ergonomics, 10 external monitor port, 5 F Fn key...


