Reference Guide
Page 3
.... Check with local codes for example, near a bathtub, sink, swimming pool, or in a wet basement). • Avoid using your notebook computer with a telephone connection, always follow basic safety precautions to reduce the risk of fire, electrical shock, and injury to report a gas... AWG or larger telecommunications line cord to connect a modem to the Telecommunication Network through a line cord that meets the requirements of batteries in this product with a telephone connection near water (for possible special disposal instructions. • Disconnect the modem cable before opening ...
.... Check with local codes for example, near a bathtub, sink, swimming pool, or in a wet basement). • Avoid using your notebook computer with a telephone connection, always follow basic safety precautions to reduce the risk of fire, electrical shock, and injury to report a gas... AWG or larger telecommunications line cord to connect a modem to the Telecommunication Network through a line cord that meets the requirements of batteries in this product with a telephone connection near water (for possible special disposal instructions. • Disconnect the modem cable before opening ...

Reference Guide
Page 7
... components 6 Status lights...8 Setting Up Your Notebook 10 Step 1: Insert the battery 10 Step 2: Connect AC power 11 Step 3: Connect a phone line 12 Step 4: Turn on the notebook 13 Step 5: Set up Windows 13 Basic Operation ...15 Operating Your Notebook 16 Default power settings 16 To reset the notebook 17 To change the boot device...
... components 6 Status lights...8 Setting Up Your Notebook 10 Step 1: Insert the battery 10 Step 2: Connect AC power 11 Step 3: Connect a phone line 12 Step 4: Turn on the notebook 13 Step 5: Set up Windows 13 Basic Operation ...15 Operating Your Notebook 16 Default power settings 16 To reset the notebook 17 To change the boot device...

Reference Guide
Page 8
... 28 To clean your notebook 28 Batteries and Power Management 29 Managing Power Consumption 30 How the notebook manages power automatically 30 Using Battery Power 32 To check battery status 32 To respond to a low-battery warning 33 To recharge the battery 33 To get the most from your batteries 34 Modem and Network ...44 To prepare for Bluetooth connections 45 To send or receive files using Bluetooth 46 Add-On Devices ...47 Connecting PC Cards 48 To insert or remove a PC Card 48 Connecting External Devices 50 To connect an audio device 50 To use an external monitor 52 To connect an...
... 28 To clean your notebook 28 Batteries and Power Management 29 Managing Power Consumption 30 How the notebook manages power automatically 30 Using Battery Power 32 To check battery status 32 To respond to a low-battery warning 33 To recharge the battery 33 To get the most from your batteries 34 Modem and Network ...44 To prepare for Bluetooth connections 45 To send or receive files using Bluetooth 46 Add-On Devices ...47 Connecting PC Cards 48 To insert or remove a PC Card 48 Connecting External Devices 50 To connect an audio device 50 To use an external monitor 52 To connect an...
Reference Guide
Page 9
... area network (LAN) problems 72 Memory problems 73 Modem problems 73 PC Card problems 76 Performance problems 76 Power and battery problems 77 Printing problems 79 Serial, parallel, and USB problems 80 Startup problems 81 Wireless problems 82 Configuring Your Notebook 84 To run the BIOS Setup utility 84 To change video memory...
... area network (LAN) problems 72 Memory problems 73 Modem problems 73 PC Card problems 76 Performance problems 76 Power and battery problems 77 Printing problems 79 Serial, parallel, and USB problems 80 Startup problems 81 Wireless problems 82 Configuring Your Notebook 84 To run the BIOS Setup utility 84 To change video memory...
Reference Guide
Page 12
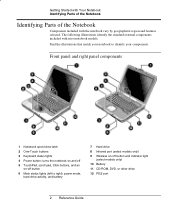
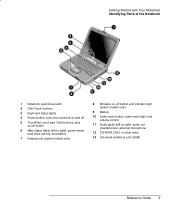
.../close latch 2 One-Touch buttons 3 Keyboard status lights 4 Power button: turns the notebook on and off 5 TouchPad, scroll pad, Click buttons, and an on -off button and indicator light (select models only) 10 Battery 11 CD-ROM, DVD, or other drive 12 PS/2 port 2 Reference Guide Find ...the illustrations that match your notebook to right): power mode, hard drive activity, and battery 7 Hard drive 8 Infrared port (select models only) 9 Wireless on -off button 6 Main status lights (left to identify your components. The following...
.../close latch 2 One-Touch buttons 3 Keyboard status lights 4 Power button: turns the notebook on and off 5 TouchPad, scroll pad, Click buttons, and an on -off button and indicator light (select models only) 10 Battery 11 CD-ROM, DVD, or other drive 12 PS/2 port 2 Reference Guide Find ...the illustrations that match your notebook to right): power mode, hard drive activity, and battery 7 Hard drive 8 Infrared port (select models only) 9 Wireless on -off button 6 Main status lights (left to identify your components. The following...
Reference Guide
Page 13
...2 One-Touch buttons 3 Keyboard status lights 4 Power button: turns the notebook on and off 5 TouchPad, scroll pad, Click buttons, plus on-off button 6 Main status lights (left to right): power mode, hard drive activity, and battery 7 Infrared port (select models only) 8 Wireless on-off button and ...indicator light (select models only) 9 Battery 10 Audio mute button, audio mute light, and volume control 11 Audio jacks (left to right...
...2 One-Touch buttons 3 Keyboard status lights 4 Power button: turns the notebook on and off 5 TouchPad, scroll pad, Click buttons, plus on-off button 6 Main status lights (left to right): power mode, hard drive activity, and battery 7 Infrared port (select models only) 8 Wireless on-off button and ...indicator light (select models only) 9 Battery 10 Audio mute button, audio mute light, and volume control 11 Audio jacks (left to right...
Reference Guide
Page 16
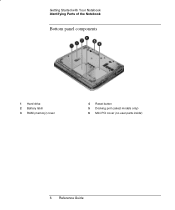
Getting Started with Your Notebook Identifying Parts of the Notebook Bottom panel components 1 Hard drive 2 Battery latch 3 RAM (memory) cover 4 Reset button 5 Docking port (select models only) 6 Mini PCI cover (no user parts inside) 6 Reference Guide
Getting Started with Your Notebook Identifying Parts of the Notebook Bottom panel components 1 Hard drive 2 Battery latch 3 RAM (memory) cover 4 Reset button 5 Docking port (select models only) 6 Mini PCI cover (no user parts inside) 6 Reference Guide
Reference Guide
Page 17
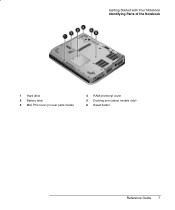
Getting Started with Your Notebook Identifying Parts of the Notebook 1 Hard drive 2 Battery latch 3 Mini PCI cover (no user parts inside) 4 RAM (memory) cover 5 Docking port (select models only) 6 Reset button Reference Guide 7
Getting Started with Your Notebook Identifying Parts of the Notebook 1 Hard drive 2 Battery latch 3 Mini PCI cover (no user parts inside) 4 RAM (memory) cover 5 Docking port (select models only) 6 Reset button Reference Guide 7
Reference Guide
Page 18
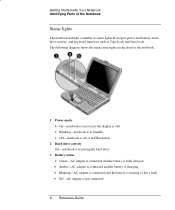
...if the display is off) • Blinking-notebook is in Standby • Off-notebook is off or in Hibernation 2 Hard drive activity On-notebook is accessing the hard drive 3 Battery status • Green-AC adapter is connected and the battery is fully charged • Amber-AC adapter...not connected 8 Reference Guide Getting Started with Your Notebook Identifying Parts of the Notebook Status lights The notebook includes a number of the notebook. 1 Power mode • On-notebook is on the front of status lights that report power and battery status, drive activity, and keyboard functions such as ...
...if the display is off) • Blinking-notebook is in Standby • Off-notebook is off or in Hibernation 2 Hard drive activity On-notebook is accessing the hard drive 3 Battery status • Green-AC adapter is connected and the battery is fully charged • Amber-AC adapter...not connected 8 Reference Guide Getting Started with Your Notebook Identifying Parts of the Notebook Status lights The notebook includes a number of the notebook. 1 Power mode • On-notebook is on the front of status lights that report power and battery status, drive activity, and keyboard functions such as ...
Reference Guide
Page 20
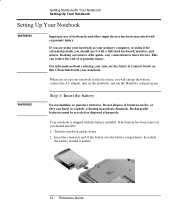
... latches. 10 Reference Guide WARNING Step 1: Insert the battery Do not mutilate or puncture batteries. If the battery has been removed, you will charge the battery, connect the AC adapter, turn on this CD included with the battery installed. If you are using your notebook as your notebook. Rechargeable batteries must be recycled or disposed of properly. For...
... latches. 10 Reference Guide WARNING Step 1: Insert the battery Do not mutilate or puncture batteries. If the battery has been removed, you will charge the battery, connect the AC adapter, turn on this CD included with the battery installed. If you are using your notebook as your notebook. Rechargeable batteries must be recycled or disposed of properly. For...
Reference Guide
Page 21
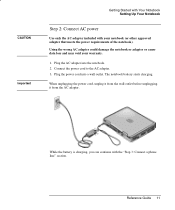
...cause data loss and may void your notebook (or other approved adapter that meets the power requirements of the notebook). Reference Guide 11 Plug the AC adapter into a wall outlet. Plug the power cord into the notebook. 2. The notebook battery starts charging. When unplugging the power cord..., unplug it from the wall outlet before unplugging it from the AC adapter. While the battery is charging, you can continue with your warranty. 1. Connect...
...cause data loss and may void your notebook (or other approved adapter that meets the power requirements of the notebook). Reference Guide 11 Plug the AC adapter into a wall outlet. Plug the power cord into the notebook. 2. The notebook battery starts charging. When unplugging the power cord..., unplug it from the wall outlet before unplugging it from the AC adapter. While the battery is charging, you can continue with your warranty. 1. Connect...
Reference Guide
Page 23
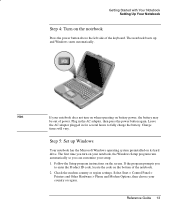
...5: Set up and Windows starts automatically. Hint If your setup. 1. If the program prompts you can customize your notebook does not turn on when operating on battery power, the battery may be out of power. Plug in for several hours to enter the Product ID code, locate the code on... the bottom of the keyboard. The first time you turn on your notebook, the Windows Setup program runs automatically so you to fully charge the battery. Select Start > Control Panel > Printers and Other Hardware > Phone and Modem Options, then choose your country...
...5: Set up and Windows starts automatically. Hint If your setup. 1. If the program prompts you can customize your notebook does not turn on when operating on battery power, the battery may be out of power. Plug in for several hours to enter the Product ID code, locate the code on... the bottom of the keyboard. The first time you turn on your notebook, the Windows Setup program runs automatically so you to fully charge the battery. Select Start > Control Panel > Printers and Other Hardware > Phone and Modem Options, then choose your country...

Reference Guide
Page 25
... other components. • Maintains current session in this mode Briefly press the power button. Allow the system to time out. See the "Batteries and Power Management" chapter in RAM. • Restarts quickly. • Restores network connections. • Saves maximum power. • Saves... current session to start and stop the notebook-depending on . To enter this guide. 16 Reference Guide However, at least 4 seconds to turn off the display and other methods to disk...
... other components. • Maintains current session in this mode Briefly press the power button. Allow the system to time out. See the "Batteries and Power Management" chapter in RAM. • Restarts quickly. • Restores network connections. • Saves maximum power. • Saves... current session to start and stop the notebook-depending on . To enter this guide. 16 Reference Guide However, at least 4 seconds to turn off the display and other methods to disk...

Reference Guide
Page 32
When you reach this situation. To create or copy CDs If your notebook is equipped with a DVD or other DVD readable drive, it also includes ...Start > All Programs > Multimedia > DVD Player > InterVideo WinDVD. Refer to the region code will be hard-coded on battery power, set the Control Panel power scheme to play a DVD intended for your last change the region code only a limited ...the software. Hint Important Basic Operation Using CDs or DVDs To play DVD movies If your notebook is equipped with a DVD/CD-RW combo drive, it also includes a DVD player software that lets you play DVD ...
When you reach this situation. To create or copy CDs If your notebook is equipped with a DVD or other DVD readable drive, it also includes ...Start > All Programs > Multimedia > DVD Player > InterVideo WinDVD. Refer to the region code will be hard-coded on battery power, set the Control Panel power scheme to play a DVD intended for your last change the region code only a limited ...the software. Hint Important Basic Operation Using CDs or DVDs To play DVD movies If your notebook is equipped with a DVD/CD-RW combo drive, it also includes a DVD player software that lets you play DVD ...
Reference Guide
Page 36
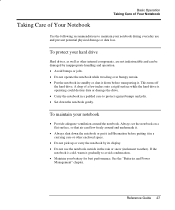
...it down the notebook gently. To protect your hard drive Hard drives, as well as other enclosed space. • Do not pick up or carry the notebook by its display. • Do not use and prevent potential physical damage or data loss. See the "Batteries and Power Management..." chapter. A drop of Your Notebook Use the following recommendations to maintain your notebook during everyday use the notebook outside in the rain or snow (inclement weather). Reference Guide 27 This turns ...
...it down the notebook gently. To protect your hard drive Hard drives, as well as other enclosed space. • Do not pick up or carry the notebook by its display. • Do not use and prevent potential physical damage or data loss. See the "Batteries and Power Management..." chapter. A drop of Your Notebook Use the following recommendations to maintain your notebook during everyday use the notebook outside in the rain or snow (inclement weather). Reference Guide 27 This turns ...
Reference Guide
Page 37
... a soft cloth dampened with clean water or with your notebook) to check the integrity of the keyboard). • If you are not using an external monitor, set the Turn off monitor timeouts (for both AC and battery operation) to the shortest comfortable interval. • Avoid using AC power and... have no external monitor attached, put the notebook in Standby when not in the disk Properties window.
... a soft cloth dampened with clean water or with your notebook) to check the integrity of the keyboard). • If you are not using an external monitor, set the Turn off monitor timeouts (for both AC and battery operation) to the shortest comfortable interval. • Avoid using AC power and... have no external monitor attached, put the notebook in Standby when not in the disk Properties window.

Reference Guide
Page 39
...lost. 30 Reference Guide Begin using the notebook, and the hard drive turns on battery power, you can adjust these timeouts to conserve battery power. Your notebook is initiated. Maintains your current session in RAM, and turns off the notebook. When this occurs No keyboard, pointing ... to your current session. If power is interrupted while the notebook is in Standby, any key or move a pointing device to occur shortly after specified timeout periods. Hard drive turns off . Batteries and Power Management Managing Power Consumption Managing Power Consumption When you...
...lost. 30 Reference Guide Begin using the notebook, and the hard drive turns on battery power, you can adjust these timeouts to conserve battery power. Your notebook is initiated. Maintains your current session in RAM, and turns off the notebook. When this occurs No keyboard, pointing ... to your current session. If power is interrupted while the notebook is in Standby, any key or move a pointing device to occur shortly after specified timeout periods. Hard drive turns off . Batteries and Power Management Managing Power Consumption Managing Power Consumption When you...
Reference Guide
Page 40
... select Save As and enter a name for details. To resume normal operation, restore power by connecting an AC adapter or installing a charged battery, then shut the notebook off and restart it. Changing timeout settings and creating power schemes You can also save the settings as a power scheme. 1. Select the ...Power Schemes tab, then enter the settings you will find on resuming that all your notebook automatically shuts down completely. If this happens, you do not want . Reference Guide 31 If you will lose any unsaved data if the...
... select Save As and enter a name for details. To resume normal operation, restore power by connecting an AC adapter or installing a charged battery, then shut the notebook off and restart it. Changing timeout settings and creating power schemes You can also save the settings as a power scheme. 1. Select the ...Power Schemes tab, then enter the settings you will find on resuming that all your notebook automatically shuts down completely. If this happens, you do not want . Reference Guide 31 If you will lose any unsaved data if the...
Reference Guide
Page 41
... Windows Help for details). The Alarms and Advanced tabs provide additional Windows power-information options. See the "Getting Started with Your Notebook" chapter in this guide. 2. On the battery 1. The icon resembles a battery when AC power is shown as either a percentage of a full charge). 32 Reference Guide From the Windows taskbar The Windows...
... Windows Help for details). The Alarms and Advanced tabs provide additional Windows power-information options. See the "Getting Started with Your Notebook" chapter in this guide. 2. On the battery 1. The icon resembles a battery when AC power is shown as either a percentage of a full charge). 32 Reference Guide From the Windows taskbar The Windows...
Reference Guide
Page 42
... you continue working while the battery charges, the charging time may increase. To recharge the battery The AC adapter is normally warm whenever plugged into the notebook. Plug the AC adapter into an AC outlet. The notebook is below 50 percent before ...battery with a charged one. • Plug in a briefcase or other confined space, or the battery could overheat. Note CAUTION Batteries and Power Management Using Battery Power To respond to a low-battery warning The notebook automatically alerts you when the battery power drops to work while your battery recharges. The notebook...
... you continue working while the battery charges, the charging time may increase. To recharge the battery The AC adapter is normally warm whenever plugged into the notebook. Plug the AC adapter into an AC outlet. The notebook is below 50 percent before ...battery with a charged one. • Plug in a briefcase or other confined space, or the battery could overheat. Note CAUTION Batteries and Power Management Using Battery Power To respond to a low-battery warning The notebook automatically alerts you when the battery power drops to work while your battery recharges. The notebook...


