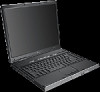
Using LightScribe (Select Models Only)
Page 3
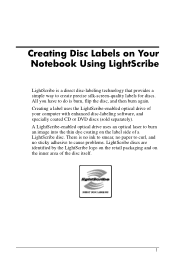
.... Creating Disc Labels on the label side of a LightScribe disc. A LightScribe-enabled optical drive uses an optical laser to burn an image into the thin dye coating on Your Notebook Using LightScribe LightScribe is a direct disc-labeling technology that provides a simple way to cause problems. LightScribe discs are identified by the LightScribe...
.... Creating Disc Labels on the label side of a LightScribe disc. A LightScribe-enabled optical drive uses an optical laser to burn an image into the thin dye coating on Your Notebook Using LightScribe LightScribe is a direct disc-labeling technology that provides a simple way to cause problems. LightScribe discs are identified by the LightScribe...
Using LightScribe (Select Models Only)
Page 4
...are available at major computer and consumer electronics retail outlets, and through online shopping. ■ Can LightScribe burn a color label? Using Draft or Normal imaging modes provides a shorter burn time, but also results in a lighter label. Burning a label with LightScribe media? In most cases, the less area ... current optical drive to be LightScribe capable. ■ What do I know if I have a LightScribe drive? Creating Disc Labels on Your Notebook Using LightScribe Frequently asked questions ■ How do I upgrade my current DVD-RW drive to finish burning the label.
...are available at major computer and consumer electronics retail outlets, and through online shopping. ■ Can LightScribe burn a color label? Using Draft or Normal imaging modes provides a shorter burn time, but also results in a lighter label. Burning a label with LightScribe media? In most cases, the less area ... current optical drive to be LightScribe capable. ■ What do I know if I have a LightScribe drive? Creating Disc Labels on Your Notebook Using LightScribe Frequently asked questions ■ How do I upgrade my current DVD-RW drive to finish burning the label.
Using LightScribe (Select Models Only)
Page 5
...or dangerous to light? LightScribe does not require your computer for other tasks while the label is being burned. ■ Will the LightScribe image fade or darken over time or with exposure to handle immediately after the label is not recognized and prompts you that the label surface ...LightScribe surface/coating safe to flip the disk over. The LightScribe software notifies you to handle? Creating Disc Labels on Your Notebook Using LightScribe ■ Can I use my PC for other things while I forget to touch as soon as the label burning process is safe to flip the disc over...
...or dangerous to light? LightScribe does not require your computer for other tasks while the label is being burned. ■ Will the LightScribe image fade or darken over time or with exposure to handle immediately after the label is not recognized and prompts you that the label surface ...LightScribe surface/coating safe to flip the disk over. The LightScribe software notifies you to handle? Creating Disc Labels on Your Notebook Using LightScribe ■ Can I use my PC for other things while I forget to touch as soon as the label burning process is safe to flip the disc over...
Using LightScribe (Select Models Only)
Page 6
Creating Disc Labels on Your Notebook Using LightScribe Tips and tricks Before you begin, take a moment to avoid duplicate information being burned, then add the new label information and burn again. &#... needs. To make sure the label is exactly the way you 'll burn fewer tracks per inch, which takes less burn time but creates a lighter image. Because LightScribe burns from Best to a previously burned label. The LightScribe software that fits your...
Creating Disc Labels on Your Notebook Using LightScribe Tips and tricks Before you begin, take a moment to avoid duplicate information being burned, then add the new label information and burn again. &#... needs. To make sure the label is exactly the way you 'll burn fewer tracks per inch, which takes less burn time but creates a lighter image. Because LightScribe burns from Best to a previously burned label. The LightScribe software that fits your...
Using LightScribe (Select Models Only)
Page 8
... process from burning data, music, or picture files onto a disc. Labels can be a simple title with InterVideo DiscLabel or Sonic Express Labeler. Depending on Your Notebook Using LightScribe Creating a LightScribe label Burning a label with select versions of LightScribe software only). 6 You can get more creative by adding backgrounds and...
... process from burning data, music, or picture files onto a disc. Labels can be a simple title with InterVideo DiscLabel or Sonic Express Labeler. Depending on Your Notebook Using LightScribe Creating a LightScribe label Burning a label with select versions of LightScribe software only). 6 You can get more creative by adding backgrounds and...
Using LightScribe (Select Models Only)
Page 9
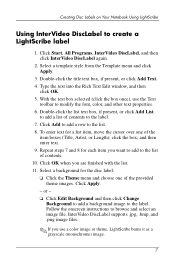
...once), use a color image or theme, LightScribe burns it as a grayscale (monochrome) image. 7 or - ❏ Click Edit Background and then click Change Background to add a background image to create a LightScribe label 1. Creating Disc Labels on Your Notebook Using LightScribe Using InterVideo DiscLabel... to the label. InterVideo DiscLabel supports .jpg, .bmp, and .png image files. ✎ If you are finished with ...
...once), use a color image or theme, LightScribe burns it as a grayscale (monochrome) image. 7 or - ❏ Click Edit Background and then click Change Background to add a background image to create a LightScribe label 1. Creating Disc Labels on Your Notebook Using LightScribe Using InterVideo DiscLabel... to the label. InterVideo DiscLabel supports .jpg, .bmp, and .png image files. ✎ If you are finished with ...
Using LightScribe (Select Models Only)
Page 10
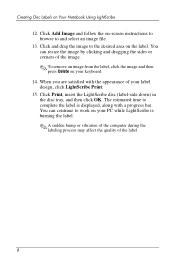
...PC while LightScribe is displayed, along with the appearance of the image. ✎ To remove an image from the label, click the image and then press Delete on your label design, click LightScribe Print. 15. Click Add Image and follow the on-screen instructions to browse to the desired area on Your Notebook... Using LightScribe 12. Creating Disc Labels on the label. You can resize the image by clicking and dragging the sides or corners of ...
...PC while LightScribe is displayed, along with the appearance of the image. ✎ To remove an image from the label, click the image and then press Delete on your label design, click LightScribe Print. 15. Click Add Image and follow the on-screen instructions to browse to the desired area on Your Notebook... Using LightScribe 12. Creating Disc Labels on the label. You can resize the image by clicking and dragging the sides or corners of ...
Using LightScribe (Select Models Only)
Page 11
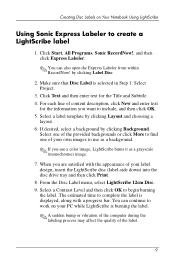
... 8. When you use as a grayscale (monochrome) image. 7. From the Disc Label menu, select LightScribe 12cm Disc. 9. The estimated time to use a color image, LightScribe burns it as a background. ✎ If... Sonic RecordNow!, and then click Express Labeler. ✎ You can continue to work on Your Notebook Using LightScribe Using Sonic Express Labeler to begin burning the label. If desired, select a background ...by clicking Layout and choosing a layout. 6. Creating Disc Labels on your PC while LightScribe is burning the label. ✎ A sudden bump or vibration of the ...
... 8. When you use as a grayscale (monochrome) image. 7. From the Disc Label menu, select LightScribe 12cm Disc. 9. The estimated time to use a color image, LightScribe burns it as a background. ✎ If... Sonic RecordNow!, and then click Express Labeler. ✎ You can continue to work on Your Notebook Using LightScribe Using Sonic Express Labeler to begin burning the label. If desired, select a background ...by clicking Layout and choosing a layout. 6. Creating Disc Labels on your PC while LightScribe is burning the label. ✎ A sudden bump or vibration of the ...
Using LightScribe (Select Models Only)
Page 12
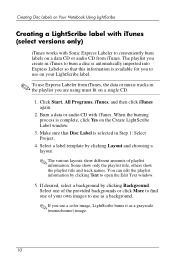
... burns it as a grayscale (monochrome) image. 10 If desired, select a background by clicking Layout and choosing a layout. ✎ The various layouts show the playlist title and track names. Creating Disc Labels on Your Notebook Using LightScribe Creating a LightScribe label with iTunes (select versions only) iTunes works with ...click Yes on a data CD or audio CD from iTunes, the data or music tracks in the playlist you to use on your own images to find one of playlist information. Burn a data or audio CD with Sonic Express Labeler to open the Edit Text window. 5. Click ...
... burns it as a grayscale (monochrome) image. 10 If desired, select a background by clicking Layout and choosing a layout. ✎ The various layouts show the playlist title and track names. Creating Disc Labels on Your Notebook Using LightScribe Creating a LightScribe label with iTunes (select versions only) iTunes works with ...click Yes on a data CD or audio CD from iTunes, the data or music tracks in the playlist you to use on your own images to find one of playlist information. Burn a data or audio CD with Sonic Express Labeler to open the Edit Text window. 5. Click ...
Hardware-Software Guide
Page 5
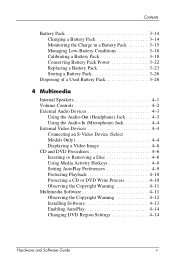
... Devices 4-3 Using the Audio-Out (Headphone) Jack 4-3 Using the Audio-In (Microphone) Jack 4-4 External Video Devices 4-4 Connecting an S-Video Device (Select Models Only 4-4 Displaying a Video Image 4-6 CD and DVD Procedures 4-6 Inserting or Removing a Disc 4-6 Using Media Activity Hotkeys 4-8 Setting AutoPlay Preferences 4-9 Protecting Playback 4-10 Protecting a CD or DVD Write Process 4-10...
... Devices 4-3 Using the Audio-Out (Headphone) Jack 4-3 Using the Audio-In (Microphone) Jack 4-4 External Video Devices 4-4 Connecting an S-Video Device (Select Models Only 4-4 Displaying a Video Image 4-6 CD and DVD Procedures 4-6 Inserting or Removing a Disc 4-6 Using Media Activity Hotkeys 4-8 Setting AutoPlay Preferences 4-9 Protecting Playback 4-10 Protecting a CD or DVD Write Process 4-10...

Hardware-Software Guide
Page 34
... Hotkey Opens Help and Support Center. fn+f1 Opens print options window. fn+f6 Decreases screen brightness. fn+f5 Initiates QuickLock. fn+f3 Switches the image among displays. The function of the fn+f5 hotkey can be changed. fn+f9 Stops an audio CD or DVD. fn+f10 Plays the previous...
... Hotkey Opens Help and Support Center. fn+f1 Opens print options window. fn+f6 Decreases screen brightness. fn+f5 Initiates QuickLock. fn+f3 Switches the image among displays. The function of the fn+f5 hotkey can be changed. fn+f9 Stops an audio CD or DVD. fn+f10 Plays the previous...
Hardware-Software Guide
Page 38
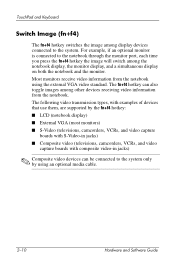
..., camcorders, VCRs, and video capture boards with composite video-in jacks) ✎ Composite video devices can also toggle images among other devices receiving video information from the notebook using an optional media cable. 2-10 Hardware and Software Guide For example, if an optional monitor is connected to the... notebook through the monitor port, each time you press the fn+f4 hotkey the image will switch among display devices connected to the system only by using the external VGA video ...
..., camcorders, VCRs, and video capture boards with composite video-in jacks) ✎ Composite video devices can also toggle images among other devices receiving video information from the notebook using an optional media cable. 2-10 Hardware and Software Guide For example, if an optional monitor is connected to the... notebook through the monitor port, each time you press the fn+f4 hotkey the image will switch among display devices connected to the system only by using the external VGA video ...

Hardware-Software Guide
Page 78
...place the disc label-side up on the drive bezel to release the media tray. Pressing the fn+f4 hotkey switches the image among the notebook display, the connected video device display, and simultaneously on the drive bezel to release the media tray. For more information ...f10 hotkey. ■ To insert a disc-Be sure the notebook is turned on . » To switch the image between the notebook display and the video device display, repeatedly press the fn+f4 hotkey. Multimedia Displaying a Video Image To display an image on the notebook display or a video device display, both displays.
...place the disc label-side up on the drive bezel to release the media tray. Pressing the fn+f4 hotkey switches the image among the notebook display, the connected video device display, and simultaneously on the drive bezel to release the media tray. For more information ...f10 hotkey. ■ To insert a disc-Be sure the notebook is turned on . » To switch the image between the notebook display and the video device display, repeatedly press the fn+f4 hotkey. Multimedia Displaying a Video Image To display an image on the notebook display or a video device display, both displays.

Hardware-Software Guide
Page 95
...-Enables the exchange of information files such as ■ Network access points. ■ Computers (desktop, notebook, PDA). ■ Phones (cellular, cordless, smart phone). ■ Imaging devices (printer, camera). ■ Audio devices (headset, speakers). The network access points can be traditional... and message items between Bluetooth computers or devices. ■ PIM synchronization-Synchronizes PIM data between a Bluetooth wireless device and a notebook, PDA, or cell phone using Bluetooth. ■ File Transfer-Enables the exchange of files between Bluetooth computers or devices. &#...
...-Enables the exchange of information files such as ■ Network access points. ■ Computers (desktop, notebook, PDA). ■ Phones (cellular, cordless, smart phone). ■ Imaging devices (printer, camera). ■ Audio devices (headset, speakers). The network access points can be traditional... and message items between Bluetooth computers or devices. ■ PIM synchronization-Synchronizes PIM data between a Bluetooth wireless device and a notebook, PDA, or cell phone using Bluetooth. ■ File Transfer-Enables the exchange of files between Bluetooth computers or devices. &#...

Hardware-Software Guide
Page 96
..., pointing devices, gaming devices, and remote monitoring devices. ■ Fax-Provides a Bluetooth connection that enables a notebook to act as the Bluetooth cellular phone audio input and output mechanism. ■ Basic imaging-Provides a wireless connection between a headset and a notebook or cellular phone. Hardware and Software Guide 5-9 The headset acts as the device's audio input...
..., pointing devices, gaming devices, and remote monitoring devices. ■ Fax-Provides a Bluetooth connection that enables a notebook to act as the Bluetooth cellular phone audio input and output mechanism. ■ Basic imaging-Provides a wireless connection between a headset and a notebook or cellular phone. Hardware and Software Guide 5-9 The headset acts as the device's audio input...

Hardware-Software Guide
Page 115
... monitor or other display device does not display an image, try pressing the fn+f4 hotkey to switch the image to the jack or jack on the notebook specified by the device manufacturer. 3. To disconnect a powered external device from the notebook. Be sure the device is turned off the device.... 2. Disconnect the device from the notebook: 1. Hardware and Software Guide 7-1...
... monitor or other display device does not display an image, try pressing the fn+f4 hotkey to switch the image to the jack or jack on the notebook specified by the device manufacturer. 3. To disconnect a powered external device from the notebook. Be sure the device is turned off the device.... 2. Disconnect the device from the notebook: 1. Hardware and Software Guide 7-1...
Hardware-Software Guide
Page 156
... playback 3-7 display release button 1-10 display switch identifying 1-4, 3-4 setting preferences 3-13 display, internal controlling brightness 2-12 switching image 2-10 docking device as power source 3-2 docking, undocking while using disc, diskette 4-10 expansion port on notebook 1-12 monitor port 2-10 USB support 7-2 driver recovery disc 1-19 drivers, reinstalling or repairing 1-19 drives adding...
... playback 3-7 display release button 1-10 display switch identifying 1-4, 3-4 setting preferences 3-13 display, internal controlling brightness 2-12 switching image 2-10 docking device as power source 3-2 docking, undocking while using disc, diskette 4-10 expansion port on notebook 1-12 monitor port 2-10 USB support 7-2 driver recovery disc 1-19 drivers, reinstalling or repairing 1-19 drives adding...

Hardware-Software Guide
Page 158
Index initiate QuickLock 2-12 initiate standby 3-9, 3-13 open Internet Explorer 2-9 open print options window 2-9 Quick Reference 2-6 switch image 2-10 hotkeys identifying 1-1, 2-5 procedures 2-7 Quick Reference 2-6 using with external keyboard 2-7 hub, USB 7-2 humidity specifications A-1 I IDE drive light 1-9, 7-11 IEEE 1394 port 1-14, 7-3 installing CD and ...
Index initiate QuickLock 2-12 initiate standby 3-9, 3-13 open Internet Explorer 2-9 open print options window 2-9 Quick Reference 2-6 switch image 2-10 hotkeys identifying 1-1, 2-5 procedures 2-7 Quick Reference 2-6 using with external keyboard 2-7 hub, USB 7-2 humidity specifications A-1 I IDE drive light 1-9, 7-11 IEEE 1394 port 1-14, 7-3 installing CD and ...

Hardware-Software Guide
Page 159
... 7-4 microphone 4-4 microphone jack 1-10, 4-4 Microsoft Certificate of Authenticity label 1-20 Mini PCI compartment 1-16 model, identifying notebook 2-8, 8-2 modem country-specific adapter 1-18 documentation 7-4 Modem Approval label 1-20 modem cable 1-18 modem jack 1-12 monitor connecting 7-1 switching image 2-10, 7-1 monitor port 1-12 mouse, external setting preferences 2-3 USB 7-2 MultiMediaCard 7-4 mute button 1-7, 4-2 mute light 1-5, 4-2 N network...
... 7-4 microphone 4-4 microphone jack 1-10, 4-4 Microsoft Certificate of Authenticity label 1-20 Mini PCI compartment 1-16 model, identifying notebook 2-8, 8-2 modem country-specific adapter 1-18 documentation 7-4 Modem Approval label 1-20 modem cable 1-18 modem jack 1-12 monitor connecting 7-1 switching image 2-10, 7-1 monitor port 1-12 mouse, external setting preferences 2-3 USB 7-2 MultiMediaCard 7-4 mute button 1-7, 4-2 mute light 1-5, 4-2 N network...
Hardware-Software Guide
Page 161
... 3-8 powered device, connecting 7-1 power-on password 6-4, 6-8 Press ESC to change boot order message 8-13 Product Key 1-20 product name and number, notebook 1-20, 2-8 projector connecting 1-12, 7-1 switching image 2-10 PXE server 7-4 Q QuickLock 2-12, 6-3 R RAM (random access memory) 7-17 reader, memory card 7-4 recovery discs 1-19 region settings,... 2-2 Secure Digital Memory Card (SD Card) 7-4 security cable lock, connecting 6-14 security cable slot 1-15 security features 6-1 serial number, notebook 1-20, 2-8 series, notebook 8-2 Service Tag 1-20 Setup 6-4 Index-8 Hardware and Software Guide
... 3-8 powered device, connecting 7-1 power-on password 6-4, 6-8 Press ESC to change boot order message 8-13 Product Key 1-20 product name and number, notebook 1-20, 2-8 projector connecting 1-12, 7-1 switching image 2-10 PXE server 7-4 Q QuickLock 2-12, 6-3 R RAM (random access memory) 7-17 reader, memory card 7-4 recovery discs 1-19 region settings,... 2-2 Secure Digital Memory Card (SD Card) 7-4 security cable lock, connecting 6-14 security cable slot 1-15 security features 6-1 serial number, notebook 1-20, 2-8 series, notebook 8-2 Service Tag 1-20 Setup 6-4 Index-8 Hardware and Software Guide


