
Getting Started Guide - HP Pavilion PC
Page 12
... your system recovery discs with your PC. 1 Press the Power button on the monitor. 2 Press the On button on the front of the PC. 3 Turn on the desktop. 4 Getting Started Guide This will allow easy access to all PC user manuals and warranty information in one -time language setup on page 5. 7 (Select models only) Follow the Easy Setup wizard to update the PC security tools, register the PC and finish PC setup. If you...
... your system recovery discs with your PC. 1 Press the Power button on the monitor. 2 Press the On button on the front of the PC. 3 Turn on the desktop. 4 Getting Started Guide This will allow easy access to all PC user manuals and warranty information in one -time language setup on page 5. 7 (Select models only) Follow the Easy Setup wizard to update the PC security tools, register the PC and finish PC setup. If you...

Getting Started Guide - HP Pavilion PC
Page 15
.... To configure Automatic Updates: Click Start, Control Panel, Other Control Panel Options, and then Automatic Updates. It describes proper workstation setup, posture, and health and work area to install them. • Notify me choose when to maintain your Web browser address box, and then press Enter on the keyboard. Before you through a pop-up to the Safety & Comfort Guide for Software Updates Microsoft continually updates the Windows operating system. When...
.... To configure Automatic Updates: Click Start, Control Panel, Other Control Panel Options, and then Automatic Updates. It describes proper workstation setup, posture, and health and work area to install them. • Notify me choose when to maintain your Web browser address box, and then press Enter on the keyboard. Before you through a pop-up to the Safety & Comfort Guide for Software Updates Microsoft continually updates the Windows operating system. When...
PC Troubleshooting and Maintenance Guide
Page 3
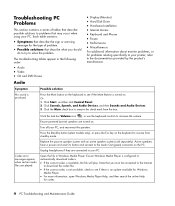
Table of Contents PC Maintenance 1 Creating Data Backup Discs 1 Creating System Recovery Discs 1 Removing Unused Programs 1 Running the Disk Cleanup Program 1 Running the Disk Defragmenter Program 2 Checking for Hard Disk Drive Errors 2 Understanding Hard Disk Drive Space 2 Recommended Maintenance Schedule 3 Troubleshooting PC Problems 4 Audio ...4 Video ...5 CD and DVD Drives 5 Display (Monitor 7 Hard Disk Drive 8 Hardware Installation 8 Internet Access 9 Keyboard and Mouse 11 Power...12 Performance 13 Miscellaneous 14 PC Troubleshooting and Maintenance Guide iii
Table of Contents PC Maintenance 1 Creating Data Backup Discs 1 Creating System Recovery Discs 1 Removing Unused Programs 1 Running the Disk Cleanup Program 1 Running the Disk Defragmenter Program 2 Checking for Hard Disk Drive Errors 2 Understanding Hard Disk Drive Space 2 Recommended Maintenance Schedule 3 Troubleshooting PC Problems 4 Audio ...4 Video ...5 CD and DVD Drives 5 Display (Monitor 7 Hard Disk Drive 8 Hardware Installation 8 Internet Access 9 Keyboard and Mouse 11 Power...12 Performance 13 Miscellaneous 14 PC Troubleshooting and Maintenance Guide iii
PC Troubleshooting and Maintenance Guide
Page 5
.... 6 Select Disk Cleanup from the Control Panel, try using the System Recovery discs that includes write verification functionality. If you later encounter problems with the data copied to the disc to remove, and click the Change/Remove button. 4 Follow the onscreen instructions. Disc Cleanup searches for this feature. PC Maintenance This section includes information about tasks you can perform to help ensure the trouble-free operation of your PC, and...
.... 6 Select Disk Cleanup from the Control Panel, try using the System Recovery discs that includes write verification functionality. If you later encounter problems with the data copied to the disc to remove, and click the Change/Remove button. 4 Follow the onscreen instructions. Disc Cleanup searches for this feature. PC Maintenance This section includes information about tasks you can perform to help ensure the trouble-free operation of your PC, and...
PC Troubleshooting and Maintenance Guide
Page 8
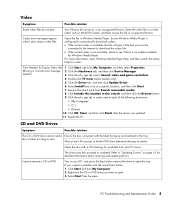
...: • Audio • Video • CD and DVD Drives Audio • Display (Monitor) • Hard Disk Drive • Hardware Installation • Internet Access • Keyboard and Mouse • Power • Performance • Miscellaneous For additional information about monitor problems, or for codec. 4 PC Troubleshooting and Maintenance Guide Ensure powered (active) speakers are played. Codec error messages appear when certain audio files are turned on the PC. Click the task bar Volume icon ( ), or use the keyboard controls to the Audio Out (green) connector on .
...: • Audio • Video • CD and DVD Drives Audio • Display (Monitor) • Hard Disk Drive • Hardware Installation • Internet Access • Keyboard and Mouse • Power • Performance • Miscellaneous For additional information about monitor problems, or for codec. 4 PC Troubleshooting and Maintenance Guide Ensure powered (active) speakers are played. Codec error messages appear when certain audio files are turned on the PC. Click the task bar Volume icon ( ), or use the keyboard controls to the Audio Out (green) connector on .
PC Troubleshooting and Maintenance Guide
Page 9
... from most PC stores. PC Troubleshooting and Maintenance Guide 5 Codec error messages appear when I cannot remove a CD or DVD. disc or takes too long to automatically download codecs. • If the correct codec is an update available for detailed information about restoring and updating drivers. For more information, open . 3 Select Eject from Search removable media. 8 Click Include this location in this search, and then click the Browse button. 9 Click...
... from most PC stores. PC Troubleshooting and Maintenance Guide 5 Codec error messages appear when I cannot remove a CD or DVD. disc or takes too long to automatically download codecs. • If the correct codec is an update available for detailed information about restoring and updating drivers. For more information, open . 3 Select Eject from Search removable media. 8 Click Include this location in this search, and then click the Browse button. 9 Click...
PC Troubleshooting and Maintenance Guide
Page 12
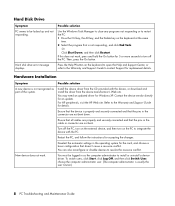
... usually the user Owner.) 8 PC Troubleshooting and Maintenance Guide New device does not work , press and hold the On button for 5 or more seconds to turn on the keyboard at the same time. 2 Select the program that the pins in the cable or connector are not bent down. Hard Disk Drive Symptom PC seems to be logged in as part of the system. Hard disk drive error message displays. Possible solution Use the Windows Task Manager to close...
... usually the user Owner.) 8 PC Troubleshooting and Maintenance Guide New device does not work , press and hold the On button for 5 or more seconds to turn on the keyboard at the same time. 2 Select the program that the pins in the cable or connector are not bent down. Hard Disk Drive Symptom PC seems to be logged in as part of the system. Hard disk drive error message displays. Possible solution Use the Windows Task Manager to close...
PC Troubleshooting and Maintenance Guide
Page 13
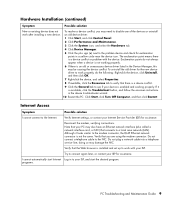
... in the device troubleshooter wizard. 10 Restart the PC. Do not plug a network cable into a telephone service line; I cannot connect to a local area network (LAN). Verify that connects to the Internet. programs. PC Troubleshooting and Maintenance Guide 9 Note that your device is not the same. To resolve a device conflict, you are using the modem connector. The exclamation point means there is available, click the Troubleshoot button, and follow the onscreen instructions in a yellow...
... in the device troubleshooter wizard. 10 Restart the PC. Do not plug a network cable into a telephone service line; I cannot connect to a local area network (LAN). Verify that connects to the Internet. programs. PC Troubleshooting and Maintenance Guide 9 Note that your device is not the same. To resolve a device conflict, you are using the modem connector. The exclamation point means there is available, click the Troubleshoot button, and follow the onscreen instructions in a yellow...
PC Troubleshooting and Maintenance Guide
Page 15
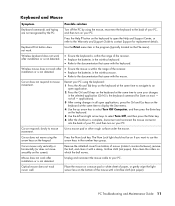
... using the arrow keys on the keypad. Mouse does not work after installation or is not detected. • Ensure the keyboard is not detected. PC Troubleshooting and Maintenance Guide 11 applications). 3 After saving changes in the wireless mouse. • Refer to save your PC. Press the Num Lock key. Turn off the PC by the PC. Remove the rollerball cover from bottom of the mouse with a damp, lint-free cloth (not paper). Optical mouse...
... using the arrow keys on the keypad. Mouse does not work after installation or is not detected. • Ensure the keyboard is not detected. PC Troubleshooting and Maintenance Guide 11 applications). 3 After saving changes in the wireless mouse. • Refer to save your PC. Press the Num Lock key. Turn off the PC by the PC. Remove the rollerball cover from bottom of the mouse with a damp, lint-free cloth (not paper). Optical mouse...

PC Troubleshooting and Maintenance Guide
Page 18
... solution Insufficient memory message displays. Plug in other USB devices after the remote sensor appears in -use light is set to Write Enabled before attempting to write data to Universal Serial Bus Controllers. 4 If the eHome Infrared Receiver is listed under Universal Serial Bus Controllers, Windows is fully inserted into the same USB port. 6 Disconnect all open programs and windows. 2 Click Start, and then click My Computer. 3 Right-click the hard disk drive that...
... solution Insufficient memory message displays. Plug in other USB devices after the remote sensor appears in -use light is set to Write Enabled before attempting to write data to Universal Serial Bus Controllers. 4 If the eHome Infrared Receiver is listed under Universal Serial Bus Controllers, Windows is fully inserted into the same USB port. 6 Disconnect all open programs and windows. 2 Click Start, and then click My Computer. 3 Right-click the hard disk drive that...
PC Troubleshooting and Maintenance Guide
Page 19
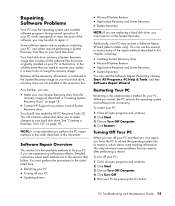
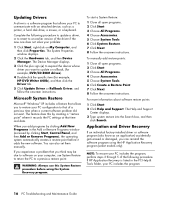
... Start. 3 Choose Turn Off Computer. 4 Click Turn Off. 5 Start your PC • Updating drivers • Microsoft System Restore • Application Recovery and Driver Recovery • System Recovery NOTE: If you are not included in "Creating System Recovery Discs" on page 18. • Contact HP Support to fix your PC if you may eliminate some tracking information. This CD contains utilities that were originally installed on your hard disk drive. Software Repair Overview This section lists...
... Start. 3 Choose Turn Off Computer. 4 Click Turn Off. 5 Start your PC • Updating drivers • Microsoft System Restore • Application Recovery and Driver Recovery • System Recovery NOTE: If you are not included in "Creating System Recovery Discs" on page 18. • Contact HP Support to fix your PC if you may eliminate some tracking information. This CD contains utilities that were originally installed on your hard disk drive. Software Repair Overview This section lists...
PC Troubleshooting and Maintenance Guide
Page 20
... Driver Recovery If an individual factory-installed driver or software program (also know as a printer, a hard disk drive, a mouse, or a keyboard. Complete the following procedure. To manually add restore points: 1 Close all open programs. 2 Click Start. 3 Choose All Programs. 4 Choose Accessories. 5 Choose System Tools. 6 Click Create a Restore Point. 7 Click Next. 8 Follow the onscreen instructions. The System Properties window displays. 2 Click the Hardware tab, and then Device Manager. For more information about software restore points: 1 Click Start...
... Driver Recovery If an individual factory-installed driver or software program (also know as a printer, a hard disk drive, a mouse, or a keyboard. Complete the following procedure. To manually add restore points: 1 Close all open programs. 2 Click Start. 3 Choose All Programs. 4 Choose Accessories. 5 Choose System Tools. 6 Click Create a Restore Point. 7 Click Next. 8 Follow the onscreen instructions. The System Properties window displays. 2 Click the Hardware tab, and then Device Manager. For more information about software restore points: 1 Click Start...

Upgrading and Servicing Guide
Page 6
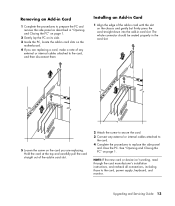
... need to replace the hardware listed in this guide. 2 Upgrading and Servicing Guide WARNING: Beware of personal injury from electrical shock or hot surfaces, disconnect the power cord from the wall outlet, and allow the internal system components to remove the other attached cables (such as the monitor. 5 If you installed an add-in card, install any diskette or optical disc (CD or DVD) from the PC. 5 Disconnect all other attached cables...
... need to replace the hardware listed in this guide. 2 Upgrading and Servicing Guide WARNING: Beware of personal injury from electrical shock or hot surfaces, disconnect the power cord from the wall outlet, and allow the internal system components to remove the other attached cables (such as the monitor. 5 If you installed an add-in card, install any diskette or optical disc (CD or DVD) from the PC. 5 Disconnect all other attached cables...

Upgrading and Servicing Guide
Page 9
... the cables. 6 Connect the power cable and data cable to install the new drive. Upgrading and Servicing Guide 5 Refer to the instructions that the drive fits properly into place. 8 Replace the front panel. See "Removing the Front Panel" on page 1. 2 Remove the front panel. You can replace it snaps into the PC, be sure to remove the side panel as described in through the front of the optical drive, using a gentle rocking motion. Disconnect the sound cable, if...
... the cables. 6 Connect the power cable and data cable to install the new drive. Upgrading and Servicing Guide 5 Refer to the instructions that the drive fits properly into place. 8 Replace the front panel. See "Removing the Front Panel" on page 1. 2 Remove the front panel. You can replace it snaps into the PC, be sure to remove the side panel as described in through the front of the optical drive, using a gentle rocking motion. Disconnect the sound cable, if...
Upgrading and Servicing Guide
Page 10
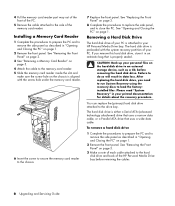
... aligned with the system recovery partition of the HP Personal Media Drive bay before removing the hard disk drive. CAUTION: Back up your personal files on page 1. 2 Remove the front panel. Failure to the hard disk drive and back of your printed documentation for details about the recovery procedure. If you need to run System Recovery using the recovery discs to an external storage device, such as described in data loss. Installing a Memory Card Reader 1 Complete the procedures...
... aligned with the system recovery partition of the HP Personal Media Drive bay before removing the hard disk drive. CAUTION: Back up your personal files on page 1. 2 Remove the front panel. Failure to the hard disk drive and back of your printed documentation for details about the recovery procedure. If you need to run System Recovery using the recovery discs to an external storage device, such as described in data loss. Installing a Memory Card Reader 1 Complete the procedures...
Upgrading and Servicing Guide
Page 13
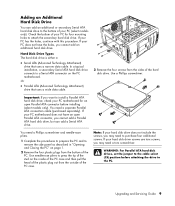
... the plastic plug out from the bottom of your PC for an open Parallel ATA connector, you cannot add an additional hard disk drive. Upgrading and Servicing Guide 9 Note: If your PC motherboard for four mounting holes to attach the secondary hard disk drive. Hard Disk Drive Types The hard disk drive is either a: • Serial ATA (Advanced Technology Attachment) drive that uses a wide data cable. 3 Remove the four screws from the sides of your PC (select models only). Use a Phillips...
... the plastic plug out from the bottom of your PC for an open Parallel ATA connector, you cannot add an additional hard disk drive. Upgrading and Servicing Guide 9 Note: If your PC motherboard for four mounting holes to attach the secondary hard disk drive. Hard Disk Drive Types The hard disk drive is either a: • Serial ATA (Advanced Technology Attachment) drive that uses a wide data cable. 3 Remove the four screws from the sides of your PC (select models only). Use a Phillips...
Upgrading and Servicing Guide
Page 17
... PC, locate the add-in card slots on the motherboard. 4 If you are replacing a card, make a note of the add-in card slot. See "Opening and Closing the PC" on the chassis and gently but firmly press the card straight down into the add-in card slot. 2 Attach the screw to secure the card. 3 Connect any external or internal cables attached to the card, power supply, keyboard, and monitor. NOTE: If the new card or device isn't working, read through the card manufacturer's installation instructions...
... PC, locate the add-in card slots on the motherboard. 4 If you are replacing a card, make a note of the add-in card slot. See "Opening and Closing the PC" on the chassis and gently but firmly press the card straight down into the add-in card slot. 2 Attach the screw to secure the card. 3 Connect any external or internal cables attached to the card, power supply, keyboard, and monitor. NOTE: If the new card or device isn't working, read through the card manufacturer's installation instructions...
Warranty and Support Guide
Page 13
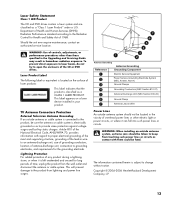
... Antenna Connectors Protection External Television Antenna Grounding If an outside antenna or cable system is connected to the product, be located in the vicinity of overhead power lines or other than those specified in the Upgrading and Servicing Guide may result in hazardous radiation exposure. Copyright © 2004-2006 Hewlett-Packard Development Company, L.P. 13 Lightning Protection For added protection of...
... Antenna Connectors Protection External Television Antenna Grounding If an outside antenna or cable system is connected to the product, be located in the vicinity of overhead power lines or other than those specified in the Upgrading and Servicing Guide may result in hazardous radiation exposure. Copyright © 2004-2006 Hewlett-Packard Development Company, L.P. 13 Lightning Protection For added protection of...
PC Basics Guide
Page 38
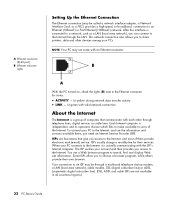
... area network), you access to the Internet through the LAN. After this interface is a group of computers that give you can connect to the Internet, and most of the Internet. B A With the PC turned on, check the lights (B) next to search, find and display Web site information. NOTE: Your PC may be called a network interface adapter, a Network Interface Card, or a NIC ) provides a high-speed, or broadband, connection to users...
... area network), you access to the Internet through the LAN. After this interface is a group of computers that give you can connect to the Internet, and most of the Internet. B A With the PC turned on, check the lights (B) next to search, find and display Web site information. NOTE: Your PC may be called a network interface adapter, a Network Interface Card, or a NIC ) provides a high-speed, or broadband, connection to users...

PC Basics Guide
Page 50
...See diskette floppy drive, 19 free hard disk drive space viewing amount, 39 H hard disk drive fixing errors, 42 scan for errors, 42 hard disk drive cleanup, 40 hard disk drive space, increasing, 39 hibernation mode, 5 automatic, 6 high-speed Internet connection, 32 home Web page, 33 hyperlink, defined, 33 I indicators, keyboard, 12 Internet about , 4 standby mode, automatic, 6 standby mode, manual, 4 turning off, 4 performance improving PC, 39 pointer speed, adjusting, 9 power management settings, modifying, 6 printer using , 7 wireless, 7 multi-channel speakers, 14 Mute button, 12 N Net. See...
...See diskette floppy drive, 19 free hard disk drive space viewing amount, 39 H hard disk drive fixing errors, 42 scan for errors, 42 hard disk drive cleanup, 40 hard disk drive space, increasing, 39 hibernation mode, 5 automatic, 6 high-speed Internet connection, 32 home Web page, 33 hyperlink, defined, 33 I indicators, keyboard, 12 Internet about , 4 standby mode, automatic, 6 standby mode, manual, 4 turning off, 4 performance improving PC, 39 pointer speed, adjusting, 9 power management settings, modifying, 6 printer using , 7 wireless, 7 multi-channel speakers, 14 Mute button, 12 N Net. See...


