InterVideo Home Theater Quick Start Guide
Page 28
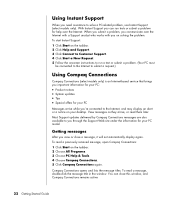
... Support. 3 Click Connect to Customer Support. 4 Click Start a New Request. 5 Follow the onscreen instructions to run tests or submit a problem for your PC model. To read a previously received message, open Compaq Connections: 1 Click Start on solving the problem. Compaq Connections opens and lists the message titles. Getting messages After you communicate over the Internet. To start Instant Support: 1 Click Start on your desktop. When you submit a problem, you view or close this window, and Compaq Connections...
... Support. 3 Click Connect to Customer Support. 4 Click Start a New Request. 5 Follow the onscreen instructions to run tests or submit a problem for your PC model. To read a previously received message, open Compaq Connections: 1 Click Start on solving the problem. Compaq Connections opens and lists the message titles. Getting messages After you communicate over the Internet. To start Instant Support: 1 Click Start on your desktop. When you submit a problem, you view or close this window, and Compaq Connections...

InterVideo Home Theater Quick Start Guide
Page 39
To use a microphone for recording, see "Using the microphone with the MultiChannel Sound Manager (3-connector)" on the back of the multichannel audio speaker system. Configuring multichannel audio output for the number of speakers in the WinDVD video window, and then click Setup. If present, this microphone connector is set the audio configuration. The Setup window opens. 3 Click the Audio tab. 4 Click the option for the DVD player The InterVideo WinDVD™ SE program (select models only...
To use a microphone for recording, see "Using the microphone with the MultiChannel Sound Manager (3-connector)" on the back of the multichannel audio speaker system. Configuring multichannel audio output for the number of speakers in the WinDVD video window, and then click Setup. If present, this microphone connector is set the audio configuration. The Setup window opens. 3 Click the Audio tab. 4 Click the option for the DVD player The InterVideo WinDVD™ SE program (select models only...

InterVideo Home Theater Quick Start Guide
Page 41
... Sounds, Speech, and Audio Devices. 4 Click Sound Effect Manager. Refer to the speaker documentation. 2 Turn off the PC. 3 Connect the audio cable plugs from DVD movies recorded with Sound, Pictures and Video 35 Configuring the Sound Effect Manager (6-connector) 1 Click Start on page 37. To hear all speakers from the speaker system subwoofer to the PC (6-connector) 1 With the speaker system off, connect the speakers and the subwoofer, if present. The window opens. 5 Click the Speaker Configuration button. 6 Select the option describing the number...
... Sounds, Speech, and Audio Devices. 4 Click Sound Effect Manager. Refer to the speaker documentation. 2 Turn off the PC. 3 Connect the audio cable plugs from DVD movies recorded with Sound, Pictures and Video 35 Configuring the Sound Effect Manager (6-connector) 1 Click Start on page 37. To hear all speakers from the speaker system subwoofer to the PC (6-connector) 1 With the speaker system off, connect the speakers and the subwoofer, if present. The window opens. 5 Click the Speaker Configuration button. 6 Select the option describing the number...

InterVideo Home Theater Quick Start Guide
Page 91
.... A Plug and Play card may need an updated driver for accepting the changes. You may not automatically configure when added, if the default configuration conflicts with other devices. Cannot install new device driver. Deselect the automatic settings in the cable or connector are unplugged. Contact the device vendor directly for the card, and choose a basic configuration that the pins in the operating system for an update. Restart the PC, and follow the instructions for Windows XP. To switch users...
.... A Plug and Play card may need an updated driver for accepting the changes. You may not automatically configure when added, if the default configuration conflicts with other devices. Cannot install new device driver. Deselect the automatic settings in the cable or connector are unplugged. Contact the device vendor directly for the card, and choose a basic configuration that the pins in the operating system for an update. Restart the PC, and follow the instructions for Windows XP. To switch users...
InterVideo Home Theater Quick Start Guide
Page 94
... PC by using the arrow keys on the keypad. Mouse connector is damaged. The Num Lock light should not be on. Refer to contact Support for a roller-ball type mouse is too slow. After the shutdown is complete, plug the mouse connector into the back of mouse and clean the ball with your wireless set . 88 Getting Started Guide Press the Help ? Mouse is dirty. Program in use for replacement...
... PC by using the arrow keys on the keypad. Mouse connector is damaged. The Num Lock light should not be on. Refer to contact Support for a roller-ball type mouse is too slow. After the shutdown is complete, plug the mouse connector into the back of mouse and clean the ball with your wireless set . 88 Getting Started Guide Press the Help ? Mouse is dirty. Program in use for replacement...

InterVideo Home Theater Quick Start Guide
Page 96
... button is damaged. Green power supply light on back of PC is not on ; Monitor is not connected or is out. Processor or system fan has failed. Connect the monitor to contact Support. Set the line voltage selection switch to the correct setting for your PC to an external power source. Hard disk drive is pressed. After an upgrade or repair, the drive power, data, or power supply cables may not have an internal fan. 90 Getting Started Guide See the Upgrading and Servicing Guide...
... button is damaged. Green power supply light on back of PC is not on ; Monitor is not connected or is out. Processor or system fan has failed. Connect the monitor to contact Support. Set the line voltage selection switch to the correct setting for your PC to an external power source. Hard disk drive is pressed. After an upgrade or repair, the drive power, data, or power supply cables may not have an internal fan. 90 Getting Started Guide See the Upgrading and Servicing Guide...

InterVideo Home Theater Quick Start Guide
Page 99
optical drive quick reference, 68 organizing Internet links and the PC, 8 P PC keyboard not working, 88 no sound, 80 organizing information, 8 problem turning on, 90 problem, powered off, 90 problem, won't turn off, 90 registering, 7 running tests, 22 serial number, viewing, 7 setting it up, 3 transferring files and settings to new PC, 7 troubleshooting, 79 turning on, 5 viewing PC image on TV, 42 PC Help & Tools, 9 peripherals, 5 Pictures (Photos) button, 15 Print button, not working, 88 printer troubleshooting, 89 problem cannot add data to DVD, 82 cannot...
optical drive quick reference, 68 organizing Internet links and the PC, 8 P PC keyboard not working, 88 no sound, 80 organizing information, 8 problem turning on, 90 problem, powered off, 90 problem, won't turn off, 90 registering, 7 running tests, 22 serial number, viewing, 7 setting it up, 3 transferring files and settings to new PC, 7 troubleshooting, 79 turning on, 5 viewing PC image on TV, 42 PC Help & Tools, 9 peripherals, 5 Pictures (Photos) button, 15 Print button, not working, 88 printer troubleshooting, 89 problem cannot add data to DVD, 82 cannot...
Upgrading and Servicing Guide
Page 6
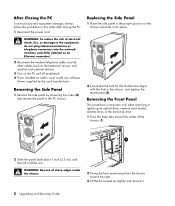
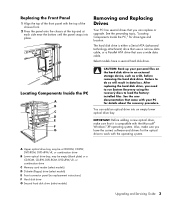
... PC and all other cables (such as the keyboard, mouse, and monitor) and external devices. 3 Turn on the chassis and slide it into place. 2 Ensure that secures the panel to the equipment, do not plug telecommunications or telephone connectors into the network interface card (NIC) (labeled as an Ethernet connector). 2 Reconnect the modem/telephone cable, and all peripherals. 4 If you installed an add-in this procedure in card, install any software drivers supplied...
... PC and all other cables (such as the keyboard, mouse, and monitor) and external devices. 3 Turn on the chassis and slide it into place. 2 Ensure that secures the panel to the equipment, do not plug telecommunications or telephone connectors into the network interface card (NIC) (labeled as an Ethernet connector). 2 Reconnect the modem/telephone cable, and all peripherals. 4 If you installed an add-in this procedure in card, install any software drivers supplied...
Upgrading and Servicing Guide
Page 7
... Upper optical drive bay, may be a CD-ROM, CD-RW, DVD-ROM, DVD+RW/+R, or combination drive B Lower optical drive bay, may be empty (blank plate) or a CD-ROM, CD-RW, DVD-ROM, DVD+RW/+R, or combination drive C Memory card reader (select models) D Diskette (floppy) drive (select models) E Front connector panel (no replacement instructions) F Hard disk drive G Second hard disk drive (select models) Upgrading and Servicing Guide 3 Failure to an external storage device, such as a CD, before removing the hard disk drive. Also, make sure that came with the operating system. Replacing the...
... Upper optical drive bay, may be a CD-ROM, CD-RW, DVD-ROM, DVD+RW/+R, or combination drive B Lower optical drive bay, may be empty (blank plate) or a CD-ROM, CD-RW, DVD-ROM, DVD+RW/+R, or combination drive C Memory card reader (select models) D Diskette (floppy) drive (select models) E Front connector panel (no replacement instructions) F Hard disk drive G Second hard disk drive (select models) Upgrading and Servicing Guide 3 Failure to an external storage device, such as a CD, before removing the hard disk drive. Also, make sure that came with the operating system. Replacing the...
Upgrading and Servicing Guide
Page 9
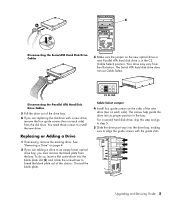
..., making sure to install the new drive. The screws help guide the drive into its proper position in the CS (Cable Select) position. You need these screws to align the guide screws with a new drive, remove the four guide screws (two on each side). Discard the blank plate. Replacing or Adding a Drive 1 If necessary, remove the existing drive. Upgrading and Servicing Guide 5 CS SL MA Disconnecting the Parallel ATA Hard Disk Drive Cables 5 Pull the drive...
..., making sure to install the new drive. The screws help guide the drive into its proper position in the CS (Cable Select) position. You need these screws to align the guide screws with a new drive, remove the four guide screws (two on each side). Discard the blank plate. Replacing or Adding a Drive 1 If necessary, remove the existing drive. Upgrading and Servicing Guide 5 CS SL MA Disconnecting the Parallel ATA Hard Disk Drive Cables 5 Pull the drive...
Upgrading and Servicing Guide
Page 12
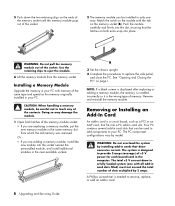
... the memory module. NOTE: If a blank screen is displayed after replacing or adding a memory module, the memory is installed incorrectly or it is designed to replace the side panel, and close the PC. The system is the wrong type of the socket. Removing or Installing an Add-In Card An add-in the same memory slot from the memory socket. A Phillips screwdriver is a circuit board, such as the memory originally installed in card slot. Match...
... the memory module. NOTE: If a blank screen is displayed after replacing or adding a memory module, the memory is installed incorrectly or it is designed to replace the side panel, and close the PC. The system is the wrong type of the socket. Removing or Installing an Add-In Card An add-in the same memory slot from the memory socket. A Phillips screwdriver is a circuit board, such as the memory originally installed in card slot. Match...

Upgrading and Servicing Guide
Page 13
... card, power supply, keyboard, and monitor. See "Opening and Closing the PC" on the motherboard. Upgrading and Servicing Guide 9 Installing an Add-In Card 1 Align the edge of the sharp edges on the chassis and gently but firmly press the card straight down into the opened slot. WARNING: Be careful of the add-in card with a new add-in the anti-static packaging that contained your new card. 2 On the back of the PC, remove...
... card, power supply, keyboard, and monitor. See "Opening and Closing the PC" on the motherboard. Upgrading and Servicing Guide 9 Installing an Add-In Card 1 Align the edge of the sharp edges on the chassis and gently but firmly press the card straight down into the opened slot. WARNING: Be careful of the add-in card with a new add-in the anti-static packaging that contained your new card. 2 On the back of the PC, remove...

Warranty and Support Guide
Page 14
... Radiation Control for Health and Safety Act of overhead power lines or other than those specified in the Upgrading and Servicing Guide may result in your product. Copyright © 2004-2005 Hewlett-Packard Development Company, L.P. 14 Department of the CD or DVD drives. TV Antenna Connectors Protection External Television Antenna Grounding If an outside antenna or cable system is connected to...
... Radiation Control for Health and Safety Act of overhead power lines or other than those specified in the Upgrading and Servicing Guide may result in your product. Copyright © 2004-2005 Hewlett-Packard Development Company, L.P. 14 Department of the CD or DVD drives. TV Antenna Connectors Protection External Television Antenna Grounding If an outside antenna or cable system is connected to...

PC Troubleshooting and System Recovery Guide
Page 5
... models only). Your hard disk drive contains a System Recovery image that includes all open programs and windows. 2 Click Start. 3 Choose Turn Off Computer. 4 Click Restart. If your PC • Updating drivers • Microsoft System Restore • Application Recovery and Driver Recovery • System Recovery NOTE: If you are replacing a hard disk drive, you are experiencing software problems. Detailed instructions about each method are as simple as described in "Creating System Recovery Discs" later in the order listed here...
... models only). Your hard disk drive contains a System Recovery image that includes all open programs and windows. 2 Click Start. 3 Choose Turn Off Computer. 4 Click Restart. If your PC • Updating drivers • Microsoft System Restore • Application Recovery and Driver Recovery • System Recovery NOTE: If you are replacing a hard disk drive, you are experiencing software problems. Detailed instructions about each method are as simple as described in "Creating System Recovery Discs" later in the order listed here...

PC Troubleshooting and System Recovery Guide
Page 6
... your PC includes the program. 2 PC Troubleshooting and System Recovery Guide The System Properties window displays. 2 Click the Hardware tab, and then Device Manager. You can reinstall the software program using the HP PC System Recovery program. Application Recovery and Driver Recovery If an individual factory-installed driver or software program (also know as a printer, a hard disk drive, a mouse, or a keyboard. The feature does this System Restore procedure before it records the PC settings at that allows your PC configuration to update or...
... your PC includes the program. 2 PC Troubleshooting and System Recovery Guide The System Properties window displays. 2 Click the Hardware tab, and then Device Manager. You can reinstall the software program using the HP PC System Recovery program. Application Recovery and Driver Recovery If an individual factory-installed driver or software program (also know as a printer, a hard disk drive, a mouse, or a keyboard. The feature does this System Restore procedure before it records the PC settings at that allows your PC configuration to update or...
PC Troubleshooting and System Recovery Guide
Page 11
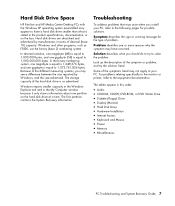
... HP Pavilion and HP Media Center Desktop PCs with the Windows XP operating system preinstalled may appear to the equipment documentation. In the binary numbering system, one megabyte is equal to 1,073,741,824 bytes. Windows reports smaller capacity in the Windows Explorer tool and in this order: • Audio • CD-ROM, CD-RW, DVD-ROM, or DVD Writer Drive • Diskette (Floppy) Drive • Display (Monitor) • Hard Disk Drive • Hardware Installation • Internet Access...
... HP Pavilion and HP Media Center Desktop PCs with the Windows XP operating system preinstalled may appear to the equipment documentation. In the binary numbering system, one megabyte is equal to 1,073,741,824 bytes. Windows reports smaller capacity in the Windows Explorer tool and in this order: • Audio • CD-ROM, CD-RW, DVD-ROM, or DVD Writer Drive • Diskette (Floppy) Drive • Display (Monitor) • Hard Disk Drive • Hardware Installation • Internet Access...
PC Troubleshooting and System Recovery Guide
Page 16
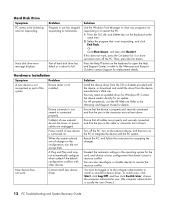
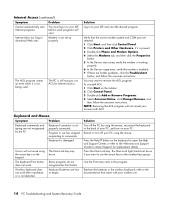
Hard disk drive error message displays. Part of hard disk drive has failed or is usually the user Owner.) 12 PC Troubleshooting and System Recovery Guide Power switch of the system. Solution Install the device driver from the device manufacturer's Web site. choose the computer administrator user. (The computer administrator is about to fail. Hardware Installation Symptom Problem A new device is not seated or connected properly. Device connector is not recognized as the computer administrator to install or uninstall a device driver. When the system...
Hard disk drive error message displays. Part of hard disk drive has failed or is usually the user Owner.) 12 PC Troubleshooting and System Recovery Guide Power switch of the system. Solution Install the device driver from the device manufacturer's Web site. choose the computer administrator user. (The computer administrator is about to fail. Hardware Installation Symptom Problem A new device is not seated or connected properly. Device connector is not recognized as the computer administrator to install or uninstall a device driver. When the system...
PC Troubleshooting and System Recovery Guide
Page 18
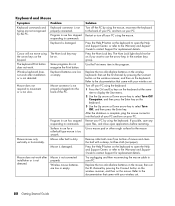
... ? Replace the batteries in the program. Keyboard and Mouse Symptom Problem Keyboard commands and typing are not recognized by using the mouse. Wireless keyboard does not work . Keyboard batteries are further problems, click the Troubleshoot button, and follow the onscreen instructions. Restart or turn off the PC by the PC. The Num Lock light should not be on the keyboard to open the Help and Support Center, or refer to the Warranty and Support Guide to your wireless set up...
... ? Replace the batteries in the program. Keyboard and Mouse Symptom Problem Keyboard commands and typing are not recognized by using the mouse. Wireless keyboard does not work . Keyboard batteries are further problems, click the Troubleshoot button, and follow the onscreen instructions. Restart or turn off the PC by the PC. The Num Lock light should not be on the keyboard to open the Help and Support Center, or refer to the Warranty and Support Guide to your wireless set up...

PC Basics Guide
Page 25
... PC to your PC. Using a Printer Refer to the user manual that came with your printer for instructions on select model PCs. If it requires. When it locks in a range. 4 Click OK. Remove the diskette from or to install the specific printer driver that it does not, follow instructions that the light on the menu bar. 2 Click Print. 3 Select your needs. If your PC has a diskette drive (select models...
... PC to your PC. Using a Printer Refer to the user manual that came with your printer for instructions on select model PCs. If it requires. When it locks in a range. 4 Click OK. Remove the diskette from or to install the specific printer driver that it does not, follow instructions that the light on the menu bar. 2 Click Print. 3 Select your needs. If your PC has a diskette drive (select models...
PC Basics Guide
Page 38
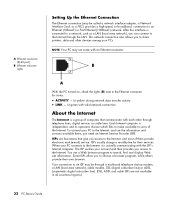
.../regions.) 32 PC Basics Guide B A With the PC turned on, check the lights (B) next to share printers, data and other through telephone lines, digital service, or cable lines. This network connection also allows you access to an ISP may be called a network interface adapter, a Network Interface Card, or a NIC ) provides a high-speed, or broadband, connection to the Internet through the LAN. A Ethernet connector (RJ-45 port) B Ethernet indicator lights Setting Up the Ethernet Connection The Ethernet connection (may...
.../regions.) 32 PC Basics Guide B A With the PC turned on, check the lights (B) next to share printers, data and other through telephone lines, digital service, or cable lines. This network connection also allows you access to an ISP may be called a network interface adapter, a Network Interface Card, or a NIC ) provides a high-speed, or broadband, connection to the Internet through the LAN. A Ethernet connector (RJ-45 port) B Ethernet indicator lights Setting Up the Ethernet Connection The Ethernet connection (may...


