Quick Setup Guide
Page 7
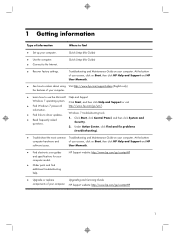
... fix problems (troubleshooting). ● Troubleshoot the most common Troubleshooting and Maintenance Guide on your computer. Quick Setup (this Guide) ● Recover factory settings. Quick Setup (this Guide) ● Use the computer. ● Connect to the Internet. At the bottom of your screen, click on Start, then click HP Help and Support and HP User Manuals. ● See how-to find additional troubleshooting help. User Manuals. ● Find electronic user guides and specifications for your computer model. ● Order parts and...
... fix problems (troubleshooting). ● Troubleshoot the most common Troubleshooting and Maintenance Guide on your computer. Quick Setup (this Guide) ● Recover factory settings. Quick Setup (this Guide) ● Use the computer. ● Connect to the Internet. At the bottom of your screen, click on Start, then click HP Help and Support and HP User Manuals. ● See how-to find additional troubleshooting help. User Manuals. ● Find electronic user guides and specifications for your computer model. ● Order parts and...
Quick Setup Guide
Page 8
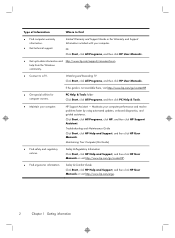
... computer performance and resolve problems faster by using automated updates, on-board diagnostics, and guided assistance. If the guide is not available there, visit http://www.hp.com/go /contactHP. ● Find ergonomic information. Troubleshooting and Maintenance Guide Click Start, click HP Help and Support, and then click HP User Manuals. Safety & Comfort Guide Click Start, click HP Help and Support, and then click HP User Manuals or visit http://www.hp.com/ergo. 2 Chapter...
... computer performance and resolve problems faster by using automated updates, on-board diagnostics, and guided assistance. If the guide is not available there, visit http://www.hp.com/go /contactHP. ● Find ergonomic information. Troubleshooting and Maintenance Guide Click Start, click HP Help and Support, and then click HP User Manuals. Safety & Comfort Guide Click Start, click HP Help and Support, and then click HP User Manuals or visit http://www.hp.com/ergo. 2 Chapter...
Quick Setup Guide
Page 9
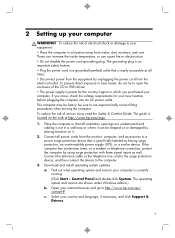
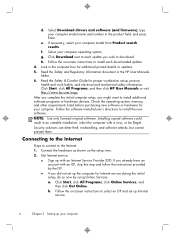
.... The grounding plug is specifically labeled as well. be sure to http://www.hp.com/go to use ergonomically correct lifting procedures when moving the computer. c. The computer may be stepped on the web at all power cords from the electrical outlet. a. 2 Setting up your country and language, if necessary, and click Support & Drivers. 3 Download and install operating system updates. Select your...
.... The grounding plug is specifically labeled as well. be sure to http://www.hp.com/go to use ergonomically correct lifting procedures when moving the computer. c. The computer may be stepped on the web at all power cords from the electrical outlet. a. 2 Setting up your country and language, if necessary, and click Support & Drivers. 3 Download and install operating system updates. Select your...
Quick Setup Guide
Page 10
... press Enter. Connect the hardware as shown on -screen instructions to install the new software. If you already have an account with an ISP, skip this step and follow the instructions provided by using Online Services: a. f. h. Click Start, click All Programs, and then click HP User Manuals or visit http://www.hp.com/ergo. e. Check the operating system, memory, and other requirements listed before purchasing new software or hardware for proper workstation setup...
... press Enter. Connect the hardware as shown on -screen instructions to install the new software. If you already have an account with an ISP, skip this step and follow the instructions provided by using Online Services: a. f. h. Click Start, click All Programs, and then click HP User Manuals or visit http://www.hp.com/ergo. e. Check the operating system, memory, and other requirements listed before purchasing new software or hardware for proper workstation setup...
Quick Setup Guide
Page 12
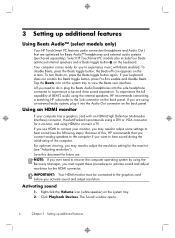
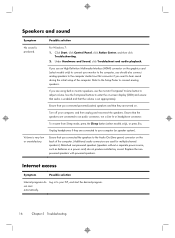
... sound during the initial setup of BEATS audio using the internal speakers, HP recommends connecting a matching HP subwoofer to the Sub connector on the back panel. If you use . For optimum viewing, you may need to recover the computer operating system by using the Recovery Manager, you must be connected to the graphics card before you to experience music with an HDMI (High Definition Multimedia Interface) connector, Hewlett-Packard recommends using a DVI or VGA connector...
... sound during the initial setup of BEATS audio using the internal speakers, HP recommends connecting a matching HP subwoofer to the Sub connector on the back panel. If you use . For optimum viewing, you may need to recover the computer operating system by using the Recovery Manager, you must be connected to the graphics card before you to experience music with an HDMI (High Definition Multimedia Interface) connector, Hewlett-Packard recommends using a DVI or VGA connector...
Quick Setup Guide
Page 13
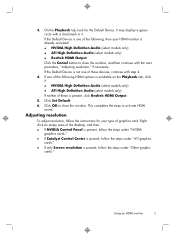
... , then your type of the desktop, and then: ● If NVIDIA Control Panel is present, follow the steps under "NVIDIA graphics cards." ● If Catalyst Control Center is present, click Realtek HDMI Output. 5. Click OK to close the window, and then continue with a checkmark in it : ● NVIDIA High Definition Audio (select models only) ● ATI High Definition Audio (select models only) If neither...
... , then your type of the desktop, and then: ● If NVIDIA Control Panel is present, follow the steps under "NVIDIA graphics cards." ● If Catalyst Control Center is present, click Realtek HDMI Output. 5. Click OK to close the window, and then continue with a checkmark in it : ● NVIDIA High Definition Audio (select models only) ● ATI High Definition Audio (select models only) If neither...
Quick Setup Guide
Page 14
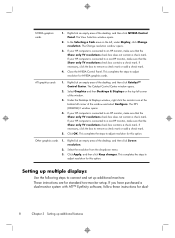
NVIDIA graphics cards 1. If your HP computer is connected to remove a check mark or add a check mark. 4. If necessary, click the box to an HP monitor, make sure that the Show only TV resolutions check box does not contain a check mark. Close the NVIDIA Control Panel. The Catalyst Control Center window opens. 2. Under the Desktops & Displays window, right click the monitor icon at the bottom left corner of the desktop, and...
NVIDIA graphics cards 1. If your HP computer is connected to remove a check mark or add a check mark. 4. If necessary, click the box to an HP monitor, make sure that the Show only TV resolutions check box does not contain a check mark. Close the NVIDIA Control Panel. The Catalyst Control Center window opens. 2. Under the Desktops & Displays window, right click the monitor icon at the bottom left corner of the desktop, and...
Quick Setup Guide
Page 15
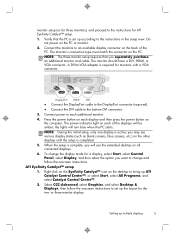
... Catalyst Control Center™. 2. you will turn blue when the PC starts. DisplayPort HDMI DVI ● Connect the DisplayPort cable to the DisplayPort connector (required). ● Connect the DVI cable to change the display mode for a display, select Start, select Control Panel, select Display, and then select the option you separately purchase an additional monitor and cable. When the setup is completed. 5. or three-monitor display. Do not power on the PC. Press the power button on...
... Catalyst Control Center™. 2. you will turn blue when the PC starts. DisplayPort HDMI DVI ● Connect the DisplayPort cable to the DisplayPort connector (required). ● Connect the DVI cable to change the display mode for a display, select Start, select Control Panel, select Display, and then select the option you separately purchase an additional monitor and cable. When the setup is completed. 5. or three-monitor display. Do not power on the PC. Press the power button on...
Quick Setup Guide
Page 16
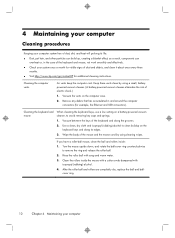
... every three months. ● Visit http://www.hp.com/go/contactHP for example, the Ethernet and USB connectors). Clean the rollers inside : 1. Keep these vents clean by using a small, batterypowered vacuum cleaner. (A battery-powered vacuum cleaner eliminates the risk of electric shock.) 1. Cleaning the keyboard and mouse When cleaning the keyboard keys, use a low setting on the keyboard keys and along the grooves. 2. If you have...
... every three months. ● Visit http://www.hp.com/go/contactHP for example, the Ethernet and USB connectors). Clean the rollers inside : 1. Keep these vents clean by using a small, batterypowered vacuum cleaner. (A battery-powered vacuum cleaner eliminates the risk of electric shock.) 1. Cleaning the keyboard and mouse When cleaning the keyboard keys, use a low setting on the keyboard keys and along the grooves. 2. If you have...
Quick Setup Guide
Page 17
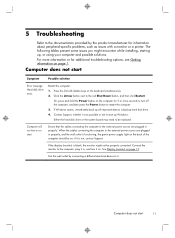
... be on; Contact Support, whether it . When the cables connecting the computer to the external power source are plugged in , and turn on page 1. Click the Arrow button next to be properly connected. Computer does not start Symptom Possible solution Error message: Hard disk drive error. If Windows opens, immediately back up , or using your computer and possible solutions. Restart the computer. 1. See Display (monitor) on the keyboard simultaneously. 2. Computer does...
... be on; Contact Support, whether it . When the cables connecting the computer to the external power source are plugged in , and turn on page 1. Click the Arrow button next to be properly connected. Computer does not start Symptom Possible solution Error message: Hard disk drive error. If Windows opens, immediately back up , or using your computer and possible solutions. Restart the computer. 1. See Display (monitor) on the keyboard simultaneously. 2. Computer does...

Quick Setup Guide
Page 19
...-monitor setup, refer to the computer. Computer shuts ● The computer might not have an internal fan.) Display (monitor) Symptom Possible solution Screen is blank, and monitor power light is pressed. see : Cleaning procedures on page 8, under Setting up multiple displays on page 10. (Your computer might be in an exceedingly hot environment. Reconnect the power plug to the back of the pins are bent, replace...
...-monitor setup, refer to the computer. Computer shuts ● The computer might not have an internal fan.) Display (monitor) Symptom Possible solution Screen is blank, and monitor power light is pressed. see : Cleaning procedures on page 8, under Setting up multiple displays on page 10. (Your computer might be in an exceedingly hot environment. Reconnect the power plug to the back of the pins are bent, replace...

Quick Setup Guide
Page 20
... work or is complete, unplug and reconnect the mouse connector to save changes in all open program. 2. Press Num Lock on the keyboard simultaneously to save your computer: 1. Press the Alt+Tab keys simultaneously to navigate to mouse movement. Use the keyboard to display the Windows Start menu. 5. Press Ctrl+S simultaneously to the back of your computer, and then restart your computer. 14 Chapter 5 Troubleshooting...
... work or is complete, unplug and reconnect the mouse connector to save changes in all open program. 2. Press Num Lock on the keyboard simultaneously to save your computer: 1. Press the Alt+Tab keys simultaneously to navigate to mouse movement. Use the keyboard to display the Windows Start menu. 5. Press Ctrl+S simultaneously to the back of your computer, and then restart your computer. 14 Chapter 5 Troubleshooting...
Quick Setup Guide
Page 21
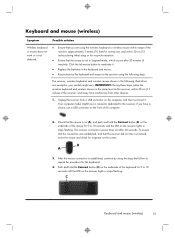
... and hold the Connect button (B) on the underside of the mouse for normal use a USB connector on the receiver lights or stops flashing. Click the left mouse button to the receiver using the following illustrations are using the wireless keyboard or wireless mouse within range of the receiver, and away from interference from a USB connector on the computer, and then reconnect it . ● Replace the batteries in Suspend mode, which occurs...
... and hold the Connect button (B) on the underside of the mouse for normal use a USB connector on the receiver lights or stops flashing. Click the left mouse button to the receiver using the following illustrations are using the wireless keyboard or wireless mouse within range of the receiver, and away from interference from a USB connector on the computer, and then reconnect it . ● Replace the batteries in Suspend mode, which occurs...
Quick Setup Guide
Page 22
... connected the speakers to an audio connector, not a Line In or headphone connector. Unplug headphones if they are using built-in to your ISP, and start automatically. Under Hardware and Sound, click Troubleshoot and audio playback. Refer to the Setup Poster to enter the on the graphics card (select models only) to connect your computer, and then unplug and reconnect the speakers. To resume from Sleep mode, press the Sleep button (select models...
... connected the speakers to an audio connector, not a Line In or headphone connector. Unplug headphones if they are using built-in to your ISP, and start automatically. Under Hardware and Sound, click Troubleshoot and audio playback. Refer to the Setup Poster to enter the on the graphics card (select models only) to connect your computer, and then unplug and reconnect the speakers. To resume from Sleep mode, press the Sleep button (select models...
Quick Setup Guide
Page 23
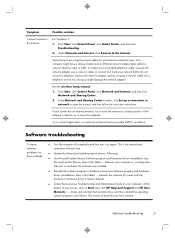
... then turn it came with the product) or hardware driver to a better position. At the bottom of your system has an external antenna, try to move the antenna to factory defaults. ● System Recovery (see Troubleshooting and Maintenance Guide on Start, then click HP Help and Support and HP User Manuals. ) - Click Start, click Control Panel, click Action Center, and then click Troubleshooting. 2. A modem uses a standard telephone cable, whereas the network adapter uses a network cable, to connect to the network adapter...
... then turn it came with the product) or hardware driver to a better position. At the bottom of your system has an external antenna, try to move the antenna to factory defaults. ● System Recovery (see Troubleshooting and Maintenance Guide on Start, then click HP Help and Support and HP User Manuals. ) - Click Start, click Control Panel, click Action Center, and then click Troubleshooting. 2. A modem uses a standard telephone cable, whereas the network adapter uses a network cable, to connect to the network adapter...
Quick Setup Guide
Page 24
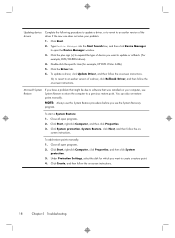
... use this System Restore procedure before you have a problem that was installed on -screen instructions. Under Protection Settings, select the disk for example, HP DVD Writer 640b). 5. Click the Driver tab. 6. Double-click the specific item (for which you want to open the Device Manager window. 3. Close all open programs. 2. Close all open programs. 2. You can also set restore points manually. To start a System Restore: 1. screen instructions. Click Start. 2. Click the plus sign (+) to expand the type...
... use this System Restore procedure before you have a problem that was installed on -screen instructions. Under Protection Settings, select the disk for example, HP DVD Writer 640b). 5. Click the Driver tab. 6. Double-click the specific item (for which you want to open the Device Manager window. 3. Close all open programs. 2. Close all open programs. 2. You can also set restore points manually. To start a System Restore: 1. screen instructions. Click Start. 2. Click the plus sign (+) to expand the type...

Quick Setup Guide
Page 25
... I need help immediately, click Software Program Reinstallation. 3. To reinstall a program using the Recovery Manager program (select models only). and then click Recovery Manager. 2. Under Programs, click Uninstall a program. 4. Select the program you want to be sure that it (for example, discs or the Internet). Check to install, click Next, and follow the on CDs or DVDs included in the list of programs opens. If...
... I need help immediately, click Software Program Reinstallation. 3. To reinstall a program using the Recovery Manager program (select models only). and then click Recovery Manager. 2. Under Programs, click Uninstall a program. 4. Select the program you want to be sure that it (for example, discs or the Internet). Check to install, click Next, and follow the on CDs or DVDs included in the list of programs opens. If...
Quick Setup Guide
Page 26
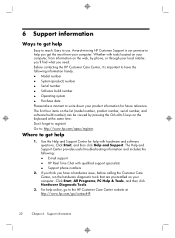
The Help and Support Center provides useful troubleshooting information and includes the following information handy. ● Model number ● System (product) number ● Serial number ● Software build number ● Operating system ● Purchase date Please take a moment to : http://www.hp.com/apac/register. Click Start, and then click Help and Support. For help with hardware and software questions. Award-winning HP Customer Support is our promise to help...
The Help and Support Center provides useful troubleshooting information and includes the following information handy. ● Model number ● System (product) number ● Serial number ● Software build number ● Operating system ● Purchase date Please take a moment to : http://www.hp.com/apac/register. Click Start, and then click Help and Support. For help with hardware and software questions. Award-winning HP Customer Support is our promise to help...
Quick Setup Guide
Page 27
... support for repairs If your computer parts that you have parts replaced, you attempted to upgrade your new computer. Phone assistance to get you up and running is covered for thirty (30) days from the time you . By breaking the security seal on , immediately contact the HP Customer Care Center listed earlier in the Hardware Limited Warranty section of your computer needs to the setup...
... support for repairs If your computer parts that you have parts replaced, you attempted to upgrade your new computer. Phone assistance to get you up and running is covered for thirty (30) days from the time you . By breaking the security seal on , immediately contact the HP Customer Care Center listed earlier in the Hardware Limited Warranty section of your computer needs to the setup...

Quick Setup Guide
Page 28
... a key priority at HP. Screen savers can also reduce the life of your monitor by increasing the number of this computer are committed to using the safest materials in mind. We design to come, we do not disable them. We design our products to use computers in the world. We are set to minimize energy use without power management. The power to make a change Thank...
... a key priority at HP. Screen savers can also reduce the life of your monitor by increasing the number of this computer are committed to using the safest materials in mind. We design to come, we do not disable them. We design our products to use computers in the world. We are set to minimize energy use without power management. The power to make a change Thank...

