HP USB Digital Drive
Page 8
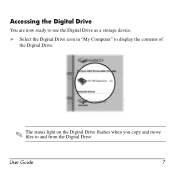
User Guide 7 Accessing the Digital Drive You are now ready to use the Digital Drive as a storage device. » Select the Digital Drive icon in "My Computer" to display the contents of the Digital Drive. ✎ The status light on the Digital Drive flashes when you copy and move files to and from the Digital Drive.
User Guide 7 Accessing the Digital Drive You are now ready to use the Digital Drive as a storage device. » Select the Digital Drive icon in "My Computer" to display the contents of the Digital Drive. ✎ The status light on the Digital Drive flashes when you copy and move files to and from the Digital Drive.

HP USB Digital Drive
Page 9
Gently unplug the Digital Drive from the USB port. ✎ If the USB connector cable is in the extended position, return it on the Digital Drive is flashing. 1. Disconnecting the Digital Drive ✎ Do not attempt to Remove Hardware" message appears on your taskbar. Select the "Safely Remove Hardware" icon on your screen. 3. Select the Digital Drive and wait until the "Safe to remove the Digital Drive when the status light on its track for safe storage. 8 User Guide A dialog box displays a list of connected devices. 2.
Gently unplug the Digital Drive from the USB port. ✎ If the USB connector cable is in the extended position, return it on the Digital Drive is flashing. 1. Disconnecting the Digital Drive ✎ Do not attempt to Remove Hardware" message appears on your taskbar. Select the "Safely Remove Hardware" icon on your screen. 3. Select the Digital Drive and wait until the "Safe to remove the Digital Drive when the status light on its track for safe storage. 8 User Guide A dialog box displays a list of connected devices. 2.
Security - Windows Vista
Page 8
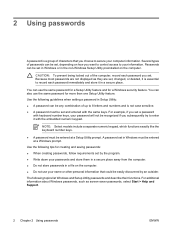
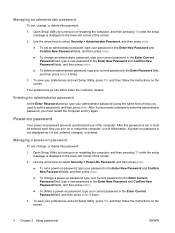
... for a Setup Utility feature and for creating and saving passwords: ● When creating passwords, follow requirements set by an outsider. Because most passwords are not displayed as screen-saver passwords, select Start > Help and Support. 2 Chapter 2 Using passwords ENWW You can be set, depending on how you want to control access...
... for a Setup Utility feature and for creating and saving passwords: ● When creating passwords, follow requirements set by an outsider. Because most passwords are not displayed as screen-saver passwords, select Start > Help and Support. 2 Chapter 2 Using passwords ENWW You can be set, depending on how you want to control access...
Security - Windows Vista
Page 9
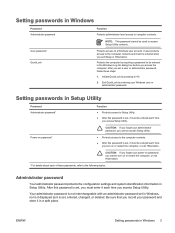
... the configuration settings and system identification information in Windows 3 Your administrator password is not interchangeable with an administrator password set in Windows, nor is it displayed as it must be used to be entered each time you access Setup Utility. Power-on password* CAUTION: If you forget your Windows user or...
... the configuration settings and system identification information in Windows 3 Your administrator password is not interchangeable with an administrator password set in Windows, nor is it displayed as it must be used to be entered each time you access Setup Utility. Power-on password* CAUTION: If you forget your Windows user or...
Security - Windows Vista
Page 10
... go into effect when the computer restarts. A power-on password To set , entered, changed, or deleted. Managing a power-on password is not displayed as it must restart the computer and try again. Open Setup Utility by turning on or restarting the computer, and then pressing f10 while the...use of the screen. 2. Open Setup Utility by turning on or restarting the computer, and then pressing f10 while the setup message is displayed in the lower-left corner of the computer. To save your preferences and exit Setup Utility, press f10, and then follow the instructions...
... go into effect when the computer restarts. A power-on password To set , entered, changed, or deleted. Managing a power-on password is not displayed as it must restart the computer and try again. Open Setup Utility by turning on or restarting the computer, and then pressing f10 while the...use of the screen. 2. Open Setup Utility by turning on or restarting the computer, and then pressing f10 while the setup message is displayed in the lower-left corner of the computer. To save your preferences and exit Setup Utility, press f10, and then follow the instructions...
Security - Windows Vista
Page 17
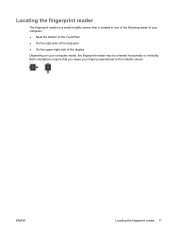
Both orientations require that is located in one of the following areas of your computer: ● Near the bottom of the TouchPad ● On the right side of the keyboard ● On the upper-right side of the display Depending on your finger perpendicular to the metallic sensor. ENWW Locating the fingerprint reader 11 Locating the fingerprint reader The fingerprint reader is a small metallic sensor that you swipe your computer model, the fingerprint reader may be oriented horizontally or vertically.
Both orientations require that is located in one of the following areas of your computer: ● Near the bottom of the TouchPad ● On the right side of the keyboard ● On the upper-right side of the display Depending on your finger perpendicular to the metallic sensor. ENWW Locating the fingerprint reader 11 Locating the fingerprint reader The fingerprint reader is a small metallic sensor that you swipe your computer model, the fingerprint reader may be oriented horizontally or vertically.
Security - Windows Vista
Page 18
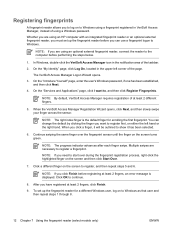
Whether you are using an HP computer with an integrated fingerprint reader or an optional external fingerprint reader, you must set up the fingerprint reader before performing the steps below. 1. NOTE: ... repeat steps 1 through 8. 12 Chapter 7 Using the fingerprint reader (select models only) ENWW Multiple swipes are using a Windows password. NOTE: The right index finger is displayed.
Whether you are using an HP computer with an integrated fingerprint reader or an optional external fingerprint reader, you must set up the fingerprint reader before performing the steps below. 1. NOTE: ... repeat steps 1 through 8. 12 Chapter 7 Using the fingerprint reader (select models only) ENWW Multiple swipes are using a Windows password. NOTE: The right index finger is displayed.

Drives - Windows Vista
Page 10
... not initiate Sleep or Hibernation while reading or writing to resume audio and video playback. 4 Chapter 3 Using an optical drive If Sleep or Hibernation is displayed, click No. ● You may see a warning message asking if you may experience the following behaviors: ● Your playback may be supported by your computer...
... not initiate Sleep or Hibernation while reading or writing to resume audio and video playback. 4 Chapter 3 Using an optical drive If Sleep or Hibernation is displayed, click No. ● You may see a warning message asking if you may experience the following behaviors: ● Your playback may be supported by your computer...
Drives - Windows Vista
Page 15
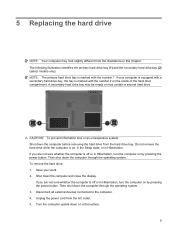
... only). Then shut down the computer before removing the hard drive from the AC outlet. 5. Turn the computer upside down the computer and close the display. NOTE: The primary hard drive bay is marked with the number 1. Shut down on by pressing the power button. 5 Replacing the hard drive NOTE: Your...
... only). Then shut down the computer before removing the hard drive from the AC outlet. 5. Turn the computer upside down the computer and close the display. NOTE: The primary hard drive bay is marked with the number 1. Shut down on by pressing the power button. 5 Replacing the hard drive NOTE: Your...
External Devices - Windows Vista
Page 8
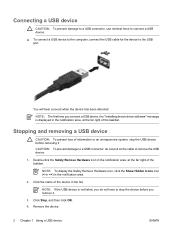
... removing a USB device CAUTION: To prevent loss of the taskbar. NOTE: The first time you connect a USB device, the "Installing device driver software" message is displayed in the notification area, at the far right of information or an unresponsive system, stop the USB device before removing it. Double-click the Safely...
... removing a USB device CAUTION: To prevent loss of the taskbar. NOTE: The first time you connect a USB device, the "Installing device driver software" message is displayed in the notification area, at the far right of information or an unresponsive system, stop the USB device before removing it. Double-click the Safely...
External Devices - Windows Vista
Page 10
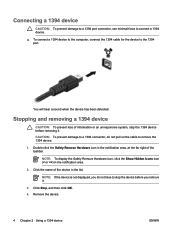
...: To prevent loss of the taskbar. CAUTION: To prevent damage to a 1394 connector, do not pull on the cable to the 1394 port. NOTE: To display the Safely Remove Hardware icon, click the Show Hidden Icons icon (< or Double-click the Safely Remove Hardware icon in the notification area, at the...
...: To prevent loss of the taskbar. CAUTION: To prevent damage to a 1394 connector, do not pull on the cable to the 1394 port. NOTE: To display the Safely Remove Hardware icon, click the Show Hidden Icons icon (< or Double-click the Safely Remove Hardware icon in the notification area, at the...
External Media Cards - Windows Vista
Page 8
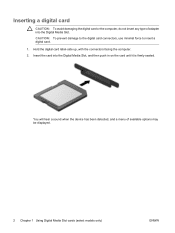
... a digital card. 1. Inserting a digital card CAUTION: To avoid damaging the digital card or the computer, do not insert any type of available options may be displayed. 2 Chapter 1 Using Digital Media Slot cards (select models only) ENWW
... a digital card. 1. Inserting a digital card CAUTION: To avoid damaging the digital card or the computer, do not insert any type of available options may be displayed. 2 Chapter 1 Using Digital Media Slot cards (select models only) ENWW
External Media Cards - Windows Vista
Page 9
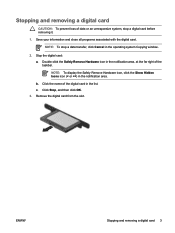
NOTE: To stop a digital card before removing it. 1. Stop the digital card: a. Double-click the Safely Remove Hardware icon in the notification area, at the far right of data or an unresponsive system, stop a data transfer, click Cancel in the operating system Copying window. 2. Stopping and removing a digital card CAUTION: To prevent loss of the taskbar. NOTE: To display the Safely Remove Hardware icon, click the Show Hidden Icons icon (< or Save your information and close all programs associated with the digital card.
NOTE: To stop a digital card before removing it. 1. Stop the digital card: a. Double-click the Safely Remove Hardware icon in the notification area, at the far right of data or an unresponsive system, stop a data transfer, click Cancel in the operating system Copying window. 2. Stopping and removing a digital card CAUTION: To prevent loss of the taskbar. NOTE: To display the Safely Remove Hardware icon, click the Show Hidden Icons icon (< or Save your information and close all programs associated with the digital card.
External Media Cards - Windows Vista
Page 11
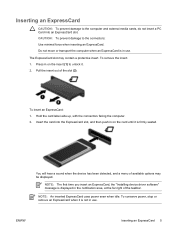
...displayed. Pull the insert out of available options may contain a protective insert. ENWW Inserting an ExpressCard 5 To remove the insert: 1. Press in use . NOTE: An inserted ExpressCard uses power even when idle. CAUTION: To prevent damage to the computer and external media cards, do not insert a PC...To prevent damage to the connectors: Use minimal force when inserting an ExpressCard. Do not move or transport the computer when an ExpressCard is displayed in use . Hold the card label-side up, with the connectors facing the computer. 2. NOTE: The first time you insert an ...
...displayed. Pull the insert out of available options may contain a protective insert. ENWW Inserting an ExpressCard 5 To remove the insert: 1. Press in use . NOTE: An inserted ExpressCard uses power even when idle. CAUTION: To prevent damage to the computer and external media cards, do not insert a PC...To prevent damage to the connectors: Use minimal force when inserting an ExpressCard. Do not move or transport the computer when an ExpressCard is displayed in use . Hold the card label-side up, with the connectors facing the computer. 2. NOTE: The first time you insert an ...
External Media Cards - Windows Vista
Page 12
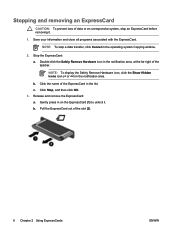
Double-click the Safely Remove Hardware icon in the operating system Copying window. 2. Stopping and removing an ExpressCard CAUTION: To prevent loss of the taskbar. Stop the ExpressCard: a. Save your information and close all programs associated with the ExpressCard. NOTE: To stop a data transfer, click Cancel in the notification area, at the far right of data or an unresponsive system, stop an ExpressCard before removing it. 1. NOTE: To display the Safely Remove Hardware icon, click the Show Hidden Icons icon (< or
Double-click the Safely Remove Hardware icon in the operating system Copying window. 2. Stopping and removing an ExpressCard CAUTION: To prevent loss of the taskbar. Stop the ExpressCard: a. Save your information and close all programs associated with the ExpressCard. NOTE: To stop a data transfer, click Cancel in the notification area, at the far right of data or an unresponsive system, stop an ExpressCard before removing it. 1. NOTE: To display the Safely Remove Hardware icon, click the Show Hidden Icons icon (< or

Memory Modules - Windows Vista
Page 7
...-channel configuration when adding a second memory module, be increased by upgrading the existing memory module in Hibernation, turn the computer on a flat surface. 7. Close the display. 4. Loosen the 2 memory module compartment screws (1). To add or replace a memory module: 1. WARNING! Save your work and close all external devices connected to the computer...
...-channel configuration when adding a second memory module, be increased by upgrading the existing memory module in Hibernation, turn the computer on a flat surface. 7. Close the display. 4. Loosen the 2 memory module compartment screws (1). To add or replace a memory module: 1. WARNING! Save your work and close all external devices connected to the computer...
Modem and Local Area Network - Windows Vista
Page 9
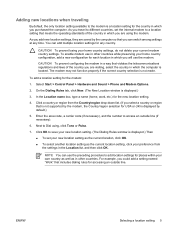
...save your home country configuration, add a new configuration for any time. The modem may not function properly if the correct country selection is displayed.) Then ● To set the internal modem to access an outside line. Click a country or region from the settings in other ... made. Adding new locations when traveling By default, the only location setting available to the modem is displayed by default.) 5. NOTE You can use in which the computer is displayed.) 3. For example, you can add multiple location settings for each location in other countries. In the...
...save your home country configuration, add a new configuration for any time. The modem may not function properly if the correct country selection is displayed.) Then ● To set the internal modem to access an outside line. Click a country or region from the settings in other ... made. Adding new locations when traveling By default, the only location setting available to the modem is displayed by default.) 5. NOTE You can use in which the computer is displayed.) 3. For example, you can add multiple location settings for each location in other countries. In the...
Modem and Local Area Network - Windows Vista
Page 10
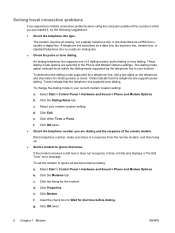
... dial tones. c. Click Properties. Click Modem. g. To determine the dialing mode supported by the telephone line in which you purchased it does not dial and displays a "No Dial Tone" error message. c. Select your current modem location setting: a. Click Edit. If the modem receives a dial tone it does not recognize, it , try...
... dial tones. c. Click Properties. Click Modem. g. To determine the dialing mode supported by the telephone line in which you purchased it does not dial and displays a "No Dial Tone" error message. c. Select your current modem location setting: a. Click Edit. If the modem receives a dial tone it does not recognize, it , try...
Modem and Local Area Network - Windows Vista
Page 11
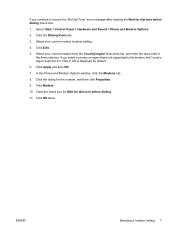
... for dial tone before dialing. 11. Select Start > Control Panel > Hardware and Sound > Phone and Modem Options. 2. If you select a country or region that is displayed by the modem, the Country/ region selection for the modem, and then click Properties. 9. Select your current location from the Country/region drop-down list...
... for dial tone before dialing. 11. Select Start > Control Panel > Hardware and Sound > Phone and Modem Options. 2. If you select a country or region that is displayed by the modem, the Country/ region selection for the modem, and then click Properties. 9. Select your current location from the Country/region drop-down list...
Setup Utility - Windows Vista and XP
Page 3
Table of contents 1 Starting the Setup Utility 2 Using the Setup Utility Changing the language of the Setup Utility 2 Navigating and selecting in the Setup Utility 2 Displaying system information ...3 Restoring default settings in the Setup Utility 3 Using advanced Setup Utility features 4 Closing the Setup Utility ...4 3 Setup Utility menus Main menu ...5 Security menu ...5 System Configuration menu ...6 Diagnostics menu ...6 Index ...7 ENWW iii
Table of contents 1 Starting the Setup Utility 2 Using the Setup Utility Changing the language of the Setup Utility 2 Navigating and selecting in the Setup Utility 2 Displaying system information ...3 Restoring default settings in the Setup Utility 3 Using advanced Setup Utility features 4 Closing the Setup Utility ...4 3 Setup Utility menus Main menu ...5 Security menu ...5 System Configuration menu ...6 Diagnostics menu ...6 Index ...7 ENWW iii


