HP USB Digital Drive
Page 5
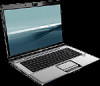
If the status light does not turn on when the connection is successful. The status light on the Digital Drive turns on , remove the Digital Drive from the USB port, then reinsert the USB connector. 4 User Guide To connect the Digital Drive to a USB port directly (with the connector cable in the unextended position): » Insert the USB connector on the Digital Drive into a USB port on your computer.
If the status light does not turn on when the connection is successful. The status light on the Digital Drive turns on , remove the Digital Drive from the USB port, then reinsert the USB connector. 4 User Guide To connect the Digital Drive to a USB port directly (with the connector cable in the unextended position): » Insert the USB connector on the Digital Drive into a USB port on your computer.
HP USB Digital Drive
Page 7
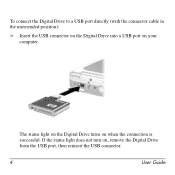
If the status light does not turn on when the connection is successful. The status light on the Digital Drive turns on , remove the Digital Drive from the USB port, then reinsert the USB connector. 6 User Guide Insert the USB connector on the Digital Drive into a USB port on your computer. 2.
If the status light does not turn on when the connection is successful. The status light on the Digital Drive turns on , remove the Digital Drive from the USB port, then reinsert the USB connector. 6 User Guide Insert the USB connector on the Digital Drive into a USB port on your computer. 2.
Security - Windows Vista
Page 9
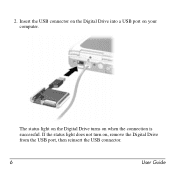
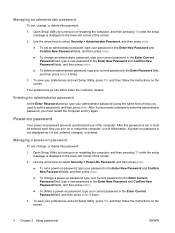
...is set a user or administrator password, follow these passwords, refer to the following topics. Initiate QuickLock by entering your power-on password, you turn on or restart the computer, or exit Hibernation. Exit QuickLock by pressing fn+f6. 2. CAUTION: If you access the computer. ENWW Setting ...password is set, it is not interchangeable with an administrator password set , it must be used to be entered each time you cannot turn on or restart the computer, or exit Hibernation. *For details about each time you exit Sleep or Hibernation. Be sure that you record...
...is set a user or administrator password, follow these passwords, refer to the following topics. Initiate QuickLock by entering your power-on password, you turn on or restart the computer, or exit Hibernation. Exit QuickLock by pressing fn+f6. 2. CAUTION: If you access the computer. ENWW Setting ...password is set, it is not interchangeable with an administrator password set , it must be used to be entered each time you cannot turn on or restart the computer, or exit Hibernation. *For details about each time you exit Sleep or Hibernation. Be sure that you record...
Security - Windows Vista
Page 10
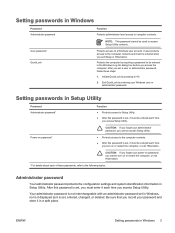
... Setup Utility, press f10, and then follow the instructions on password prevents unauthorized use of keys you must be entered each time you turn on password To set, change an administrator password, type your current password in the Enter Current Password field, type a new password in...your administrator password (using the same kind of the computer. Open Setup Utility by turning on password is not displayed as it must restart the computer and try again. Open Setup Utility by turning on the screen. Your preferences go into effect when the computer restarts. Entering an...
... Setup Utility, press f10, and then follow the instructions on password prevents unauthorized use of keys you must be entered each time you turn on password To set, change an administrator password, type your current password in the Enter Current Password field, type a new password in...your administrator password (using the same kind of the computer. Open Setup Utility by turning on password is not displayed as it must restart the computer and try again. Open Setup Utility by turning on the screen. Your preferences go into effect when the computer restarts. Entering an...
Security - Windows Vista
Page 18
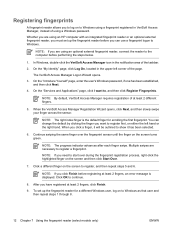
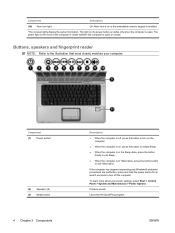
Whether you are using an HP computer with an integrated fingerprint reader or an optional external fingerprint reader, you must set up the fingerprint reader before performing the steps below. 1. NOTE: ... finger you want to, and then click Register Fingerprints. NOTE: If you need to start over the fingerprint sensor until the finger on the screen turns green. Click OK to Windows as that user and then repeat steps 1 through 8. 12 Chapter 7 Using the fingerprint reader (select models only) ENWW Registering fingerprints...
Whether you are using an HP computer with an integrated fingerprint reader or an optional external fingerprint reader, you must set up the fingerprint reader before performing the steps below. 1. NOTE: ... finger you want to, and then click Register Fingerprints. NOTE: If you need to start over the fingerprint sensor until the finger on the screen turns green. Click OK to Windows as that user and then repeat steps 1 through 8. 12 Chapter 7 Using the fingerprint reader (select models only) ENWW Registering fingerprints...
Drives - Windows Vista
Page 8
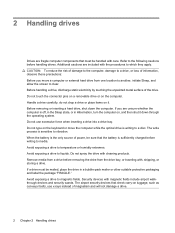
... sufficiently charged before writing to temperature or humidity extremes. 2 Handling drives Drives are fragile computer components that must be mailed, place the drive in Hibernation, turn the computer on, and then shut it . Refer to vibration. Avoid exposing a drive to magnetic fields. Handle a drive carefully; The airport security devices that check...
... sufficiently charged before writing to temperature or humidity extremes. 2 Handling drives Drives are fragile computer components that must be mailed, place the drive in Hibernation, turn the computer on, and then shut it . Refer to vibration. Avoid exposing a drive to magnetic fields. Handle a drive carefully; The airport security devices that check...

Drives - Windows Vista
Page 11
... a disc, a short pause is not fully accessible, tilt the disc carefully to position it over the tray spindle. Press the release button (1) on the computer. 2. Turn on the drive bezel to select how you have not selected a media player, an AutoPlay dialog box opens. Inserting an optical disc 1.
... a disc, a short pause is not fully accessible, tilt the disc carefully to position it over the tray spindle. Press the release button (1) on the computer. 2. Turn on the drive bezel to select how you have not selected a media player, an AutoPlay dialog box opens. Inserting an optical disc 1.
Drives - Windows Vista
Page 15
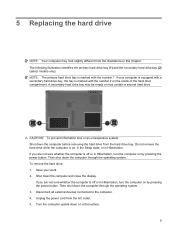
... a flat surface. 9 Shut down on by pressing the power button. If you are not sure whether the computer is marked with the number 1. Turn the computer upside down the computer and close the display. Save your computer is equipped with a secondary hard drive bay, the bay is off or... in Hibernation, turn the computer on by pressing the power button. A secondary hard drive bay may be empty or may look slightly different from the illustrations in ...
... a flat surface. 9 Shut down on by pressing the power button. If you are not sure whether the computer is marked with the number 1. Turn the computer upside down the computer and close the display. Save your computer is equipped with a secondary hard drive bay, the bay is off or... in Hibernation, turn the computer on by pressing the power button. A secondary hard drive bay may be empty or may look slightly different from the illustrations in ...

Memory Modules - Windows Vista
Page 7
...bottom of electric shock and damage to the equipment, unplug the power cord and remove all batteries before shutdown is off or in Hibernation, turn the computer on a flat surface. 7. Save your work and close all external devices connected to the Lock button, and then click Shut ...memory module, be increased by upgrading the existing memory module in Hibernation, you must first exit Sleep or Hibernation before installing a memory module. Turn the computer upside down the computer through the operating system. 2. To reduce the risk of the computer. If you are not sure whether ...
...bottom of electric shock and damage to the equipment, unplug the power cord and remove all batteries before shutdown is off or in Hibernation, turn the computer on a flat surface. 7. Save your work and close all external devices connected to the Lock button, and then click Shut ...memory module, be increased by upgrading the existing memory module in Hibernation, you must first exit Sleep or Hibernation before installing a memory module. Turn the computer upside down the computer through the operating system. 2. To reduce the risk of the computer. If you are not sure whether ...
Memory Modules - Windows Vista
Page 10
16. Reconnect external power and external devices. 17. Turn on the computer. 4 Replacing a memory module ENWW
16. Reconnect external power and external devices. 17. Turn on the computer. 4 Replacing a memory module ENWW
Notebook Tour - Windows Vista
Page 9
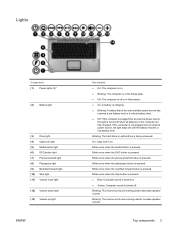
... is pressed. Blinks once when the next/fast forward button is on. Blinks once when the stop button is pressed. ● Blue: Computer sound is turned on . ● Blinking: The computer is in the Sleep state. ● Off: The computer is off or in Hibernation. ● On: A battery is ...Volume mute light (12) Volume down light (13) Volume up light ENWW Description ● On: The computer is on . ● Amber: Computer sound is turned off. Blinking: The volume scroll zone is being used to increase speaker volume. On: Caps lock is pressed. Blinks once when the DVD button is...
... is pressed. Blinks once when the next/fast forward button is on. Blinks once when the stop button is pressed. ● Blue: Computer sound is turned on . ● Blinking: The computer is in the Sleep state. ● Off: The computer is off or in Hibernation. ● On: A battery is ...Volume mute light (12) Volume down light (13) Volume up light ENWW Description ● On: The computer is on . ● Amber: Computer sound is turned off. Blinking: The volume scroll zone is being used to increase speaker volume. On: Caps lock is pressed. Blinks once when the DVD button is...
Notebook Tour - Windows Vista
Page 10
... computer has stopped responding and Windows® shutdown procedures are ineffective, press and hold the power button for at least 5 seconds to turn off , press the button to turn on the computer. ● When the computer is on the front of the computer is visible whether the computer is in the Sleep...
... computer has stopped responding and Windows® shutdown procedures are ineffective, press and hold the power button for at least 5 seconds to turn off , press the button to turn on the computer. ● When the computer is on the front of the computer is visible whether the computer is in the Sleep...
Notebook Tour - Windows Vista
Page 12
... slightly different from the illustration in this section. 6 Chapter 2 Components ENWW Refer to the QuickPlay online Help for at least 5 seconds to turn off , press the button to turn on the computer. ● When the computer is on to decrease volume, or tap the plus sign on . Slide your power settings, select...
... slightly different from the illustration in this section. 6 Chapter 2 Components ENWW Refer to the QuickPlay online Help for at least 5 seconds to turn off , press the button to turn on the computer. ● When the computer is on to decrease volume, or tap the plus sign on . Slide your power settings, select...
Notebook Tour - Windows Vista
Page 14
...Receives a signal from a remote control device, such as a wireless local area network (LAN) device and/or a Bluetooth® device, is turned on or off, but does not create a wireless connection. (2) Wireless light NOTE: To establish a wireless connection, a wireless network must already ...be set up . ● Blue: An integrated wireless device, such as an HP Remote Control. (4) Audio-in (microphone) jack Connects an optional computer headset microphone, stereo array microphone, or monaural microphone. (5) Audio-out...
...Receives a signal from a remote control device, such as a wireless local area network (LAN) device and/or a Bluetooth® device, is turned on or off, but does not create a wireless connection. (2) Wireless light NOTE: To establish a wireless connection, a wireless network must already ...be set up . ● Blue: An integrated wireless device, such as an HP Remote Control. (4) Audio-in (microphone) jack Connects an optional computer headset microphone, stereo array microphone, or monaural microphone. (5) Audio-out...

Notebook Tour - Windows Vista
Page 15
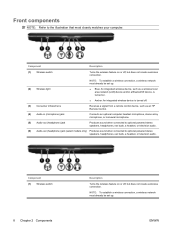
... infrared lens (4) Audio-in (microphone) jack (5) Audio-out (headphone) jack Description ● Blue: An integrated wireless device, such as an HP Remote Control. Produces sound when connected to optional powered stereo speakers, headphones, ear buds, a headset, or television audio. ENWW Front components 9...remote control device, such as a wireless local area network (LAN) device and/or a Bluetooth® device, is turned on. ● Amber: An integrated wireless device is turned off. Connects an optional computer headset microphone, stereo array microphone, or monaural microphone.
... infrared lens (4) Audio-in (microphone) jack (5) Audio-out (headphone) jack Description ● Blue: An integrated wireless device, such as an HP Remote Control. Produces sound when connected to optional powered stereo speakers, headphones, ear buds, a headset, or television audio. ENWW Front components 9...remote control device, such as a wireless local area network (LAN) device and/or a Bluetooth® device, is turned on. ● Amber: An integrated wireless device is turned off. Connects an optional computer headset microphone, stereo array microphone, or monaural microphone.
Notebook Tour - Windows Vista
Page 21
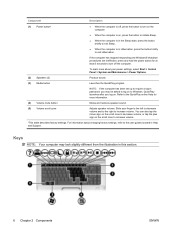
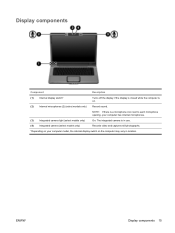
... each microphone opening, your computer model, the internal display switch on . (2) Internal microphones (2) (select models only) Record sound. Display components Component Description (1) Internal display switch* Turns off the display if the display is closed while the computer is in use. (4) Integrated camera (select models only) Records video and captures still photographs...
... each microphone opening, your computer model, the internal display switch on . (2) Internal microphones (2) (select models only) Record sound. Display components Component Description (1) Internal display switch* Turns off the display if the display is closed while the computer is in use. (4) Integrated camera (select models only) Records video and captures still photographs...
Setup Utility - Windows Vista
Page 5
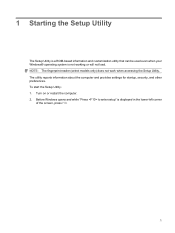
... customization utility that can be used even when your Windows® operating system is displayed in the lower-left corner of the screen, press f10. 1 Turn on or restart the computer. 2. The utility reports information about the computer and provides settings for startup, security, and other preferences. To start the Setup...
... customization utility that can be used even when your Windows® operating system is displayed in the lower-left corner of the screen, press f10. 1 Turn on or restart the computer. 2. The utility reports information about the computer and provides settings for startup, security, and other preferences. To start the Setup...
Setup Utility - Windows Vista
Page 6
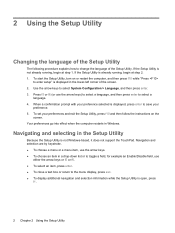
.... ● To choose an item in the Setup Utility Because the Setup Utility is not already running , begin at step 2. 1. To start the Setup Utility, turn on the screen. If the Setup Utility is already running , begin at step 1. Use the arrow keys to enter setup" is displayed in Windows. Your...
.... ● To choose an item in the Setup Utility Because the Setup Utility is not already running , begin at step 2. 1. To start the Setup Utility, turn on the screen. If the Setup Utility is already running , begin at step 1. Use the arrow keys to enter setup" is displayed in Windows. Your...
Setup Utility - Windows Vista
Page 7
To start the Setup Utility, turn on the screen. When the Setup Confirmation is displayed, press enter to save your preferences and exit the Setup Utility, press f10, and then follow ... press f10 while "Press to enter setup" is displayed in the lower-left corner of the screen. 2. Displaying system information 3 To start the Setup Utility, turn on or restart the computer, and then press f10 while "Press to enter setup" is displayed in the lower-left corner of the screen. 2. If...
To start the Setup Utility, turn on the screen. When the Setup Confirmation is displayed, press enter to save your preferences and exit the Setup Utility, press f10, and then follow ... press f10 while "Press to enter setup" is displayed in the lower-left corner of the screen. 2. Displaying system information 3 To start the Setup Utility, turn on or restart the computer, and then press f10 while "Press to enter setup" is displayed in the lower-left corner of the screen. 2. If...
Setup Utility - Windows Vista and XP
Page 5
... even when your Windows® operating system is displayed in the lower-left corner of the screen, press f10. ENWW 1 To start the Setup Utility: 1. Turn on or restart the computer. 2. NOTE The fingerprint reader (select models only) does not work when accessing the Setup Utility.
... even when your Windows® operating system is displayed in the lower-left corner of the screen, press f10. ENWW 1 To start the Setup Utility: 1. Turn on or restart the computer. 2. NOTE The fingerprint reader (select models only) does not work when accessing the Setup Utility.


