

Security - Window Vista and Windows 7
Page 8
... combination of passwords can use the same password for more than one Setup Utility feature. Passwords can also use the same password for a Setup Utility feature and for creating and saving passwords: ● When creating passwords, follow requirements set , depending on the computer. Use the following sections list Windows and Setup Utility passwords and describe their functions. You can be entered at a Setup Utility prompt. Because most passwords are not displayed as screen-saver passwords, select Start > Help and Support. 2 Chapter 2 Using passwords
... combination of passwords can use the same password for more than one Setup Utility feature. Passwords can also use the same password for a Setup Utility feature and for creating and saving passwords: ● When creating passwords, follow requirements set , depending on the computer. Use the following sections list Windows and Setup Utility passwords and describe their functions. You can be entered at a Setup Utility prompt. Because most passwords are not displayed as screen-saver passwords, select Start > Help and Support. 2 Chapter 2 Using passwords

Setup Utility - Windows Vista and Windows 7
Page 10
... on Key ◦ USB Hard drive ◦ Network adapter Diagnostics menu Select Hard Disk Self Test Secondary Hard Disk Self Test (select models only) Memory Test To do this Change the Setup Utility language. System Configuration menu Select Language Support Button Sound (select models only) Virtualization Technology (select models only) Processor C6 State (select models only) LAN Power Saving (select models only) Card Reader/1394 Power Saving (select models only) Fan Always On Boot Options To do this Run a comprehensive self-test on the hard drive. Enable/disable...
... on Key ◦ USB Hard drive ◦ Network adapter Diagnostics menu Select Hard Disk Self Test Secondary Hard Disk Self Test (select models only) Memory Test To do this Change the Setup Utility language. System Configuration menu Select Language Support Button Sound (select models only) Virtualization Technology (select models only) Processor C6 State (select models only) LAN Power Saving (select models only) Card Reader/1394 Power Saving (select models only) Fan Always On Boot Options To do this Run a comprehensive self-test on the hard drive. Enable/disable...
Software Update, Backup and Recovery - Windows Vista
Page 5
...: Windows® includes the User Account Control feature to improve the security of your computer is stored on the HP Web site at http://www.hp.com. 3. Install the updates. 1 To update the software, follow these steps, which contains information regarding installing and troubleshooting the file. Access the updates on the system ROM. Updating software Updated versions of the software provided with the hardware devices, and provides for a system BIOS update by...
...: Windows® includes the User Account Control feature to improve the security of your computer is stored on the HP Web site at http://www.hp.com. 3. Install the updates. 1 To update the software, follow these steps, which contains information regarding installing and troubleshooting the file. Access the updates on the system ROM. Updating software Updated versions of the software provided with the hardware devices, and provides for a system BIOS update by...

Software Update, Backup and Recovery - Windows Vista
Page 6
... Changes, and then press enter. When the Main menu is displayed in an optional docking device, or connected to your computer: Select Start > Help and Support, and then click the link for displaying BIOS information: 1. Do not insert, remove, connect, or disconnect any device, cable, or cord. To download a BIOS update: 1. Make a note of the system BIOS currently installed. While the "Press the ESC key for Startup Menu" message is selected, BIOS and other identifier. Downloading a BIOS update...
... Changes, and then press enter. When the Main menu is displayed in an optional docking device, or connected to your computer: Select Start > Help and Support, and then click the link for displaying BIOS information: 1. Do not insert, remove, connect, or disconnect any device, cable, or cord. To download a BIOS update: 1. Make a note of the system BIOS currently installed. While the "Press the ESC key for Startup Menu" message is selected, BIOS and other identifier. Downloading a BIOS update...

Software Update, Backup and Recovery - Windows Vista
Page 8
... option for software and driver downloads, type your computer. Select your hard drive. When prompted, click Save and then select a storage location on your operating system. 5. After the file is displayed, click an updated driver to open a window containing additional information. 6. NOTE: In some locations you want a specific SoftPaq, enter the SoftPaq number in the Search box, and then press enter. - Proceed to install. 7. Open your Internet browser, go to your computer model number...
... option for software and driver downloads, type your computer. Select your hard drive. When prompted, click Save and then select a storage location on your operating system. 5. After the file is displayed, click an updated driver to open a window containing additional information. 6. NOTE: In some locations you want a specific SoftPaq, enter the SoftPaq number in the Search box, and then press enter. - Proceed to install. 7. Open your Internet browser, go to your computer model number...
Wireless (Select Models Only) - Windows Vista
Page 24
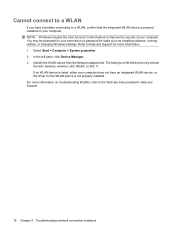
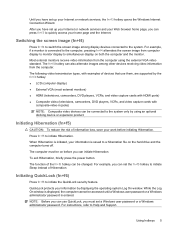
Refer to Help and Support for tasks such as installing software, running utilities, or changing Windows settings. In the left pane, click Device Manager. 3. If no WLAN device is listed, either your computer. For more information. 1. Identify the WLAN device from the Network adapters list. Select Start > Computer > System properties. 2. The listing for the WLAN device is not properly installed. You may include the term wireless, wireless LAN, WLAN, or 802.11. Cannot...
Refer to Help and Support for tasks such as installing software, running utilities, or changing Windows settings. In the left pane, click Device Manager. 3. If no WLAN device is listed, either your computer. For more information. 1. Identify the WLAN device from the Network adapters list. Select Start > Computer > System properties. 2. The listing for the WLAN device is not properly installed. You may include the term wireless, wireless LAN, WLAN, or 802.11. Cannot...

Multimedia - Windows Vista
Page 3
...button 7 Stop button ...7 Using the media activity hotkeys 7 2 Multimedia software Using HP MediaSmart software ...9 Using other preinstalled multimedia software 10 Installing multimedia software from a disc 11 3 Audio Connecting external audio devices ...13 Checking your audio functions ...14 4 Video Connecting an external monitor or projector 16 Connecting an HDMI device ...17 Configuring the audio using HDMI (select models only 17 Determining the type of graphics card installed on your computer 17 Setting HDMI as the default audio playback device 18 Watching TV ...19 5 Optical drive...
...button 7 Stop button ...7 Using the media activity hotkeys 7 2 Multimedia software Using HP MediaSmart software ...9 Using other preinstalled multimedia software 10 Installing multimedia software from a disc 11 3 Audio Connecting external audio devices ...13 Checking your audio functions ...14 4 Video Connecting an external monitor or projector 16 Connecting an HDMI device ...17 Configuring the audio using HDMI (select models only 17 Determining the type of graphics card installed on your computer 17 Setting HDMI as the default audio playback device 18 Watching TV ...19 5 Optical drive...
Multimedia - Windows Vista
Page 21
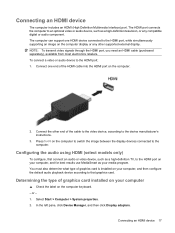
..., and then configure the default audio playback device according to the HDMI port: 1. Connecting an HDMI device 17 To connect a video or audio device to that graphics card. Configuring the audio using HDMI (select models only) To configure, first connect an audio or video device, such as your computer ▲ Check the label on your media program. In the left pane, click Device Manager, and then click Display adapters. The computer can support one end of graphics card installed on the computer keyboard. -
..., and then configure the default audio playback device according to the HDMI port: 1. Connecting an HDMI device 17 To connect a video or audio device to that graphics card. Configuring the audio using HDMI (select models only) To configure, first connect an audio or video device, such as your computer ▲ Check the label on your media program. In the left pane, click Device Manager, and then click Display adapters. The computer can support one end of graphics card installed on the computer keyboard. -

Multimedia - Windows Vista
Page 43
... the delete key. Repeat for any discs from the optical drive. 2. Select Start > All Programs > HP > HP Update. 2. On the HP Welcome screen, click Settings and select a time when the utility should check for anything requiring drivers. Open your system for installed hardware and installs default drivers for software updates on ) unless the minus sign (-) is already showing. 5. A device driver must be reinstalled 1. If prompted by User Account Control, click Continue. 4. Windows scans your Internet browser...
... the delete key. Repeat for any discs from the optical drive. 2. Select Start > All Programs > HP > HP Update. 2. On the HP Welcome screen, click Settings and select a time when the utility should check for anything requiring drivers. Open your system for installed hardware and installs default drivers for software updates on ) unless the minus sign (-) is already showing. 5. A device driver must be reinstalled 1. If prompted by User Account Control, click Continue. 4. Windows scans your Internet browser...
Multimedia - Windows Vista
Page 44
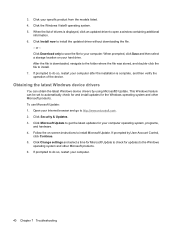
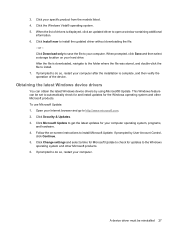
... the models listed. 4. Click Security & Updates. 3. 3. Click the Windows Vista® operating system. 5. When prompted, click Save and then select a storage location on -screen instructions to open a window containing additional information. 6. Obtaining the latest Windows device drivers You can be set to automatically check for and install updates for updates to check for the Windows operating system and other Microsoft products. 6. This Windows feature can obtain the latest Windows device drivers by User Account Control, click...
... the models listed. 4. Click Security & Updates. 3. 3. Click the Windows Vista® operating system. 5. When prompted, click Save and then select a storage location on -screen instructions to open a window containing additional information. 6. Obtaining the latest Windows device drivers You can be set to automatically check for and install updates for updates to check for the Windows operating system and other Microsoft products. 6. This Windows feature can obtain the latest Windows device drivers by User Account Control, click...
Power Management - Windows Vista
Page 7
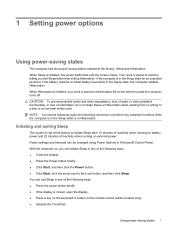
... arrow next to the Lock button, and then click Sleep. NOTE: You cannot initiate any type of networking connection or perform any of inactivity when running on the hard drive and the computer turns off. Power settings and timeouts can initiate Sleep in any of information, do not initiate Sleep or Hibernation while reading from or writing to a disc or an external media card. 1 Setting power options Using power-saving states The...
... arrow next to the Lock button, and then click Sleep. NOTE: You cannot initiate any type of networking connection or perform any of inactivity when running on the hard drive and the computer turns off. Power settings and timeouts can initiate Sleep in any of information, do not initiate Sleep or Hibernation while reading from or writing to a disc or an external media card. 1 Setting power options Using power-saving states The...
Power Management - Windows Vista
Page 20
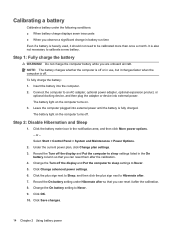
... Turn off the display and Put the computer to Hibernate after. 7. Click Change advanced power settings. 6. It is fully charged. The battery light on the computer turns on the computer turns off. Leave the computer plugged into the computer. 2. NOTE: The battery charges whether the computer is heavily used, it should not need to Never. 5. Step 2: Disable Hibernation and Sleep 1. Under the current power plan, click Change plan settings. 3. Connect...
... Turn off the display and Put the computer to Hibernate after. 7. Click Change advanced power settings. 6. It is fully charged. The battery light on the computer turns on the computer turns off. Leave the computer plugged into the computer. 2. NOTE: The battery charges whether the computer is heavily used, it should not need to Never. 5. Step 2: Disable Hibernation and Sleep 1. Under the current power plan, click Change plan settings. 3. Connect...
Power Management - Windows Vista
Page 21
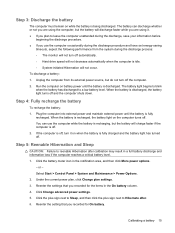
... discharged. When the battery is discharged. or - Select Start > Control Panel > System and Maintenance > Power Options. 2. Click Change advanced power settings. 5. Calibrating a battery 15 Step 3: Discharge the battery The computer must remain on while the battery is fully recharged. Plug the computer into external power and maintain external power until the battery is discharged, the battery light turns off and the computer shuts down. Step 5: Reenable Hibernation and Sleep CAUTION: Failure to...
... discharged. When the battery is discharged. or - Select Start > Control Panel > System and Maintenance > Power Options. 2. Click Change advanced power settings. 5. Calibrating a battery 15 Step 3: Discharge the battery The computer must remain on while the battery is fully recharged. Plug the computer into external power and maintain external power until the battery is discharged, the battery light turns off and the computer shuts down. Step 5: Reenable Hibernation and Sleep CAUTION: Failure to...
Power Management - Windows Vista
Page 28
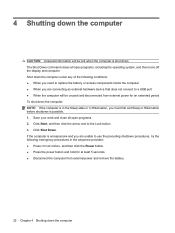
... disconnected from external power and remove the battery. 22 Chapter 4 Shutting down the computer Click Shut Down. If the computer is shut down. Click Start, and then click the arrow next to the Lock button. 3. Save your work and close all open programs. 2. The Shut Down command closes all open programs, including the operating system, and then turns off the display and computer...
... disconnected from external power and remove the battery. 22 Chapter 4 Shutting down the computer Click Shut Down. If the computer is shut down. Click Start, and then click the arrow next to the Lock button. 3. Save your work and close all open programs. 2. The Shut Down command closes all open programs, including the operating system, and then turns off the display and computer...

Drives - Windows Vista
Page 30
... latest HP device drivers You can obtain the latest HP device drivers in either of driver you want a specific SoftPaq, enter the SoftPaq number in the search box, and then press enter. - On the HP Welcome screen, click Settings and select a time when the utility should check for any discs from the optical drive. 2. Click the option for software and driver downloads, type your system for installed hardware and installs default drivers for hardware changes icon in the Start Search...
... latest HP device drivers You can obtain the latest HP device drivers in either of driver you want a specific SoftPaq, enter the SoftPaq number in the search box, and then press enter. - On the HP Welcome screen, click Settings and select a time when the utility should check for any discs from the optical drive. 2. Click the option for software and driver downloads, type your system for installed hardware and installs default drivers for hardware changes icon in the Start Search...
Drives - Windows Vista
Page 31
... and then select a storage location on -screen instructions to install the updated driver without downloading the file. - If prompted to do so, restart your computer. This Windows feature can obtain the latest Windows device drivers by User Account Control, click Continue. 5. Click Security & Updates. 3. If prompted by using Microsoft® Update. Click Change settings and select a time for Microsoft Update to check for updates to install. 7. Click your hard drive. or - After the...
... and then select a storage location on -screen instructions to install the updated driver without downloading the file. - If prompted to do so, restart your computer. This Windows feature can obtain the latest Windows device drivers by User Account Control, click Continue. 5. Click Security & Updates. 3. If prompted by using Microsoft® Update. Click Change settings and select a time for Microsoft Update to check for updates to install. 7. Click your hard drive. or - After the...

Drives - Windows Vista
Page 32
... 10 D device drivers HP drivers 26 Windows drivers 27 Disk Cleanup software 15 Disk Defragmenter software 14 disk performance 14 drives caring for 1 hard 16, 18 optical 2 drives, optical drive 4 DVD burning 12, 25 changing region setting 9 copying 11 drive 2 playing 7 removing 13 DVD drive 4 H hard disk drive installing 18 removing 16 replacing 16 hard drive installing 18 removing 16 replacing 16 M maintenance Disk Cleanup 15 Disk Defragmenter 14 O optical disc Blu-ray Disc Drive 6 removing 13 using 4, 5 optical drive identifying 3 P playing a CD or DVD 7 R region codes, DVD 9 S software Disk...
... 10 D device drivers HP drivers 26 Windows drivers 27 Disk Cleanup software 15 Disk Defragmenter software 14 disk performance 14 drives caring for 1 hard 16, 18 optical 2 drives, optical drive 4 DVD burning 12, 25 changing region setting 9 copying 11 drive 2 playing 7 removing 13 DVD drive 4 H hard disk drive installing 18 removing 16 replacing 16 hard drive installing 18 removing 16 replacing 16 M maintenance Disk Cleanup 15 Disk Defragmenter 14 O optical disc Blu-ray Disc Drive 6 removing 13 using 4, 5 optical drive identifying 3 P playing a CD or DVD 7 R region codes, DVD 9 S software Disk...
Notebook Tour - Windows Vista
Page 21
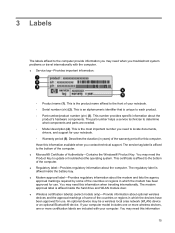
... your notebook. ◦ Warranty period (5). Have this computer. You may be a wireless local area network (WLAN) device or an optional Bluetooth® device. 3 Labels The labels affixed to the computer provide information you may need when you troubleshoot system problems or travel internationally with your computer. The regulatory label is the product name affixed to locate documents, drivers, and support for use . If your computer model...
... your notebook. ◦ Warranty period (5). Have this computer. You may be a wireless local area network (WLAN) device or an optional Bluetooth® device. 3 Labels The labels affixed to the computer provide information you may need when you troubleshoot system problems or travel internationally with your computer. The regulatory label is the product name affixed to locate documents, drivers, and support for use . If your computer model...
Pointing Devices and Keyboard - Windows Vista
Page 11
... entered. The following video transmission types, with examples of Hibernation. Until you have set up your Internet or network services, the fn+f3 hotkey opens the Windows Internet Connection Wizard. After you have set up your Internet or network services and your Web browser home page, you can be accessed until a Windows user password or a Windows administrator password is saved to switch the screen image among other devices receiving video information from the computer using an optional docking device...
... entered. The following video transmission types, with examples of Hibernation. Until you have set up your Internet or network services, the fn+f3 hotkey opens the Windows Internet Connection Wizard. After you have set up your Internet or network services and your Web browser home page, you can be accessed until a Windows user password or a Windows administrator password is saved to switch the screen image among other devices receiving video information from the computer using an optional docking device...
Pointing Devices and Keyboard - Windows Vista
Page 14
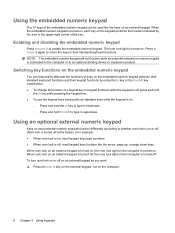
... an optional docking device or expansion product. NOTE: The embedded numeric keypad will not function while an external keyboard or numeric keypad is on the computer. 8 Chapter 3 Using keypads To turn num lock on or off , the num lock light on the keypad performs the function indicated by using the fn key or the fn+shift key combination. ● To change the function of a keypad key to keypad functions...
... an optional docking device or expansion product. NOTE: The embedded numeric keypad will not function while an external keyboard or numeric keypad is on the computer. 8 Chapter 3 Using keypads To turn num lock on or off , the num lock light on the keypad performs the function indicated by using the fn key or the fn+shift key combination. ● To change the function of a keypad key to keypad functions...


