Security - Windows Vista
Page 8
... your computer information. Because most passwords are not displayed as screen-saver passwords, select Start > Help and Support. 2 Chapter 2 Using passwords ENWW Several types of passwords can be any combination of the computer, record each password immediately and store it in Setup Utility: ● A password can be set a password with keyboard number keys, your password will not be recognized if you want to control access to enter it is essential to record each...
... your computer information. Because most passwords are not displayed as screen-saver passwords, select Start > Help and Support. 2 Chapter 2 Using passwords ENWW Several types of passwords can be any combination of the computer, record each password immediately and store it in Setup Utility: ● A password can be set a password with keyboard number keys, your password will not be recognized if you want to control access to enter it is essential to record each...
Setup Utility - Windows Vista and XP
Page 8
... the Setup Utility menus are offered an option to return to Help and Support, which is accessible only when the computer is the prompt to the menu display. When you use either of the screen each time the computer is started or restarted in Windows is in Windows. 4 Chapter 2 Using the Setup Utility ENWW The Setup Utility features available for advanced users include a hard drive self-test, a Network Service Boot, and settings for all users.
... the Setup Utility menus are offered an option to return to Help and Support, which is accessible only when the computer is the prompt to the menu display. When you use either of the screen each time the computer is started or restarted in Windows is in Windows. 4 Chapter 2 Using the Setup Utility ENWW The Setup Utility features available for advanced users include a hard drive self-test, a Network Service Boot, and settings for all users.
Software Update, Backup, and Recovery - Windows Vista
Page 5
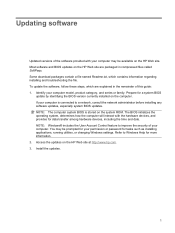
.... 1 Updating software Updated versions of your computer. Some download packages contain a file named Readme.txt, which contains information regarding installing and troubleshooting the file. You may be prompted for your computer model, product category, and series or family. Refer to improve the security of the software provided with the hardware devices, and provides for tasks such as installing applications, running utilities, or changing Windows settings. Identify...
.... 1 Updating software Updated versions of your computer. Some download packages contain a file named Readme.txt, which contains information regarding installing and troubleshooting the file. You may be prompted for your computer model, product category, and series or family. Refer to improve the security of the software provided with the hardware devices, and provides for tasks such as installing applications, running utilities, or changing Windows settings. Identify...
Software Update, Backup, and Recovery - Windows Vista
Page 6
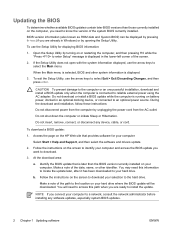
... Setup Utility does not open with the system information displayed, use the arrow keys to select Exit > Exit Discarding Changes, and then press enter. When the Main menu is running on battery power, docked in an optional docking device, or connected to reliable external power using the AC adapter. Do not shut down the computer or initiate Sleep or Hibernation. Follow the instructions on the screen to download your hard drive. Do not download or install a BIOS update...
... Setup Utility does not open with the system information displayed, use the arrow keys to select Exit > Exit Discarding Changes, and then press enter. When the Main menu is running on battery power, docked in an optional docking device, or connected to reliable external power using the AC adapter. Do not shut down the computer or initiate Sleep or Hibernation. Follow the instructions on the screen to download your hard drive. Do not download or install a BIOS update...
Software Update, Backup, and Recovery - Windows Vista
Page 13
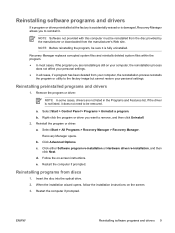
... the computer if prompted. Reinstall the program or driver: a. e. NOTE Software not provided with this computer must be removed. b. Select Start > All Programs > Recovery Manager > Recovery Manager. Click either Software program re-installation or Hardware driver re-installation, and then click Next. c. Follow the on-screen instructions. Insert the disc into the optical drive. 2. ENWW Reinstalling software programs and drivers 9 Recovery Manager opens. NOTE Before reinstalling the program, be sure it . Restart...
... the computer if prompted. Reinstall the program or driver: a. e. NOTE Software not provided with this computer must be removed. b. Select Start > All Programs > Recovery Manager > Recovery Manager. Click either Software program re-installation or Hardware driver re-installation, and then click Next. c. Follow the on-screen instructions. Insert the disc into the optical drive. 2. ENWW Reinstalling software programs and drivers 9 Recovery Manager opens. NOTE Before reinstalling the program, be sure it . Restart...
Software Updates - Windows Vista
Page 7
... this guide: 1. To update the software, follow these steps, which contains information regarding installing and troubleshooting the file. Identify your computer model, product category, and series or family. NOTE: The computer system BIOS is connected to a network, consult the network administrator before installing any software updates, especially system BIOS updates. NOTE: Windows® includes the User Account Control feature to Windows Help for a system BIOS update by identifying the BIOS version currently installed on...
... this guide: 1. To update the software, follow these steps, which contains information regarding installing and troubleshooting the file. Identify your computer model, product category, and series or family. NOTE: The computer system BIOS is connected to a network, consult the network administrator before installing any software updates, especially system BIOS updates. NOTE: Windows® includes the User Account Control feature to Windows Help for a system BIOS update by identifying the BIOS version currently installed on...

Drives - Windows Vista
Page 17
... removing, with power 5 removing, without power 6 optical drive 3 S software Disk Cleanup 7 Disk Defragmenter 7 DVD inserting 4 removing, with power 5 removing, without power 6 CD drive 3 L LightScribe DVD±RW and CD-RW Combo Drive with Double-Layer support 3 H hard disk drive installing 9 removing 8 replacing 8 hard drive installing 9 removing 8 replacing 8 Index 11 Index A airport security devices 2 C CD inserting 4 removing, with power 5 removing, without power 6 DVD drive 3 DVD/CD-RW Combo Drive 3 DVD±RW and CD-RW Combo Drive with Double-Layer support 3 M maintenance Disk...
... removing, with power 5 removing, without power 6 optical drive 3 S software Disk Cleanup 7 Disk Defragmenter 7 DVD inserting 4 removing, with power 5 removing, without power 6 CD drive 3 L LightScribe DVD±RW and CD-RW Combo Drive with Double-Layer support 3 H hard disk drive installing 9 removing 8 replacing 8 hard drive installing 9 removing 8 replacing 8 Index 11 Index A airport security devices 2 C CD inserting 4 removing, with power 5 removing, without power 6 DVD drive 3 DVD/CD-RW Combo Drive 3 DVD±RW and CD-RW Combo Drive with Double-Layer support 3 M maintenance Disk...
Notebook Tour - Windows Vista
Page 9
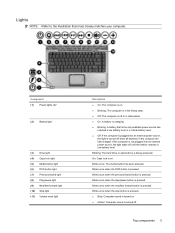
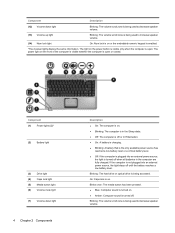
... sound is turned off when all batteries in Hibernation. ● On: A battery is charging. ● Blinking: A battery that most closely matches your computer. Blinks once when the DVD button is pressed. Blinks once when the previous/rewind button is being accessed. Blinking: The hard drive or optical drive is pressed. Top components 3 Component (1) Power lights (2)* (2) Battery light (3) Drive light (4) Caps lock light (5) Media button light (6) DVD button light (7) Previous/rewind light (8) Play/pause light (9) Next/fast forward light (10) Stop light (11) Volume mute light...
... sound is turned off when all batteries in Hibernation. ● On: A battery is charging. ● Blinking: A battery that most closely matches your computer. Blinks once when the DVD button is pressed. Blinks once when the previous/rewind button is being accessed. Blinking: The hard drive or optical drive is pressed. Top components 3 Component (1) Power lights (2)* (2) Battery light (3) Drive light (4) Caps lock light (5) Media button light (6) DVD button light (7) Previous/rewind light (8) Play/pause light (9) Next/fast forward light (10) Stop light (11) Volume mute light...
Notebook Tour - Windows Vista
Page 10
...: Computer sound is open or closed. Blinking: The volume scroll zone is being used to decrease speaker volume. Component (1) Power lights (2)* (2) Battery light (3) Drive light (4) Caps lock light (5) Media button light (6) Volume mute light (7) Volume down light Blinking: The volume scroll zone is being used to decrease speaker volume. (13) Volume up light Blinking: The volume scroll zone is being accessed. Component Description (12) Volume down light 4 Chapter 2 Components Description ● On: The computer is on. ● Blinking: The computer is in the Sleep state...
...: Computer sound is open or closed. Blinking: The volume scroll zone is being used to decrease speaker volume. Component (1) Power lights (2)* (2) Battery light (3) Drive light (4) Caps lock light (5) Media button light (6) Volume mute light (7) Volume down light Blinking: The volume scroll zone is being used to decrease speaker volume. (13) Volume up light Blinking: The volume scroll zone is being accessed. Component Description (12) Volume down light 4 Chapter 2 Components Description ● On: The computer is on. ● Blinking: The computer is in the Sleep state...
Touchpad and Keyboard - Windows Vista
Page 15
... keyboard functions and their standard keyboard functions. When num lock on an external keypad is turned on, the num lock light on the computer is connected, the embedded numeric keypad cannot be used like the arrow, page up, or page down keys. If an external keypad is turned on the keypad performs the function indicated by using the fn key or the fn+shift key combination. ● To change the function...
... keyboard functions and their standard keyboard functions. When num lock on an external keypad is turned on, the num lock light on the computer is connected, the embedded numeric keypad cannot be used like the arrow, page up, or page down keys. If an external keypad is turned on the keypad performs the function indicated by using the fn key or the fn+shift key combination. ● To change the function...

HP Pavilion dv2500 and dv2700 Notebook PC - Maintenance and Service Guide
Page 20
... battery reaches a low battery level. Blinking: The hard drive or optical drive is being used to decrease speaker volume. Blinks once when the DVD button is pressed. Lights Item (1) Component Power lights (2)* (2) Battery light (3) (4) (5) (6) (7) (8) (9) (10) (11) Drive light Caps lock light Media button light DVD button light Previous/rewind light Play/pause light Next/fast forward light Stop light Volume mute light (12) Volume down light 12 Chapter 2 External component identification Description ● On: The computer is on. ● Blinking: The computer is in the Sleep...
... battery reaches a low battery level. Blinking: The hard drive or optical drive is being used to decrease speaker volume. Blinks once when the DVD button is pressed. Lights Item (1) Component Power lights (2)* (2) Battery light (3) (4) (5) (6) (7) (8) (9) (10) (11) Drive light Caps lock light Media button light DVD button light Previous/rewind light Play/pause light Next/fast forward light Stop light Volume mute light (12) Volume down light 12 Chapter 2 External component identification Description ● On: The computer is on. ● Blinking: The computer is in the Sleep...

HP Pavilion dv2500 and dv2700 Notebook PC - Maintenance and Service Guide
Page 77
Shut down through the operating system. 2. Disconnect all external devices connected to computer models with WWAN capability. Remove the SIM (2) from the computer. 4. SIM NOTE: This section applies only to the computer. 3. If you are unsure whether the computer is a SIM inserted in Hibernation, turn the computer on, and then shut it must be removed before disassembling the computer. Disconnect...
Shut down through the operating system. 2. Disconnect all external devices connected to computer models with WWAN capability. Remove the SIM (2) from the computer. 4. SIM NOTE: This section applies only to the computer. 3. If you are unsure whether the computer is a SIM inserted in Hibernation, turn the computer on, and then shut it must be removed before disassembling the computer. Disconnect...

HP Pavilion dv2500 and dv2700 Notebook PC - Maintenance and Service Guide
Page 86
.... Disconnect all external devices connected to the WWAN module "Aux" terminal. 78 Chapter 4 Removal and replacement procedures Remove the battery (see Keyboard on the WWAN module. If you replace the module and then receive a warning message, remove the module to the computer. (The edge of the module opposite the slot rises away from the computer by the governmental agency that secure the WWAN module to restore computer functionality, and...
.... Disconnect all external devices connected to the WWAN module "Aux" terminal. 78 Chapter 4 Removal and replacement procedures Remove the battery (see Keyboard on the WWAN module. If you replace the module and then receive a warning message, remove the module to the computer. (The edge of the module opposite the slot rises away from the computer by the governmental agency that secure the WWAN module to restore computer functionality, and...

HP Pavilion dv2500 and dv2700 Notebook PC - Maintenance and Service Guide
Page 127
... select Exit > Exit Saving Changes, and then press enter. Setup Utility menus The menu tables in Windows. NOTE: Some of the screen each time the computer is started or restarted in Windows. Using advanced Setup Utility features 119 The "Press to change the boot order. The Setup Utility features available for advanced users include a hard drive self-test, a Network Service Boot, and settings for all users. When you use either of the screen each time the computer...
... select Exit > Exit Saving Changes, and then press enter. Setup Utility menus The menu tables in Windows. NOTE: Some of the screen each time the computer is started or restarted in Windows. Using advanced Setup Utility features 119 The "Press to change the boot order. The Setup Utility features available for advanced users include a hard drive self-test, a Network Service Boot, and settings for all users. When you use either of the screen each time the computer...

HP Pavilion dv2500 and dv2700 Notebook PC - Maintenance and Service Guide
Page 171
... screen. 3. Insert the disc into the optical drive. 2. Restart the computer if prompted. Recovering system information 163 Recovery Manager replaces corrupted system files and reinstalls deleted system files within the program. ● In most cases, if the program you are not listed in the Programs and Features list. Recovery Manager opens. Click Advanced Options. When the installation wizard opens, follow the installation instructions on -screen instructions. Select Start > All Programs > Recovery Manager > Recovery Manager...
... screen. 3. Insert the disc into the optical drive. 2. Restart the computer if prompted. Recovering system information 163 Recovery Manager replaces corrupted system files and reinstalls deleted system files within the program. ● In most cases, if the program you are not listed in the Programs and Features list. Recovery Manager opens. Click Advanced Options. When the installation wizard opens, follow the installation instructions on -screen instructions. Select Start > All Programs > Recovery Manager > Recovery Manager...
HP Pavilion dv2500 and dv2700 Notebook PC - Maintenance and Service Guide
Page 186
... camera location 8 product description 4 camera light 8 camera module illustrated 30 removal 57 spare part number 30, 43, 57 camera module cable illustrated 30 removal 87 spare part number 87 caps lock light 12 carrying case, spare part number 35, 38 changing the Setup Utility language 117 chipset, product description 2 closing the Setup Utility 119 CMOS clearing 53 components bottom 17 display 8 front 14 keyboard 11 left-side 15 lights 12 rear 16 right-side 16 top 8 TouchPad 13 composite video cable, spare part number...
... camera location 8 product description 4 camera light 8 camera module illustrated 30 removal 57 spare part number 30, 43, 57 camera module cable illustrated 30 removal 87 spare part number 87 caps lock light 12 carrying case, spare part number 35, 38 changing the Setup Utility language 117 chipset, product description 2 closing the Setup Utility 119 CMOS clearing 53 components bottom 17 display 8 front 14 keyboard 11 left-side 15 lights 12 rear 16 right-side 16 top 8 TouchPad 13 composite video cable, spare part number...

HP Pavilion dv2500 and dv2700 Notebook PC - Maintenance and Service Guide
Page 188
... 4 removal 86 microphone jack location 14 pin assignments 166 model name 1 modem jack location 16 pin assignments 168 modem module product description 5 removal 95 spare part number 23, 38, 47, 95 modem module cable illustrated 33 removal 109 monitor port location 15 pin assignments 167 mouse, spare part numbers 35, 38 N navigating in the Setup Utility 118 network jack location 15 pin assignments 168 next/fast forward button 10 next/fast forward light 12 num lock light 13 O operating system...
... 4 removal 86 microphone jack location 14 pin assignments 166 model name 1 modem jack location 16 pin assignments 168 modem module product description 5 removal 95 spare part number 23, 38, 47, 95 modem module cable illustrated 33 removal 109 monitor port location 15 pin assignments 167 mouse, spare part numbers 35, 38 N navigating in the Setup Utility 118 network jack location 15 pin assignments 168 next/fast forward button 10 next/fast forward light 12 num lock light 13 O operating system...

HP Pavilion dv2500 and dv2700 Notebook PC - Maintenance and Service Guide
Page 189
... 1 removal 115 spare part numbers 24, 42, 43, 45, 46, 115 product description audio 4 camera 4 chipset 2 diskette drive 4 display panel 3 docking support 6 Ethernet 5 external media cards 6 graphics 2 hard drives 4 keyboard 6 memory module 3 microphone 4 modem module 5 operating system 7 optical drives 4 pointing devices 6 ports 6 power requirements 6 processors 1 product name 1 security 7 serviceability 7 wireless 5 product name 1 R rear component 16 recovery discs 162 recovery partition, deleting 165 recovery, system 164 remote control, spare part numbers 35, 37, 38, 39 removal/replacement...
... 1 removal 115 spare part numbers 24, 42, 43, 45, 46, 115 product description audio 4 camera 4 chipset 2 diskette drive 4 display panel 3 docking support 6 Ethernet 5 external media cards 6 graphics 2 hard drives 4 keyboard 6 memory module 3 microphone 4 modem module 5 operating system 7 optical drives 4 pointing devices 6 ports 6 power requirements 6 processors 1 product name 1 security 7 serviceability 7 wireless 5 product name 1 R rear component 16 recovery discs 162 recovery partition, deleting 165 recovery, system 164 remote control, spare part numbers 35, 37, 38, 39 removal/replacement...
Power - Windows Vista
Page 7
... external power. Using power-saving states 1 Your work is saved to a hibernation file on the keyboard. ● Activate the TouchPad. When you initiate Hibernation, your work is saved to memory, letting you initiate Sleep, the power lights blink and the screen clears. 1 Setting power options Using power-saving states The Windows Vista™ operating system has two power-saving states enabled at the factory to a disc or an external media card. CAUTION: To prevent possible audio and video degradation, loss of audio or video playback functionality...
... external power. Using power-saving states 1 Your work is saved to a hibernation file on the keyboard. ● Activate the TouchPad. When you initiate Hibernation, your work is saved to memory, letting you initiate Sleep, the power lights blink and the screen clears. 1 Setting power options Using power-saving states The Windows Vista™ operating system has two power-saving states enabled at the factory to a disc or an external media card. CAUTION: To prevent possible audio and video degradation, loss of audio or video playback functionality...
Power - Windows Vista
Page 27
... to the Lock button. 3. The Shut Down command closes all open programs, including the operating system, and then turns off the display and computer. Save your work and close all open programs. 2. If the computer is unresponsive and you are connecting an external hardware device that does not connect to a USB port ● When the computer will be unused and disconnected from external power and remove the battery. 21...
... to the Lock button. 3. The Shut Down command closes all open programs, including the operating system, and then turns off the display and computer. Save your work and close all open programs. 2. If the computer is unresponsive and you are connecting an external hardware device that does not connect to a USB port ● When the computer will be unused and disconnected from external power and remove the battery. 21...


