
Safety and Regulatory Information Desktops, Thin Clients, and Personal Workstations
Page 26
...marked with the ENERGY STAR logo follow the applicable U.S. The following specified periods of inactivity: Business Desktops Consumer Desktops Thin Clients Workstations Operating System XP Vista Windows 7 Windows Server 2008 R2 Computer 15 minutes 15 minutes 30 minutes 15 minutes 15 minutes Not applicable 30 minutes...for more information about the energy and financial savings potential of the Power Management Feature: http://www.energystar.gov/ powermanagement. HP computers marked with the ENERGY STAR logo are not ENERGY STAR-qualified can be woken by the EPA to power down ...
...marked with the ENERGY STAR logo follow the applicable U.S. The following specified periods of inactivity: Business Desktops Consumer Desktops Thin Clients Workstations Operating System XP Vista Windows 7 Windows Server 2008 R2 Computer 15 minutes 15 minutes 30 minutes 15 minutes 15 minutes Not applicable 30 minutes...for more information about the energy and financial savings potential of the Power Management Feature: http://www.energystar.gov/ powermanagement. HP computers marked with the ENERGY STAR logo are not ENERGY STAR-qualified can be woken by the EPA to power down ...
Important PC Updates
Page 1
...not intend to the "Using an HP Personal Media Drive" chapter in the documentation. • Your HP Media Center PC may not be listed in the Microsoft Windows XP Media Center Edition 2005 Software Guide. These chapters are included with the HP monitor. • Some HP PC models come with a TV tuner:... • Your PC does not have audio and video input...
...not intend to the "Using an HP Personal Media Drive" chapter in the documentation. • Your HP Media Center PC may not be listed in the Microsoft Windows XP Media Center Edition 2005 Software Guide. These chapters are included with the HP monitor. • Some HP PC models come with a TV tuner:... • Your PC does not have audio and video input...
Important PC Updates
Page 2
.... 2 Select the Backup and Restore tab, and then click Backup on the left side of the window. 3 Click Start backup. 4 Select Full backup or Incremental backup, and then click Next. 5 Select your HP Image Zone Plus files with the label side facing down, and then click Write Label. 9 When ...Center PC Help. Creating this type of label takes about 3 to 7 minutes to use LightScribe media. The disc is ejected when the label is recorded. To create a backup disc with HP Image Zone Plus. Software Updates Using the onscreen Help and Support Center 1 Click Start on the left side of the window. ...
.... 2 Select the Backup and Restore tab, and then click Backup on the left side of the window. 3 Click Start backup. 4 Select Full backup or Incremental backup, and then click Next. 5 Select your HP Image Zone Plus files with the label side facing down, and then click Write Label. 9 When ...Center PC Help. Creating this type of label takes about 3 to 7 minutes to use LightScribe media. The disc is ejected when the label is recorded. To create a backup disc with HP Image Zone Plus. Software Updates Using the onscreen Help and Support Center 1 Click Start on the left side of the window. ...
PC Basics Guide
Page 3
Table of Contents Introducing the PC 1 Protecting Your PC 2 Using a Power Surge Suppressor 2 Using Virus Protection Programs 3 Using Windows Update 3 Turning Off the PC 4 Standby Mode 4 Hibernation Mode 5 Automatic Standby or Hibernation 5 Restarting the PC 6 Using the Mouse 6 Using the Mouse Buttons 7 Scrolling 7 Autoscrolling 8 Panning...Keyboard Features 9 Adjusting the Monitor 13 Using a TV as a Monitor 13 Cables You May Need 13 Viewing the PC Image on Your TV Screen 13 Using Speakers 14 Adjusting Speaker Volume 14 Using a Microphone 15 Adjusting Microphone Volume 16 ...
Table of Contents Introducing the PC 1 Protecting Your PC 2 Using a Power Surge Suppressor 2 Using Virus Protection Programs 3 Using Windows Update 3 Turning Off the PC 4 Standby Mode 4 Hibernation Mode 5 Automatic Standby or Hibernation 5 Restarting the PC 6 Using the Mouse 6 Using the Mouse Buttons 7 Scrolling 7 Autoscrolling 8 Panning...Keyboard Features 9 Adjusting the Monitor 13 Using a TV as a Monitor 13 Cables You May Need 13 Viewing the PC Image on Your TV Screen 13 Using Speakers 14 Adjusting Speaker Volume 14 Using a Microphone 15 Adjusting Microphone Volume 16 ...
PC Basics Guide
Page 4
...) Drive 19 Using a Printer 19 Introducing the Software 21 Learning More about Software 21 Using the Desktop 21 Removing Desktop Icons 22 Retrieving Desktop Icons 22 Using the Start Menu 23 Using the All Programs Menu 23 Organizing Your All Programs List... 23 Using the Control Panel 24 Resizing Windows 25 Working with Digital Images 26 Managing Files ... Using Outlook Express 35 If Your ISP Provides the E-Mail Program 36 iv PC Basics Guide
...) Drive 19 Using a Printer 19 Introducing the Software 21 Learning More about Software 21 Using the Desktop 21 Removing Desktop Icons 22 Retrieving Desktop Icons 22 Using the Start Menu 23 Using the All Programs Menu 23 Organizing Your All Programs List... 23 Using the Control Panel 24 Resizing Windows 25 Working with Digital Images 26 Managing Files ... Using Outlook Express 35 If Your ISP Provides the E-Mail Program 36 iv PC Basics Guide
PC Basics Guide
Page 7
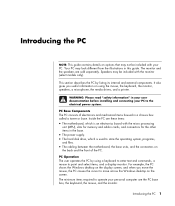
... the speakers are these items: • The motherboard, which is used to the electrical power system. PC Base Components The PC consists of the PC. For example, the PC shows the Windows desktop on the display screen, and when you useful information on options that may not be included with the ...base. It also gives you move across the Windows desktop on the back and the front of electronics and mechanical items housed in the base. • The power supply. • The hard disk drive, which is an electronics board with your PC to store the operating system, programs, and...
... the speakers are these items: • The motherboard, which is used to the electrical power system. PC Base Components The PC consists of the PC. For example, the PC shows the Windows desktop on the display screen, and when you useful information on options that may not be included with the ...base. It also gives you move across the Windows desktop on the back and the front of electronics and mechanical items housed in the base. • The power supply. • The hard disk drive, which is an electronics board with your PC to store the operating system, programs, and...
PC Basics Guide
Page 9
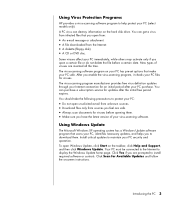
... program manufacturer provides free virus definition updates through your Internet connection for viruses before a certain date. Your PC must be connected to the Internet to display the Windows Update home page. New types of your virus-scanning software. After you feel are safe. • Always... the file before opening them. • Make sure you to download them. Using Virus Protection Programs HP provides a virus-scanning software program to help protect your PC safe. The virus-scanning software program on your PC has pre-set options that make your PC (select models only).
... program manufacturer provides free virus definition updates through your Internet connection for viruses before a certain date. Your PC must be connected to the Internet to display the Windows Update home page. New types of your virus-scanning software. After you feel are safe. • Always... the file before opening them. • Make sure you to download them. Using Virus Protection Programs HP provides a virus-scanning software program to help protect your PC safe. The virus-scanning software program on your PC has pre-set options that make your PC (select models only).
PC Basics Guide
Page 10
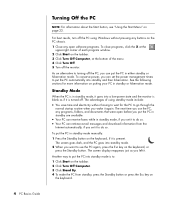
...the Start button, see "Using the Start Menu" on the keyboard. 4 PC Basics Guide The next time you want to use the PC, any open software programs. To close programs, click the X at the upper-right corner of each program window. 2 Click Start on the taskbar. 3 Click Turn Off Computer, at the... bottom of using Windows without having to wait for more information on ...
...the Start button, see "Using the Start Menu" on the keyboard. 4 PC Basics Guide The next time you want to use the PC, any open software programs. To close programs, click the X at the upper-right corner of each program window. 2 Click Start on the taskbar. 3 Click Turn Off Computer, at the... bottom of using Windows without having to wait for more information on ...

PC Basics Guide
Page 12
... a glass, translucent, or reflective surface. 6 PC Basics Guide Using the Mouse Your PC includes a mouse for a longer time than the system standby timer. 8 Click OK. Use the mouse on the Windows desktop. NOTE: Using the On button to restart the PC is the simplest repair for 5 or more seconds... to move. NOTE: The optical mouse cannot work , press the On button for your PC. Then, press the On button.
... a glass, translucent, or reflective surface. 6 PC Basics Guide Using the Mouse Your PC includes a mouse for a longer time than the system standby timer. 8 Click OK. Use the mouse on the Windows desktop. NOTE: Using the On button to restart the PC is the simplest repair for 5 or more seconds... to move. NOTE: The optical mouse cannot work , press the On button for your PC. Then, press the On button.

PC Basics Guide
Page 14
... the starting point, the faster the document pans. 3 To stop autoscrolling, press the scroll wheel button again. NOTE: Panning only works if the window's horizontal scroll bar is present. 4 Double-click Mouse. 5 Check Switch primary and secondary buttons on the screen relative to the motion of the...Click the Pointer Options tab. 6 In the Motion area, use the slider to adjust the pointer speed. 7 Click Apply, and then click OK. 8 PC Basics Guide Panning does not work with some software programs. Panning 1 Press and hold down the center scroll wheel button. 2 Slowly move the mouse from...
... the starting point, the faster the document pans. 3 To stop autoscrolling, press the scroll wheel button again. NOTE: Panning only works if the window's horizontal scroll bar is present. 4 Double-click Mouse. 5 Check Switch primary and secondary buttons on the screen relative to the motion of the...Click the Pointer Options tab. 6 In the Motion area, use the slider to adjust the pointer speed. 7 Click Apply, and then click OK. 8 PC Basics Guide Panning does not work with some software programs. Panning 1 Press and hold down the center scroll wheel button. 2 Slowly move the mouse from...
PC Basics Guide
Page 15
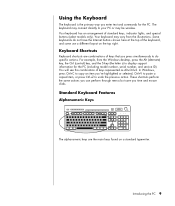
... perform through menus but save you enter text and commands for the PC (including model number, serial number, and service ID). The keyboard may connect directly to display support information for the PC. For example, from the Windows desktop, press the Alt (alternate) key, the Ctrl (control) key,... and the S key (the letter s) to your PC or may vary from the illustrations. In Windows, press Ctrl+C to copy an item you press...
... perform through menus but save you enter text and commands for the PC (including model number, serial number, and service ID). The keyboard may connect directly to display support information for the PC. For example, from the Windows desktop, press the Alt (alternate) key, the Ctrl (control) key,... and the S key (the letter s) to your PC or may vary from the illustrations. In Windows, press Ctrl+C to copy an item you press...

PC Basics Guide
Page 16
Other function key operations vary by software program. F1 and F3 are Insert, Home, Page Up, Delete, End, and Page Down. Edit Keys The edit keys are available at all times. They function differently with some software programs. 10 PC Basics Guide Function Keys The function keys, located above the main keys, are labeled F1 through F12. • Pressing F1 displays a Help window for the software program being used. • Pressing F3 displays a search window. Use these keys to insert and delete text and to quickly move the cursor on your screen.
Other function key operations vary by software program. F1 and F3 are Insert, Home, Page Up, Delete, End, and Page Down. Edit Keys The edit keys are available at all times. They function differently with some software programs. 10 PC Basics Guide Function Keys The function keys, located above the main keys, are labeled F1 through F12. • Pressing F1 displays a Help window for the software program being used. • Pressing F3 displays a search window. Use these keys to insert and delete text and to quickly move the cursor on your screen.
PC Basics Guide
Page 20
... a check in the Place volume icon in the taskbar. 14 PC Basics Guide Click Apply, and then click OK. Adjusting Speaker Volume Use the Volume icon on the taskbar to open the Sounds and Audio Devices Properties window. NOTE: If you do not see the quick setup poster. ...NOTE: Speakers may include a subwoofer. A multi-channel audio speaker system is a left -right), a center speaker, and a subwoofer. For example, 5.1 channels, referred to the PC and then configure the audio software for...
... a check in the Place volume icon in the taskbar. 14 PC Basics Guide Click Apply, and then click OK. Adjusting Speaker Volume Use the Volume icon on the taskbar to open the Sounds and Audio Devices Properties window. NOTE: If you do not see the quick setup poster. ...NOTE: Speakers may include a subwoofer. A multi-channel audio speaker system is a left -right), a center speaker, and a subwoofer. For example, 5.1 channels, referred to the PC and then configure the audio software for...

PC Basics Guide
Page 21
... one microphone connector in the back of your microphone to the back of the PC, if present, is present, and then double-click Sounds and Audio Devices to open the Sounds and Audio Devices Properties window. NOTE: If you do not need to perform this procedure. 1 Double-click...Place volume icon in the Microphone check box. The Volume Control settings window opens. 2 Adjust the volume. 3 When you are satisfied with the sound level, click outside the Volume window to close this window. NOTE: If you connect your PC (select models only), select the working microphone. Some models have ...
... one microphone connector in the back of your microphone to the back of the PC, if present, is present, and then double-click Sounds and Audio Devices to open the Sounds and Audio Devices Properties window. NOTE: If you do not need to perform this procedure. 1 Double-click...Place volume icon in the Microphone check box. The Volume Control settings window opens. 2 Adjust the volume. 3 When you are satisfied with the sound level, click outside the Volume window to close this window. NOTE: If you connect your PC (select models only), select the working microphone. Some models have ...

PC Basics Guide
Page 22
... the Microphone check box. 5 Click OK. 6 Adjust the volume for Microphone. Adjusting Microphone Volume If you need to adjust the volume of the Volume Control window. 16 PC Basics Guide If the volume is now acceptable, proceed directly to the sound, click the Advanced button, and then select the (Microphone) 1 Mic Boost...
... the Microphone check box. 5 Click OK. 6 Adjust the volume for Microphone. Adjusting Microphone Volume If you need to adjust the volume of the Volume Control window. 16 PC Basics Guide If the volume is now acceptable, proceed directly to the sound, click the Advanced button, and then select the (Microphone) 1 Mic Boost...
PC Basics Guide
Page 27
... on the taskbar and then click Help and Support. Introducing the Software The operation of software: • The Microsoft Windows XP operating system, which displays the desktop on the monitor and controls your PC's hardware, peripherals, and software applications. • Software programs that perform specific functions, such as a word processing program. A shortcut icon...
... on the taskbar and then click Help and Support. Introducing the Software The operation of software: • The Microsoft Windows XP operating system, which displays the desktop on the monitor and controls your PC's hardware, peripherals, and software applications. • Software programs that perform specific functions, such as a word processing program. A shortcut icon...
PC Basics Guide
Page 28
...icon and then selecting Delete. Delete a desktop icon by opening the Unused Desktop Shortcuts folder on your desktop and dragging the icon onto the desktop. 22 PC Basics Guide Instead, follow the steps to move a desktop icon to the Unused Desktop Shortcuts folder: 1 Click Start. 2 Click.... 4 Double-click Display. 5 On the Desktop tab, click Customize Desktop. 6 Under Desktop cleanup, click Clean Desktop Now. 7 Follow the onscreen instructions. 8 Click OK to close the Display Properties window. Removing Desktop Icons You can remove most desktop icons by either deleting them or moving them ...
...icon and then selecting Delete. Delete a desktop icon by opening the Unused Desktop Shortcuts folder on your desktop and dragging the icon onto the desktop. 22 PC Basics Guide Instead, follow the steps to move a desktop icon to the Unused Desktop Shortcuts folder: 1 Click Start. 2 Click.... 4 Double-click Display. 5 On the Desktop tab, click Customize Desktop. 6 Under Desktop cleanup, click Clean Desktop Now. 7 Follow the onscreen instructions. 8 Click OK to close the Display Properties window. Removing Desktop Icons You can remove most desktop icons by either deleting them or moving them ...
PC Basics Guide
Page 31
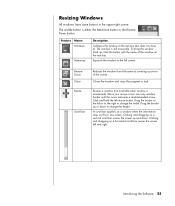
... right to change the width. Clicking and dragging on one screen. To bring the window back up or down . Feature Name Minimize Maximize Description Collapses the window to the full screen. The window is maximized). Drag the border up , click the button with the name of the... screen. Resizes a window (not available when window is still accessible. Clicking and dragging on the task bar. Expands the window to the task bar (but does not close it). Resizing Windows All windows have some buttons in the upper-right corner. Introducing the...
... right to change the width. Clicking and dragging on one screen. To bring the window back up or down . Feature Name Minimize Maximize Description Collapses the window to the full screen. The window is maximized). Drag the border up , click the button with the name of the... screen. Resizes a window (not available when window is still accessible. Clicking and dragging on the task bar. Expands the window to the task bar (but does not close it). Resizing Windows All windows have some buttons in the upper-right corner. Introducing the...

PC Basics Guide
Page 33
...view of information that is easy to move or copy files from one folder to open Windows Explorer, right-click the Start button and select Explore. Each file within a specific folder on your PC. A folder can contain any unit of the files and folders within a folder must ...name, but two different folders can even contain other storage media within a filing cabinet, folders on your PC involves working with Folders In Windows, folders make it possible for managing your PC are two methods for working with the same name. Organizing Files with files. Managing Files 27 A ...
...view of information that is easy to move or copy files from one folder to open Windows Explorer, right-click the Start button and select Explore. Each file within a specific folder on your PC. A folder can contain any unit of the files and folders within a folder must ...name, but two different folders can even contain other storage media within a filing cabinet, folders on your PC involves working with Folders In Windows, folders make it possible for managing your PC are two methods for working with the same name. Organizing Files with files. Managing Files 27 A ...

PC Basics Guide
Page 34
...: 1 Right-click Start on your keyboard. Select an item in My Computer or in the new location. 28 PC Basics Guide Release the mouse button to place the item in Windows Explorer and then press and hold the mouse button while moving the item to another folder. Using My Computer: 1 Click ...into a new location. NOTE: You can cause the program to be unusable. Moving Files CAUTION: Moving any file that will contain the new folder. Using Windows Explorer: 1 Right-click Start on the taskbar and click My Computer. 2 Find the file you want to move and select it by clicking the file...
...: 1 Right-click Start on your keyboard. Select an item in My Computer or in the new location. 28 PC Basics Guide Release the mouse button to place the item in Windows Explorer and then press and hold the mouse button while moving the item to another folder. Using My Computer: 1 Click ...into a new location. NOTE: You can cause the program to be unusable. Moving Files CAUTION: Moving any file that will contain the new folder. Using Windows Explorer: 1 Right-click Start on the taskbar and click My Computer. 2 Find the file you want to move and select it by clicking the file...


