
Important PC Updates
Page 1
... Media Center without a remote control: 1 Click Start on the front panel. • You cannot use the video capture software referred to FM Radio • Using an HP Personal Media Drive • Importing, Editing, and Burning Videos Opening and navigating Media Center without an HP Personal Media Drive If you can disregard this drive with a camera docking bay. NOTE: HP does not support TV tuner cards purchased separately. HP speakers can be listed in the Getting Started Guide for select models...
... Media Center without a remote control: 1 Click Start on the front panel. • You cannot use the video capture software referred to FM Radio • Using an HP Personal Media Drive • Importing, Editing, and Burning Videos Opening and navigating Media Center without an HP Personal Media Drive If you can disregard this drive with a camera docking bay. NOTE: HP does not support TV tuner cards purchased separately. HP speakers can be listed in the Getting Started Guide for select models...
PC Basics Guide
Page 9
... install required software or controls. Using Virus Protection Programs HP provides a virus-scanning software program to help protect your PC safe. A PC virus can purchase a subscription service for an initial period after the initial free period expires. The virus-scanning software program on the hard disk drive. New types of your Internet connection for updates after your PC, identifies necessary updates, and helps you open Windows Update, click Start on the taskbar, click Help and Support...
... install required software or controls. Using Virus Protection Programs HP provides a virus-scanning software program to help protect your PC safe. A PC virus can purchase a subscription service for an initial period after the initial free period expires. The virus-scanning software program on the hard disk drive. New types of your Internet connection for updates after your PC, identifies necessary updates, and helps you open Windows Update, click Start on the taskbar, click Help and Support...
PC Basics Guide
Page 25
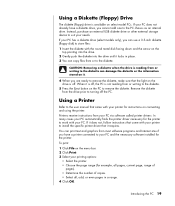
... most software programs and Internet sites if you can print text and graphics from the drive prior to suit your PC does not already have a printer connected to the PC chassis as an internal drive. If it is not reading from or writing to the diskette. 5 Press the Eject button on select model PCs. Instead, purchase an external USB diskette drive or other external storage device to turning...
... most software programs and Internet sites if you can print text and graphics from the drive prior to suit your PC does not already have a printer connected to the PC chassis as an internal drive. If it is not reading from or writing to the diskette. 5 Press the Eject button on select model PCs. Instead, purchase an external USB diskette drive or other external storage device to turning...

PC Basics Guide
Page 38
... most of the Internet. You use the information and services available there, you access to share printers, data, and other through telephone lines, digital service, or cable lines. Your connection to an ISP may be called a network interface adapter, a Network Interface Card, or a NIC ) provides a high-speed, or broadband, connection to the Internet through the LAN. A Ethernet connector (RJ-45 port) B Ethernet indicator lights Setting Up the Ethernet Connection The Ethernet connection (may be through...
... most of the Internet. You use the information and services available there, you access to share printers, data, and other through telephone lines, digital service, or cable lines. Your connection to an ISP may be called a network interface adapter, a Network Interface Card, or a NIC ) provides a high-speed, or broadband, connection to the Internet through the LAN. A Ethernet connector (RJ-45 port) B Ethernet indicator lights Setting Up the Ethernet Connection The Ethernet connection (may be through...
PC Basics Guide
Page 48
... 33 Internet connection, high speed, 32 Internet Service Provider (ISP), defined, 32 K keyboard indicators, 11 shortcuts, 9 types of buttons, 12 using , 19 programs, uninstalling, 38 See hibernation mode standby mode, about , 32 O Off button. floppy disk. See Internet, about network interface about , 4 standby mode, automatic, 5 standby mode, manual, 4 turning off, 4 performance improving PC, 37 pointer speed, adjusting, 8 power management settings, modifying, 5 printer using , 9 keyboard keys alphanumeric, 9 arrow, 11 edit, 10 function keys, 10 numeric, 11 L logging off PC operating system...
... 33 Internet connection, high speed, 32 Internet Service Provider (ISP), defined, 32 K keyboard indicators, 11 shortcuts, 9 types of buttons, 12 using , 19 programs, uninstalling, 38 See hibernation mode standby mode, about , 32 O Off button. floppy disk. See Internet, about network interface about , 4 standby mode, automatic, 5 standby mode, manual, 4 turning off, 4 performance improving PC, 37 pointer speed, adjusting, 8 power management settings, modifying, 5 printer using , 9 keyboard keys alphanumeric, 9 arrow, 11 edit, 10 function keys, 10 numeric, 11 L logging off PC operating system...

Upgrading and Servicing Guide
Page 6
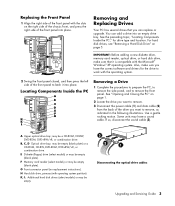
... of sharp edges inside of the panel extended slightly. Removing the Side Panel 1 Loosen the two thumbscrews (A) that secure the panel to the equipment, do not plug telecommunications or telephone connectors into the network interface card (NIC) (labeled as the keyboard, mouse, and monitor) and external devices. 3 Turn on the inside the chassis. 2 Swing open the front panel and lift it off the chassis. 2 Upgrading and Servicing Guide Ensure the hooks...
... of sharp edges inside of the panel extended slightly. Removing the Side Panel 1 Loosen the two thumbscrews (A) that secure the panel to the equipment, do not plug telecommunications or telephone connectors into the network interface card (NIC) (labeled as the keyboard, mouse, and monitor) and external devices. 3 Turn on the inside the chassis. 2 Swing open the front panel and lift it off the chassis. 2 Upgrading and Servicing Guide Ensure the hooks...
Upgrading and Servicing Guide
Page 7
... adding a new diskette drive, memory card reader, optical drive, or hard disk drive, make sure you can add a drive into place. A Upper optical drive bay; B, C, D Optical drive bay; Disconnecting the optical drive cables Upgrading and Servicing Guide 3 You can replace or upgrade. See "Opening and Closing the PC" on page 5. F Memory card reader (select models) or may be empty (blank plate). may be a CD-ROM, CD-RW, DVD-ROM, DVD+RW/+R, or combination drive. G Front connector panel (no replacement instructions). K, L Additional hard disk drives (select models...
... adding a new diskette drive, memory card reader, optical drive, or hard disk drive, make sure you can add a drive into place. A Upper optical drive bay; B, C, D Optical drive bay; Disconnecting the optical drive cables Upgrading and Servicing Guide 3 You can replace or upgrade. See "Opening and Closing the PC" on page 5. F Memory card reader (select models) or may be empty (blank plate). may be a CD-ROM, CD-RW, DVD-ROM, DVD+RW/+R, or combination drive. G Front connector panel (no replacement instructions). K, L Additional hard disk drives (select models...
Upgrading and Servicing Guide
Page 9
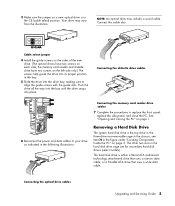
... the hard disk drive cage are for secondary hard disk drives (select models). 3 Make sure the jumper on page 1. Your drive may include a sound cable. Removing a Hard Disk Drive The system hard disk drive is either a Serial ATA (advanced technology attachment) drive that uses a narrow data cable, or a Parallel ATA drive that uses a wide data cable. The other two slots in the following illustrations: Connecting the memory card reader drive cables 7 Complete the procedures to align the guide screws with the guide slots. Cable select jumper 4 Install the guide screws...
... the hard disk drive cage are for secondary hard disk drives (select models). 3 Make sure the jumper on page 1. Your drive may include a sound cable. Removing a Hard Disk Drive The system hard disk drive is either a Serial ATA (advanced technology attachment) drive that uses a narrow data cable, or a Parallel ATA drive that uses a wide data cable. The other two slots in the following illustrations: Connecting the memory card reader drive cables 7 Complete the procedures to align the guide screws with the guide slots. Cable select jumper 4 Install the guide screws...

Upgrading and Servicing Guide
Page 10
... files on the hard disk drive to do so will result in data loss. Failure to an external storage device, such as a CD, before removing the hard disk drive. You need to run System Recovery using the recovery discs to load the factory-installed files. 1 Complete the procedures to prepare the PC, and to install the new drive. The Serial ATA drive does not use a gentle rocking motion to free the plug. 4 Release the drive from the cage...
... files on the hard disk drive to do so will result in data loss. Failure to an external storage device, such as a CD, before removing the hard disk drive. You need to run System Recovery using the recovery discs to load the factory-installed files. 1 Complete the procedures to prepare the PC, and to install the new drive. The Serial ATA drive does not use a gentle rocking motion to free the plug. 4 Release the drive from the cage...
Upgrading and Servicing Guide
Page 12
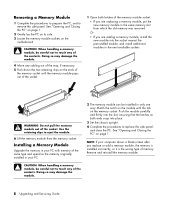
... you replace or add a memory module, the memory is installed incorrectly, or it is the wrong type of the contacts. Match the notch on the module with memory of the memory module socket: • If you are adding a memory module, install the new module into the slot, ensuring that the latches on page 1. Remove and reinstall the memory module. Use the retaining clips to remove the side panel...
... you replace or add a memory module, the memory is installed incorrectly, or it is the wrong type of the contacts. Match the notch on the module with memory of the memory module socket: • If you are adding a memory module, install the new module into the slot, ensuring that the latches on page 1. Remove and reinstall the memory module. Use the retaining clips to remove the side panel...

Upgrading and Servicing Guide
Page 13
... not replacing the old add-in card with a new add-in card, close the PC. Upgrading and Servicing Guide 9 The latch should be used to add components to the card, power supply, keyboard, and monitor. Removing or Installing an Add-in Card An add-in card is completely seated into its side. 3 Inside the PC, locate the add-in card slots on the motherboard. 4 Release the latch that retains the cards by model. See "Opening and Closing the PC" on page 1. The PC component configurations vary...
... not replacing the old add-in card with a new add-in card, close the PC. Upgrading and Servicing Guide 9 The latch should be used to add components to the card, power supply, keyboard, and monitor. Removing or Installing an Add-in Card An add-in card is completely seated into its side. 3 Inside the PC, locate the add-in card slots on the motherboard. 4 Release the latch that retains the cards by model. See "Opening and Closing the PC" on page 1. The PC component configurations vary...
Getting Started Guide
Page 14
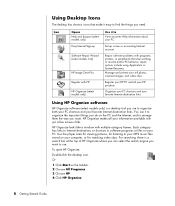
... images, and video clips. Or 1 Click Start on your PC. repair options include using Application or System Recovery. You use to View onscreen Help information about your favorite Internet destination links. For searching, there is a desktop tool you need. To open HP Organize: Double-click the desktop icon. Manage and protect your favorite Internet destination links. Icon Opens Help and Support (select models only) Easy Internet Sign-up a new or an existing Internet...
... images, and video clips. Or 1 Click Start on your PC. repair options include using Application or System Recovery. You use to View onscreen Help information about your favorite Internet destination links. For searching, there is a desktop tool you need. To open HP Organize: Double-click the desktop icon. Manage and protect your favorite Internet destination links. Icon Opens Help and Support (select models only) Easy Internet Sign-up a new or an existing Internet...
Getting Started Guide
Page 27
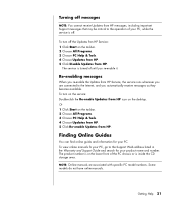
...-enable it. To turn on the lower front of your PC, while the service is on the service: Double-click the Re-enable Updates from HP messages, including important Support messages that may be critical to the Support Web address listed in the Warranty and Support Guide and search for your product name and number. The product number is off until you are associated with specific PC model numbers...
...-enable it. To turn on the lower front of your PC, while the service is on the service: Double-click the Re-enable Updates from HP messages, including important Support messages that may be critical to the Support Web address listed in the Warranty and Support Guide and search for your product name and number. The product number is off until you are associated with specific PC model numbers...
Getting Started Guide
Page 37
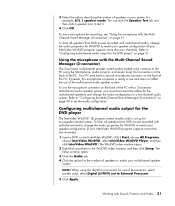
... multichannel audio speaker system. The Setup window opens. 3 Click the Audio tab. 4 Click the option for example, 6/5.1 speaker mode. Refer to "Configuring multichannel audio output for WinDVD to match your speaker configuration (if your InterVideo WinDVD program supports more than two channels). If present, this microphone connector is set the audio configuration. Working with multichannel audio, change the audio properties for the DVD player" on the back of the PC with the MultiChannel Sound Manager (3-connector)" on...
... multichannel audio speaker system. The Setup window opens. 3 Click the Audio tab. 4 Click the option for example, 6/5.1 speaker mode. Refer to "Configuring multichannel audio output for WinDVD to match your speaker configuration (if your InterVideo WinDVD program supports more than two channels). If present, this microphone connector is set the audio configuration. Working with multichannel audio, change the audio properties for the DVD player" on the back of the PC with the MultiChannel Sound Manager (3-connector)" on...
Getting Started Guide
Page 39
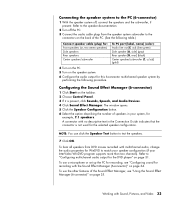
... the audio cable plugs from DVD movies recorded with the Sound Effect Manager (6-connector)" on page 34. To use a microphone or set up the PC for recording, see "Using the Sound Effect Manager (6-connector)" on page 35. Configuring the Sound Effect Manager (6-connector) 1 Click Start on page 31. The window opens. 5 Click the Speaker Configuration button. 6 Select the option describing the number of the PC. (See the following table.) Connect speaker cable (plug) for: Front speakers (or, two stereo speakers) Side speakers Rear speakers Center speaker/subwoofer To PC port...
... the audio cable plugs from DVD movies recorded with the Sound Effect Manager (6-connector)" on page 34. To use a microphone or set up the PC for recording, see "Using the Sound Effect Manager (6-connector)" on page 35. Configuring the Sound Effect Manager (6-connector) 1 Click Start on page 31. The window opens. 5 Click the Speaker Configuration button. 6 Select the option describing the number of the PC. (See the following table.) Connect speaker cable (plug) for: Front speakers (or, two stereo speakers) Side speakers Rear speakers Center speaker/subwoofer To PC port...

Getting Started Guide
Page 67
.... To use the WinDVD control panel: • To move the WinDVD control panel, place the mouse pointer on the panel (but not on a button), and drag it to the desired location on the screen. • To resize the video window when it by clicking the ? (question mark) icon in any player or drive in the WinDVD control panel. Using country/region codes Most DVD discs have country/region codes embedded...
.... To use the WinDVD control panel: • To move the WinDVD control panel, place the mouse pointer on the panel (but not on a button), and drag it to the desired location on the screen. • To resize the video window when it by clicking the ? (question mark) icon in any player or drive in the WinDVD control panel. Using country/region codes Most DVD discs have country/region codes embedded...

Getting Started Guide
Page 103
... turned on the PC to integrate the device with other devices. A Plug and Play card may need an updated driver for an update. You may not automatically configure when added if the default configuration conflicts with the PC system. Refer to resolve the resource conflict. Deselect the automatic settings in the operating system for the card, and choose a basic configuration that the pins in the cable or connector are properly and securely connected...
... turned on the PC to integrate the device with other devices. A Plug and Play card may need an updated driver for an update. You may not automatically configure when added if the default configuration conflicts with the PC system. Refer to resolve the resource conflict. Deselect the automatic settings in the operating system for the card, and choose a basic configuration that the pins in the cable or connector are properly and securely connected...

Getting Started Guide
Page 105
... correct modem speed and COM port are selected: 1 Click Start, and then click Control Panel. 2 Click Printers and Other Hardware, if it is enabled. 7 If there are further problems, click the Troubleshoot button and follow the onscreen instructions. NOTE: Removing the AOL program will not cancel your account with your wireless set. Keyboard is not set the ID channel by pressing the Connect button on the wireless receiver and...
... correct modem speed and COM port are selected: 1 Click Start, and then click Control Panel. 2 Click Printers and Other Hardware, if it is enabled. 7 If there are further problems, click the Troubleshoot button and follow the onscreen instructions. NOTE: Removing the AOL program will not cancel your account with your wireless set. Keyboard is not set the ID channel by pressing the Connect button on the wireless receiver and...
Getting Started Guide
Page 107
... Warranty and Support Guide to the outlet. PC powered off . PC is defective. Reseat drive power, data, and power supply cables. Connect the monitor to the PC, plug it cool down before attempting to the external power source are not blocked and internal fan is running. Wrong memory modules were used in an upgrade, or memory modules were installed in the drive during startup. Let it in, and turn on the keyboard to open the Help and Support Center, or refer...
... Warranty and Support Guide to the outlet. PC powered off . PC is defective. Reseat drive power, data, and power supply cables. Connect the monitor to the PC, plug it cool down before attempting to the external power source are not blocked and internal fan is running. Wrong memory modules were used in an upgrade, or memory modules were installed in the drive during startup. Let it in, and turn on the keyboard to open the Help and Support Center, or refer...
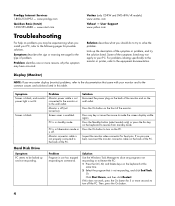
Warranty and Support Guide
Page 4
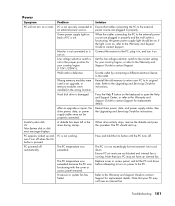
... problem. Hard Disk Drive Symptom PC seems to turn on the back of the symptoms listed may not apply to turn off the PC. Then, press the On button. 4 Problem identifies one or more seconds to be experiencing when you may have occurred. PC is off . Press the On button to your PC. If no pins are bent, reconnect the monitor connector cable on the PC. Solution Use the Windows Task Manager...
... problem. Hard Disk Drive Symptom PC seems to turn on the back of the symptoms listed may not apply to turn off the PC. Then, press the On button. 4 Problem identifies one or more seconds to be experiencing when you may have occurred. PC is off . Press the On button to your PC. If no pins are bent, reconnect the monitor connector cable on the PC. Solution Use the Windows Task Manager...


