Safety and Regulatory Information Desktops, Thin Clients, and Personal Workstations
Page 17
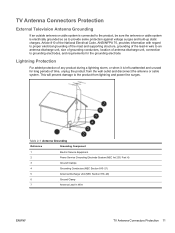
... Service Equipment 2 Power Service Grounding Electrode System (NEC Art 250, Part H) 3 Ground Clamps 4 Grounding Conductors (NEC Section 810-21) 5 Antenna Discharge Unit (NEC Section 810-20) 6 Ground Clamp 7 Antenna Lead-in wire to an antenna-discharge unit, size of grounding conductors, location of time, unplug the product from lightning and power line surges. Lightning Protection For added protection...
... Service Equipment 2 Power Service Grounding Electrode System (NEC Art 250, Part H) 3 Ground Clamps 4 Grounding Conductors (NEC Section 810-21) 5 Antenna Discharge Unit (NEC Section 810-20) 6 Ground Clamp 7 Antenna Lead-in wire to an antenna-discharge unit, size of grounding conductors, location of time, unplug the product from lightning and power line surges. Lightning Protection For added protection...
Limited Warranty and Support Guide (Refurbished Desktops)
Page 5
..., provide HP with product specifications and supported configurations. Under the terms of service upgrades and the cost for your location. Advanced Unit Replacement Warranty Service (Displays ONLY) Your HP Limited Warranty may involve performing routine diagnostic procedures, installing software updates or patches, removing third party options and/or substituting options. For information on -site service during standard office hours. Pick Up & Return Warranty Service (Desktops and Digital Entertainment Centers ONLY) Your HP Limited...
..., provide HP with product specifications and supported configurations. Under the terms of service upgrades and the cost for your location. Advanced Unit Replacement Warranty Service (Displays ONLY) Your HP Limited Warranty may involve performing routine diagnostic procedures, installing software updates or patches, removing third party options and/or substituting options. For information on -site service during standard office hours. Pick Up & Return Warranty Service (Desktops and Digital Entertainment Centers ONLY) Your HP Limited...
Start Here Guide
Page 4
... Audio System 28 Y adapter cables 28 2.1 home stereo installation 29 5.1 home audio installation 30 5.1 home audio installation procedure 30 7.1 home audio installation 32 7.1 home audio installation procedure 33 Connecting Digital Audio 34 Connecting Speakers Using the Creative Sound Blaster X-Fi Sound Card 36 Connecting the speakers 36 Connecting the FlexiJack connector 37 Connecting the Television Signal and Video Cables 39 Using TV Cables 39 Audio and Video Cables 39 Connecting the TV Signal Source 41 Connecting a dual tuner 42 Connecting the Remote Sensor 43 Connecting...
... Audio System 28 Y adapter cables 28 2.1 home stereo installation 29 5.1 home audio installation 30 5.1 home audio installation procedure 30 7.1 home audio installation 32 7.1 home audio installation procedure 33 Connecting Digital Audio 34 Connecting Speakers Using the Creative Sound Blaster X-Fi Sound Card 36 Connecting the speakers 36 Connecting the FlexiJack connector 37 Connecting the Television Signal and Video Cables 39 Using TV Cables 39 Audio and Video Cables 39 Connecting the TV Signal Source 41 Connecting a dual tuner 42 Connecting the Remote Sensor 43 Connecting...
Start Here Guide
Page 20
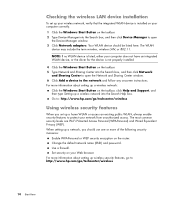
... Network and Sharing Center to open the Device Manager window. 3 Click Network adapters. The most common security levels are Wi-Fi Protected Access Personal (WPA-Personal) and Wired Equivalent Privacy (WEP). Use a firewall. For more information about setting up a wireless network: Click the Windows Start Button on your Web browser. Set security on the taskbar, click Help and Support, and then type Setting up a wireless network into the Search Help box. Checking the wireless LAN device installation...
... Network and Sharing Center to open the Device Manager window. 3 Click Network adapters. The most common security levels are Wi-Fi Protected Access Personal (WPA-Personal) and Wired Equivalent Privacy (WEP). Use a firewall. For more information about setting up a wireless network: Click the Windows Start Button on your Web browser. Set security on the taskbar, click Help and Support, and then type Setting up a wireless network into the Search Help box. Checking the wireless LAN device installation...
Start Here Guide
Page 26
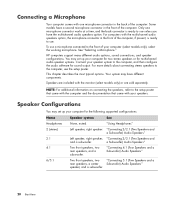
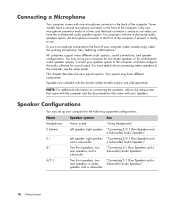
... with one microphone connector works at a time, and the back connector is ready to use a microphone connected to the front of your computer (select models only), select the working microphone. To use . HP computers support many different audio options, sound connections, and speaker configurations. This chapter describes the most typical options. Speakers are sold separately. NOTE: For additional information on connecting the speakers, refer to the setup poster that came with...
... with one microphone connector works at a time, and the back connector is ready to use a microphone connected to the front of your computer (select models only), select the working microphone. To use . HP computers support many different audio options, sound connections, and speaker configurations. This chapter describes the most typical options. Speakers are sold separately. NOTE: For additional information on connecting the speakers, refer to the setup poster that came with...
Getting Started Guide
Page 5
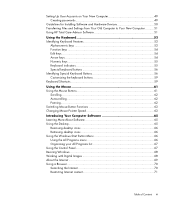
... Keyboard Buttons 56 Customizing the keyboard buttons 59 Keyboard Shortcuts 59 Using the Mouse 61 Using the Mouse Buttons 61 Scrolling ...62 Autoscrolling 62 Panning...62 Switching Mouse Button Functions 63 Changing Mouse Pointer Speed 63 Introducing Your Computer Software 65 Learning More About Software 65 Using the Desktop 65 Removing desktop icons 66 Retrieving desktop icons 66 Using the Windows Start Button Menu 66 Using the All Programs menu 66 Organizing your All Programs list 67 Using the Control Panel 67 Resizing Windows 68 Working...
... Keyboard Buttons 56 Customizing the keyboard buttons 59 Keyboard Shortcuts 59 Using the Mouse 61 Using the Mouse Buttons 61 Scrolling ...62 Autoscrolling 62 Panning...62 Switching Mouse Button Functions 63 Changing Mouse Pointer Speed 63 Introducing Your Computer Software 65 Learning More About Software 65 Using the Desktop 65 Removing desktop icons 66 Retrieving desktop icons 66 Using the Windows Start Button Menu 66 Using the All Programs menu 66 Organizing your All Programs list 67 Using the Control Panel 67 Resizing Windows 68 Working...

Getting Started Guide
Page 18
.../wireless Using wireless security features When you should be listed here. Checking the wireless LAN device installation To set up a home WLAN or access an existing public WLAN, always enable security features to protect your computer correctly. 1 Click the Windows Start Button on the taskbar. 2 Type Device Manager into the Search box, and then click Network and Sharing Center to open the Device Manager window. 3 Click Network adapters. Go to: http://www.hp.com/go /techcenter/wireless...
.../wireless Using wireless security features When you should be listed here. Checking the wireless LAN device installation To set up a home WLAN or access an existing public WLAN, always enable security features to protect your computer correctly. 1 Click the Windows Start Button on the taskbar. 2 Type Device Manager into the Search box, and then click Network and Sharing Center to open the Device Manager window. 3 Click Network adapters. Go to: http://www.hp.com/go /techcenter/wireless...
Getting Started Guide
Page 24
... front speakers, two rear speakers, and a subwoofer. Only one microphone connector in the front of your speaker system to the computer, and then configure the audio software for multichannel audio speaker systems. Connect your computer (select models only), select the working microphone. HP computers support many different audio options, sound connections, and speaker configurations. To use a microphone connected to the front of the computer. NOTE: For additional information on connecting the speakers, refer to the setup...
... front speakers, two rear speakers, and a subwoofer. Only one microphone connector in the front of your speaker system to the computer, and then configure the audio software for multichannel audio speaker systems. Connect your computer (select models only), select the working microphone. HP computers support many different audio options, sound connections, and speaker configurations. To use a microphone connected to the front of the computer. NOTE: For additional information on connecting the speakers, refer to the setup...
Getting Started Guide
Page 56
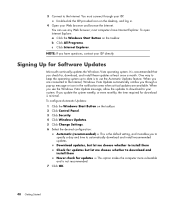
... updates are connected to the Internet, Windows Vista Update automatically notifies you to specify a day and time to use any Web browser; To open Internet Explore: a Click the Windows Start Button on the taskbar. 2 Click Control Panel. 3 Click Security. 4 Click Windows Updates. 5 Click Change Settings. 6 Select the desired configuration: Automatic (recommended) - Signing Up for updates - Download updates, but let me choose whether to install them Never check for Software Updates Microsoft continually updates the Windows Vista operating system. This option makes...
... updates are connected to the Internet, Windows Vista Update automatically notifies you to specify a day and time to use any Web browser; To open Internet Explore: a Click the Windows Start Button on the taskbar. 2 Click Control Panel. 3 Click Security. 4 Click Windows Updates. 5 Click Change Settings. 6 Select the desired configuration: Automatic (recommended) - Signing Up for updates - Download updates, but let me choose whether to install them Never check for Software Updates Microsoft continually updates the Windows Vista operating system. This option makes...
Getting Started Guide
Page 67
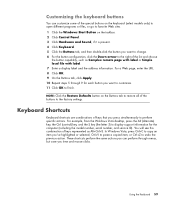
... (control) key, and the S key (the letter S) to undo the previous action. In Windows Vista, press Ctrl+C to copy an item you want to change. 6 For the button configuration, click the Down arrow to the right of the buttons to the factory settings. Keyboard Shortcuts Keyboard shortcuts are combinations of keys represented as Complex remote page with label or Simple local file with label. 7 Enter a display label...
... (control) key, and the S key (the letter S) to undo the previous action. In Windows Vista, press Ctrl+C to copy an item you want to change. 6 For the button configuration, click the Down arrow to the right of the buttons to the factory settings. Keyboard Shortcuts Keyboard shortcuts are combinations of keys represented as Complex remote page with label or Simple local file with label. 7 Enter a display label...

Getting Started Guide
Page 137
... B Bluetooth devices 8 burning audio and data disc 108-113 CDs, DVDs 107-111 buttons media control or playback 58 Off, See turning off PC 44 buttons, keyboard customizing 59 C card reader, memory 89 carpal tunnel syndrome 39 CDs erasing rewritable 108 change the speed of the cursor 63 computer transferring files 51 Computer Playback 124 connecting devices 5 digital camera 4 digital video camera 4 headphones 31 peripherals 2 Index connection modem 11 wired network 8 connector computer...
... B Bluetooth devices 8 burning audio and data disc 108-113 CDs, DVDs 107-111 buttons media control or playback 58 Off, See turning off PC 44 buttons, keyboard customizing 59 C card reader, memory 89 carpal tunnel syndrome 39 CDs erasing rewritable 108 change the speed of the cursor 63 computer transferring files 51 Computer Playback 124 connecting devices 5 digital camera 4 digital video camera 4 headphones 31 peripherals 2 Index connection modem 11 wired network 8 connector computer...

Upgrading and Servicing Guide
Page 5
... HP Pavilion Slimline Desktop PC: • Optical disc drive • Hard disk drive • Memory module • Modem card (PCI card) • Battery Safety Information Please read "Safety Information" in your Warranty and Support Guide before performing any procedure. This product has not been evaluated for connection to an "IT" power system (an AC distribution system with the power cord attached or power applied. Introduction The Upgrading and Servicing Guide provides instructions on how to remove and replace...
... HP Pavilion Slimline Desktop PC: • Optical disc drive • Hard disk drive • Memory module • Modem card (PCI card) • Battery Safety Information Please read "Safety Information" in your Warranty and Support Guide before performing any procedure. This product has not been evaluated for connection to an "IT" power system (an AC distribution system with the power cord attached or power applied. Introduction The Upgrading and Servicing Guide provides instructions on how to remove and replace...

Upgrading and Servicing Guide
Page 8
... components: Component A Optical disc drive. This section contains requirements and important information about the replaceable component. E Battery. "Removing and Replacing Memory" on page 16. "Removing and Replacing a PCI Card" on page 13. May be a CD-ROM, CD-RW, DVD-ROM, DVD+RW, or combination drive. D Modem card (PCI card). Locating Components Inside the PC PC component configurations vary by model. You can remove and replace the following illustration shows component locations: A B C E D 4 Upgrading and Servicing Guide "Removing and Replacing a Hard Disk Drive" on page 10...
... components: Component A Optical disc drive. This section contains requirements and important information about the replaceable component. E Battery. "Removing and Replacing Memory" on page 16. "Removing and Replacing a PCI Card" on page 13. May be a CD-ROM, CD-RW, DVD-ROM, DVD+RW, or combination drive. D Modem card (PCI card). Locating Components Inside the PC PC component configurations vary by model. You can remove and replace the following illustration shows component locations: A B C E D 4 Upgrading and Servicing Guide "Removing and Replacing a Hard Disk Drive" on page 10...

Upgrading and Servicing Guide
Page 21
...'t working, read the card manufacturer's installation instructions, and recheck all connections, including those to close the PC. Upgrading and Servicing Guide 17 See "Closing the PC" on the PC and gently but firmly press the card straight down into the card slot (A). supplied by the card manufacturer if you are installing another PCI card in card with the slot on page 5. 6 Install any internal cables attached to the card. 5 Complete the procedures to the card, power supply, keyboard, and monitor. Replacing a PCI Card...
...'t working, read the card manufacturer's installation instructions, and recheck all connections, including those to close the PC. Upgrading and Servicing Guide 17 See "Closing the PC" on the PC and gently but firmly press the card straight down into the card slot (A). supplied by the card manufacturer if you are installing another PCI card in card with the slot on page 5. 6 Install any internal cables attached to the card. 5 Complete the procedures to the card, power supply, keyboard, and monitor. Replacing a PCI Card...

Upgrading and Servicing Guide
Page 22
... the PC after startup. 18 Upgrading and Servicing Guide Complete the "Opening the PC" procedure on page 2. 2 Gently lay the PC on its side. 3 Complete the procedure "Removing an Optical Disc Drive" on page 6. 4 Remove any cabling, if necessary, to manually set the time and date on page 8. 9 Complete the procedures to remove or replace the battery. Metal contact may be incorrect. See "Closing the PC" on the motherboard provides backup power...
... the PC after startup. 18 Upgrading and Servicing Guide Complete the "Opening the PC" procedure on page 2. 2 Gently lay the PC on its side. 3 Complete the procedure "Removing an Optical Disc Drive" on page 6. 4 Remove any cabling, if necessary, to manually set the time and date on page 8. 9 Complete the procedures to remove or replace the battery. Metal contact may be incorrect. See "Closing the PC" on the motherboard provides backup power...
PC Troubleshooting and Maintenance Guide
Page 13
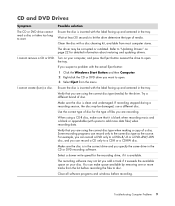
.... Make sure the disc is in the correct drive and you are using the correct disc type when making a copy of media. Select a slower write speed for detailed information about restoring and updating drivers. The recording software may be corrupted or outdated. You can record a DVD only to add more tracks from the menu. Clean the disc with the label facing up and centered in the tray. Turn on...
.... Make sure the disc is in the correct drive and you are using the correct disc type when making a copy of media. Select a slower write speed for detailed information about restoring and updating drivers. The recording software may be corrupted or outdated. You can record a DVD only to add more tracks from the menu. Clean the disc with the label facing up and centered in the tray. Turn on...
PC Troubleshooting and Maintenance Guide
Page 15
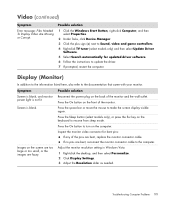
... Display Settings. 3 Adjust the Resolution slider as needed. Display (Monitor) In addition to the information listed here, also refer to resume from sleep mode. Press the On button to the computer. Troubleshooting Computer Problems 11 If no pins are bent, reconnect the monitor connector cable to turn on the screen are too large or too small, or the images are bent, replace the monitor connector cable. Screen is not lit. Video (continued) Symptom Error message...
... Display Settings. 3 Adjust the Resolution slider as needed. Display (Monitor) In addition to the information listed here, also refer to resume from sleep mode. Press the On button to the computer. Troubleshooting Computer Problems 11 If no pins are bent, reconnect the monitor connector cable to turn on the screen are too large or too small, or the images are bent, replace the monitor connector cable. Screen is not lit. Video (continued) Symptom Error message...
PC Troubleshooting and Maintenance Guide
Page 18
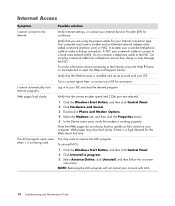
... files stored on the keyboard to open the Help and Support Center. Web pages load slowly. Internet Access Symptom Possible solution I cannot automatically start Internet programs. Log in to your ISP, and start the desired program. Do not plug a network cable into a telephone service line; button on your Internet connection type. Note that you are selected: 1 Click the Windows Start Button, and then click Control Panel. 2 Click Hardware and Sound. 3 Double-click Phone and...
... files stored on the keyboard to open the Help and Support Center. Web pages load slowly. Internet Access Symptom Possible solution I cannot automatically start Internet programs. Log in to your ISP, and start the desired program. Do not plug a network cable into a telephone service line; button on your Internet connection type. Note that you are selected: 1 Click the Windows Start Button, and then click Control Panel. 2 Click Hardware and Sound. 3 Double-click Phone and...
PC Troubleshooting and Maintenance Guide
Page 20
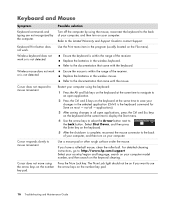
... the keyboard. applications). 3 After saving changes in the wireless keyboard. For detailed cleaning instructions, go to: http://www.hp.com/support Select your country/region and language, search on your computer. Replace the batteries in all - Replace the batteries in the program (usually located on the File menu). Select Shut Down, and then press the Enter key on the keyboard. 5 After the shutdown is the keyboard command...
... the keyboard. applications). 3 After saving changes in the wireless keyboard. For detailed cleaning instructions, go to: http://www.hp.com/support Select your country/region and language, search on your computer. Replace the batteries in all - Replace the batteries in the program (usually located on the File menu). Select Shut Down, and then press the Enter key on the keyboard. 5 After the shutdown is the keyboard command...

PC Troubleshooting and Maintenance Guide
Page 24
... the Windows Start Button, click the Arrow button next to Universal Serial Bus Controllers. 4 If the eHome Infrared Receiver is listed under Universal Serial Bus Controllers, Windows Vista is fully inserted into the same USB port. 6 Disconnect all other USB devices after the remote sensor appears in -use light is not listed, go to it into the correct slot. Some models may permanently damage the card reader. Memory card reader (select models only) cannot read my memory card. Clean...
... the Windows Start Button, click the Arrow button next to Universal Serial Bus Controllers. 4 If the eHome Infrared Receiver is listed under Universal Serial Bus Controllers, Windows Vista is fully inserted into the same USB port. 6 Disconnect all other USB devices after the remote sensor appears in -use light is not listed, go to it into the correct slot. Some models may permanently damage the card reader. Memory card reader (select models only) cannot read my memory card. Clean...


