
User Manual
Page 1
Enhanced for Accessibility User Guide 1506, 1706 and1906 LCD Monitors Document Part Number: 389521-002 October 2005 This guide provides information on setting up the monitor, installing drivers, using the on-screen display menu, troubleshooting and technical specifications.
Enhanced for Accessibility User Guide 1506, 1706 and1906 LCD Monitors Document Part Number: 389521-002 October 2005 This guide provides information on setting up the monitor, installing drivers, using the on-screen display menu, troubleshooting and technical specifications.
User Manual
Page 2
... loss of Hewlett-Packard Company in the express limited warranty statements accompanying such products. User Guide 1506, 1706 and 1906 LCD Monitors Second Edition (October 2005) Document Part Number: 389521-002 HP, Hewlett Packard, and the Hewlett-Packard logo are trademarks of Hewlett-Packard Development Company, L.P. Compaq and the Compaq logo are...
... loss of Hewlett-Packard Company in the express limited warranty statements accompanying such products. User Guide 1506, 1706 and 1906 LCD Monitors Second Edition (October 2005) Document Part Number: 389521-002 HP, Hewlett Packard, and the Hewlett-Packard logo are trademarks of Hewlett-Packard Development Company, L.P. Compaq and the Compaq logo are...

User Manual
Page 3
Contents 1 Product Features 2 Safety and Maintenance Guidelines Important Safety Information 2-1 Maintenance Guidelines 2-2 Cleaning the Monitor 2-3 Shipping the Monitor 2-3 3 Setting Up the Monitor Installing the Monitor Pedestal 3-1 Connecting the Monitor 3-3 Removing the Monitor Base 3-6 Mounting the Monitor 3-7 Locating the Rating Labels 3-8 4 Operating the Monitor Software and Utilities 4-1 The Information File 4-1 The Image Color Matching File 4-2 Installing the .INF and .ICM...
Contents 1 Product Features 2 Safety and Maintenance Guidelines Important Safety Information 2-1 Maintenance Guidelines 2-2 Cleaning the Monitor 2-3 Shipping the Monitor 2-3 3 Setting Up the Monitor Installing the Monitor Pedestal 3-1 Connecting the Monitor 3-3 Removing the Monitor Base 3-6 Mounting the Monitor 3-7 Locating the Rating Labels 3-8 4 Operating the Monitor Software and Utilities 4-1 The Information File 4-1 The Image Color Matching File 4-2 Installing the .INF and .ICM...
User Manual
Page 4
Contents Optimizing Digital Conversion 4-9 Identifying Monitor Conditions 4-10 Sleep Timer Mode 4-10 HP Display LiteSaver (Available with Select Models) . 4-12 Installing the HP Display LiteSaver Software. . . . . 4-12 sRGB Support (Available with Select Models 4-14 Changing the Color Temperature 4-15 Installing the sRGB ICM File for Microsoft Windows 2000 ...
Contents Optimizing Digital Conversion 4-9 Identifying Monitor Conditions 4-10 Sleep Timer Mode 4-10 HP Display LiteSaver (Available with Select Models) . 4-12 Installing the HP Display LiteSaver Software. . . . . 4-12 sRGB Support (Available with Select Models 4-14 Changing the Color Temperature 4-15 Installing the sRGB ICM File for Microsoft Windows 2000 ...

User Manual
Page 7
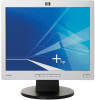
The monitor features include: 1506 Model ■� 15-inch (38.1 cm) viewable area display. ■� 1024 x 768 resolution, plus full-screen support for lower resolutions. &#...
The monitor features include: 1506 Model ■� 15-inch (38.1 cm) viewable area display. ■� 1024 x 768 resolution, plus full-screen support for lower resolutions. &#...
User Manual
Page 11
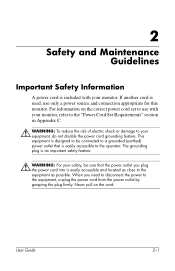
... located as close to the equipment as possible. 2 Safety and Maintenance Guidelines Important Safety Information A power cord is included with your monitor, refer to the "Power Cord Set Requirements" section in Appendix C. Å WARNING: To reduce the risk of electric shock or damage to...grounded (earthed) power outlet that the power outlet you need to disconnect the power to use only a power source and connection appropriate for this monitor. This equipment is used, use with your equipment, do not disable the power cord grounding feature. For information on the cord. User Guide ...
... located as close to the equipment as possible. 2 Safety and Maintenance Guidelines Important Safety Information A power cord is included with your monitor, refer to the "Power Cord Set Requirements" section in Appendix C. Å WARNING: To reduce the risk of electric shock or damage to...grounded (earthed) power outlet that the power outlet you need to disconnect the power to use only a power source and connection appropriate for this monitor. This equipment is used, use with your equipment, do not disable the power cord grounding feature. For information on the cord. User Guide ...
User Manual
Page 12
... or attempt to some form of surge protection device such as having this product yourself. If your monitor is not operating properly or has been dropped or damaged, contact your HP authorized dealer, reseller, or service provider. ■� Use only a power source and connection ...appropriate for each device. ■� Install your monitor by grasping the plug firmly and pulling it from the outlet...
... or attempt to some form of surge protection device such as having this product yourself. If your monitor is not operating properly or has been dropped or damaged, contact your HP authorized dealer, reseller, or service provider. ■� Use only a power source and connection ...appropriate for each device. ■� Install your monitor by grasping the plug firmly and pulling it from the outlet...
User Manual
Page 13
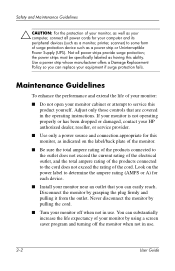
... cleaner. Ä CAUTION: Do not use benzene, thinner, ammonia, or any kind into cabinet slots or other volatile substances to clean your monitor or place it on an unstable surface. ■� Do not allow anything to rest on a soft area to prevent it later if ...box in a well-ventilated area, away from the wall outlet. 3. User Guide 2-3 Unplug the monitor from excessive light, heat or moisture. ■� When removing the monitor base, you move or ship your monitor in a storage area. Safety and Maintenance Guidelines ■� Slots and openings in the cabinet...
... cleaner. Ä CAUTION: Do not use benzene, thinner, ammonia, or any kind into cabinet slots or other volatile substances to clean your monitor or place it on an unstable surface. ■� Do not allow anything to rest on a soft area to prevent it later if ...box in a well-ventilated area, away from the wall outlet. 3. User Guide 2-3 Unplug the monitor from excessive light, heat or moisture. ■� When removing the monitor base, you move or ship your monitor in a storage area. Safety and Maintenance Guidelines ■� Slots and openings in the cabinet...

User Manual
Page 15
3 Setting Up the Monitor To set up the monitor, ensure that the power is facing forward. ✎ Do not install the base if the monitor will be sure the arrow on the underside of the plate is turned off to be used on "Mounting the Monitor" in this chapter. Place the pedestal plate on your desktop or table and check to the monitor, computer system, and other mounting fixture; instead see the section on a wall, swing arm, or other attached devices, then follow the steps below. User Guide 3-1 Installing the Monitor Pedestal To install the monitor pedestal: 1.
3 Setting Up the Monitor To set up the monitor, ensure that the power is facing forward. ✎ Do not install the base if the monitor will be sure the arrow on the underside of the plate is turned off to be used on "Mounting the Monitor" in this chapter. Place the pedestal plate on your desktop or table and check to the monitor, computer system, and other mounting fixture; instead see the section on a wall, swing arm, or other attached devices, then follow the steps below. User Guide 3-1 Installing the Monitor Pedestal To install the monitor pedestal: 1.
User Manual
Page 16
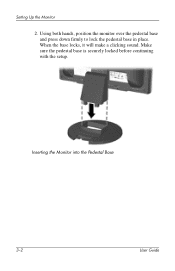
Make sure the pedestal base is securely locked before continuing with the setup. When the base locks, it will make a clicking sound. Using both hands, position the monitor over the pedestal base and press down firmly to lock the pedestal base in place. Setting Up the Monitor 2. Inserting the Monitor into the Pedestal Base 3-2 User Guide
Make sure the pedestal base is securely locked before continuing with the setup. When the base locks, it will make a clicking sound. Using both hands, position the monitor over the pedestal base and press down firmly to lock the pedestal base in place. Setting Up the Monitor 2. Inserting the Monitor into the Pedestal Base 3-2 User Guide
User Manual
Page 17
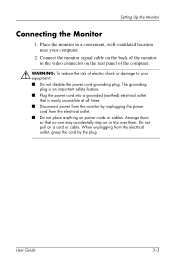
...; Plug the power cord into a grounded (earthed) electrical outlet that no one may accidentally step on a cord or cable. Setting Up the Monitor Connecting the Monitor 1. User Guide 3-3 The grounding plug is easily accessible at all times. ■� Disconnect power from the electrical outlet. ■� ...Do not place anything on the rear panel of the computer. Å WARNING: To reduce the risk of the monitor to the video connector on power cords or cables. When unplugging from the electrical outlet, grasp the cord by unplugging the power cord from...
...; Plug the power cord into a grounded (earthed) electrical outlet that no one may accidentally step on a cord or cable. Setting Up the Monitor Connecting the Monitor 1. User Guide 3-3 The grounding plug is easily accessible at all times. ■� Disconnect power from the electrical outlet. ■� ...Do not place anything on the rear panel of the computer. Å WARNING: To reduce the risk of the monitor to the video connector on power cords or cables. When unplugging from the electrical outlet, grasp the cord by unplugging the power cord from...

User Manual
Page 18
Connecting the Signal and Power Cables 3-4 User Guide Setting Up the Monitor 3. Connect one end of the power cable to the back of the monitor, and the other end to an electrical wall outlet.
Connecting the Signal and Power Cables 3-4 User Guide Setting Up the Monitor 3. Connect one end of the power cable to the back of the monitor, and the other end to an electrical wall outlet.

User Manual
Page 19
... a prolonged period of time. Press the power switch to turn off the monitor when it is a condition that may occur on monitors that display the same static image on all LCD screens. User Guide 3-5 Adjust the monitor as needed for your monitor screen, you should always activate a screen saver application or turn on the...
... a prolonged period of time. Press the power switch to turn off the monitor when it is a condition that may occur on monitors that display the same static image on all LCD screens. User Guide 3-5 Adjust the monitor as needed for your monitor screen, you should always activate a screen saver application or turn on the...

User Manual
Page 20
... Do not remove the base from the back of the pedestal pillar. 3-6 User Guide Disconnect and remove the signal and power cables from the monitor while the monitor is turned off and the power and signal cables are both disconnected. Remove the stand cap 1 from the top of the... monitor. 2. Setting Up the Monitor Removing the Monitor Base You can remove the monitor base to mount the monitor on a soft area to disassemble the monitor, be sure the monitor is in the...
... Do not remove the base from the back of the pedestal pillar. 3-6 User Guide Disconnect and remove the signal and power cables from the monitor while the monitor is turned off and the power and signal cables are both disconnected. Remove the stand cap 1 from the top of the... monitor. 2. Setting Up the Monitor Removing the Monitor Base You can remove the monitor base to mount the monitor on a soft area to disassemble the monitor, be sure the monitor is in the...

User Manual
Page 21
... are compliant with the Video Electronics Standards Association (VESA) standard for mounting purposes. Mounting the Monitor 1. Remove the monitor base. These mounting holes are 100mm apart and are exposed on the monitor back panel to "Removing the Monitor Base" steps in the following illustration. Refer to be used for mounting flat panel displays. Setting...
... are compliant with the Video Electronics Standards Association (VESA) standard for mounting purposes. Mounting the Monitor 1. Remove the monitor base. These mounting holes are 100mm apart and are exposed on the monitor back panel to "Removing the Monitor Base" steps in the following illustration. Refer to be used for mounting flat panel displays. Setting...
User Manual
Page 22
... because they may need these numbers when contacting HP about your monitor model. Mount the monitor to a swing arm or other mounting fixture by following the instructions included with the monitor). The rating labels are required (not provided with the mounting fixture to the monitor, four 4mm, 0.7 pitch, and 10mm long... part number, product number, and serial number. To attach a third party mounting solution to be used . You may damage the monitor. It is important to verify that the manufacturer's mounting solution is rated to use the power and video cable provided with the VESA...
... because they may need these numbers when contacting HP about your monitor model. Mount the monitor to a swing arm or other mounting fixture by following the instructions included with the monitor). The rating labels are required (not provided with the mounting fixture to the monitor, four 4mm, 0.7 pitch, and 10mm long... part number, product number, and serial number. To attach a third party mounting solution to be used . You may damage the monitor. It is important to verify that the manufacturer's mounting solution is rated to use the power and video cable provided with the VESA...
User Manual
Page 23
... does not work correctly without installing the .INF file. You may need to ensure monitor compatibility with the computer's graphics adapter. 4 Operating the Monitor Software and Utilities The monitor includes a CD that the monitor connects directly to the graphics card. See "Downloading from the HP monitors support Web site. The Information File The .INF file defines...
... does not work correctly without installing the .INF file. You may need to ensure monitor compatibility with the computer's graphics adapter. 4 Operating the Monitor Software and Utilities The monitor includes a CD that the monitor connects directly to the graphics card. See "Downloading from the HP monitors support Web site. The Information File The .INF file defines...

User Manual
Page 24
...files manually from the CD in the event of an installation error. The .ICM file contains a monitor color system profile. The CD menu displays. 2. Select "Install INF and ICM Files." 4. Operating the Monitor The Image Color Matching File The .ICM files are data files that are used in conjunction with...To install the .INF and .ICM files on -screen instructions. 5. Insert the CD in accordance with graphics programs to provide consistent color matching from monitor screen to printer, or from scanner to the INF and ICM Readme file on the CD. 4-2 User Guide View the "INF and ICM Readme"...
...files manually from the CD in the event of an installation error. The .ICM file contains a monitor color system profile. The CD menu displays. 2. Select "Install INF and ICM Files." 4. Operating the Monitor The Image Color Matching File The .ICM files are data files that are used in conjunction with...To install the .INF and .ICM files on -screen instructions. 5. Insert the CD in accordance with graphics programs to provide consistent color matching from monitor screen to printer, or from scanner to the INF and ICM Readme file on the CD. 4-2 User Guide View the "INF and ICM Readme"...

User Manual
Page 25
Operating the Monitor Downloading from the Worldwide Web To download the latest version of .INF and .ICM files from the HP monitors support Web site: 1. Ensure your country region. 2. Download the software by following the instructions. Refer to the support page and download page. 3. Follow the links for your monitor to http://www.hp.com/support and select your system meets the requirements. 4. User Guide 4-3
Operating the Monitor Downloading from the Worldwide Web To download the latest version of .INF and .ICM files from the HP monitors support Web site: 1. Ensure your country region. 2. Download the software by following the instructions. Refer to the support page and download page. 3. Follow the links for your monitor to http://www.hp.com/support and select your system meets the requirements. 4. User Guide 4-3

User Manual
Page 26
Operating the Monitor Front Panel Controls ' Control 1 Menu 2 - (Minus button) 3 + (Plus button) 4 Power LED 5 Power Function Opens, selects or exits the OSD menu. • Navigates backward through the OSD menu and increases adjustment levels. Navigates forward through the OSD menu and decreases adjustment levels. • If the OSD menu is inactive, activates the auto adjustment feature to optimize the screen image. Sleep Timer mode = Flashing Amber. Turns the monitor on or off. 4-4 User Guide Fully powered = Green. Sleep mode = Amber.
Operating the Monitor Front Panel Controls ' Control 1 Menu 2 - (Minus button) 3 + (Plus button) 4 Power LED 5 Power Function Opens, selects or exits the OSD menu. • Navigates backward through the OSD menu and increases adjustment levels. Navigates forward through the OSD menu and decreases adjustment levels. • If the OSD menu is inactive, activates the auto adjustment feature to optimize the screen image. Sleep Timer mode = Flashing Amber. Turns the monitor on or off. 4-4 User Guide Fully powered = Green. Sleep mode = Amber.


