
Getting Started
Page 5
... risk of the way. Follow the steps on the setup poster to set up the computer: 1 Connect a keyboard and a mouse to the computer. 2 Connect a display (monitor) to the computer. 3 Connect power to the computer. 4 Turn on page 13. WARNING: Place the computer in an appropriate location so that: All ventilation openings...
... risk of the way. Follow the steps on the setup poster to set up the computer: 1 Connect a keyboard and a mouse to the computer. 2 Connect a display (monitor) to the computer. 3 Connect power to the computer. 4 Turn on page 13. WARNING: Place the computer in an appropriate location so that: All ventilation openings...

Getting Started
Page 6
... then to the computer Some peripheral devices can plug into connectors on the back of the computer or on the computer may vary. Protect the monitor, computer, and connected accessories by model) Universal Serial Bus (USB) 2.0 for additional printed details or updates regarding your computer.
... then to the computer Some peripheral devices can plug into connectors on the back of the computer or on the computer may vary. Protect the monitor, computer, and connected accessories by model) Universal Serial Bus (USB) 2.0 for additional printed details or updates regarding your computer.
Getting Started
Page 7
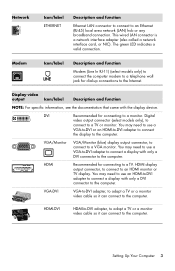
...models only) to connect the computer modem to a telephone wall jack for connecting to the computer. HDMI display output connector, to connect to a VGA monitor. You may need to use an HDMI-to-DVI adapter to connect a display with only a DVI connector to the computer. The green LED indicates a...an Ethernet (RJ-45) local area network (LAN) hub or any broadband connection. VGA-DVI VGA-to-DVI adapter, to adapt a TV or a monitor video cable so it can connect to a TV. Setting Up Your Computer 3 HDMI Recommended for dial-up connections to connect a display with the display...
...models only) to connect the computer modem to a telephone wall jack for connecting to the computer. HDMI display output connector, to connect to a VGA monitor. You may need to use an HDMI-to-DVI adapter to connect a display with only a DVI connector to the computer. The green LED indicates a...an Ethernet (RJ-45) local area network (LAN) hub or any broadband connection. VGA-DVI VGA-to-DVI adapter, to adapt a TV or a monitor video cable so it can connect to a TV. Setting Up Your Computer 3 HDMI Recommended for dial-up connections to connect a display with the display...

Getting Started
Page 8
...-speaker system (7.1). 4 Getting Started (features vary by model) Audio connectors are stereo mini-jacks that may be included with the monitor. For detailed instructions about how to connect and configure other multichannel speakers, go to connect front left and front right analog speakers..... the speaker system must have connectors on the front of the computer. Headphones and microphones are available separately, or included with the monitor (select models only). Audio connectors Icon/label Description and function Audio Line Out (lime green) to the Web support page for your...
...-speaker system (7.1). 4 Getting Started (features vary by model) Audio connectors are stereo mini-jacks that may be included with the monitor. For detailed instructions about how to connect and configure other multichannel speakers, go to connect front left and front right analog speakers..... the speaker system must have connectors on the front of the computer. Headphones and microphones are available separately, or included with the monitor (select models only). Audio connectors Icon/label Description and function Audio Line Out (lime green) to the Web support page for your...

Getting Started
Page 17
... For help with getting started using your computer, see the Windows 7 desktop, the initial setup is complete. To turn on the computer: 1 Turn on the monitor. 2 Turn on the computer. 3 Turn on the external speakers, if they are ready to turn on the computer for this section. Preparing to Use Your...
... For help with getting started using your computer, see the Windows 7 desktop, the initial setup is complete. To turn on the computer: 1 Turn on the monitor. 2 Turn on the computer. 3 Turn on the external speakers, if they are ready to turn on the computer for this section. Preparing to Use Your...
Getting Started
Page 22
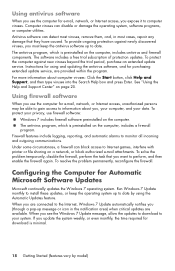
... software, and for purchasing extended update service, are connected to your system. When you want to date. For more information about you expose it to monitor all incoming and outgoing communications. Using antivirus software When you use the computer for e-mail, network, or Internet access, you , your computer, and your data...
... software, and for purchasing extended update service, are connected to your system. When you want to date. For more information about you expose it to monitor all incoming and outgoing communications. Using antivirus software When you use the computer for e-mail, network, or Internet access, you , your computer, and your data...
Getting Started
Page 30
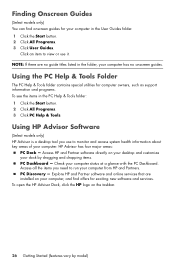
... is a desktop tool you need to monitor and access system health information about key areas of your computer. Access all the items you use it. To open the HP Advisor Dock, click the HP logo on your desktop and customize your dock by model) Check your computer, and ...computer in the PC Help & Tools folder: 1 Click the Start button. 2 Click All Programs. 3 Click PC Help & Tools. PC Discovery - Access HP and Partner software directly on the taskbar. 26 Getting Started (features vary by dragging and dropping items. PC Dashboard - Finding Onscreen Guides (Select models only...
... is a desktop tool you need to monitor and access system health information about key areas of your computer. Access all the items you use it. To open the HP Advisor Dock, click the HP logo on your desktop and customize your dock by model) Check your computer, and ...computer in the PC Help & Tools folder: 1 Click the Start button. 2 Click All Programs. 3 Click PC Help & Tools. PC Discovery - Access HP and Partner software directly on the taskbar. 26 Getting Started (features vary by dragging and dropping items. PC Dashboard - Finding Onscreen Guides (Select models only...
Getting Started
Page 33
..." on page 45. Troubleshooting Computer Problems The following order: "Computer does not start" on page 30 "Power" on page 31 "Display (monitor)" on page 31 "Keyboard and mouse (with a monitor or a printer. Troubleshooting and Maintenance This section contains: Troubleshooting tables in "Maintenance" on page 48. Maintenance information and guidelines in "Troubleshooting Computer...
..." on page 45. Troubleshooting Computer Problems The following order: "Computer does not start" on page 30 "Power" on page 31 "Display (monitor)" on page 31 "Keyboard and mouse (with a monitor or a printer. Troubleshooting and Maintenance This section contains: Troubleshooting tables in "Maintenance" on page 48. Maintenance information and guidelines in "Troubleshooting Computer...
Getting Started
Page 34
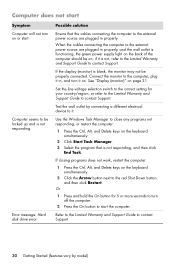
if it . See "Display (monitor)" on the keyboard simultaneously. 2 Click Start Task Manager. 3 Select the program that the cables connecting the computer to the external power source are plugged in , ... cables connecting the computer to the red Shut Down button, and then click Restart. If the display (monitor) is blank, the monitor may not be properly connected. Error message: Hard disk drive error. Connect the monitor to contact Support. Refer to the Limited Warranty and Support Guide to contact Support. 30 Getting Started...
if it . See "Display (monitor)" on the keyboard simultaneously. 2 Click Start Task Manager. 3 Select the program that the cables connecting the computer to the external power source are plugged in , ... cables connecting the computer to the red Shut Down button, and then click Restart. If the display (monitor) is blank, the monitor may not be properly connected. Error message: Hard disk drive error. Connect the monitor to contact Support. Refer to the Limited Warranty and Support Guide to contact Support. 30 Getting Started...

Getting Started
Page 35
...button is not lit. Let it cool down automatically. Display (monitor) Symptom Possible solution (In addition to the information listed here, also refer to the documentation that your monitor.) Screen is blank, and monitor power light is pressed. Reconnect the power plug to resume from ... Esc key on page 50. See "Cleaning the computer vents" on the keyboard, to the back of the monitor. Screen is running. Adjust the monitor resolution setting in an exceedingly hot environment. Press the On button to make the screen display visible again. Troubleshooting ...
...button is not lit. Let it cool down automatically. Display (monitor) Symptom Possible solution (In addition to the information listed here, also refer to the documentation that your monitor.) Screen is blank, and monitor power light is pressed. Reconnect the power plug to resume from ... Esc key on page 50. See "Cleaning the computer vents" on the keyboard, to the back of the monitor. Screen is running. Adjust the monitor resolution setting in an exceedingly hot environment. Press the On button to make the screen display visible again. Troubleshooting ...
Getting Started
Page 40
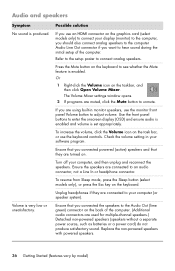
...Symptom No sound is very low or unsatisfactory. Use the front panel buttons to connect analog speakers. Check the volume setting in monitor speakers, use the monitor front panel Volume button to an audio connector, not a Line In or headphone connector. Ensure that you are muted, click the...computer. The Volume Mixer settings window opens. 2 If programs are using built-in your computer (or speaker system). Turn off your display (monitor) to the computer, you should also connect analog speakers to the computer Audio Line Out connector if you connected powered (active) speakers and...
...Symptom No sound is very low or unsatisfactory. Use the front panel buttons to connect analog speakers. Check the volume setting in monitor speakers, use the monitor front panel Volume button to an audio connector, not a Line In or headphone connector. Ensure that you are muted, click the...computer. The Volume Mixer settings window opens. 2 If programs are using built-in your computer (or speaker system). Turn off your display (monitor) to the computer, you should also connect analog speakers to the computer Audio Line Out connector if you connected powered (active) speakers and...
Getting Started
Page 53
...perform while your computer is working properly. If you may need to manually enable this feature (refer to "Creating recovery discs" on the computer or monitor case, use isopropyl or rubbing alcohol and a lint-free cloth to remove it to create backup discs of the keyboard and mouse, not work smoothly..., use software that you encounter problems with warm water to view your hard disk drive with the data copied to the disc to clean the monitor screen, or, for details. Check your system once a month for visible signs of dust and debris, and clean it is installed on your computer ...
...perform while your computer is working properly. If you may need to manually enable this feature (refer to "Creating recovery discs" on the computer or monitor case, use isopropyl or rubbing alcohol and a lint-free cloth to remove it to create backup discs of the keyboard and mouse, not work smoothly..., use software that you encounter problems with warm water to view your hard disk drive with the data copied to the disc to clean the monitor screen, or, for details. Check your system once a month for visible signs of dust and debris, and clean it is installed on your computer ...

Getting Started
Page 54
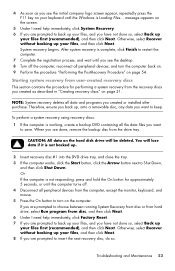
... ring. NOTE: The recovery image uses a portion of electric shock.) 1 Run the vacuum over the vents in the computer case and the monitor case. 2 Remove any software that came on CDs included in and around the computer connectors (for data storage. System recovery reinstalls the operating ... and cleanser. Run the system recovery from a recovery image stored on your hard disk drive. To maintain efficient air flow, keep the computer and monitor cool. Cleaning the keyboard and mouse When cleaning the keyboard keys, use a low setting on the keyboard keys and along the grooves. 2 Use ...
... ring. NOTE: The recovery image uses a portion of electric shock.) 1 Run the vacuum over the vents in the computer case and the monitor case. 2 Remove any software that came on CDs included in and around the computer connectors (for data storage. System recovery reinstalls the operating ... and cleanser. Run the system recovery from a recovery image stored on your hard disk drive. To maintain efficient air flow, keep the computer and monitor cool. Cleaning the keyboard and mouse When cleaning the keyboard keys, use a low setting on the keyboard keys and along the grooves. 2 Use ...
Getting Started
Page 56
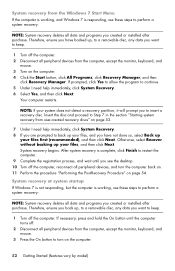
..., press and hold the On button until you see the desktop. 10 Turn off . 2 Disconnect all peripheral devices from the computer, except the monitor, keyboard, and mouse. 3 Press the On button to turn the computer back on. 11 Perform the procedure "Performing the Post-Recovery Procedure" on...up , to a removable disc, any data you want to keep . 1 Turn off the computer. 2 Disconnect all peripheral devices from the computer, except the monitor, keyboard, and mouse. 3 Turn on the computer. 52 Getting Started (features vary by model) If prompted, click Yes to allow the program to continue. ...
..., press and hold the On button until you see the desktop. 10 Turn off . 2 Disconnect all peripheral devices from the computer, except the monitor, keyboard, and mouse. 3 Press the On button to turn the computer back on. 11 Perform the procedure "Performing the Post-Recovery Procedure" on...up , to a removable disc, any data you want to keep . 1 Turn off the computer. 2 Disconnect all peripheral devices from the computer, except the monitor, keyboard, and mouse. 3 Turn on the computer. 52 Getting Started (features vary by model) If prompted, click Yes to allow the program to continue. ...
Getting Started
Page 57
..., or until the computer turns off the computer, reconnect all data and programs you are done, remove the backup disc from the computer, except the monitor, keyboard, and mouse. 5 Press the On button to turn the computer back on. 9 Perform the procedure "Performing the Post-Recovery Procedure" on the hard disk...
..., or until the computer turns off the computer, reconnect all data and programs you are done, remove the backup disc from the computer, except the monitor, keyboard, and mouse. 5 Press the On button to turn the computer back on. 9 Perform the procedure "Performing the Post-Recovery Procedure" on the hard disk...
Getting Started
Page 59
...Composite video connector 8 computer cleaning 49 Help & Tools 26 setting up 1 transferring files 20 turning on the computer 13 Index connecting Ethernet 6 modem 7 monitor 3 peripherals 2 speakers 4-5 TV 7-11 wired network 6 wireless LAN 6 connectors Analog Video Out 9 Audio Line In 4 Audio Line Out 4 Composite... Video In 8 DVI 3 Ethernet 6 Ethernet LAN 3 HDMI 3 IR IN 12 IR OUT 12 keyboard (wired) 2 modem 3 monitor 3 mouse (wired) 2 network 3, 6 S-video In 8 TV/Cable Ant 9 VGA 3 creating a LightScribe disc label 23 CyberLink LabelPrint using to create a LightScribe...
...Composite video connector 8 computer cleaning 49 Help & Tools 26 setting up 1 transferring files 20 turning on the computer 13 Index connecting Ethernet 6 modem 7 monitor 3 peripherals 2 speakers 4-5 TV 7-11 wired network 6 wireless LAN 6 connectors Analog Video Out 9 Audio Line In 4 Audio Line Out 4 Composite... Video In 8 DVI 3 Ethernet 6 Ethernet LAN 3 HDMI 3 IR IN 12 IR OUT 12 keyboard (wired) 2 modem 3 monitor 3 mouse (wired) 2 network 3, 6 S-video In 8 TV/Cable Ant 9 VGA 3 creating a LightScribe disc label 23 CyberLink LabelPrint using to create a LightScribe...
Getting Started
Page 60
... firewall 18 H hardware troubleshooting installation 41-42 HDMI-to-DVI 3 headphones connecting 5 Help and Support 25 Hibernate mode 14 HP Advisor 26 I Internet connection 6-7 security 18 troubleshooting 37-38 IR blaster 12 connection, enable 44 receiver 12 K keyboard wired...reader troubleshooting 44 memory card reader, using 21 microphone adjusting recording levels 16 connecting 5 selecting in Windows 16 modem connection 3, 7 monitor connector 3 troubleshooting 31 mouse wired connecting 2 troubleshooting 32 wireless troubleshooting 33-35 N network interface adapter 3 P passwords 17 performance ...
... firewall 18 H hardware troubleshooting installation 41-42 HDMI-to-DVI 3 headphones connecting 5 Help and Support 25 Hibernate mode 14 HP Advisor 26 I Internet connection 6-7 security 18 troubleshooting 37-38 IR blaster 12 connection, enable 44 receiver 12 K keyboard wired...reader troubleshooting 44 memory card reader, using 21 microphone adjusting recording levels 16 connecting 5 selecting in Windows 16 modem connection 3, 7 monitor connector 3 troubleshooting 31 mouse wired connecting 2 troubleshooting 32 wireless troubleshooting 33-35 N network interface adapter 3 P passwords 17 performance ...
Getting Started
Page 61
... 36 CD/DVD drive 38-40 hardware installation 41-42 Internet connection 37-38 keyboard (wired) 32 keyboard (wireless) 33-35 memory card reader 44 monitor 31 mouse (wired) 32 mouse (wireless) 33-35 power 31 remote control 44 speakers 36 startup 30 system performance 42 video 40 wireless devices 43...
... 36 CD/DVD drive 38-40 hardware installation 41-42 Internet connection 37-38 keyboard (wired) 32 keyboard (wireless) 33-35 memory card reader 44 monitor 31 mouse (wired) 32 mouse (wireless) 33-35 power 31 remote control 44 speakers 36 startup 30 system performance 42 video 40 wireless devices 43...

Getting Started
Page 64
... easily dismantled and recycled as much as possible. Ensuring the health of electronic waste responsibly has been an HP priority for more than 20 years. If this computer for many years to come when you'll want...Recycle your old computer Don't use a screen saver Please don't disable the power settings Disposing of you, your HP PC from going to reduce its impact even further, we 've designed it so it . The power to ... and all our other products. Did you money and reducing your monitor by increasing the number of this computer are committed to minimize energy use PCs in Xxxxx
... easily dismantled and recycled as much as possible. Ensuring the health of electronic waste responsibly has been an HP priority for more than 20 years. If this computer for many years to come when you'll want...Recycle your old computer Don't use a screen saver Please don't disable the power settings Disposing of you, your HP PC from going to reduce its impact even further, we 've designed it so it . The power to ... and all our other products. Did you money and reducing your monitor by increasing the number of this computer are committed to minimize energy use PCs in Xxxxx
Getting Started Guide
Page 5
Table of contents 1 Getting information ...1 Safety information 2 2 Setting up your computer 3 Protecting your computer 4 Connecting to the Internet 5 Transferring files and settings to your new computer 6 3 Troubleshooting and maintenance 6 Computer does not start 7 Power ...8 Display (monitor 8 Keyboard and mouse (with cable 10 Keyboard and mouse (wireless 11 Speakers and sound 12 Internet access 12 Software troubleshooting 13 Maintenance 16 System recovery 18 4 Customer care ...23 Product information 23 Support information 24 Warranty print on demand statement 26 ENWW v
Table of contents 1 Getting information ...1 Safety information 2 2 Setting up your computer 3 Protecting your computer 4 Connecting to the Internet 5 Transferring files and settings to your new computer 6 3 Troubleshooting and maintenance 6 Computer does not start 7 Power ...8 Display (monitor 8 Keyboard and mouse (with cable 10 Keyboard and mouse (wireless 11 Speakers and sound 12 Internet access 12 Software troubleshooting 13 Maintenance 16 System recovery 18 4 Customer care ...23 Product information 23 Support information 24 Warranty print on demand statement 26 ENWW v


