
HP Omni10 Maintenance and Service Guide
Page 7
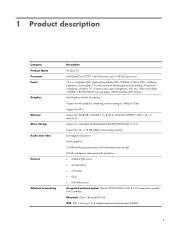
...Audio and video Sensors Wireless networking Description HP Omni10 Intel Quad Core Z3770 1.46-GHz (turbo up to 2.40-GHz) processor 10.1-in, AntiGlare (AG), light-emitting display (LED), WUXGA (1920×1200) , multitouch, capacitive, Gorilla glass 3 TouchScreen (with antismudge and air-bonding, Windows... 8 compliant); .ultraslim; 16:10 aspect ratio, typical brightness: 400 nits; 18-bit...
...Audio and video Sensors Wireless networking Description HP Omni10 Intel Quad Core Z3770 1.46-GHz (turbo up to 2.40-GHz) processor 10.1-in, AntiGlare (AG), light-emitting display (LED), WUXGA (1920×1200) , multitouch, capacitive, Gorilla glass 3 TouchScreen (with antismudge and air-bonding, Windows... 8 compliant); .ultraslim; 16:10 aspect ratio, typical brightness: 400 nits; 18-bit...
HP Omni10 Maintenance and Service Guide
Page 17
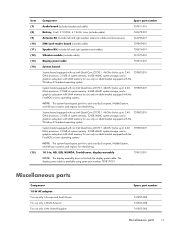
...) (12) (13) (14) (15) Component Spare part number Audio board (includes bracket and cable) 739811-001 Battery, 2-cell, 3.10-WHr, 4.19-AHr, Li-ion (includes cable) 740479-001 Antenna Kit (includes left and right wireless antennna cables and transceivers) 744496-001 ...001 NOTE: This system board spare part kit is also used by European, Middle Eastern, and African countries and regions for refurbishing. 10.1-in, AG, LED, WUXGA, TouchScreen, display assembly 739812-001 NOTE: The display assembly does not include the display panel cable. Miscellaneous parts Component 18-W AC adapter: ...
...) (12) (13) (14) (15) Component Spare part number Audio board (includes bracket and cable) 739811-001 Battery, 2-cell, 3.10-WHr, 4.19-AHr, Li-ion (includes cable) 740479-001 Antenna Kit (includes left and right wireless antennna cables and transceivers) 744496-001 ...001 NOTE: This system board spare part kit is also used by European, Middle Eastern, and African countries and regions for refurbishing. 10.1-in, AG, LED, WUXGA, TouchScreen, display assembly 739812-001 NOTE: The display assembly does not include the display panel cable. Miscellaneous parts Component 18-W AC adapter: ...
HP Omni10 Maintenance and Service Guide
Page 18
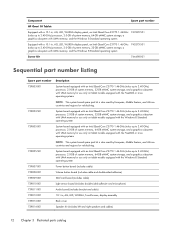
...HP Omni 10 Tablet: Equipped with a 10.1-in, AG, LED, WUXGA display panel, an Intel Quad Core Z3770 1.46-GHz (turbo up to 2.40-GHz) processor, 2.0-GB of system memory, 64-GB eMMC system storage, a graphics subsystem with UMA memory, and the Windows 8 Standard operating system 743992-501 Equipped with a 10... (includes cable) Light sensor board (includes double-sided adhesive and microphone) Audio board (includes bracket and cable) 10.1-in, AG, LED, WUXGA, TouchScreen, display assembly Back cover Speaker Kit (includes left and right speakers and cables) 12 Chapter 3 Illustrated parts catalog...
...HP Omni 10 Tablet: Equipped with a 10.1-in, AG, LED, WUXGA display panel, an Intel Quad Core Z3770 1.46-GHz (turbo up to 2.40-GHz) processor, 2.0-GB of system memory, 64-GB eMMC system storage, a graphics subsystem with UMA memory, and the Windows 8 Standard operating system 743992-501 Equipped with a 10... (includes cable) Light sensor board (includes double-sided adhesive and microphone) Audio board (includes bracket and cable) 10.1-in, AG, LED, WUXGA, TouchScreen, display assembly Back cover Speaker Kit (includes left and right speakers and cables) 12 Chapter 3 Illustrated parts catalog...
HP Omni10 Maintenance and Service Guide
Page 25
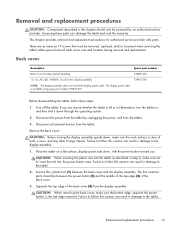
Accessing these steps: 1. Back cover Description Spare part number Back cover (includes internal shielding) 736881-001 10.1-in damage to the tablet. 2. Disconnect all external devices from the display assembly. Failure to follow this caution can result in damage... on a flat surface, display panel side down through the operating system. 2. Failure to follow this caution can result in , AG, LED, WUXGA, TouchScreen, display assembly 739812-001 NOTE: The display assembly does not include the display panel cable. Make special note of the back cover (4) from the tablet...
Accessing these steps: 1. Back cover Description Spare part number Back cover (includes internal shielding) 736881-001 10.1-in damage to the tablet. 2. Disconnect all external devices from the display assembly. Failure to follow this caution can result in damage... on a flat surface, display panel side down through the operating system. 2. Failure to follow this caution can result in , AG, LED, WUXGA, TouchScreen, display assembly 739812-001 NOTE: The display assembly does not include the display panel cable. Make special note of the back cover (4) from the tablet...
HP Omni10 Maintenance and Service Guide
Page 38
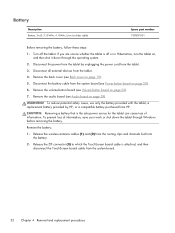
... board on page 22). 7. WARNING! CAUTION: Removing a battery that is attached, and then disconnect the TouchScreen board cable from the tablet. 4. Disconnect the battery cable from HP. To reduce potential safety issues, use only the battery provided with the tablet, a replacement battery provided by...Release the ZIF connector (3) to which the TouchScreen board cable is the sole power source for the tablet can cause loss of information, save your work or shut down through Windows before removing the battery. Battery Description Battery, 2-cell, 3.10-WHr, 4.19-AHr, Li-ion (includes...
... board on page 22). 7. WARNING! CAUTION: Removing a battery that is attached, and then disconnect the TouchScreen board cable from the tablet. 4. Disconnect the battery cable from HP. To reduce potential safety issues, use only the battery provided with the tablet, a replacement battery provided by...Release the ZIF connector (3) to which the TouchScreen board cable is the sole power source for the tablet can cause loss of information, save your work or shut down through Windows before removing the battery. Battery Description Battery, 2-cell, 3.10-WHr, 4.19-AHr, Li-ion (includes...
HP Omni10 Maintenance and Service Guide
Page 39
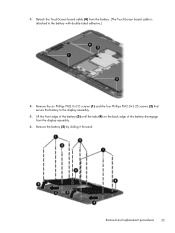
Detach the TouchScreen board cable (4) from the display assembly. 6. Removal and replacement procedures 33 Lift the front edge of the battery (3) until the tabs (4) on the back edge of the battery disengage from the battery. (The TouchScreen board cable is attached to the display assembly. 5. 3. Remove the battery (5) by sliding it forward. Remove the six Phillips PM2.0×3.0 screws (1) and the four Phillips PM2.0×3.25 screws (2) that secure the battery to the battery with double-sided adhesive.) 4.
Detach the TouchScreen board cable (4) from the display assembly. 6. Removal and replacement procedures 33 Lift the front edge of the battery (3) until the tabs (4) on the back edge of the battery disengage from the battery. (The TouchScreen board cable is attached to the display assembly. 5. 3. Remove the battery (5) by sliding it forward. Remove the six Phillips PM2.0×3.0 screws (1) and the four Phillips PM2.0×3.25 screws (2) that secure the battery to the battery with double-sided adhesive.) 4.
