Drives
Page 4
... handling a drive, discharge static electricity by touching the unpainted metal surface of the drive. ■ Do not touch the drive connector pins on a removable drive or on luggage, such as conveyor belts, use excessive force when inserting a drive into a drive bay. ■ Do not type on ,... to a drive, or loss of information, observe these precautions: ■ Initiate standby and allow the display to turn the computer on the keyboard or move a computer or external hard drive from the drive bay, or traveling with magnetic fields include airport walk-through the operating system. ...
... handling a drive, discharge static electricity by touching the unpainted metal surface of the drive. ■ Do not touch the drive connector pins on a removable drive or on luggage, such as conveyor belts, use excessive force when inserting a drive into a drive bay. ■ Do not type on ,... to a drive, or loss of information, observe these precautions: ■ Initiate standby and allow the display to turn the computer on the keyboard or move a computer or external hard drive from the drive bay, or traveling with magnetic fields include airport walk-through the operating system. ...
Drives - Windows Vista
Page 4
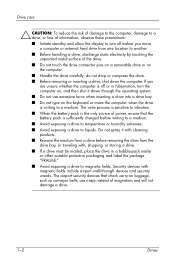
..., observe these precautions: ■ Initiate Sleep and allow the display to turn the computer on, and then shut it with cleaning products. ■ Remove the media from a drive before you are unsure whether the computer is off or in Hibernation, turn off before...through the operating system. ■ Do not use x-rays instead of the drive. ■ Do not touch the drive connector pins on a removable drive or on the keyboard or move a computer or external hard drive from one location to another. ■ Before handling a drive, discharge static electricity by touching the unpainted...
..., observe these precautions: ■ Initiate Sleep and allow the display to turn the computer on, and then shut it with cleaning products. ■ Remove the media from a drive before you are unsure whether the computer is off or in Hibernation, turn off before...through the operating system. ■ Do not use x-rays instead of the drive. ■ Do not touch the drive connector pins on a removable drive or on the keyboard or move a computer or external hard drive from one location to another. ■ Before handling a drive, discharge static electricity by touching the unpainted...
Memory Modules
Page 3
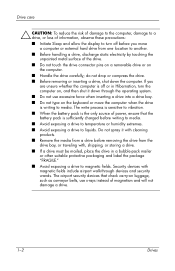
...module slot. Å WARNING: To reduce the risk of the computer. Memory Modules 1-1 The expansion memory module compartment is located under the keyboard. The primary memory module compartment is located on the bottom of electric shock and damage to the equipment, unplug the power cord and... remove all battery packs before installing a memory module. Ä CAUTION: Electrostatic discharge (ESD) can be upgraded by adding a memory module to the ...
...module slot. Å WARNING: To reduce the risk of the computer. Memory Modules 1-1 The expansion memory module compartment is located under the keyboard. The primary memory module compartment is located on the bottom of electric shock and damage to the equipment, unplug the power cord and... remove all battery packs before installing a memory module. Ä CAUTION: Electrostatic discharge (ESD) can be upgraded by adding a memory module to the ...
Memory Modules
Page 9
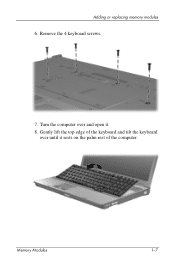
Memory Modules 1-7 Turn the computer over and open it rests on the palm rest of the keyboard and tilt the keyboard over until it . 8. Adding or replacing memory modules 6. Remove the 4 keyboard screws. 7. Gently lift the top edge of the computer.
Memory Modules 1-7 Turn the computer over and open it rests on the palm rest of the keyboard and tilt the keyboard over until it . 8. Adding or replacing memory modules 6. Remove the 4 keyboard screws. 7. Gently lift the top edge of the computer.

Memory Modules - Windows Vista
Page 3
Memory Modules 1 The expansion memory module compartment is located under the keyboard. Before beginning any procedure, ensure that you are discharged of electric shock and damage to the vacant expansion memory module slot or by upgrading ... bottom of the computer. The memory capacity of the computer can be upgraded by adding a memory module to the equipment, unplug the power cord and remove all batteries before installing a memory module. Ä CAUTION: Electrostatic discharge (ESD) can damage electronic components. Adding or replacing memory modules The computer has 2 memory ...
Memory Modules 1 The expansion memory module compartment is located under the keyboard. Before beginning any procedure, ensure that you are discharged of electric shock and damage to the vacant expansion memory module slot or by upgrading ... bottom of the computer. The memory capacity of the computer can be upgraded by adding a memory module to the equipment, unplug the power cord and remove all batteries before installing a memory module. Ä CAUTION: Electrostatic discharge (ESD) can damage electronic components. Adding or replacing memory modules The computer has 2 memory ...

Memory Modules - Windows Vista
Page 10
Adding or replacing memory modules 8. Remove the 4 keyboard screws. 9. Gently lift the top edge of the computer. 8 Memory Modules Turn the computer over until it rests on the palm rest of the keyboard and tilt the keyboard over and open it. 10.
Adding or replacing memory modules 8. Remove the 4 keyboard screws. 9. Gently lift the top edge of the computer. 8 Memory Modules Turn the computer over until it rests on the palm rest of the keyboard and tilt the keyboard over and open it. 10.

Pointing Devices and Keyboard
Page 23
Keyboard HP Quick Launch Buttons control panel ✎ Some of HP Quick Launch Buttons desktop notifications. ❏ Enabling or disabling automatic mode change. ❏ Enabling or disabling the display switch. ❏ Enabling or disabling quick switch. ❏ Enabling or disabling the display resolution change the settings for each button. ■ Add, modify, and remove...is identified with a question mark icon. 2-12 Pointing Devices and Keyboard The following ❏ Preferences for the display of the HP Quick Launch Buttons icon. ❏ Permission for non-administrator users ...
Keyboard HP Quick Launch Buttons control panel ✎ Some of HP Quick Launch Buttons desktop notifications. ❏ Enabling or disabling automatic mode change. ❏ Enabling or disabling the display switch. ❏ Enabling or disabling quick switch. ❏ Enabling or disabling the display resolution change the settings for each button. ■ Add, modify, and remove...is identified with a question mark icon. 2-12 Pointing Devices and Keyboard The following ❏ Preferences for the display of the HP Quick Launch Buttons icon. ❏ Permission for non-administrator users ...

Pointing Devices and Keyboard
Page 27
...defined items can choose to display these items or choose not to display them. You can be added, modified, and removed. The items on Q Menu list. 2-16 Pointing Devices and Keyboard Setting Q Menu preferences The Q Menu can display up to 40 items. Several system-defined items are managed from the... Items to display on the Q Menu are displayed by default. Keyboard Displaying the Q Menu The Q Menu provides quick access to many of the system tasks accessed with the buttons, keys, or hotkeys found on ...
...defined items can choose to display these items or choose not to display them. You can be added, modified, and removed. The items on Q Menu list. 2-16 Pointing Devices and Keyboard Setting Q Menu preferences The Q Menu can display up to 40 items. Several system-defined items are managed from the... Items to display on the Q Menu are displayed by default. Keyboard Displaying the Q Menu The Q Menu provides quick access to many of the system tasks accessed with the buttons, keys, or hotkeys found on ...

Pointing Devices and Keyboard
Page 28
Keyboard Removing a Q Menu item To remove an item from the Items to display on Q Menu list, clear the check box for the item you want to add. 3. On the Items to display on Q Menu list to the Q Menu: 1. In the HP Quick Launch Buttons control panel, click the Q Menu tab. 2. To ... close the control panel, click OK. Adding a listed item to remove. 3. To save your preferences and close the control panel, click OK. In the HP Quick Launch Buttons control panel, click the Q Menu tab. 2. Pointing Devices and Keyboard 2-17 Select the check box for each item you want to the...
Keyboard Removing a Q Menu item To remove an item from the Items to display on Q Menu list, clear the check box for the item you want to add. 3. On the Items to display on Q Menu list to the Q Menu: 1. In the HP Quick Launch Buttons control panel, click the Q Menu tab. 2. To ... close the control panel, click OK. Adding a listed item to remove. 3. To save your preferences and close the control panel, click OK. In the HP Quick Launch Buttons control panel, click the Q Menu tab. 2. Pointing Devices and Keyboard 2-17 Select the check box for each item you want to the...

Pointing Devices and Keyboard
Page 31
... click the Move Down button. 3. To save your preferences and close the control panel, click OK. 2-20 Pointing Devices and Keyboard In the HP Quick Launch Buttons control panel, click the Q Menu tab. 2. Keyboard Repositioning a Q Menu item To change the location of an item on Q Menu list. In the... HP Quick Launch Buttons control panel, click the Q Menu tab. 2. Click the item you want to display on the Items to remove. 3. Select the item on Q Menu list...
... click the Move Down button. 3. To save your preferences and close the control panel, click OK. 2-20 Pointing Devices and Keyboard In the HP Quick Launch Buttons control panel, click the Q Menu tab. 2. Keyboard Repositioning a Q Menu item To change the location of an item on Q Menu list. In the... HP Quick Launch Buttons control panel, click the Q Menu tab. 2. Click the item you want to display on the Items to remove. 3. Select the item on Q Menu list...

Pointing Devices and Keyboard - Windows Vista
Page 17
...detection feature. The following ❏ Preferences for setting preferences within the control panel. Keyboard HP Quick Launch Buttons control panel ✎ Some of the preferences listed in the upper-right corner of HP Quick Launch Buttons desktop notifications. ❏ Enabling or disabling automatic mode change. &#... change the settings for each button. ■ Add, modify, and remove items on the Q Menu. ■ Set preferences for tiling windows on the control panel, click the Help button in the HP Quick Launch Buttons control panel may not be supported by your computer.
...detection feature. The following ❏ Preferences for setting preferences within the control panel. Keyboard HP Quick Launch Buttons control panel ✎ Some of the preferences listed in the upper-right corner of HP Quick Launch Buttons desktop notifications. ❏ Enabling or disabling automatic mode change. &#... change the settings for each button. ■ Add, modify, and remove items on the Q Menu. ■ Set preferences for tiling windows on the control panel, click the Help button in the HP Quick Launch Buttons control panel may not be supported by your computer.

Pointing Devices and Keyboard - Windows Vista
Page 19
... to display them. You can be added, modified, and removed. Click the down arrow next to the button you want to select one. b. Click Browse to search for available programs, folders, files, or Web sites, and then click to set, and click Presentation. Keyboard ❏ To open a program, folder, file, or ... folder, or file, or the URL of the system tasks accessed with the buttons, keys, or hotkeys found on the desktop: » Right-click the HP Quick Launch Buttons icon, and select Launch Q Menu. To save your preferences and close the control panel, click Apply, and then click OK.
... to display them. You can be added, modified, and removed. Click the down arrow next to the button you want to select one. b. Click Browse to search for available programs, folders, files, or Web sites, and then click to set, and click Presentation. Keyboard ❏ To open a program, folder, file, or ... folder, or file, or the URL of the system tasks accessed with the buttons, keys, or hotkeys found on the desktop: » Right-click the HP Quick Launch Buttons icon, and select Launch Q Menu. To save your preferences and close the control panel, click Apply, and then click OK.

Pointing Devices and Keyboard - Windows Vista
Page 20
...click Apply, and then click OK. In the HP Quick Launch Buttons control panel, click the Q Menu tab. 2. In the HP Quick Launch Buttons control panel, click the Q Menu tab. 2. In the HP Quick Launch Buttons control panel, click the Q Menu tab. 2. Pointing Devices and Keyboard 2-13 Adding a listed item to the Q ... list and to the Q Menu when it is not on Q Menu list, clear the check box for each item you want to add. 3. Keyboard Removing a Q Menu item To remove an item from the Items to display on Q Menu list to display on Q Menu list-for example, an item on a drive, network, or...
...click Apply, and then click OK. In the HP Quick Launch Buttons control panel, click the Q Menu tab. 2. In the HP Quick Launch Buttons control panel, click the Q Menu tab. 2. In the HP Quick Launch Buttons control panel, click the Q Menu tab. 2. Pointing Devices and Keyboard 2-13 Adding a listed item to the Q ... list and to the Q Menu when it is not on Q Menu list, clear the check box for each item you want to add. 3. Keyboard Removing a Q Menu item To remove an item from the Items to display on Q Menu list to display on Q Menu list-for example, an item on a drive, network, or...

Pointing Devices and Keyboard - Windows Vista
Page 23
... Buttons control panel, click the Quick Tile tab. 2. In the HP Quick Launch Buttons control panel, click the Q Menu tab. 2. In the HP Quick Launch Buttons control panel, click the Q Menu tab. 2. Click Remove. 4. Setting tiling preferences To set tiling preferences on Q Menu list. Keyboard Repositioning a Q Menu item To change the location of an...
... Buttons control panel, click the Quick Tile tab. 2. In the HP Quick Launch Buttons control panel, click the Q Menu tab. 2. In the HP Quick Launch Buttons control panel, click the Q Menu tab. 2. Click Remove. 4. Setting tiling preferences To set tiling preferences on Q Menu list. Keyboard Repositioning a Q Menu item To change the location of an...

HP Compaq nx9420 and nw9440 Notebook PC - Getting Started - Enhanced for Accessibility Windows Vista
Page 35
...in Windows, press ctrl+alt+delete. If you cannot shut down the computer by using the power button, disconnect the computer from external power and remove the battery pack. ✎ If you cannot shut down the computer by using ctrl+alt+delete, press and hold the power button for at least... the computer is not responding? Save your work and close all open applications. 2. If the computer is turned on, but not responding to software or keyboard commands, turn the computer back on , but is in the lower-right corner of the screen, click the Power button. 2. If the computer remains...
...in Windows, press ctrl+alt+delete. If you cannot shut down the computer by using the power button, disconnect the computer from external power and remove the battery pack. ✎ If you cannot shut down the computer by using ctrl+alt+delete, press and hold the power button for at least... the computer is not responding? Save your work and close all open applications. 2. If the computer is turned on, but not responding to software or keyboard commands, turn the computer back on , but is in the lower-right corner of the screen, click the Power button. 2. If the computer remains...

HP Compaq nx9420, nw9440 Notebook PC - Getting Started - Enhanced for Accessibility
Page 34
... unresponsive, try first to shut down the computer through the operating system by using the power button, unplug the computer from external power and remove the battery pack. ✎ If you cannot turn the computer back on after shutting it down the computer by selecting Start > Turn Off.... (If you have been registered to a domain, the button you cannot shut down , refer to "Is the computer unable to software applications or keyboard commands, try the emergency shutdown procedures in Windows, press ctrl+alt+delete. If the computer is in the following sequence: 1. If you cannot shut ...
... unresponsive, try first to shut down the computer through the operating system by using the power button, unplug the computer from external power and remove the battery pack. ✎ If you cannot turn the computer back on after shutting it down the computer by selecting Start > Turn Off.... (If you have been registered to a domain, the button you cannot shut down , refer to "Is the computer unable to software applications or keyboard commands, try the emergency shutdown procedures in Windows, press ctrl+alt+delete. If the computer is in the following sequence: 1. If you cannot shut ...

HP Compaq nx9420 and nx9440 Notebook PC - Maintenance and Service Guide
Page 4
... 4-5 4.6 Workstation Precautions 4-6 4.7 Grounding Equipment and Methods 4-7 5 Removal and Replacement Procedures 5.1 Serial Number 5-1 5.2 Disassembly Sequence Chart 5-2 5.3 Preparing the Computer for Disassembly 5-4 5.4 Hard Drive 5-6 5.5 Computer Feet 5-10 5.6 Bluetooth Module 5-11 5.7 External Memory Module 5-12 5.8 Mini Card Module 5-14 5.9 RTC Battery 5-17 5.10 Optical Drive 5-18 5.11 Keyboard 5-20 5.12 Internal Memory Module 5-24 5.13...
... 4-5 4.6 Workstation Precautions 4-6 4.7 Grounding Equipment and Methods 4-7 5 Removal and Replacement Procedures 5.1 Serial Number 5-1 5.2 Disassembly Sequence Chart 5-2 5.3 Preparing the Computer for Disassembly 5-4 5.4 Hard Drive 5-6 5.5 Computer Feet 5-10 5.6 Bluetooth Module 5-11 5.7 External Memory Module 5-12 5.8 Mini Card Module 5-14 5.9 RTC Battery 5-17 5.10 Optical Drive 5-18 5.11 Keyboard 5-20 5.12 Internal Memory Module 5-24 5.13...
HP Compaq nx9420 and nx9440 Notebook PC - Maintenance and Service Guide
Page 28
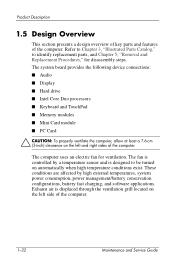
...board provides the following device connections: ■ Audio ■ Display ■ Hard drive ■ Intel Core Duo processors ■ Keyboard and TouchPad ■ Memory modules ■ Mini Card module ■ PC Card Ä CAUTION: To properly ventilate the computer,...conservation configurations, battery fast charging, and software applications. Exhaust air is designed to identify replacement parts, and Chapter 5, "Removal and Replacement Procedures," for ventilation. Product Description 1.5 Design Overview This section presents a design overview of key parts and features of the...
...board provides the following device connections: ■ Audio ■ Display ■ Hard drive ■ Intel Core Duo processors ■ Keyboard and TouchPad ■ Memory modules ■ Mini Card module ■ PC Card Ä CAUTION: To properly ventilate the computer,...conservation configurations, battery fast charging, and software applications. Exhaust air is designed to identify replacement parts, and Chapter 5, "Removal and Replacement Procedures," for ventilation. Product Description 1.5 Design Overview This section presents a design overview of key parts and features of the...
HP Compaq nx9420 and nx9440 Notebook PC - Maintenance and Service Guide
Page 103
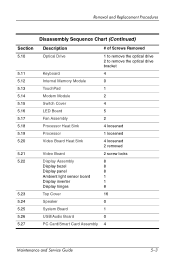
Removal and Replacement Procedures Disassembly Sequence Chart (Continued) Section 5.10 5.11 5.12 5.13 5.14 5.15 5.16 5.17 5.18 5.19 5.20 5.21 5.22 5.23 5.24 5.25 5.26 5.27 Description Optical Drive Keyboard Internal Memory Module TouchPad Modem Module Switch Cover LED Board Fan Assembly Processor...hinges Top Cover Speaker System Board USB/Audio Board PC Card/Smart Card Assembly # of Screws Removed 1 to remove the optical drive 2 to remove the optical drive bracket 4 0 1 2 4 5 2 4 loosened 1 loosened 4 loosened 2 removed 2 screw locks 8 8 8 1 1 8 16 0 1 0 4 Maintenance and Service Guide 5-3
Removal and Replacement Procedures Disassembly Sequence Chart (Continued) Section 5.10 5.11 5.12 5.13 5.14 5.15 5.16 5.17 5.18 5.19 5.20 5.21 5.22 5.23 5.24 5.25 5.26 5.27 Description Optical Drive Keyboard Internal Memory Module TouchPad Modem Module Switch Cover LED Board Fan Assembly Processor...hinges Top Cover Speaker System Board USB/Audio Board PC Card/Smart Card Assembly # of Screws Removed 1 to remove the optical drive 2 to remove the optical drive bracket 4 0 1 2 4 5 2 4 loosened 1 loosened 4 loosened 2 removed 2 screw locks 8 8 8 1 1 8 16 0 1 0 4 Maintenance and Service Guide 5-3

HP Compaq nx9420 and nx9440 Notebook PC - Maintenance and Service Guide
Page 262
..., 3-33, 3-34 specifications 6-6 hard drive bay 1-21 hard drive cover illustrated 3-18 removal 5-7 headphone jack location 1-9 pin assignments D-1 HP Docking Station, spare part number 3-21, 3-24 HP Extended Life Battery, spare part number 3-21, 3-24 I I/O address specifications 6-15 interrupt specifications 6-13 K keyboard removal 5-20 spare part numbers 3-3, 3-5, 3-26, 3-27, 3-28, 3-29, 3-30, 3-31, 5-20 troubleshooting...
..., 3-33, 3-34 specifications 6-6 hard drive bay 1-21 hard drive cover illustrated 3-18 removal 5-7 headphone jack location 1-9 pin assignments D-1 HP Docking Station, spare part number 3-21, 3-24 HP Extended Life Battery, spare part number 3-21, 3-24 I I/O address specifications 6-15 interrupt specifications 6-13 K keyboard removal 5-20 spare part numbers 3-3, 3-5, 3-26, 3-27, 3-28, 3-29, 3-30, 3-31, 5-20 troubleshooting...


