Reference Guide
Page 4
...govern the use the software on more than one HP product. IF YOU DO NOT AGREE WITH THE TERMS OF THE LICENSE AGREEMENT, YOU MUST NOW EITHER REMOVE THE SOFTWARE FROM YOUR HARD DRIVE AND DESTROY THE MASTER DISKETTES, OR RETURN THE COMPLETE HP PRODUCT AND SOFTWARE FOR A FULL REFUND. Customer may... not network the software or otherwise use of the software with an HP product so long as the copies and...
...govern the use the software on more than one HP product. IF YOU DO NOT AGREE WITH THE TERMS OF THE LICENSE AGREEMENT, YOU MUST NOW EITHER REMOVE THE SOFTWARE FROM YOUR HARD DRIVE AND DESTROY THE MASTER DISKETTES, OR RETURN THE COMPLETE HP PRODUCT AND SOFTWARE FOR A FULL REFUND. Customer may... not network the software or otherwise use of the software with an HP product so long as the copies and...

Reference Guide
Page 7
... the notebook 17 To change the boot device 17 To use the TouchPad 18 To use the function hot keys 19 To use the One-Touch buttons 20 To use the Windows and Applications keys 21 To use the ALT GR key 21 Using CDs or DVDs 22 To insert or remove... a CD or DVD 22 To play DVD movies 23 To create or copy CDs 23 Securing Your Notebook 24 To set up password protection 24 To lock your notebook 24 To attach a security cable 25 To protect against viruses 25 To lock the hard drive 26 Reference Guide vii
... the notebook 17 To change the boot device 17 To use the TouchPad 18 To use the function hot keys 19 To use the One-Touch buttons 20 To use the Windows and Applications keys 21 To use the ALT GR key 21 Using CDs or DVDs 22 To insert or remove... a CD or DVD 22 To play DVD movies 23 To create or copy CDs 23 Securing Your Notebook 24 To set up password protection 24 To lock your notebook 24 To attach a security cable 25 To protect against viruses 25 To lock the hard drive 26 Reference Guide vii

Reference Guide
Page 8
Taking Care of Your Notebook 27 To protect your hard drive 27 To maintain your notebook 27 To safeguard your data 28 To extend the life of the display 28 To clean your notebook 28 Batteries and Power Management 29 Managing Power Consumption 30 How the notebook manages power automatically 30 Using Battery Power ...prepare for Bluetooth connections 45 To send or receive files using Bluetooth 46 Add-On Devices ...47 Connecting PC Cards 48 To insert or remove a PC Card 48 Connecting External Devices 50 To connect an audio device 50 To use an external monitor 52 To connect an IEEE ...
Taking Care of Your Notebook 27 To protect your hard drive 27 To maintain your notebook 27 To safeguard your data 28 To extend the life of the display 28 To clean your notebook 28 Batteries and Power Management 29 Managing Power Consumption 30 How the notebook manages power automatically 30 Using Battery Power ...prepare for Bluetooth connections 45 To send or receive files using Bluetooth 46 Add-On Devices ...47 Connecting PC Cards 48 To insert or remove a PC Card 48 Connecting External Devices 50 To connect an audio device 50 To use an external monitor 52 To connect an IEEE ...
Reference Guide
Page 71
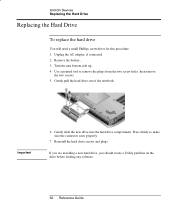
.... 62 Reference Guide Gently pull the hard drive out of the notebook. Turn the unit bottom side up. 4. Use a pointed tool to make sure the connector seats properly. 7. Gently slide the new drive into the hard drive compartment. Remove the battery. 3. Add-On Devices Replacing the Hard Drive Replacing the Hard Drive To replace the hard drive You will need a small Phillips screwdriver...
.... 62 Reference Guide Gently pull the hard drive out of the notebook. Turn the unit bottom side up. 4. Use a pointed tool to make sure the connector seats properly. 7. Gently slide the new drive into the hard drive compartment. Remove the battery. 3. Add-On Devices Replacing the Hard Drive Replacing the Hard Drive To replace the hard drive You will need a small Phillips screwdriver...
Reference Guide
Page 72
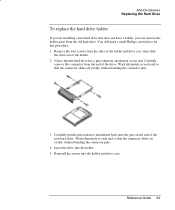
Add-On Devices Replacing the Hard Drive To replace the hard drive holder If you are installing a new hard drive that does not have a holder, you can remove the holder parts from the sides of the holder and drive case, then slide the drive out of the holder. 2. Work alternately... small Phillips screwdriver for this connector from the end of the new hard drive. Carefully remove this procedure. 1. Reinstall the screws into the holder. 5. Insert the drive into the holder and drive case. Notice that the hard drive has a pin connector attachment at each end so that the connector ...
Add-On Devices Replacing the Hard Drive To replace the hard drive holder If you are installing a new hard drive that does not have a holder, you can remove the holder parts from the sides of the holder and drive case, then slide the drive out of the holder. 2. Work alternately... small Phillips screwdriver for this connector from the end of the new hard drive. Carefully remove this procedure. 1. Reinstall the screws into the holder. 5. Insert the drive into the holder and drive case. Notice that the hard drive has a pin connector attachment at each end so that the connector ...

Reference Guide
Page 78
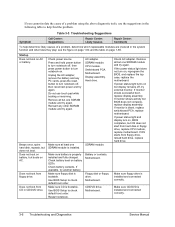
Select the Check Now box under the Error-checking section of the notebook. • Remove and reinsert the hard drive. Reference Guide 69 If the hard drive makes a buzzing or whining noise • Back up the drive immediately. • See whether the noise is fully plugged into a power source and into...adapter, then make sure it is coming from elsewhere, such as from the fan or a PC Card drive. Hard drive problems If the notebook hard drive doesn't spin • Make sure the notebook has power. In the BIOS Setup utility, try setting Video Display Device to scan, then select File >...
Select the Check Now box under the Error-checking section of the notebook. • Remove and reinsert the hard drive. Reference Guide 69 If the hard drive makes a buzzing or whining noise • Back up the drive immediately. • See whether the noise is fully plugged into a power source and into...adapter, then make sure it is coming from elsewhere, such as from the fan or a PC Card drive. Hard drive problems If the notebook hard drive doesn't spin • Make sure the notebook has power. In the BIOS Setup utility, try setting Video Display Device to scan, then select File >...

Reference Guide
Page 87
... power source and the notebook, and that the light on the Adapter is on. • If you're using a power strip, remove the AC adapter from the power strip and plug it will probably show less time remaining than a year or two old, you may need to reduce hard drive access. • If... the operating time has gradually become shorter and the battery is performing a task requiring a good deal of the notebook). So,...
... power source and the notebook, and that the light on the Adapter is on. • If you're using a power strip, remove the AC adapter from the power strip and plug it will probably show less time remaining than a year or two old, you may need to reduce hard drive access. • If... the operating time has gradually become shorter and the battery is performing a task requiring a good deal of the notebook). So,...

Reference Guide
Page 96
... select the one device in LAN provides diskless boot from a network server. Removable Devices 3. Select Start > Turn Off Computer > Restart. 2. Press F10 to bring up a list of video memory. If the notebook has more than one scanned. Does not affect password, date, or time changes...87 Default 1. Hard Drive 2. Setting Hard Drive +Removable Devices CD-ROM Drive Built-in Setup. Note Changing your video memory to change your selection. Move the entries to 8MB, 16MB, 32MB, or 64MB may change video memory settings using BIOS Setup utility The notebook comes with either ...
... select the one device in LAN provides diskless boot from a network server. Removable Devices 3. Select Start > Turn Off Computer > Restart. 2. Press F10 to bring up a list of video memory. If the notebook has more than one scanned. Does not affect password, date, or time changes...87 Default 1. Hard Drive 2. Setting Hard Drive +Removable Devices CD-ROM Drive Built-in Setup. Note Changing your video memory to change your selection. Move the entries to 8MB, 16MB, 32MB, or 64MB may change video memory settings using BIOS Setup utility The notebook comes with either ...
Reference Guide
Page 119
..., 19 business cards, 46 C Cable lock, 25 Caps Lock, 9 Cardbus cards, 48 cards, PCMCIA, 48 CD-ROM drive creating or copying CDs, 23 inserting CD, 20, 22 location, 2, 3 removing CD, 20, 22 CDs copying/creating, 23 recommended media, 23 cleaning the notebook, 28 configuring... dual display, 53 dual monitor, 53 extending life, 28 memory, 85 port, 5 secondary, 53 troubleshooting, 68 docking port, 6, 7 drives hard drive holder, 63 replacing hard drive, 62 DVD drive location, 2, 3 setting region code, 23 troubleshooting, 67 E encryption, 40 ergonomics, 10 Exit menu (BIOS), 87 extended memory, 85 ...
..., 19 business cards, 46 C Cable lock, 25 Caps Lock, 9 Cardbus cards, 48 cards, PCMCIA, 48 CD-ROM drive creating or copying CDs, 23 inserting CD, 20, 22 location, 2, 3 removing CD, 20, 22 CDs copying/creating, 23 recommended media, 23 cleaning the notebook, 28 configuring... dual display, 53 dual monitor, 53 extending life, 28 memory, 85 port, 5 secondary, 53 troubleshooting, 68 docking port, 6, 7 drives hard drive holder, 63 replacing hard drive, 62 DVD drive location, 2, 3 setting region code, 23 troubleshooting, 67 E encryption, 40 ergonomics, 10 Exit menu (BIOS), 87 extended memory, 85 ...
Reference Guide
Page 121
rebooting boot device, 87 temporary boot device, 17 region code, 23 regulatory information, 101 removing CD, 20, 22 DVD, 20, 22 hard drive, 62 hard drive holder, 63 PC card, 49 reset button, 17 resetting, 17 S safety battery use, 98 infrared port,..., 8 S-Video port, 5 T temperature, overheating, 70 1394 devices, connecting, 53 1394 port, 53 timeouts, notebook, 31 TouchPad location, 2, 3 troubleshooting, 71 troubleshooting audio, 66 battery, 77 CD/DVD drive, 67 display, 68 hard drive, 69 infrared communications, 70 keyboard, 71 LAN, 72 memory, 73 modem, 73 overheating, 70 parallel port, 80...
rebooting boot device, 87 temporary boot device, 17 region code, 23 regulatory information, 101 removing CD, 20, 22 DVD, 20, 22 hard drive, 62 hard drive holder, 63 PC card, 49 reset button, 17 resetting, 17 S safety battery use, 98 infrared port,..., 8 S-Video port, 5 T temperature, overheating, 70 1394 devices, connecting, 53 1394 port, 53 timeouts, notebook, 31 TouchPad location, 2, 3 troubleshooting, 71 troubleshooting audio, 66 battery, 77 CD/DVD drive, 67 display, 68 hard drive, 69 infrared communications, 70 keyboard, 71 LAN, 72 memory, 73 modem, 73 overheating, 70 parallel port, 80...
Worldwide Limited Warranty and Technical Support - 1 year
Page 2
... least equivalent to provide you a refund of your purchase price or lease payments (minus interest) instead of end-user replaceable Compaq or Compaq approved parts if available for your exclusive remedy for the remainder of the Limited Warranty Period of this Limited Warranty become the property... OR REMOVABLE STORAGE MEDIA. or (d) by modification or service by the warranty statutes in your country is your product in performance and reliability. Spare parts may , at its sole discretion, to new. YOU SHOULD MAKE REGULAR BACKUP COPIES OF THE DATA STORED ON YOUR HARD DRIVE OR ...
... least equivalent to provide you a refund of your purchase price or lease payments (minus interest) instead of end-user replaceable Compaq or Compaq approved parts if available for your exclusive remedy for the remainder of the Limited Warranty Period of this Limited Warranty become the property... OR REMOVABLE STORAGE MEDIA. or (d) by modification or service by the warranty statutes in your country is your product in performance and reliability. Spare parts may , at its sole discretion, to new. YOU SHOULD MAKE REGULAR BACKUP COPIES OF THE DATA STORED ON YOUR HARD DRIVE OR ...
Maintenance and Service Guide
Page 26
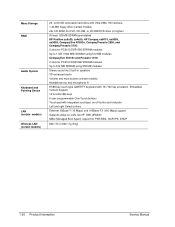
to 60-GB removable hard drive with Ultra-DMA 100 interface 1.44-MB floppy drive (certain models) 24x CD-ROM, 8x DVD, CD-RW, or CD-RW/DVD drive (or higher) At least 128 MB SDRAM preinstalled HP Pavilion ze5x00, ze4x00, HP Compaq nx9010, nx9008, nx9005, Compaq Evo N1050v, Compaq Presario 2500, and Compaq Presario 2100: 2 slots for PC2100 DDR-266 SDRAM modules...
to 60-GB removable hard drive with Ultra-DMA 100 interface 1.44-MB floppy drive (certain models) 24x CD-ROM, 8x DVD, CD-RW, or CD-RW/DVD drive (or higher) At least 128 MB SDRAM preinstalled HP Pavilion ze5x00, ze4x00, HP Compaq nx9010, nx9008, nx9005, Compaq Evo N1050v, Compaq Presario 2500, and Compaq Presario 2100: 2 slots for PC2100 DDR-266 SDRAM modules...
Maintenance and Service Guide
Page 100
... Switchboard PCA Motherboard Display assembly Hard drive Beeps once, spins hard disk, repeats, but BIOS does not complete, replace display assembly. Table 3-3. If monitor shows successful boot, replace display assembly. Press and hold power button to turn notebook off , and reconnect power and try again. Unplug the AC adapter, remove the battery and any other...
... Switchboard PCA Motherboard Display assembly Hard drive Beeps once, spins hard disk, repeats, but BIOS does not complete, replace display assembly. Table 3-3. If monitor shows successful boot, replace display assembly. Press and hold power button to turn notebook off , and reconnect power and try again. Unplug the AC adapter, remove the battery and any other...
Maintenance and Service Guide
Page 101
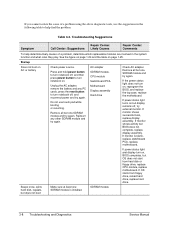
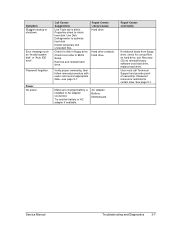
... software onto hard drive, replace hard drive. Remove and reinstall hard drive. Repair Center: Likely Causes Battery or contacts Motherboard Floppy disk or floppy drive Motherboard. CD/DVD drive Motherboard Hard drive Hard drive contacts Hard drive Password forgotten Verify proper ownership, and then follow removal procedure with ...Comments Make sure floppy drive is installed and connected correctly. Use BIOS Setup to check hard disk. Power Service Manual Troubleshooting and Diagnostics 3-9 Restart notebook. If notebook boots from CD in CD/DVD drive Sluggish startup or ...
... software onto hard drive, replace hard drive. Remove and reinstall hard drive. Repair Center: Likely Causes Battery or contacts Motherboard Floppy disk or floppy drive Motherboard. CD/DVD drive Motherboard Hard drive Hard drive contacts Hard drive Password forgotten Verify proper ownership, and then follow removal procedure with ...Comments Make sure floppy drive is installed and connected correctly. Use BIOS Setup to check hard disk. Power Service Manual Troubleshooting and Diagnostics 3-9 Restart notebook. If notebook boots from CD in CD/DVD drive Sluggish startup or ...
Maintenance and Service Guide
Page 104
...Remove and reinstall hard drive. Was notebook or drive dropped? Check hard disk installation. Check notebook and drive for alternate noise sources, such as PCMCIA drive or fan. Check connector. Declared to be caused by customer abuse. External display Motherboard Hard drive or connector Motherboard Hard drive Depends on noise source If drive...pixels or lines. Scratched display glass Local area of dark or light discoloration visible when display is damaged, drive may not operate properly. Check power source. Back up disk immediately. Check for evidence of display. ...
...Remove and reinstall hard drive. Was notebook or drive dropped? Check hard disk installation. Check notebook and drive for alternate noise sources, such as PCMCIA drive or fan. Check connector. Declared to be caused by customer abuse. External display Motherboard Hard drive or connector Motherboard Hard drive Depends on noise source If drive...pixels or lines. Scratched display glass Local area of dark or light discoloration visible when display is damaged, drive may not operate properly. Check power source. Back up disk immediately. Check for evidence of display. ...

Service Manual
Page 66
...-matrix (TFT) LCD display. Battery life: up to 1 GB (1024 MB) SDRAM using 256 MB modules. HP Pavilion ze5200, ze4200, ze4100, Compaq Evo N1050v, Compaq Presario 2500, and Compaq Presario 2100 Two slots for PC2100 DDR-266 SDRAM modules. Stereo sound via two built-in . 87/88-key touch..., 75 W. 20- or 32-MB DDR graphics memory, 4x AGP graphics capability. Hardware 3D acceleration, hardware DVD acceleration. Up to 40-GB removable hard drive with 101/102 key emulation. Embedded numeric keypad. 12 function (Fn) keys. 5 user-programmable One-Touch buttons. Fast battery recharge: 2 hours...
...-matrix (TFT) LCD display. Battery life: up to 1 GB (1024 MB) SDRAM using 256 MB modules. HP Pavilion ze5200, ze4200, ze4100, Compaq Evo N1050v, Compaq Presario 2500, and Compaq Presario 2100 Two slots for PC2100 DDR-266 SDRAM modules. Stereo sound via two built-in . 87/88-key touch..., 75 W. 20- or 32-MB DDR graphics memory, 4x AGP graphics capability. Hardware 3D acceleration, hardware DVD acceleration. Up to 40-GB removable hard drive with 101/102 key emulation. Embedded numeric keypad. 12 function (Fn) keys. 5 user-programmable One-Touch buttons. Fast battery recharge: 2 hours...
Service Manual
Page 141
.... Reinsert any PC cards, press the reset button to turn notebook off , try again. Switchboard PCA. Hard drive. Restart notebook. If power status light turns on . CPU module. Does not boot from hard disk or floppy drive, replace CPU module, replace motherboard. Motherboard. Make sure CD is bootable. Remove all but OS does not start from floppy...
.... Reinsert any PC cards, press the reset button to turn notebook off , try again. Switchboard PCA. Hard drive. Restart notebook. If power status light turns on . CPU module. Does not boot from hard disk or floppy drive, replace CPU module, replace motherboard. Motherboard. Make sure CD is bootable. Remove all but OS does not start from floppy...
Service Manual
Page 142
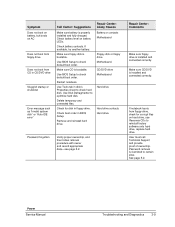
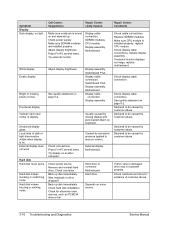
.... See page 5-1. Power No power. Use Disk Defragmenter to check hard disk. Remove and reinstall hard drive. Verify proper ownership, then follow removal procedure with owner and record appropriate data-see page 5-1. Repair Center: Comments If notebook boots from floppy drive, check for disk in BIOS Setup. Symptom Sluggish startup or shutdown. User must call Technical Support...
.... See page 5-1. Power No power. Use Disk Defragmenter to check hard disk. Remove and reinstall hard drive. Verify proper ownership, then follow removal procedure with owner and record appropriate data-see page 5-1. Repair Center: Comments If notebook boots from floppy drive, check for disk in BIOS Setup. Symptom Sluggish startup or shutdown. User must call Technical Support...
Service Manual
Page 145
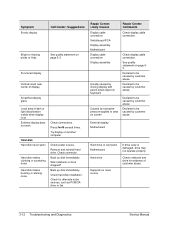
... module. Motherboard. Erratic display. Display assembly. External display does not work. Was notebook or drive dropped? Back up disk immediately. If external monitor displays no light. Display assembly. Check power source. Remove and reinstall hard drive. Check hard disk installation. Motherboard. Hard drive or connector. Hard drive. Replace SDRAM modules. Declared to be caused by customer abuse. Press Fn+F5...
... module. Motherboard. Erratic display. Display assembly. External display does not work. Was notebook or drive dropped? Back up disk immediately. If external monitor displays no light. Display assembly. Check power source. Remove and reinstall hard drive. Check hard disk installation. Motherboard. Hard drive or connector. Hard drive. Replace SDRAM modules. Declared to be caused by customer abuse. Press Fn+F5...
Hard Drive White Paper
Page 3
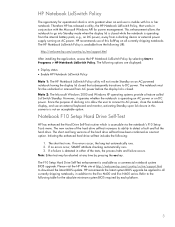
... installing the application, access the HP Notebook LidSwitch Policy by selecting Start > Programs > HP Notebook LidSwitch Policy. Please visit the HP Web site at any time by pressing the esc key. Notebook F10 Setup Hard Drive Self-Test HP has enhanced the Hard Drive Self-Test routine which is operating... called Lid Switch Standby. HP Notebook LidSwitch Policy The opportunity for the absolute minimum system BIOS required by each platform. 3 If a failure is available as one test option. HP recommends the latest system BIOS upgrade be undocked or removed from a docking device or...
... installing the application, access the HP Notebook LidSwitch Policy by selecting Start > Programs > HP Notebook LidSwitch Policy. Please visit the HP Web site at any time by pressing the esc key. Notebook F10 Setup Hard Drive Self-Test HP has enhanced the Hard Drive Self-Test routine which is operating... called Lid Switch Standby. HP Notebook LidSwitch Policy The opportunity for the absolute minimum system BIOS required by each platform. 3 If a failure is available as one test option. HP recommends the latest system BIOS upgrade be undocked or removed from a docking device or...


