
Reference Guide
Page 8
... To safeguard your data 28 To extend the life of the display 28 To clean your notebook 28 Batteries and Power Management 29 Managing Power Consumption 30 How the notebook manages power automatically 30 Using Battery Power 32 To check battery status 32 To respond to a low-battery warning 33 To recharge the battery ... 1394 device (select models only 53 To connect an infrared device (select models only 54 To use a port replicator (select models only 55 Installing Additional RAM (Memory 58 To install a RAM expansion module 58 To remove a RAM expansion module 60 viii Reference Guide
... To safeguard your data 28 To extend the life of the display 28 To clean your notebook 28 Batteries and Power Management 29 Managing Power Consumption 30 How the notebook manages power automatically 30 Using Battery Power 32 To check battery status 32 To respond to a low-battery warning 33 To recharge the battery ... 1394 device (select models only 53 To connect an infrared device (select models only 54 To use a port replicator (select models only 55 Installing Additional RAM (Memory 58 To install a RAM expansion module 58 To remove a RAM expansion module 60 viii Reference Guide
Reference Guide
Page 40
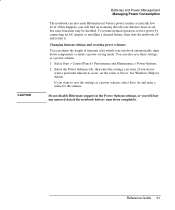
... Guide 31 Changing timeout settings and creating power schemes You can also enter Hibernation if battery power reaches a critically low level. You can also save the settings as a power scheme. 1. To resume normal operation, restore power by connecting an AC adapter or installing a charged battery, then shut the notebook off and restart it. If this happens...
... Guide 31 Changing timeout settings and creating power schemes You can also enter Hibernation if battery power reaches a critically low level. You can also save the settings as a power scheme. 1. To resume normal operation, restore power by connecting an AC adapter or installing a charged battery, then shut the notebook off and restart it. If this happens...
Reference Guide
Page 63
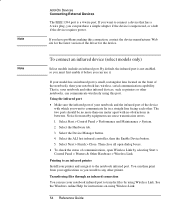
... Then close all open dialog boxes. • To check the status of the notebook), then your printer and assign it to the notebook infrared port. Printing to an infrared printer Install your notebook has wireless, serial communication capability. Transferring files through an infrared connection You can use...54 Reference Guide If you have problems making this port. By default, the infrared port is unpowered, or a hub if the device requires power. Select the Hardware tab. 3. Select the ALI fast infrared controller, then the Enable Device button. 5. Select Next > Finish > Close. ...
... Then close all open dialog boxes. • To check the status of the notebook), then your printer and assign it to the notebook infrared port. Printing to an infrared printer Install your notebook has wireless, serial communication capability. Transferring files through an infrared connection You can use...54 Reference Guide If you have problems making this port. By default, the infrared port is unpowered, or a hub if the device requires power. Select the Hardware tab. 3. Select the ALI fast infrared controller, then the Enable Device button. 5. Select Next > Finish > Close. ...
Reference Guide
Page 65
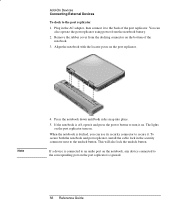
... the port replicator is docked, you can also operate the port replicator using power from the docking connector on the port replicator. When the notebook is ignored. 56 Reference Guide Press the notebook down until both the notebook and port replicator, install the cable lock in the AC adapter, then connect it . Add-On Devices...
... the port replicator is docked, you can also operate the port replicator using power from the docking connector on the port replicator. When the notebook is ignored. 56 Reference Guide Press the notebook down until both the notebook and port replicator, install the cable lock in the AC adapter, then connect it . Add-On Devices...
Reference Guide
Page 86
... responding. • Press and hold the power button for broken network connections to time out. • If the notebook hard drive frequently runs (as indicated by the hard drive light on the front of the notebook) while the notebook appears to be lost. If this occurs frequently, consider installing additional memory. • Check the amount...
... responding. • Press and hold the power button for broken network connections to time out. • If the notebook hard drive frequently runs (as indicated by the hard drive light on the front of the notebook) while the notebook appears to be lost. If this occurs frequently, consider installing additional memory. • Check the amount...

Reference Guide
Page 87
... based on the rate at which the notebook is using power at the moment. If the notebook has a short operating time • Conserve power using only the AC adapter included with your notebook (or other approved adapter that meets the power requirements of power (such as MS Word), disable this ...any nearby heat source. Troubleshooting and Maintenance Troubleshooting Your Notebook If the battery doesn't charge • Make sure the AC adapter is fully plugged into a wall outlet. • Make sure the battery is fully installed and locked in this feature or increase the specified save...
... based on the rate at which the notebook is using power at the moment. If the notebook has a short operating time • Conserve power using only the AC adapter included with your notebook (or other approved adapter that meets the power requirements of power (such as MS Word), disable this ...any nearby heat source. Troubleshooting and Maintenance Troubleshooting Your Notebook If the battery doesn't charge • Make sure the AC adapter is fully plugged into a wall outlet. • Make sure the battery is fully installed and locked in this feature or increase the specified save...
Reference Guide
Page 89
... parallel port is not working • Make sure the port connection is secure. • Press the power button to enter Standby, and again to resume. • Restart the notebook: select Start > Turn Off Computer > Restart. • Check mouse settings in Control Panel: select Start... modem, then select the option to list the current modem devices. 3. If you followed the manufacturer's installation instructions completely and have a PS/2 keyboard connected, use a PS/2 Y adapter (HP accessory F1469A). • Check the port settings in Control Panel. Open the hardware Device Manager: select ...
... parallel port is not working • Make sure the port connection is secure. • Press the power button to enter Standby, and again to resume. • Restart the notebook: select Start > Turn Off Computer > Restart. • Check mouse settings in Control Panel: select Start... modem, then select the option to list the current modem devices. 3. If you followed the manufacturer's installation instructions completely and have a PS/2 keyboard connected, use a PS/2 Y adapter (HP accessory F1469A). • Check the port settings in Control Panel. Open the hardware Device Manager: select ...
Reference Guide
Page 106
...a fused plug, if you should match the plug and voltage requirements for your local authorized dealer or Sales and Service office. For any power cord with the notebook AC adapter should use one for the local area. However, if you travel to a different area or need to connect to a different... outlet or voltage, you have to replace the fuse, be sure to install an approved fuse. To purchase a power cord (including one of the power cords listed ...
...a fused plug, if you should match the plug and voltage requirements for your local authorized dealer or Sales and Service office. For any power cord with the notebook AC adapter should use one for the local area. However, if you travel to a different area or need to connect to a different... outlet or voltage, you have to replace the fuse, be sure to install an approved fuse. To purchase a power cord (including one of the power cords listed ...
Reference Guide
Page 110
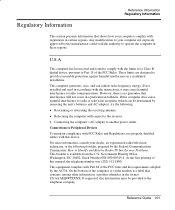
...Radio-TV Interference Problems. This booklet is available from the U.S. Reference Guide 101 This equipment complies with regulations in a residential installation. For more information, consult your dealer, an experienced radio/television technician, or the following : • Reorienting or relocating ...batteries and AC adapter), try the following booklet, prepared by the manufacturer could void the authority to another power outlet. Reference Information Regulatory Information Regulatory Information This section presents information that shows how your computer complies with ...
...Radio-TV Interference Problems. This booklet is available from the U.S. Reference Guide 101 This equipment complies with regulations in a residential installation. For more information, consult your dealer, an experienced radio/television technician, or the following : • Reorienting or relocating ...batteries and AC adapter), try the following booklet, prepared by the manufacturer could void the authority to another power outlet. Reference Information Regulatory Information Regulatory Information This section presents information that shows how your computer complies with ...
Reference Guide
Page 119
...of, 34 checking status, 32 extending life of, 34 installing, 10 location, 2, 3 low power warning, 33 operating time, 34, 78 release latch, 6, 7 safety, 98 saving power, 34 status lights, 32 troubleshooting, 77 BIOS password,...45 wireless, 44 boot device order, 17, 87 Boot menu (BIOS), 87 brightness, adjusting, 19 business cards, 46 C Cable lock, 25 Caps Lock, 9 Cardbus cards, 48 cards, PCMCIA, 48 ..., 2, 3 removing CD, 20, 22 CDs copying/creating, 23 recommended media, 23 cleaning the notebook, 28 configuring BIOS settings, 84 modem, 38 connecting IEEE 1394 devices, 53 LAN, 39 wireless network...
...of, 34 checking status, 32 extending life of, 34 installing, 10 location, 2, 3 low power warning, 33 operating time, 34, 78 release latch, 6, 7 safety, 98 saving power, 34 status lights, 32 troubleshooting, 77 BIOS password,...45 wireless, 44 boot device order, 17, 87 Boot menu (BIOS), 87 brightness, adjusting, 19 business cards, 46 C Cable lock, 25 Caps Lock, 9 Cardbus cards, 48 cards, PCMCIA, 48 ..., 2, 3 removing CD, 20, 22 CDs copying/creating, 23 recommended media, 23 cleaning the notebook, 28 configuring BIOS settings, 84 modem, 38 connecting IEEE 1394 devices, 53 LAN, 39 wireless network...

Reference Guide
Page 120
... lights, 39 location, 5 laser safety, 98 lights LAN port, 39 status, 2, 3, 8, 9 locking notebook, 24 LPT1 port, 5 M Main menu (BIOS), 85 maintenance notebook configuration, 84 software installation, 88 memory extended, 85 PC2100 DDR-266, 58, 73 troubleshooting, 73 video, 85 Mini PCI location, ...cards, 48 phone cord, connecting, 12 plug requirements, 97 port locations, 5 power connecting AC, 11 saving, 34 troubleshooting, 77 power button location, 2, 3 resetting with, 17 power cords, 97 power management automated, 30 schemes, 31 printing infrared printers, 54 troubleshooting, 79 protection Cable...
... lights, 39 location, 5 laser safety, 98 lights LAN port, 39 status, 2, 3, 8, 9 locking notebook, 24 LPT1 port, 5 M Main menu (BIOS), 85 maintenance notebook configuration, 84 software installation, 88 memory extended, 85 PC2100 DDR-266, 58, 73 troubleshooting, 73 video, 85 Mini PCI location, ...cards, 48 phone cord, connecting, 12 plug requirements, 97 port locations, 5 power connecting AC, 11 saving, 34 troubleshooting, 77 power button location, 2, 3 resetting with, 17 power cords, 97 power management automated, 30 schemes, 31 printing infrared printers, 54 troubleshooting, 79 protection Cable...
Maintenance and Service Guide
Page 89
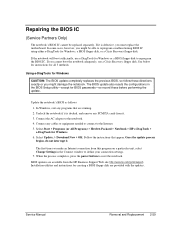
...the power button to reprogram the BIOS IC. Select Start > Programs (or All Programs) > Hewlett-Packard > Notebook > HP e-DiagTools > e-DiagTools for all 3 methods. BIOS updates are running. 2. Undock the notebook if... the HP Business Support Web site http://www.hp.com/go/bizsupport. The first time you might be replaced separately. Repairing the BIOS IC (Service Partners Only) The notebook's BIOS...performing the update. Once the update process begins, do not interrupt it. Installation utilities and instructions for BIOS passwords-so record these directions exactly or you make...
...the power button to reprogram the BIOS IC. Select Start > Programs (or All Programs) > Hewlett-Packard > Notebook > HP e-DiagTools > e-DiagTools for all 3 methods. BIOS updates are running. 2. Undock the notebook if... the HP Business Support Web site http://www.hp.com/go/bizsupport. The first time you might be replaced separately. Repairing the BIOS IC (Service Partners Only) The notebook's BIOS...performing the update. Once the update process begins, do not interrupt it. Installation utilities and instructions for BIOS passwords-so record these directions exactly or you make...
Maintenance and Service Guide
Page 97
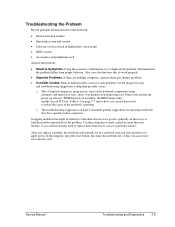
... information, try to correct a particular failure. A failure symptom is your primary troubleshooting tool. Table 3-2 on self-test, WMI/Toptools (if installed), the BIOS Setup utility, and the Sycard PCCtest. After you will normally be good is generally an ideal way to help find the module ...; Consider Causes. Determine how the problem differs from proper behavior. Other tools include the power-on page 3-7 shows how you can use these tools to isolate the cause of the notebook components using automatic and interactive tests, and is rarely caused by more than one module,...
... information, try to correct a particular failure. A failure symptom is your primary troubleshooting tool. Table 3-2 on self-test, WMI/Toptools (if installed), the BIOS Setup utility, and the Sycard PCCtest. After you will normally be good is generally an ideal way to help find the module ...; Consider Causes. Determine how the problem differs from proper behavior. Other tools include the power-on page 3-7 shows how you can use these tools to isolate the cause of the notebook components using automatic and interactive tests, and is rarely caused by more than one module,...
Maintenance and Service Guide
Page 99
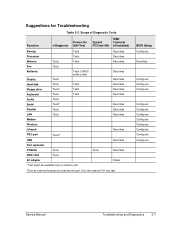
Scope of Diagnostic Tools Function Power-On e-Diagtools Self-Test WMI/ Sycard Toptools PCCtest 450 (if installed) Bootup Processor Memory Fan Batteries Display Hard disk Floppy drive Keyboard Audio Serial Parallel LAN Tests Tests Tests Tests Tests* Tests Tests Tests* Tests Tests ...
Scope of Diagnostic Tools Function Power-On e-Diagtools Self-Test WMI/ Sycard Toptools PCCtest 450 (if installed) Bootup Processor Memory Fan Batteries Display Hard disk Floppy drive Keyboard Audio Serial Parallel LAN Tests Tests Tests Tests Tests* Tests Tests Tests* Tests Tests ...
Maintenance and Service Guide
Page 100
... PCA, replace motherboard. SDRAM module Check AC adapter. If monitor is installed. If monitor shows successful boot, replace display assembly. Remove all but display remains off , and then press power button to turn notebook off, and reconnect power and try again. If the power status light does not turn on , reprogram the BIOS, and replace...
... PCA, replace motherboard. SDRAM module Check AC adapter. If monitor is installed. If monitor shows successful boot, replace display assembly. Remove all but display remains off , and then press power button to turn notebook off, and reconnect power and try again. If the power status light does not turn on , reprogram the BIOS, and replace...
Maintenance and Service Guide
Page 101
... sure floppy disk is installed and connected correctly. Use BIOS Setup to check default boot order. Check boot order in disk's Properties sheet to reinstall factory software onto hard drive, replace hard drive. Remove and reinstall hard drive. See page 5-2. Restart notebook. Use Tools tab in... Use BIOS Setup to check default boot order. Make sure CD/DVD is bootable. If notebook boots from CD in floppy drive. Make sure CD is installed and connected correctly. Power Service Manual Troubleshooting and Diagnostics 3-9 Symptom Does not boot on battery, but boots on AC ...
... sure floppy disk is installed and connected correctly. Use BIOS Setup to check default boot order. Check boot order in disk's Properties sheet to reinstall factory software onto hard drive, replace hard drive. Remove and reinstall hard drive. See page 5-2. Restart notebook. Use Tools tab in... Use BIOS Setup to check default boot order. Make sure CD/DVD is bootable. If notebook boots from CD in floppy drive. Make sure CD is installed and connected correctly. Power Service Manual Troubleshooting and Diagnostics 3-9 Symptom Does not boot on battery, but boots on AC ...
Maintenance and Service Guide
Page 102
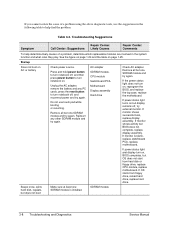
..., and must be used at that rate until battery runs out. Symptom No power Battery does not charge AC adapter does not power notebook Battery indicator is inaccurate Call Center: Suggestions Make sure charged battery is connected properly and battery installed properly. Try another battery and AC adapter. If available, try another battery or...
..., and must be used at that rate until battery runs out. Symptom No power Battery does not charge AC adapter does not power notebook Battery indicator is inaccurate Call Center: Suggestions Make sure charged battery is connected properly and battery installed properly. Try another battery and AC adapter. If available, try another battery or...
Maintenance and Service Guide
Page 103
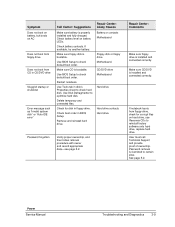
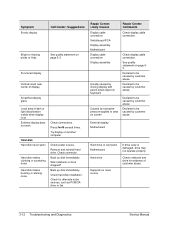
... software. Blinking cursor appears while system is busy, it normally finishes current operation before entering (or allowing notebook to Never. Repair Center: Likely Causes Make sure notebook is installed properly, replace CPU module. Make sure CPU module is turned on and warmed up. Also, make sure Hibernate timeouts (Power Schemes tab) for additional support. Try...
... software. Blinking cursor appears while system is busy, it normally finishes current operation before entering (or allowing notebook to Never. Repair Center: Likely Causes Make sure notebook is installed properly, replace CPU module. Make sure CPU module is turned on and warmed up. Also, make sure Hibernate timeouts (Power Schemes tab) for additional support. Try...
Maintenance and Service Guide
Page 104
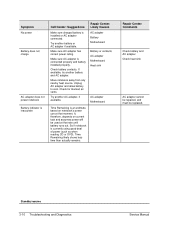
.... Declared to be caused by customer abuse. Check notebook and drive for alternate noise sources, such as PCMCIA drive or fan. Back up disk immediately. Check display cable connection. Check power source. Check hard disk installation. Declared to area on External display does not work...source If drive case is on screen Repair Center: Comments Check display cable connection. See quality statement on another computer. Was notebook or drive dropped? Try display on page 5-3. Remove and reinstall hard drive. Punctured display Vertical crack near center of dark or...
.... Declared to be caused by customer abuse. Check notebook and drive for alternate noise sources, such as PCMCIA drive or fan. Back up disk immediately. Check display cable connection. Check power source. Check hard disk installation. Declared to area on External display does not work...source If drive case is on screen Repair Center: Comments Check display cable connection. See quality statement on another computer. Was notebook or drive dropped? Try display on page 5-3. Remove and reinstall hard drive. Punctured display Vertical crack near center of dark or...
Maintenance and Service Guide
Page 111
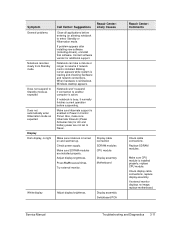
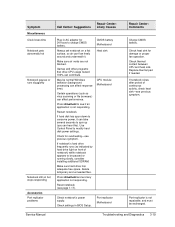
...to spin up (you can hear this). May be paused or running slowly, consider installing additional SDRAM. Restart notebook. CMOS battery Motherboard Heat sink CPU module Motherboard Check notebook's power supply. Check for damage or proper fan operation. Check settings in AC adapter for ...page 1-17). Press ctrl+alt+del to conserve power, it . Port replicator is not responding. Make sure air vents are not blocked. If notebook slows after period of notebook) while notebook appears to modify hard disk power settings. Use Control Panel to be normal Windows behavior...
...to spin up (you can hear this). May be paused or running slowly, consider installing additional SDRAM. Restart notebook. CMOS battery Motherboard Heat sink CPU module Motherboard Check notebook's power supply. Check for damage or proper fan operation. Check settings in AC adapter for ...page 1-17). Press ctrl+alt+del to conserve power, it . Port replicator is not responding. Make sure air vents are not blocked. If notebook slows after period of notebook) while notebook appears to modify hard disk power settings. Use Control Panel to be normal Windows behavior...


